XLPagerTabStripを利用する機会があったので、使い方を記録しておきます。
1. CarthageまたはCocoaPodsでプロジェクトに追加
github "xmartlabs/XLPagerTabStrip" ~> 8.0
pod ‘XLPagerTabStrip’
詳細な手順は省略
2. NewFileからUIViewControllerを作成
以下の2のViewControllerを用意する必要があります
(1)タブを管理するためのViewController
(2)タブの中身となるViewController
(1)に関しては今回はNotebookViewControllerとします
NewFileでUIViewControllerを継承したクラスを作ったあとに、ButtonBarPagerTabStripViewControllerを継承するように変更します
class NotebookViewController: ButtonBarPagerTabStripViewController {
(2)に関しては今回はNotebookTableViewControllerとします
class NotebookTableViewController: UIViewController {
3. Storyboardの設定
この部分はREADMEを読んでもわかりにくいので注意です
-
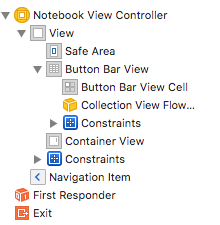
空っぽのViewControllerを追加します
-
追加したViewControllerにCollectionViewとScrollViewを追加します
なお、CollectionViewのCellは削除しないでそのままにしておきます -
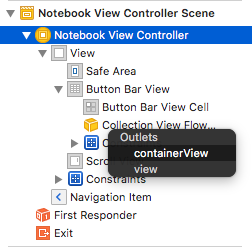
追加したViewControllerからcontrolキーを押しながらScrollViewを選択し、
表示されるcontainerViewを選択します
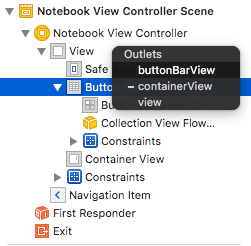
- 追加したViewControllerからcontrolキーを押しながらCollectionViewを選択し、
表示されるbuttonBarViewを選択します
ここまでやると以下のような表示になるはずです
- CollectionViewのClassに
ButtonBarViewを設定し、ModuleにXLPagerTabStripを設定します
- CollectionViewのCellに
ButtonBarViewCellを設定し、ModuleにXLPagerTabStripを設定します
4. タブの中身となるViewControllerの設定
タブの中身となるViewController(ここではNotebookTableView)を開いて
以下のようにします
このクラスではIndicatorInfoProviderを継承し、
func indicatorInfo(for pagerTabStripController: PagerTabStripViewController) -> IndicatorInfo
の戻り値で、タブ部分に表示する名前を設定する必要があります。
import UIKit
import XLPagerTabStrip

class NotebookTableViewController: UIViewController {

    var noteBookName: IndicatorInfo = ""

    override func viewDidLoad() {
        super.viewDidLoad()
    }

    override func didReceiveMemoryWarning() {
        super.didReceiveMemoryWarning()
    }
}

extension NotebookTableViewController: IndicatorInfoProvider {

    func indicatorInfo(for pagerTabStripController: PagerTabStripViewController) -> IndicatorInfo {
        return noteBookName
    }
}
5. タブを管理するためのViewControllerの設定
このクラスでは、上でも書いたように、
ButtonBarPagerTabStripViewControllerを継承し
func viewControllers(for pagerTabStripController: PagerTabStripViewController) -> [UIViewController]
をオーバーライド、そしてタブの中身となるViewControllerの配列を戻り値とする必要があります
    override func viewControllers(for pagerTabStripController: PagerTabStripViewController) -> [UIViewController] {
        var vcs: [UIViewController] = []
        let table1 =  UIStoryboard(name: "Main", bundle: nil).instantiateViewController(withIdentifier: "notebook_table") as! NotebookTableViewController
        table1.noteBookName = "Notebook1"
        vcs.append(table1)
        let table2 =  UIStoryboard(name: "Main", bundle: nil).instantiateViewController(withIdentifier: "notebook_table") as! NotebookTableViewController
        table2.noteBookName = "Notebook2"
        vcs.append(table2)
        return vcs
    }
6. スタイルの設定
タブを管理するためのViewControllerの設定のviewDidLoadで設定します
styleの設定には、super.viewDidLoad()の前に記述する必要があります
override func viewDidLoad() {
        // タブの背景色
        settings.style.buttonBarBackgroundColor = UIColor.lightGray
        // タブの色
        settings.style.buttonBarItemBackgroundColor = UIColor.lightGray
        // タブの文字サイズ
        settings.style.buttonBarItemFont = UIFont.systemFont(ofSize: 15)
        // カーソルの色
        buttonBarView.selectedBar.backgroundColor = UIColor.darkGray
        super.viewDidLoad()
    }
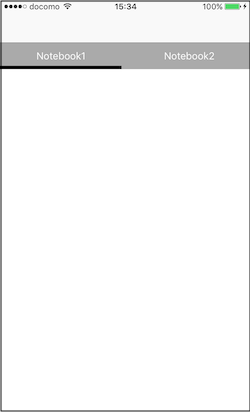
これで以下のように表示されるはずです!
7. その他
タブを動的に追加するなど、表示を更新するには以下を呼びます
reloadPagerTabStripView()
これを記述すると、
func viewControllers(for pagerTabStripController: PagerTabStripViewController) -> [UIViewController]
が呼ばれるので、そこでページを追加などできます。


