Introduction
ここに以下のようなエクセルファイル(test.xlsx)があります。
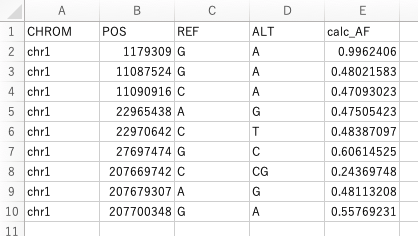
このデータは大切なものであると一目で分かるように、セルに色を塗ってほしいとの依頼がありました。このエクセルファイルひとつであれば、範囲を選択しセルの色を指定すればそれで済む話でしょう。しかし、このようなエクセルが複数あったりした場合に対応するために、この作業を自動化しておくと便利ですね。
スクリプトとその実行結果
以下にエクセルを読み込み、値の入っているセルの背景を灰色に塗るスクリプトを示します。
'''
    sheet_colorfill
    purpose: read xlsx file and fill color automatically
'''

import openpyxl as xl
from openpyxl.styles import PatternFill


# set input file name
inputfile = 'test.xlsx'

# read input xlsx
wb1 = xl.load_workbook(filename=inputfile)
ws1 = wb1.worksheets[0]

# set gray color cell fill
fill = PatternFill(patternType='solid', fgColor='d3d3d3')

# write in sheet
for row in ws1:
    for cell in row:
        ws1[cell.coordinate].fill = fill

# save target xlsx file
wb1.save(inputfile)
結果は以下のようになります。
スクリプト詳細
from openpyxl.styles import PatternFill
from openpyxl.styles import PatternFill
とすることで、セルに色を塗るためのオブジェクトを返すPatternFill関数を、直接呼び出すことができるようになります。
PatternFill関数で背景色指定
# set gray color cell fill
fill = PatternFill(patternType='solid', fgColor='d3d3d3')
で、セルを灰色に塗るためのPatternFillオブジェクトをfillに代入しています。試しにfillをprintで書き出してみましょう。
print(fill)
すると以下のような出力が得られます。
<openpyxl.styles.fills.PatternFill object>
Parameters:
patternType='solid', fgColor=<openpyxl.styles.colors.Color object>
Parameters:
rgb='00d3d3d3', indexed=None, auto=None, theme=None, tint=0.0, type='rgb', bgColor=<openpyxl.styles.colors.Color object>
Parameters:
rgb='00d3d3d3', indexed=None, auto=None, theme=None, tint=0.0, type='rgb'
PatternFill関数から返された結果は、openpyxl.styles.fills.PatternFillオブジェクトであることがわかります。
PatternFill関数の引数patternTypeではセルの塗り方を指定することができます。fgColorでセルの塗りつぶしの色を指定します。patternTypeによってはfgColorだけでなくbgColorも設定する必要があります。
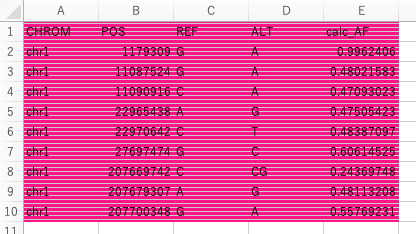
以下は灰色とピンク色の水平方向の縞模様をセルの背景色として指定する例です。
fill = PatternFill(patternType='lightHorizontal', fgColor='d3d3d3', bgColor='ff1493')
結果は以下のようになります。
patternTypeには‘darkDown’, ‘darkGrid’, ‘lightGrid’, ‘gray0625’, ‘lightGray’, ‘mediumGray’, ‘darkGray’, ‘darkHorizontal’, ‘solid’, ‘darkVertical’, ‘lightUp’, ‘lightTrellis’, ‘darkUp’, ‘lightDown’, ‘lightVertical’, ‘gray125’, ‘darkTrellis’, ‘lightHorizontal’を指定することができます。用途に合わせて好みの塗り方を指定しましょう。
ただ単色で塗りつぶす場合は、sheet_colorfill.pyにあるように、patternType='solid'とし、fgColorのみを設定すれば大丈夫です。
背景色を塗る
# write in sheet
for row in ws1:
    for cell in row:
        ws1[cell.coordinate].fill = fill
この部分で各セルの背景色.fillにPatternFillオブジェクトを設定しています。
応用: 条件を満たした部分にのみ背景色をつける
test.xlsxのE列目の'calc_AF'項目に浮動小数点の値が入っています。この値が0.5より小さいセルにのみ背景色をつけてほしいと依頼があった場合のスクリプトを作成してみましょう。
セルが'calc_AF'と同じ列かつセルの値が0.5より小さいときに背景色を塗ると考えます。
まず準備として以下の関数をインポートします。
from openpyxl.utils import column_index_from_string
このcolumn_index_from_string関数は、セルの列記号を番号に変換するものです。エクセルではセルの場所が'A1', 'E4'のように、列名に対してはアルファベットで管理されています。この関数を用いることで普段の行列のように何番目かを取得することができます。
col = column_index_from_string(cell.column)
そのセルが何列目にあるか、その番号を取得することができます。これを用いて以下のようにif文を付け足します。
 row in ws1:
    for cell in row:

        col = column_index_from_string(cell.column)

        if ws1.cell(row = 1, column = col).value == 'calc_AF':
            if type(ws1[cell.coordinate].value) == float and ws1[cell.coordinate].value < 0.5:
                ws1[cell.coordinate].fill = fill
一行目の値が'calc_AF'ならば、if文内の処理を行います。さらにその列にある値が浮動小数点かつ値が0.5より小さいならば、セルの背景色を塗りつぶす、というアルゴリズムです。
結果は以下のようになります。
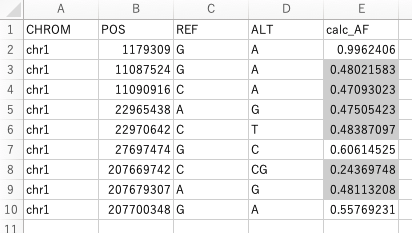
このように書いておけば、'calc_AF'がどの列にあっても対応することができます。