Introduction
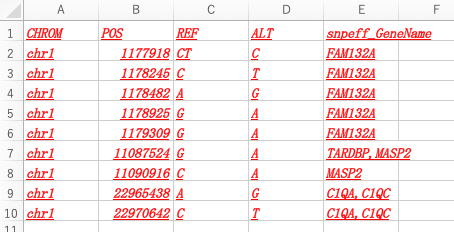
以下のようなデータファイル(test.xlsx)があります。
これは顧客に渡す大事なレポート資料なので、フォントを指定されたフォーマットで提出する必要があることがわかりました。このファイルのこのシートのみであれば手作業で済みます。しかしエクセルファイルが多数あったり、複数のシートにデータが記入されている場合には、やはりこの作業は自動化しておいたほうが良さそうです。
スクリプトとその実行結果
以下のスクリプトを実行することで、指定したシート全体のフォントをメイリオに変換することができます。
'''
    sheet_font.py
    purpose: read xlsx and set font automatically
'''

import openpyxl as xl
from openpyxl.styles import Font


# set input file name
inputfile = 'test.xlsx'

# read input xlsx
wb1 = xl.load_workbook(filename=inputfile)
ws1 = wb1.worksheets[0]

# set font
font = Font(name='メイリオ')

# write in sheet
for row in ws1:
    for cell in row:
        ws1[cell.coordinate].font = font

# save xlsx file
wb1.save(inputfile)
実行結果は以下のようになります。
スクリプト詳細
from openpyxl.styles import Font
from openpyxl.styles import Font
としてFont関数を直接インポートすることで、この関数を呼び出すたびにopenpyxl.styles.Font()と長々と記述することなく、Font関数を呼び出すことができます。
フォント設定
途中の
# set font
font = Font(name='メイリオ')
でFont関数の戻り値をfontに代入しています。試しにfontをprintで書き出してみましょう。
print(font)
以下のような出力が得られます。
<openpyxl.styles.fonts.Font object>
Parameters:
name='メイリオ', charset=None, family=None, b=False, i=False, strike=None, outline=None, shadow=None, condense=None, color=None, extend=None, sz=None, u=None, vertAlign=None, scheme=None
Font関数から返された結果はopenpyxl.sytles.fonts.Fontオブジェクトであることがわかります。
Font関数ではname='フォント名の文字列'でフォントの指定を行うことができます。その他にも、size, bold, italic, color, underlineなどの設定を行うことができます。
以下はフォント名をヒラギノ角ゴ Pro, フォントサイズを14, 太字、斜字、文字色を赤、アンダーラインを一本追加、の設定を行う場合の例です。
font = Font(name='ヒラギノ角ゴ Pro', size=14, bold=True, italic=True, color='FF0000', underline='single')
結果は以下のようになります。
# write in sheet
for row in ws1:
    for cell in row:
        ws1[cell.coordinate].font = font
で、先にFont関数で指定したフォントを各セルのフォントに代入しています。
これをforループで各ファイル・シートに対して繰り返せば、大量のエクセルデータファイルのフォントを自動で一括変換できますね。


