Arduinoを使って、待ち時間の長い処理中、センサデータを取りたいと思ったことはないでしょうか?Arduinoはマルチタスクには不向きな仕組みであることを理解したうえで、有限ステートマシン(Finite State Machine: FSM)をArduino上に実装してみましょう。
基本的なArduinoのふるまい
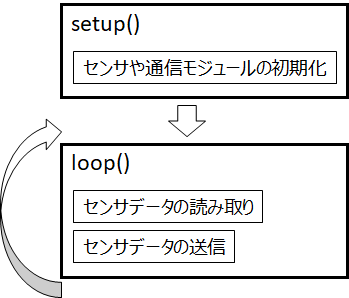
Arduinoプログラムは、setup()とloop()関数から成り立ち、それぞれ、
- setup:Arduinoの(再)起動時に呼び出され、センサや通信モジュールの初期化を行う
- loop:再帰的に呼び出され、センサデータの取得やセンサデータの送信を行う
のが通常です。
各処理を待ち続けないといけない
ただ、多くのセンサからデータを取得したり、LPWAのように低ビットレートの通信でデータを送ろうとした場合、それぞれの処理を随時待機する必要があります。
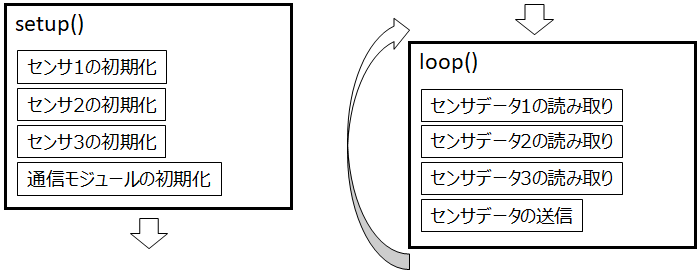
上図の例は、3つのセンサからデータを読み取り、結果を送信する場合の流れになりますが、仮にセンサデータの送信に10秒程度かかってしまう場合、(通常のArduinoのプログラム作法では)その間のセンサデータは取得できないことになります。
有限ステートマシン(Finite State Machine:FSM)とは?
Wikipediaには
有限オートマトン(ゆうげん-、英: finite automaton)または有限状態機械(ゆうげんじょうたいきかい、英: finite state machine, FSM)とは、有限個の状態と遷移と動作の組み合わせからなる数学的に抽象化された「ふるまいのモデル」である
と説明されています。
簡単に説明すると、ある状態X,Y,Zがあり、何かの変化によりXの状態がYに変化する(a)、Yの状態がZに変化(c)、Zの状態からXに戻る(d)というような感じで、
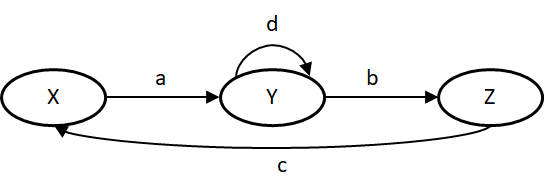
- ある状態(上図の円)
- ある状態から他の状態への遷移(上図の矢印)
つまり、ある状態を基準に考えると、その状態に入ってくる(Enter)、その状態を実行する(Execute)、その状態から抜ける(Exit)という基本モデルが考えられます。
public abstract class State {
    public abstract void Enter(...);
    public abstract void Execute(...);
    public abstract void Exit(...);
}
Sigfox Shield for Arduinoで見るFSM
Sigfox Shield for Arduino (UnaShield)向けのFinite State Machineサンプルはこちらで見ることができます。
下記コードは、Sigfox通信モジュールの状態変化を追加しているaddTransceiverTransitions関数のコードです。add_transition(...)関数は、Fsm.h/Fsm.cppで定義実装されていますが、一列目のコードを例に見ると、"transceiverIdle"という状態から"transceiverSending"という状態に、"INPUT_CHANGED"というイベントをトリガをもとに推移するということを意味しています。
  //  From state           To state             Triggering event   When transitioning states
  transceiverFsm.add_transition(                                   //  If inputs have changed when idle, send the inputs.
      &transceiverIdle,    &transceiverSending, INPUT_CHANGED,     0);

  transceiverFsm.add_transition(                                   //  If inputs have changed when busy, send the inputs later.
      &transceiverSending, &transceiverSending, INPUT_CHANGED,     &scheduleResend);

  transceiverFsm.add_transition(                                   //  When inputs have been sent, go to the "Sent" state
      &transceiverSending, &transceiverSent,    INPUT_SENT,        0);  //  and wait 2.1 seconds.

  transceiverFsm.add_transition(                                   //  If inputs have changed when busy, send the inputs later.
      &transceiverSent,    &transceiverSent,    INPUT_CHANGED,     &scheduleResend);

  //  From state           To state             Interval (millisecs) When transitioning states
  transceiverFsm.add_timed_transition(                               //  Wait 2.1 seconds before next send.  Else the transceiver library
      &transceiverSent,    &transceiverIdle,    2.1 * 1000,          &transceiverSentToIdle);  //  will reject the send.

  transceiverFsm.add_timed_transition(                               //  If nothing has been sent in the past 10 seconds,
      &transceiverIdle,    &transceiverSending, 10 * 1000,           &transceiverIdleToSending);  //  send the inputs.
合計6種の状態変化が定義されていますが、この状態変化を図にすると下図のようになります。
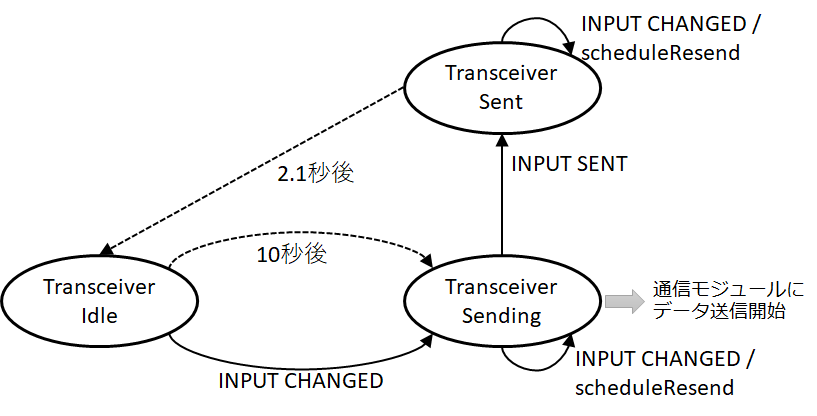
そして、ここでtransceiverSendingという状態定義を下記コードから見てみると、その状態の時に、whenTransceiverSendingという処理が実行されることを意味しています。
なお、このtransceiverSendingに遷移する"INPUT_CHANGED"は、センサのアナログPIN入力のチェック後、transceiverFsm.trigger(INPUT_CHANGED);によりトリガされています。
//    Name of state       Enter  When inside state         When exiting state
State transceiverIdle(    &enterIdle,
                                 &whenTransceiverIdle,     &exitIdle);  // Transceiver is idle until any input changes.

State transceiverSending( &prepareToSend,                                  // Transceiver enters "Sending" state to
                                 &whenTransceiverSending,  &exitSending);  // send changed inputs.

State transceiverSent(    &enterSent,     0,               &exitSent);  // After sending, it waits 2.1 seconds in "Sent" state before going to "Idle" state.
さらにwhenTransceiverSending関数を見てみると、通信モジュールにメッセージ送信し、最後にwhenTransceiverCompletedとして、送信完了処理をしています。この完了処理のなかで、"INPUT_SENT"というイベントがトリガされ、transceiverSentの状態に遷移します。
void whenTransceiverSending() {
  // 前略

  //  メッセージ送信
  msg.sendAndGetResponse(response, &transceiverState);
  uint8_t status = transceiverState.getStatus();

  // 中略
  whenTransceiverCompleted(status);

}
常にセンサの状態を監視し、適切なタイミング(例えば、センサ値がある閾値を超えた場合など)でデータを送信するということが簡単にできそうですね。
参考