Wio Terminal内蔵のWi-FiがスキャンしたパブリックWi-Fiアクセスポイントの情報から、Sigfox Atlas Wifiを使用し、位置推定する方法を説明します。

Wio Terminalの準備
RTL8720ファームウェアアップロード
Wio Terminal搭載のWi-Fiチップ(RTL8720)のファームウェアアップデートが必要です。アップデート方法は、公式Wikiに記載されていますが、大きな流れは、
- ファームウェア書き込み用ファイル(rtl8720_update_v2.uf2)のダウンロード
- ブートローダ起動(Wio Terminal側面スイッチを2回スライド: here)
- ブートローダモードになり、PC上に"Arduino"外部ドライブが表示されれば、上記1.でダウンロードしたuf2ファイルを移動. (移動すると、Wio Terminalの画面に"Burn RTL8720 fw"と表示)
- 最新ファームウェアをダウンロード
- ファームウェア書き込みツール(ambd_flash_tool)のダウンロード。
git clone https://github.com/LynnL4/ambd_flash_tool - 初期ファームウェアを削除
ambd_flash_tool erase - 新ファームウェアの書き込み
ambd_flash_tool flash -d [上記4.でダウンロードしたファイルフォルダのパス]
WiFi Scanning用のライブラリをインストール
- Seeed_Arduino_rpcWiFiリポジトリをZIPダウンロード
- Arduino IDEの[スケッチ] _ [ライブラリをインクルード] _ [ZIP形式のライブラリをインストール]メニューから、1.でダウンロードしたファイルをインストール
- インストールされると、[ライブラリをインクルード]メニューにSeeed Arduino WiFiが追加されます。
- 同様にSeeed_Arduino_rpcUnified、Seeed_Arduino_mbedtls、Wio Terminal FS、Seeed_Arduino_SFUD、Seeed_Arduino_LCDをインストール
Sigfox Breakout BoardとWio Terminalの接続
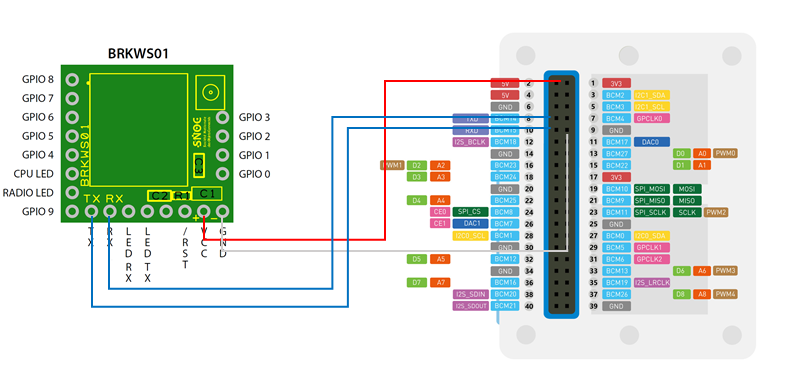
Sigfox Breakout Board (BRKWS01 RC3)とWio Terminalの接続は、下図のように、3.3V電源入力とシリアルTx/Rxを接続してください。


サンプルスケッチ
Wio Terminal内蔵のWi-FiモジュールでWi-Fiネットワークスキャンを行い、受信した上位2つのMACアドレスを、Sigfoxで送信するスケッチとなります。
# include "rpcWiFi.h"
# include "TFT_eSPI.h"
# include <SoftwareSerial.h>

TFT_eSPI tft;

struct AP {
  String ssid = "";
  int rssi = INT_MIN;
  String mac = "";
};

void setup()
{
  Serial.begin(9600);
  Serial1.begin(9600);

  // Set WiFi to station mode and disconnect from an AP if it was previously connected
  WiFi.mode(WIFI_STA);
  WiFi.disconnect();
  delay(100);

  //for button A
  pinMode(WIO_KEY_C, INPUT_PULLUP);

  tft.begin();
  tft.setRotation(3);
  tft.fillScreen(TFT_BLACK);
  tft.setTextSize(2);
  debugDisplay("Setup Done");
  Serial1.print("AT$I=10\r");
}

void loop()
{
  displaySerial1();

  if (digitalRead(WIO_KEY_C) == LOW) {
    wifiScan();
  }
  delay(100);
}

void wifiScan()
{
  tft.fillScreen(TFT_BLACK);
  tft.setCursor(0,0);

  AP ap[2];   //RSSI上位2局のWiFi AP情報
  debugDisplay("Wifi Scan Start");

  // WiFi.scanNetworks will return the number of networks found
  int n = WiFi.scanNetworks();
  debugDisplay("Wifi Scan Done");
  if (n == 0) {
    debugDisplay("No Networks Found");
  } else {
    debugDisplay("Networks Found");

    for (int i = 0; i < n; ++i) {
      // Print SSID and RSSI for each network found
      Serial.print(i + 1); Serial.print(": ");
      Serial.print(WiFi.SSID(i)); Serial.print(" (");
      Serial.print(WiFi.RSSI(i)); Serial.print(") ");
      String mac = WiFi.BSSIDstr(i); Serial.println(mac);
      mac.replace(":", "");
      // Sigfoxメッセージとして送信するWiFi MACアドレスを最大2つに絞る
      filterAP(ap, WiFi.SSID(i), WiFi.RSSI(i), mac);
    }
  }

  String msg = "AT$SF=" + ap[0].mac + ap[1].mac; //Sigfoxメッセージ
  debugDisplay("Sigfox Send Message");
  debugDisplay(msg);
  Serial1.println(msg);

  delay(5000);
}

void filterAP(AP* ap, String ssid, int rssi, String mac) {
  if (filterMac(mac)) {
    if (ap[0].rssi < rssi) {
      ap[1] = ap[0];
      ap[0].ssid = ssid;
      ap[0].rssi = rssi;
      ap[0].mac = mac;
    } else if (ap[1].rssi < rssi) {
      ap[1].ssid = ssid;
      ap[1].rssi = rssi;
      ap[1].mac = mac;
    }
  }
}

bool filterMac(String mac) {
  bool pass = true;
  if (mac.length() != 12) pass = false;
  //リザーブMACアドレスならフィルタリング
  if (pass) {
    if (mac.equalsIgnoreCase("000000000000") || mac.equalsIgnoreCase("FFFFFFFFFFFF")) {
      pass = false;
    }
  }
  //マルチキャストMACアドレスならフィルタリング
  if (pass) {
    long LSBbit_1stOct = strtol(mac.substring(0,2).c_str(), NULL, 16);
    if (LSBbit_1stOct % 2 == 1) {
      pass = false;
    }
  }
  return pass;
}

void displaySerial1()
{
  if (Serial1.available()) {
    int w = Serial1.read();
    tft.print(char(w));
    Serial.write(w);
  }
}

void debugDisplay(String s)
{
  tft.println(s);
  Serial.println(s);
}
上記サンプルスケッチをコンパイル・書き込みすることにより、Wio Terminalの"Cボタン"をプッシュすると、Wi-FiスキャンとSigfoxメッセージの送信ができ、下図のようにSigfoxクラウドに2つのMACアドレスが送信されます。

Atlas Wi-Fiによる位置情報推定
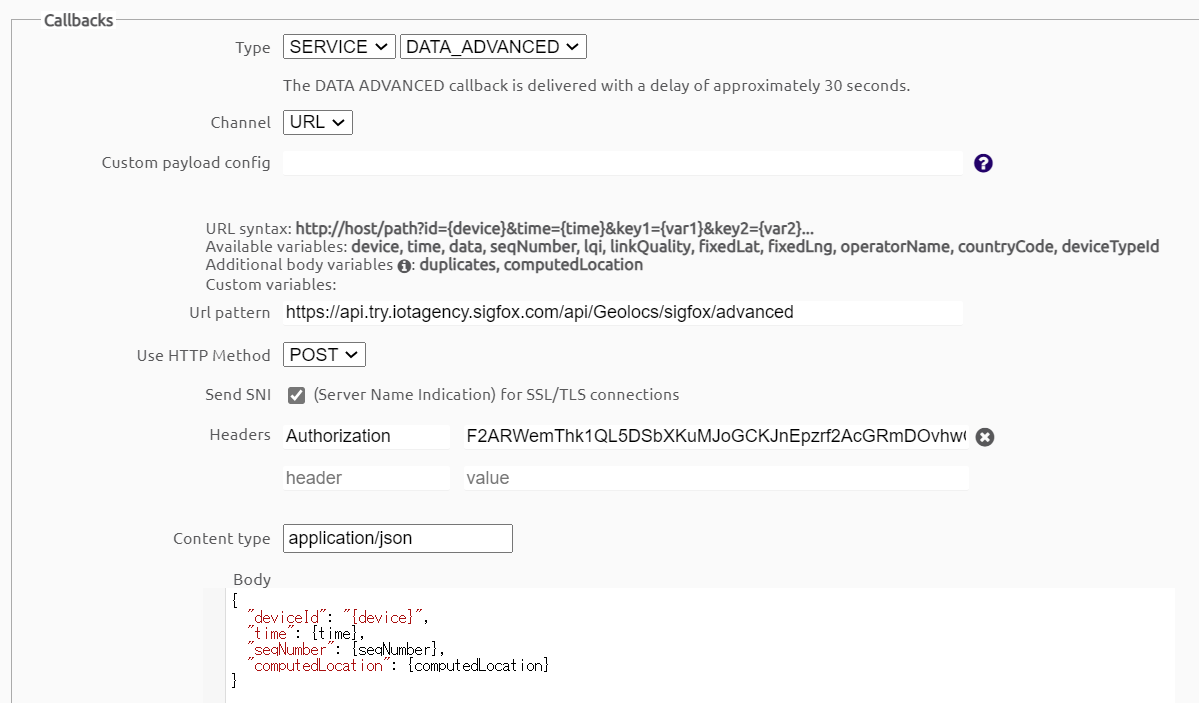
スキャンしたMACアドレスをSigfoxクラウドに送信できるようになれば、最後にData Advanced Callbackを設定することにより、位置情報を取得する事ができます。

CallbackされるJSON Bodyのうち、**[computedLocation]**という変数に計算された位置情報が取り込まれます。
{
  "deviceId": "73E6BB",
  "time": 1607677923,
  "seqNumber": 50,
  "computedLocation": {"lat":35.75xxxxx,"lng":139.71xxxxx,"radius":250,"source":6,"status":1}
}
Sigfox Atlas WiFiの仕組み
Sigfox Atlas WiFiは、IoTデバイスの位置情報をGPSよりも安価・低消費電力で提供可能なSigfox Atlasサービスのひとつです。
Atlas Wi-Fiの仕組みや注意事項はこちら(HERE Positioning APIとSigfox Atlas WiFiの検証)で確認してください。
