前提
一般的な Amazon Cognito シナリオの2番目にある「ユーザープールを使用してサーバー側のリソースにアクセスする」で、BackendをLaravelで構築する方法です。
具体的なゴールとしては、クライアントから送られてきたJWTを検証し、CognitoのIDからUserを識別し、LaravelのAuth::user()メソッドでUserが取得できるところまでを目指します。
Laravelプロジェクトの作成方法などは説明しませんので、自分の環境に合わせて適宜読み替えてください。
Cognitoの設定
- ユーザープールの作成
- アプリクライアントの作成
ユーザープールの作成
AWSコンソールからCognitoを選択し、「ユーザープールの管理」 → 「ユーザープールを作成する」をクリックする。
プール名を入力し、「デフォルトを確認する」ボタンを押す。
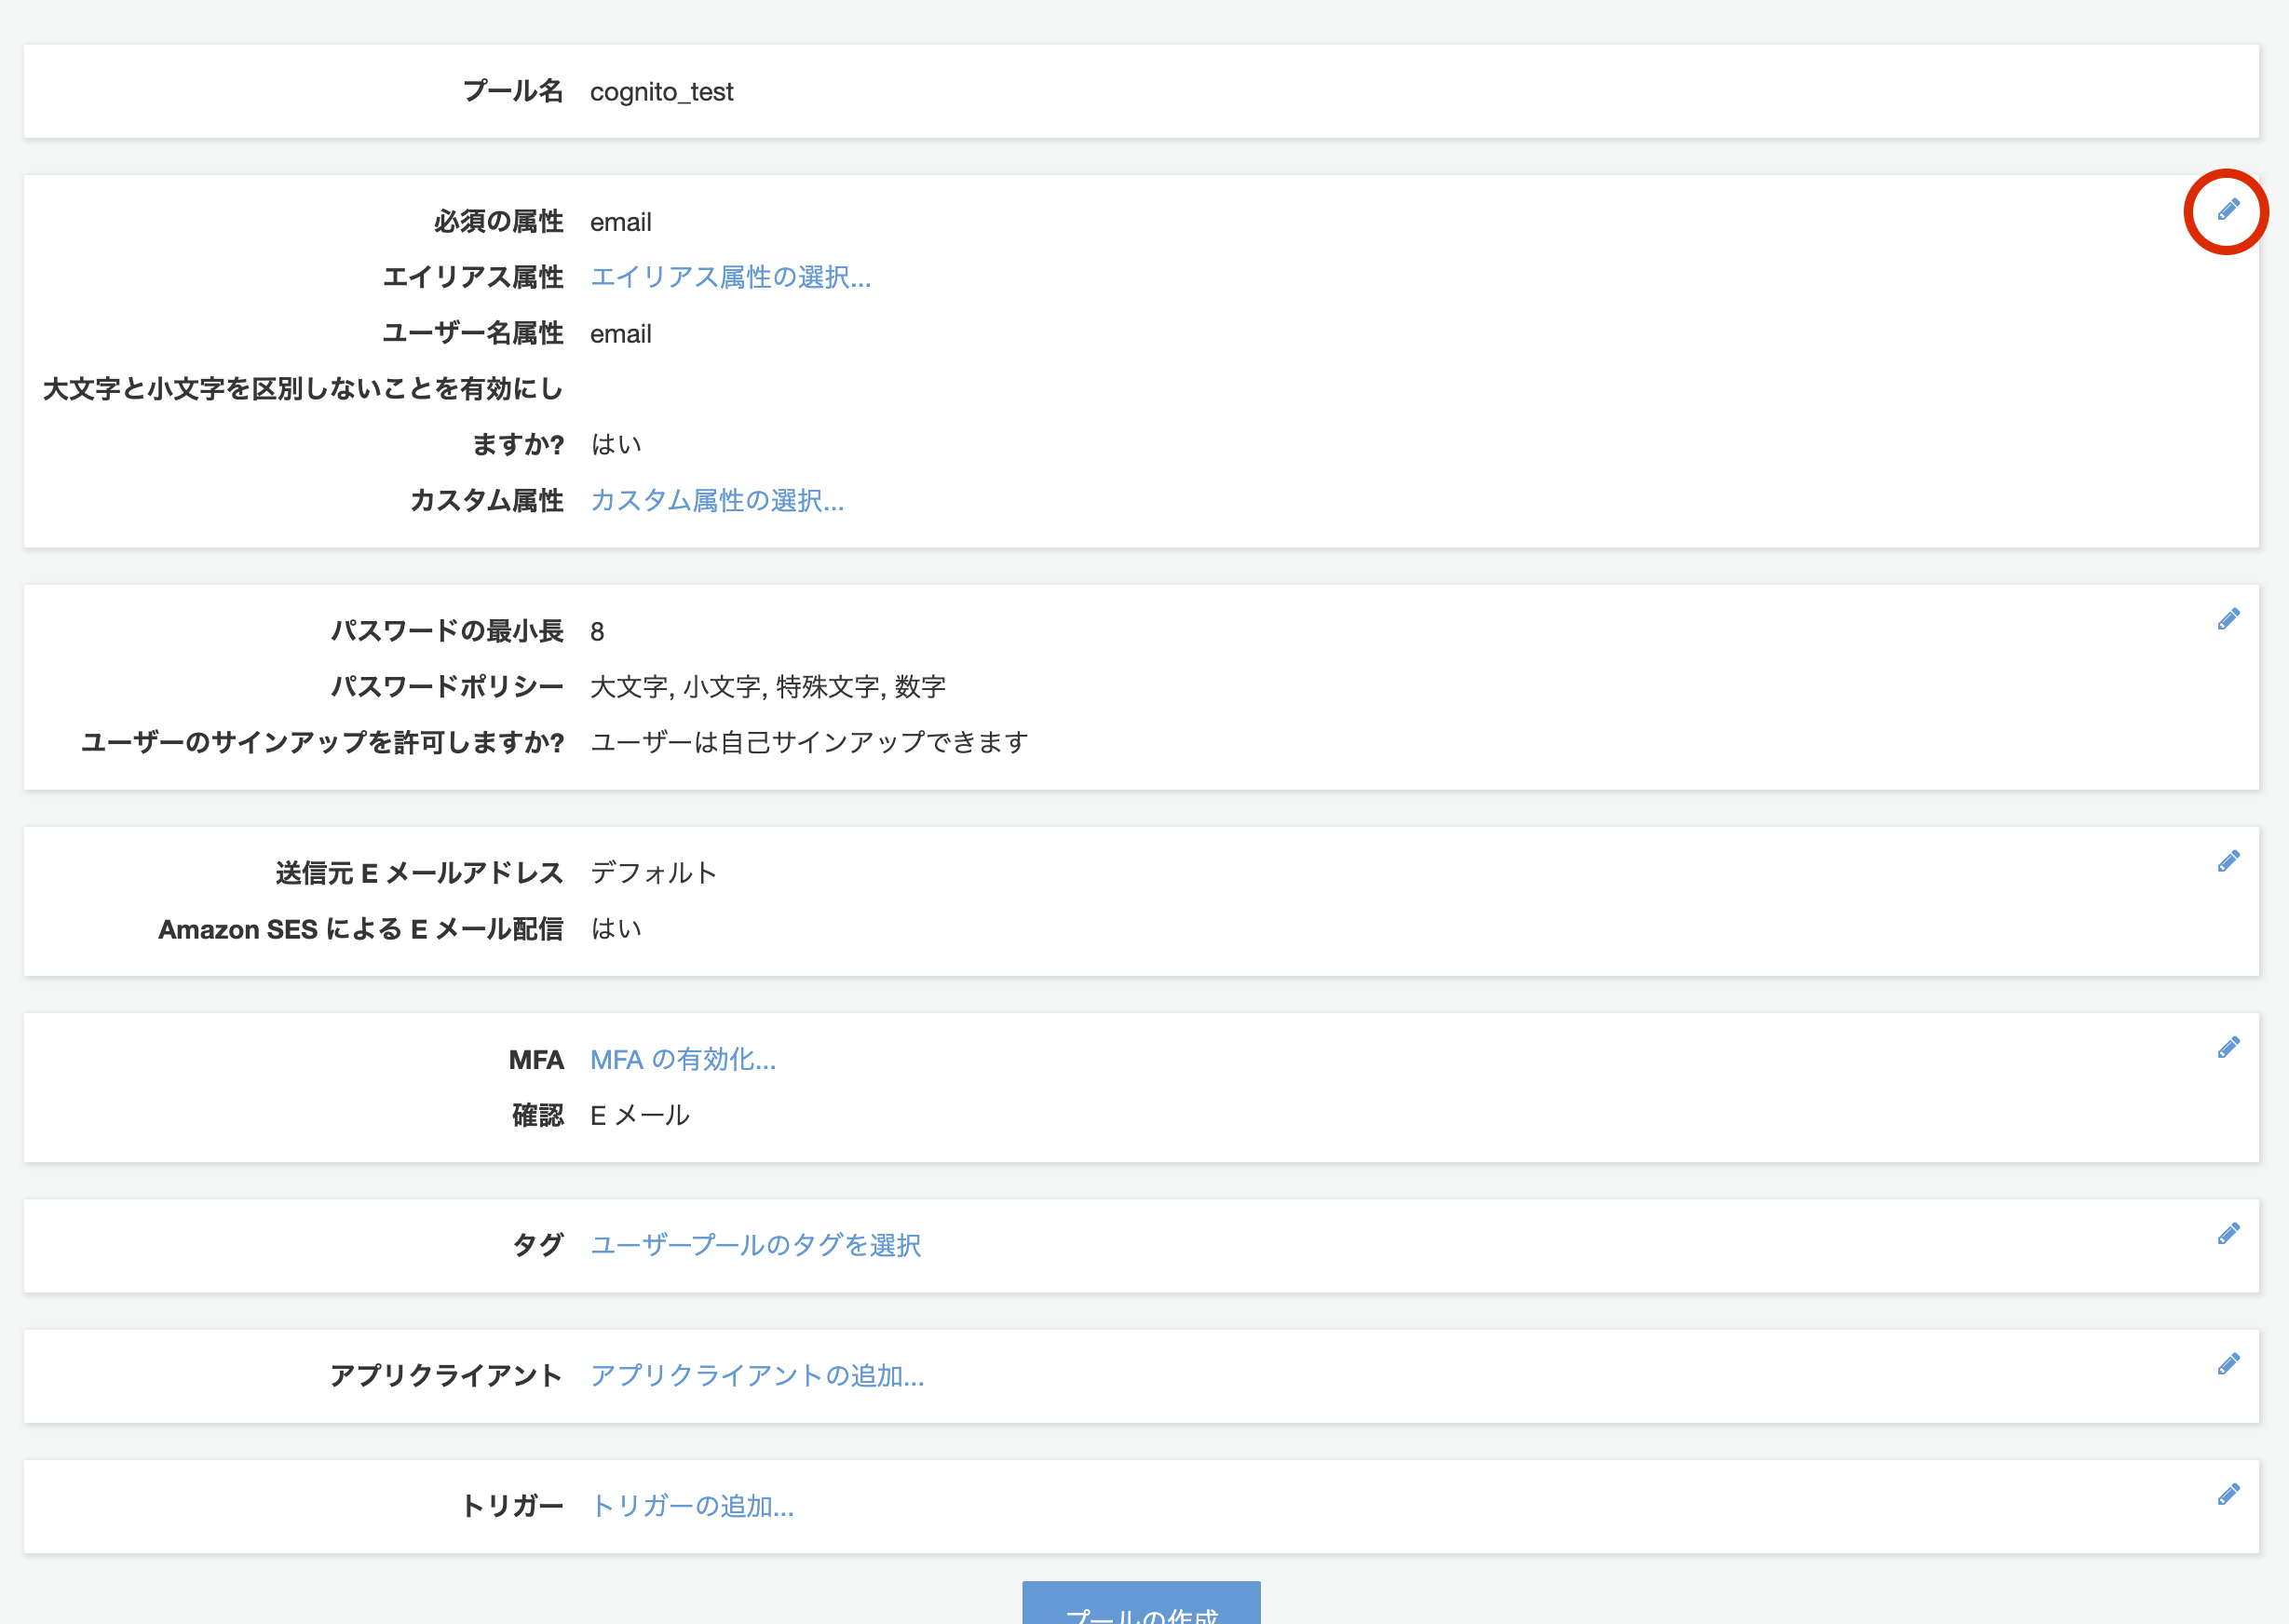
設定を確認し、「プールの作成」ボタンを押す。
※ ユーザーネームでは無く、メールアドレスでログインさせたい場合は次のように設定を変更する。後から変更できないので注意。

アプリクライアントの作成
左メニューから「アプリクライアント」を選択する。

「アプリクライアント名」には、このユーザープールを実際に利用するアプリが一意に識別できる名前を入力する。
認証フローの設定は「サーバーからユーザープールへAPIアクセスをする」なら①、「クライアントアプリからユーザープールへAPIアクセスをする」なら②にチェックを入れる。
サーバー側からAPIアクセスを行う際は、クライアントシークレットを用いることでセキュアな通信を行う。しかし、クライアント側ではセキュリティの観点からクライアントシークレットを端末に保存することができない。その代わりに、Android用、iOS用、Javascript用に用意された各種SDKがセキュアな通信を担保してくれている1。
また、APIアクセスというのは、ユーザーネームとパスワードからJWTを取得したり、アクセストークンを利用してユーザープールの情報を取得することを指し、サーバーでJWTのデコードを行うだけならAPIアクセスが必要無い点に注意。

Laravelでの認証
- JWTの検証サービスを作成
- デコードした情報からUserを取得するGuardを作成
- 作成したGuardを使用する設定を行う
JWTの検証サービスを作成
JWTの検証についてのマニュアルはこちら。
具体的なステップとしては
- JWKのダウンロード
- JWTのヘッダーから
kidを取得 -
kidから証明書を選択 - 証明書を用いてデコード
デコードの処理にはfirebase/php-jwtを用いる。具体的な実装の例は以下の通り。
<?php

namespace App\Services\Cognito;

use Firebase\JWT\JWK;
use Firebase\JWT\JWT;
use Illuminate\Support\Facades\Http;

class JWTVerifier
{
    /**
     * @param string $jwt
     * @return object|null
     */
    public function decode(string $jwt)
    {
        $tks = explode('.', $jwt);
        if (count($tks) !== 3) {
            return null;
        }
        [$headb64, $_, $_] = $tks;

        $jwks = $this->fetchJWKs();
        try {
            $kid = $this->getKid($headb64);
            $jwk = $this->getJWK($jwks, $kid);
            $alg = $this->getAlg($jwks, $kid);
            return JWT::decode($jwt, $jwk, [$alg]);
        } catch (\RuntimeException $exception) {
            return null;
        }
    }

    private function getKid(string $headb64)
    {
        $headb64 = json_decode(JWT::urlsafeB64Decode($headb64), true);
        if (array_key_exists('kid', $headb64)) {
            return $headb64['kid'];
        }
        throw new \RuntimeException();
    }

    private function getJWK(array $jwks, string $kid)
    {
        $keys = JWK::parseKeySet($jwks);
        if (array_key_exists($kid, $keys)) {
            return $keys[$kid];
        }
        throw new \RuntimeException();
    }

    private function getAlg(array $jwks, string $kid)
    {
        if (!array_key_exists('keys', $jwks)) {
            throw new \RuntimeException();
        }

        foreach ($jwks['keys'] as $key) {
            if ($key['kid'] === $kid && array_key_exists('alg', $key)) {
                return $key['alg'];
            }
        }
        throw new \RuntimeException();
    }

    private function fetchJWK(): array
    {
        $response = Http::get('https://cognito-idp.{region}.amazonaws.com/{userPoolId}/.well-known/jwks.json');
        return json_decode($response->getBody()->getContents(), true) ?: [];
    }
}
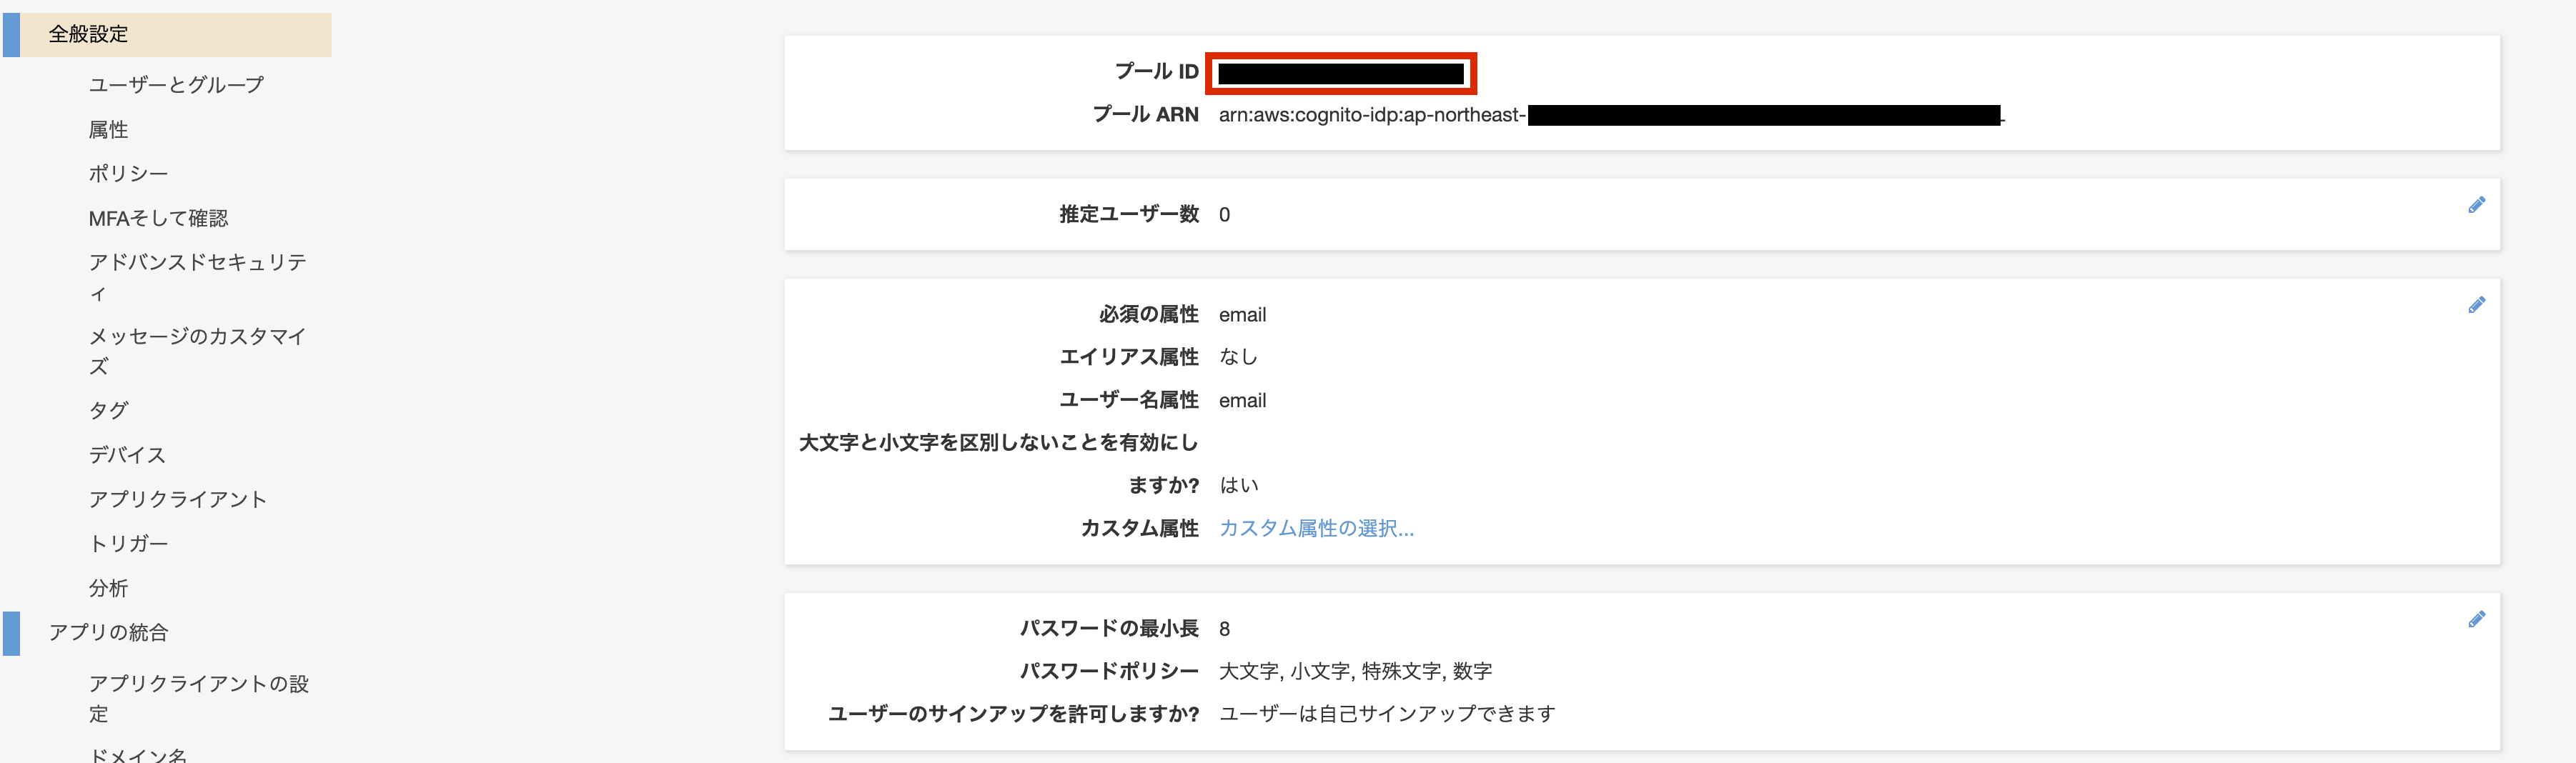
JWTのデコードには、対応する証明書が必要である。先に述べたマニュアルに書いてある通り、証明書はhttps://cognito-idp.{region}.amazonaws.com/{userPoolId}/.well-known/jwks.jsonからダウンロードしてくる。{region}はユーザープールを作成したリージョン、{userPoolId}は、ユーザープールの管理画面の左メニューの「前半設定」を押すと確認することができる。
    private function fetchJWKs(): array
    {
        $response = Http::get('https://cognito-idp.{region}.amazonaws.com/{userPoolId}/.well-known/jwks.json');
        return json_decode($response->getBody()->getContents(), true) ?: [];
    }
デコードした情報からUserを取得するGuardを作成
Laravelには認証の仕組みとして、Guardという物がある2。
Guard自体は下記のようなinterfaceで、この中で重要なのがuser()メソッドである。このuser()メソッドでAuthenticatableを実装したインスタンス(大抵の場合はUser model)を返すことで、Authファサードを使い$user = Auth::user()のようにアプリケーション内でユーザーを取得することができるようになる。
Laravelには元々いくつかGuardの実装が提供されているが、今回はJWTをデコードした結果からUserを取得して返すような実装を新たに作り、アプリケーションでそれを使用するような設定を行う。
<?php

namespace Illuminate\Contracts\Auth;

interface Guard
{
    /**
     * Determine if the current user is authenticated.
     *
     * @return bool
     */
    public function check();

    /**
     * Determine if the current user is a guest.
     *
     * @return bool
     */
    public function guest();

    /**
     * Get the currently authenticated user.
     *
     * @return \Illuminate\Contracts\Auth\Authenticatable|null
     */
    public function user();

    /**
     * Get the ID for the currently authenticated user.
     *
     * @return int|string|null
     */
    public function id();

    /**
     * Validate a user's credentials.
     *
     * @param  array  $credentials
     * @return bool
     */
    public function validate(array $credentials = []);

    /**
     * Set the current user.
     *
     * @param  \Illuminate\Contracts\Auth\Authenticatable  $user
     * @return void
     */
    public function setUser(Authenticatable $user);
}
Guardの実装の一例を以下に示す。
<?php

namespace App\Services\Auth;

use App\Services\Cognito\JWTVerifier;
use Illuminate\Auth\GuardHelpers;
use Illuminate\Contracts\Auth\Guard;
use Illuminate\Contracts\Auth\UserProvider;
use Illuminate\Http\Request;

class CognitoGuard implements Guard
{
    use GuardHelpers;

    /**
     * @var JWTVerifier
     */
    private $JWTVerifier;

    /**
     * @var Request
     */
    private $request;

    /**
     * @var UserProvider
     */
    private $userProvider;

    /**
     * CognitoGuard constructor.
     * @param Request $request
     * @param UserProvider $userProvider
     * @param JWTVerifier $JWTVerifier
     */
    public function __construct(
        JWTVerifier $JWTVerifier,
        Request $request,
        UserProvider $userProvider
    ) {
        $this->JWTVerifier = $JWTVerifier;
        $this->request = $request;
        $this->userProvider = $userProvider;
    }

    public function user()
    {
        if ($this->user) {
            return $this->user;
        }

        $jwt = $this->request->bearerToken();
        if (!$jwt) {
            return null;
        }

        $decoded = $this->JWTVerifier->decode($jwt);
        if ($decoded) {
            return $this->userProvider->retrieveByCredentials(['cognito_sub' => $decoded->sub]);
        }

        return null;
    }

    public function validate(array $credentials = [])
    {
        throw new RuntimeException('Cognito guard cannot be used for credential based authentication.');
    }
}
解説
コンストラクタでは、先ほど作成したJWTVerifierとRequest、そしてUserProviderを受け取る。
user()メソッドでは、RequestからBearerトークンを取得し、JWTVerifierで検証 & デコードを行う。そして、UserProviderを用いて、DBからJWTに含まれていた'sub'と一致するUserを取得する。
また、user()メソッドとvalidate()メソッド以外はGuardHelperstraitを使用することで自動で実装することができる。
作成したGuardを使用する設定を行う
まずは、作成したCognitoGuardをサービスとして登録する。app/Providers/AuthServiceProviders.phpの中にあるboot()メソッドを以下のようにする。これで、CognitoGuardが'cognito'という名前でサービスに登録される。
...
    public function boot()
    {
        $this->registerPolicies();

        Auth::extend('cognito', function($app, $name, array $config) {
            return new CognitoGuard(
                new JWTVerifier(),
                $app['request'],
                Auth::createUserProvider($config['provider'])
            );
        });
    }
...
続いて、config/auth.phpを編集する。
'defaults'で指定されている'guard'を'api'に変更する。そして、'guards'の中の'api'で指定されている'driver'を'cognito'に変更する。このようにすることで、アプリケーションで使用されるGuardをCognitoGuardに変更することができる。
また、ここで指定されているproviderがCognitoGuardのProviderとして渡される。
return [
...
    'defaults' => [
        'guard' => 'api',  // 変える
        'passwords' => 'users',
    ],


...
    'guards' => [
        'web' => [
            'driver' => 'session',
            'provider' => 'users',
        ],
        'api' => [
            'driver' => 'cognito',  // 変える
            'provider' => 'users',
            'hash' => false,
        ],
    ],
...
実際に認証してみる
実際の現場では、サーバーじゃフロントから送られてきたJWTを検証するだけなので、自らCognitoへJWTを取得しに行くことは無いと思う。
しかし、今回の実装でほんとに認証が行えるのかを検証するために、Cognitoのユーザー作成とJWTを取得するためのLaravelコマンドを作成した。
Userモデルにcognito_subカラムを追加
以下2つのファイルを編集し、Userモデルにcognito:usernameカラムを作成する。
<?php

namespace App\Models;

use Illuminate\Foundation\Auth\User as Authenticatable;

class User extends Authenticatable
{
    protected $fillable = ['name', 'cognito_sub',];
}
...

    public function up()
    {
        Schema::create('users', function (Blueprint $table) {
            $table->id();
            $table->string('name');
            $table->string('cognito_sub')->unique();
            $table->timestamps();
        });
    }
...
BDのマイグレーションを行う
$ ./artisan migrate
CognitoのUser作成/JWT取得コマンドを作る
AWSのSDKをインストールする。
$ composer req aws/aws-sdk-php
.envに以下の項目を設定する。AWS_ACCESS_KEY_ID、AWS_SECRET_ACCESS_KEYはIAMからUserを作成して取得する。この時、作成したUserにはCognitoに対するアクセス権が必要なので注意すること。検証だけならAmazonCognitoPowerUserポリシーをアタッチすればOK。
AWS_COGNITO_CLIENT_SECRETはCognitoのアプリクライアントに記述されている。
AWS_ACCESS_KEY_ID=xxxxx
AWS_SECRET_ACCESS_KEY=xxxxx
AWS_DEFAULT_REGION=ap-northeast-1
AWS_COGNITO_CLIENT_ID=xxxxx
AWS_COGNITO_CLIENT_SECRET=xxxxx
AWS_COGNITO_USER_POOL_ID=xxxxx
以下のコマンドを作成する。
<?php

namespace App\Console\Commands;

use App\Models\User;
use Aws\CognitoIdentityProvider\CognitoIdentityProviderClient;
use Illuminate\Console\Command;

class CognitoCommand extends Command
{
    /**
     * The name and signature of the console command.
     *
     * @var string
     */
    protected $signature = 'myapp:cognito {email} {password} {method}';

    /**
     * The console command description.
     *
     * @var string
     */
    protected $description = 'Create/Auth User';

    private $library_version;
    private $region;
    private $access_key;
    private $secret_key;
    private $client_id;
    private $client_secret;
    private $user_pool_id;

    /**
     * Create a new command instance.
     *
     * @return void
     */
    public function __construct()
    {
        parent::__construct();

        $this->library_version = 'latest';
        $this->region          = env('AWS_DEFAULT_REGION');
        $this->access_key      = env('AWS_ACCESS_KEY_ID');
        $this->secret_key      = env('AWS_SECRET_ACCESS_KEY');
        $this->client_id       = env('AWS_COGNITO_CLIENT_ID');
        $this->client_secret   = env('AWS_COGNITO_CLIENT_SECRET');
        $this->user_pool_id    = env('AWS_COGNITO_USER_POOL_ID');
    }

    /**
     * Execute the console command.
     *
     * @return mixed
     */
    public function handle()
    {
        $email = $this->argument('email');
        $password = $this->argument('password');
        $method = $this->argument('method');

        if (!in_array($method, ['auth', 'signUp'])) {
            $this->output->error('method is allowed auth or signUp');
            return 1;
        }

        $this->$method($email, $password);
        return 0;
    }

    private function adminInstantiation()
    {
        return new CognitoIdentityProviderClient([
            'version' => $this->library_version,
            'region' => $this->region,
            'credentials' => [
                'key' => $this->access_key,
                'secret' => $this->secret_key,
            ],
        ]);
    }

    private function signUp(string $email, string $password)
    {
        $response = $this
            ->adminInstantiation()
            ->signUp([
                'ClientId' => $this->client_id,
                'Username' => $email,
                'Email' => $email,
                'Password' => $password,
                'UserAttributes' => [
                    [
                        'Name' => 'email',
                        'Value' => $email,
                    ]
                ],
                'SecretHash' => $this->cognitoSecretHash($email),
            ]);
        User::create(['email' => $email, 'cognito_sub' => $response->toArray()['UserSub'],]);
        $this->output->success(sprintf('created %s', $email));
    }

    private function auth(string $email, string $password)
    {
        $response = $this
            ->adminInstantiation()
            ->adminInitiateAuth([
                'AuthFlow' => 'ADMIN_USER_PASSWORD_AUTH',
                'ClientId' => $this->client_id,
                'UserPoolId' => $this->user_pool_id,
                'AuthParameters' => [
                    'USERNAME' => $email,
                    'PASSWORD' => $password,
                    'SECRET_HASH' => $this->cognitoSecretHash($email),
                ],
            ]);
        $this->output->success(sprintf('token for %s', $email));
        $this->output->writeln($response->toArray()['AuthenticationResult']['IdToken']);
    }

    protected function cognitoSecretHash($username)
    {
        $hash = hash_hmac('sha256', $username.$this->client_id, $this->client_secret, true);
        return base64_encode($hash);
    }

}
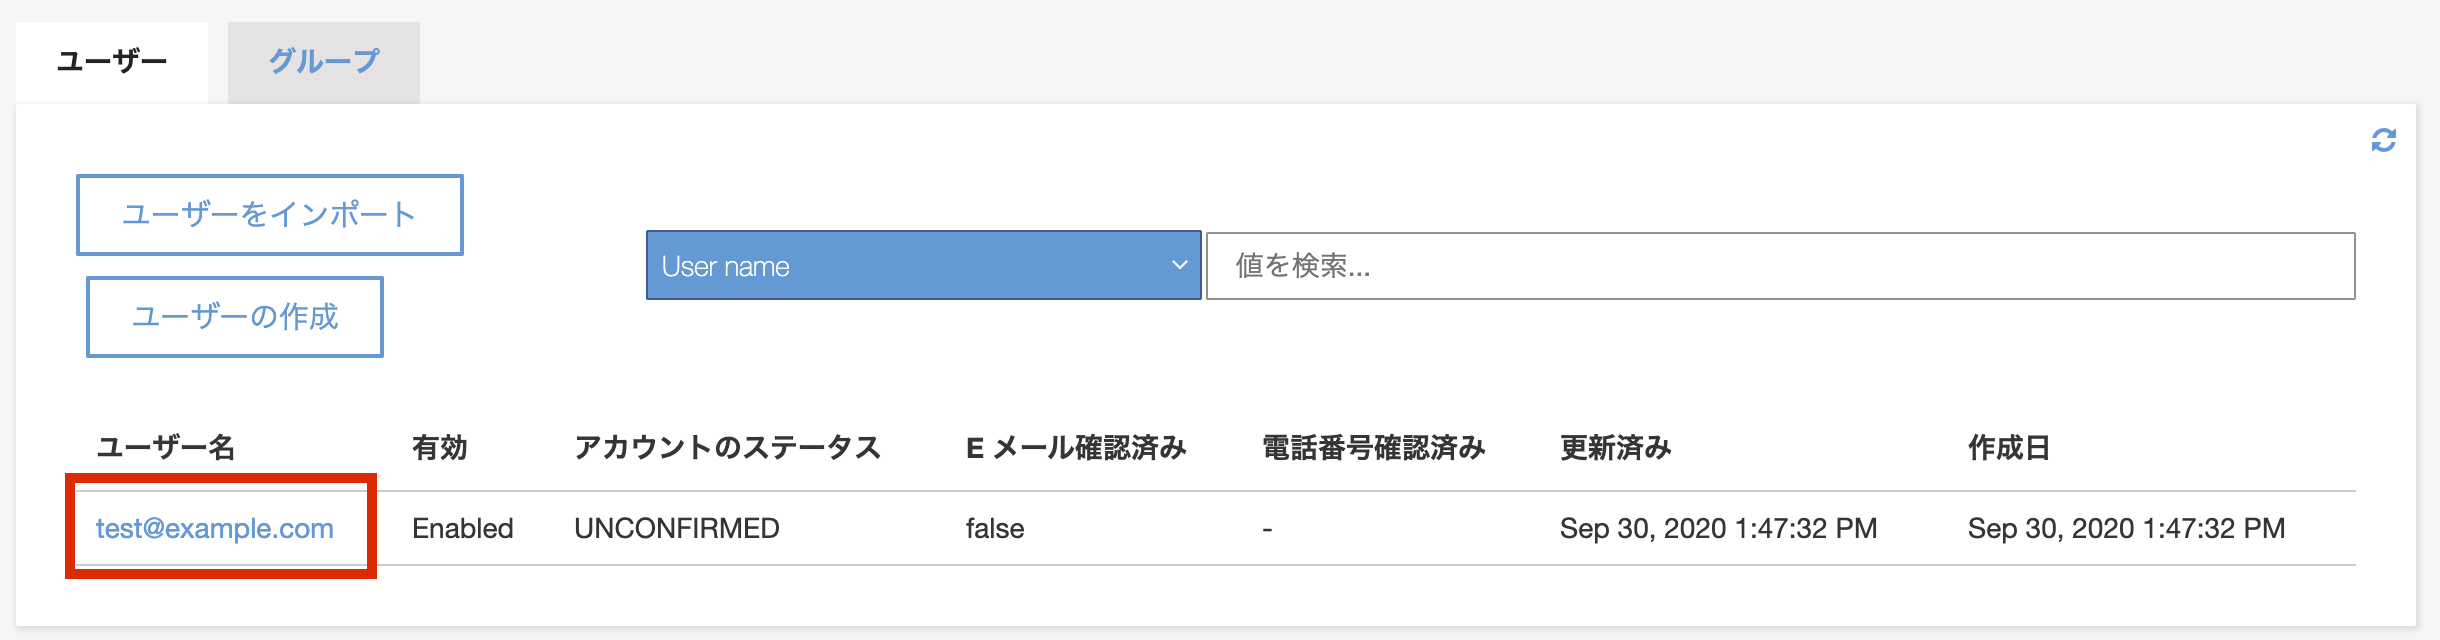
ターミナルで以下のコマンドを実行すると、CognitoとDBにUserが作成される。
$ ./artisan myapp:cognito test@example.com password signUp
Cognitoの管理画面に移動すると以下のような表示になっており、Userが追加されているのがわかる。しかし、まだこのユーザーはステータスがUNCONFITMEDなので認証を行うことができない。図のように、「アカウント名をクリック」 → 「ユーザーの確認」を押すことで、アカウントをCONFIRMEDにすることができる。
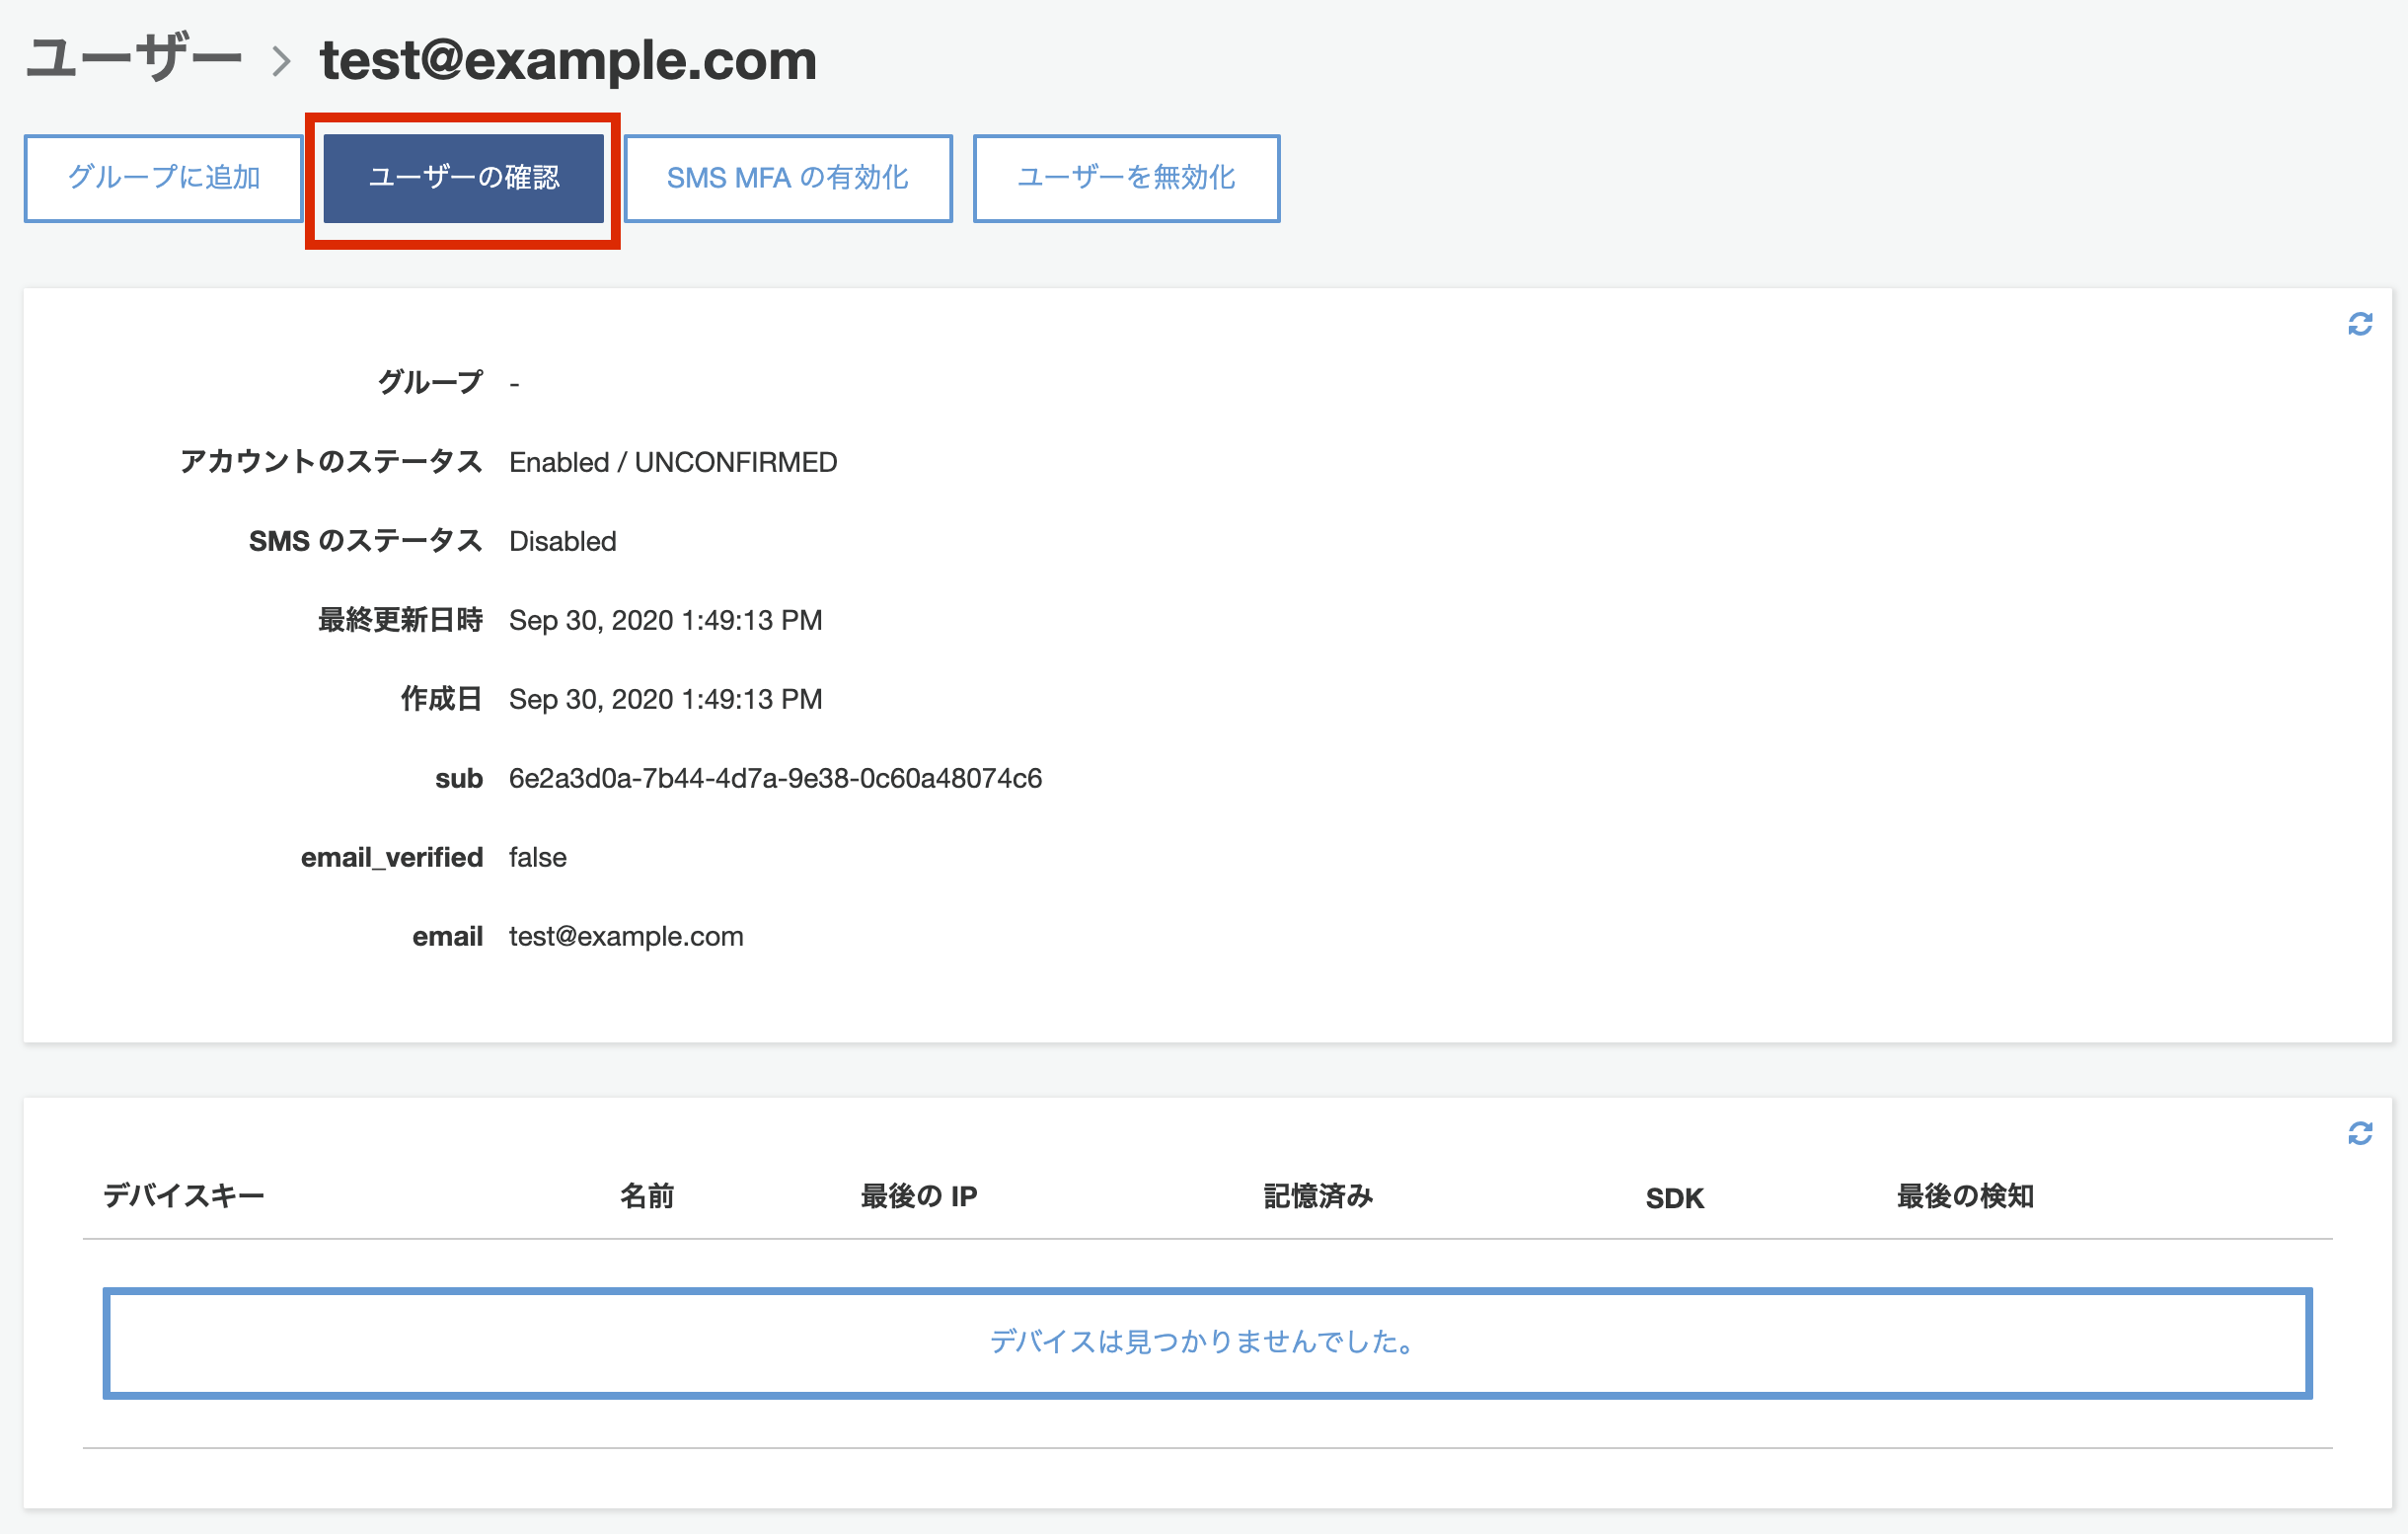
この後でターミナルで以下のコマンドを実行すると、トークンが発行される。
$ ./artisan myapp:cognito test@example.com password auth


 [OK] token for test@example.com


eyJraWQiOiJreEsyblNMWkwwQjdRRjh...
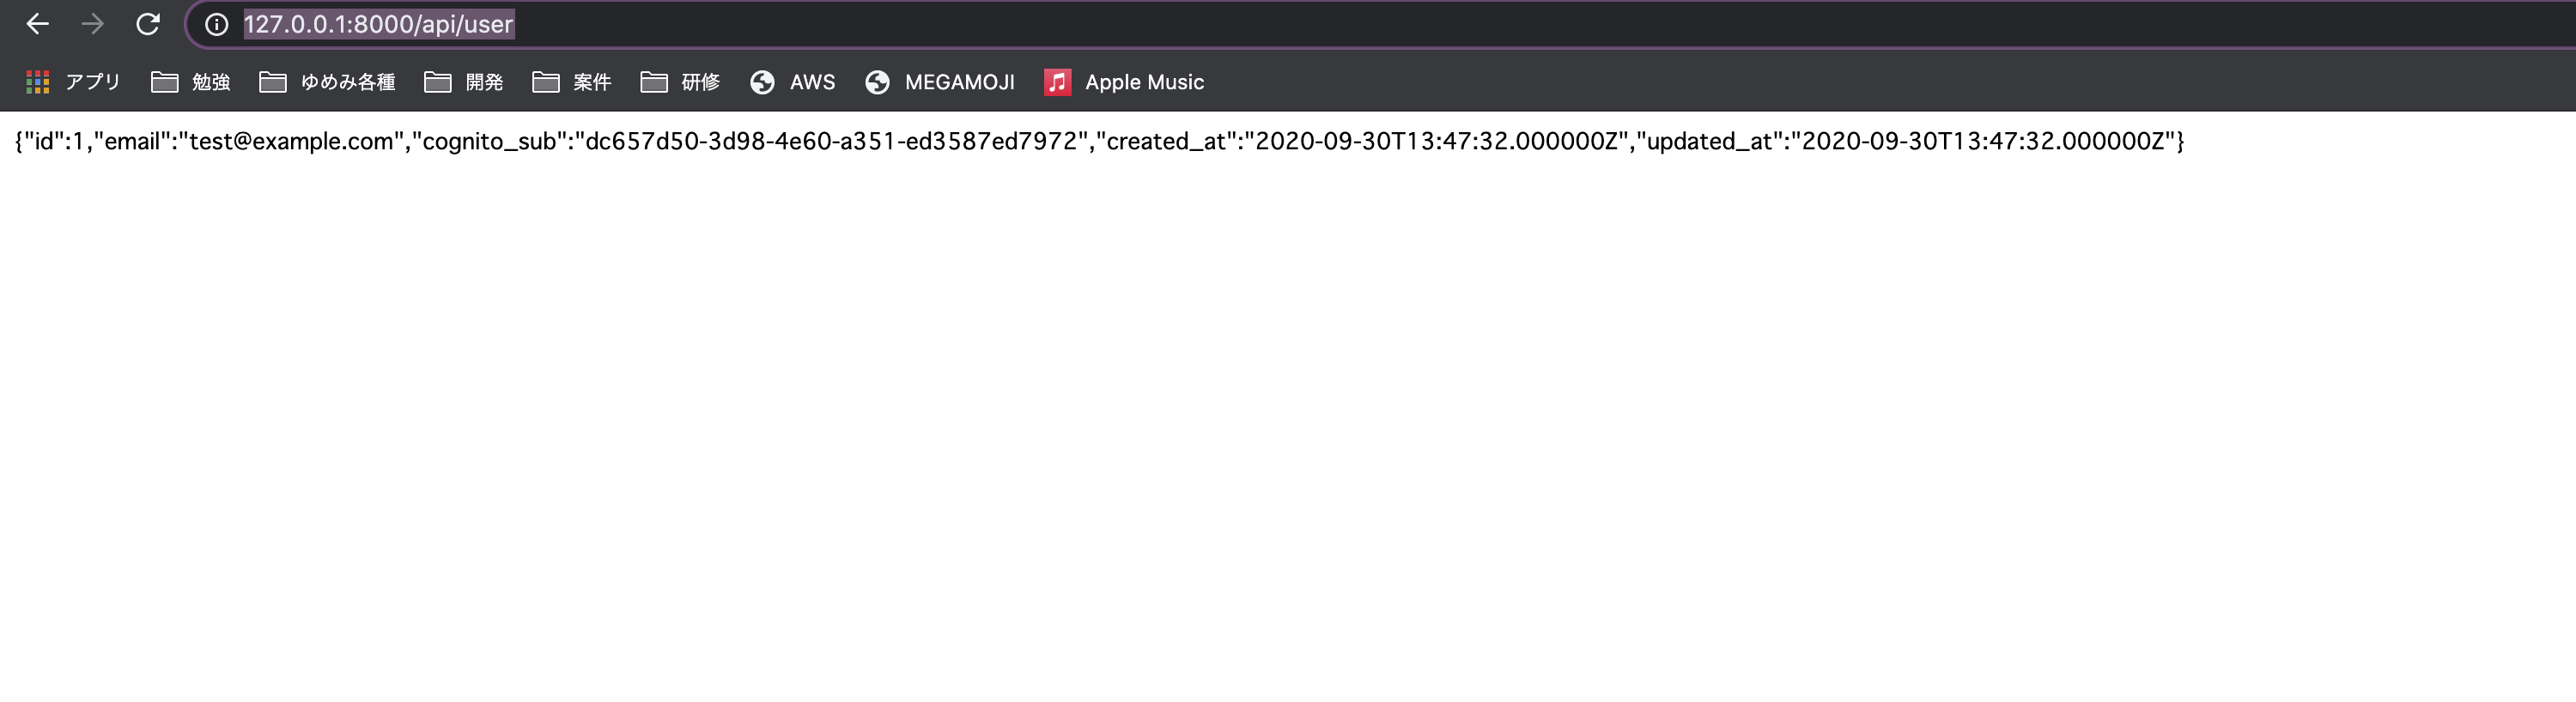
発行されたトークンをこちらのchrome拡張等を用いてAuthorization: Bearer {token}としてヘッダーに設定する。
その状態でhttp://127.0.0.1:8000/api/userにアクセスすると、ログインしているUserの情報が表示される。
今回のソース