目次
・はじめに
・ハードの準備
・ESP32を使う
・Unity
はじめに
マイコン【ESP32】からのBLEをAndroidのスマホで受信してみる。Unityを使って。
何とか数値を送れた結果は以下のと通り。
ESP32が0~100までの数値を順に500msごとに送信している。
何とかESP32からスマートフォンにBLEで数値飛ばすことができた。
— いっちー@builderscon見本市 (@get_itchy_feet) August 15, 2019
アプリ側もUnityでできた。$20出してAsset【Bluetooth LE for iOS, tvOS and Android】買ったかいがあるというものだ。 pic.twitter.com/zRyBBqtDIX
AndroidStudioとかわからんが、Unityは使えるので、受信側のスマホソフトを作ってみる。ただし、UnityはBLEへの対応はしていない。Javaとか使って書かないといけないらしいが、そんなもの覚えていたら何年かかるかわからない。
幸いAssetstoreで【Bluetooth LE for iOS, tvOS and Android】なるものが売っている。$20なのでお試しに買ってみる。
https://assetstore.unity.com/packages/tools/network/bluetooth-le-for-ios-tvos-and-android-26661?aid=1101lGs4&utm_source=aff
BLEを出す側にはESP32の乗ったモジュールを使う。Arduinoの開発環境が使用できるし、下記のDevKitならばPCと接続するだけで使用できる。
http://akizukidenshi.com/catalog/g/gM-11819/
参考にしたというかほぼコピペしたのは以下のサイト
・ESP32をArduinoの開発環境で開発する準備の仕方
https://deviceplus.jp/hobby/entry_069/
・ESP32側のUUIDの設定とか、Assetの使い方
http://takashiski.hatenablog.com/entry/2018/05/17/001301
ハードの準備
⓵ESP32-DevKit : 秋月電子やマルツパーツで売っている
⓶USBケーブル : ⓵へのPCから書き込むのに使用する⓵側はマイクロUSB
⓷Android搭載スマートホン : NuAns NEO [Reloaded]
⓸USBケーブル : スマートホンへのソフトの転送用
ESP32を使う
開発環境は以下に書いてある通り。もっと新しいやり方もあるらしいがそちらだとうまくいかなかった。
https://deviceplus.jp/hobby/entry_069/
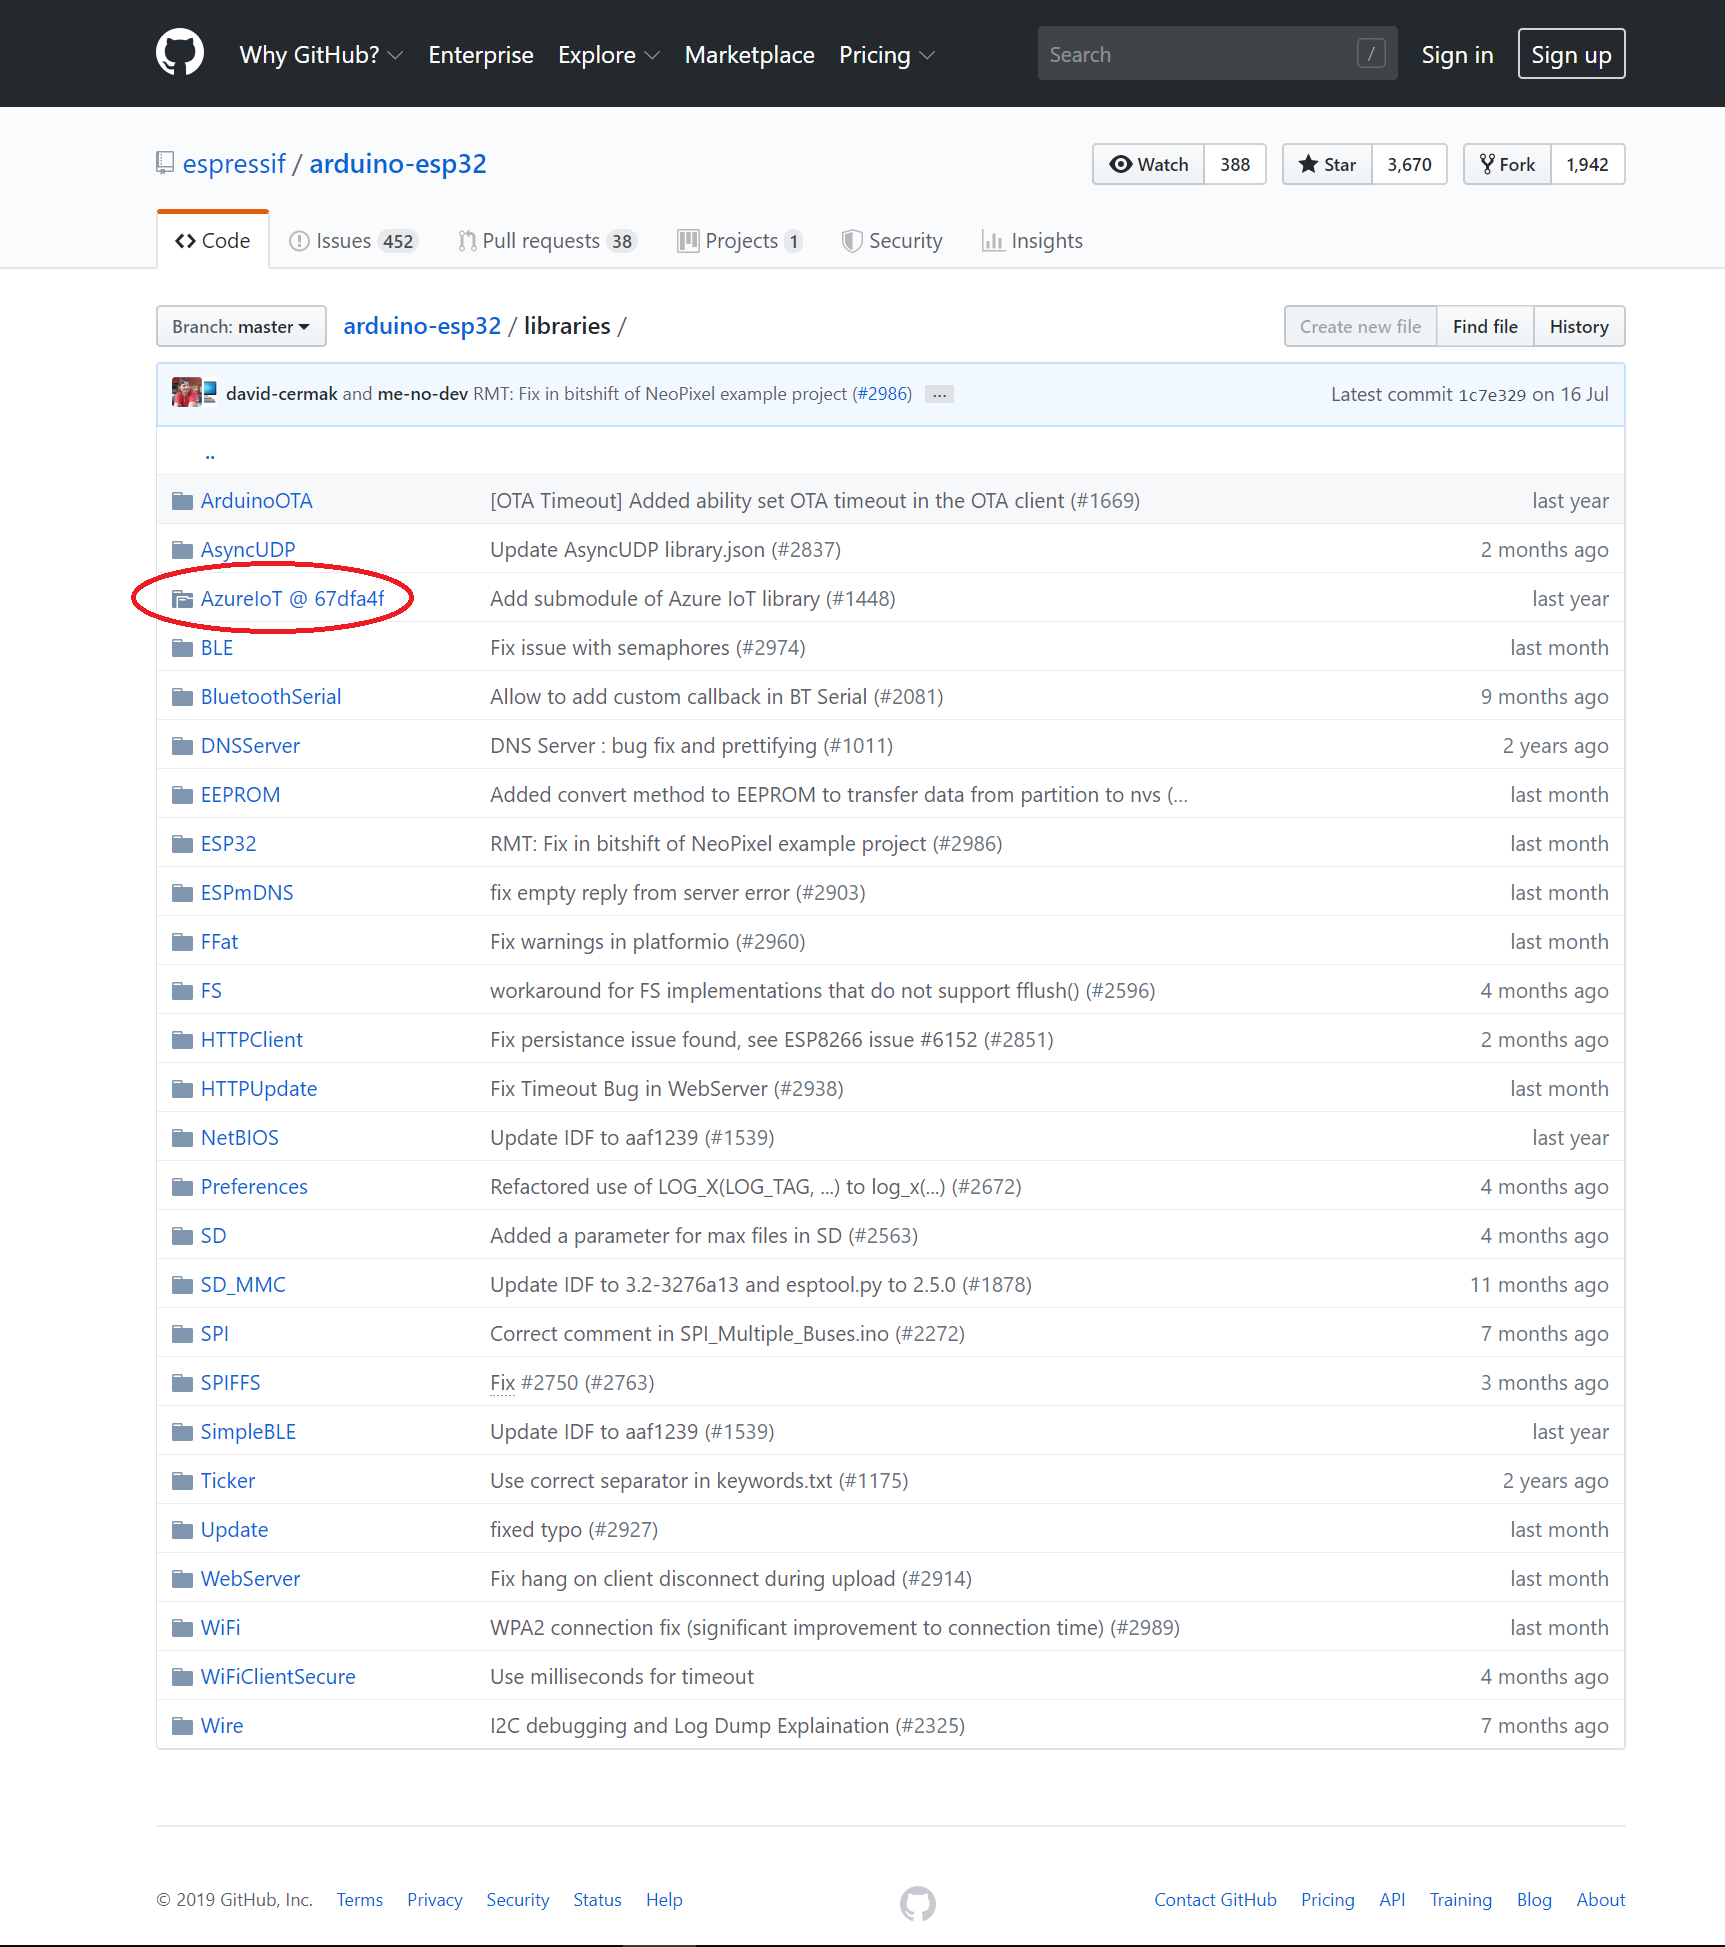
なお、GitHubからダウンロードしたものを展開すると【libraries】内の【AzureIoT】フォルダの中身が空になってしまった。GitHubで見てみると後ろに@がついている、これはリンクということらしい。これだけは個別にダウンロードしてやる必要があるようだ。
あと、なんか【get.exe】を起動させると、【esptool】が入手できるはずが、なんか出てこない場合がある。
開発環境が整ったら、スケッチ例【ESP32 BLE Arduino】→【BLE_notify】を開く。以下のように少しいじってみた。
ESP32が0~100までの数値を順に500msごとに送信するように改造してみる。
また、UUIDも以下のサイトに書いてあるようにいじってみた。(ただしデバイス名は【ESP32】のまま)
http://takashiski.hatenablog.com/entry/2018/05/17/001301
/*
    Video: https://www.youtube.com/watch?v=oCMOYS71NIU
    Based on Neil Kolban example for IDF: https://github.com/nkolban/esp32-snippets/blob/master/cpp_utils/tests/BLE%20Tests/SampleNotify.cpp
    Ported to Arduino ESP32 by Evandro Copercini
    updated by chegewara

   Create a BLE server that, once we receive a connection, will send periodic notifications.
   The service advertises itself as: 4fafc201-1fb5-459e-8fcc-c5c9c331914b
   And has a characteristic of: beb5483e-36e1-4688-b7f5-ea07361b26a8

   The design of creating the BLE server is:
   1. Create a BLE Server
   2. Create a BLE Service
   3. Create a BLE Characteristic on the Service
   4. Create a BLE Descriptor on the characteristic
   5. Start the service.
   6. Start advertising.

   A connect hander associated with the server starts a background task that performs notification
   every couple of seconds.
*/
# include <BLEDevice.h>
# include <BLEServer.h>
# include <BLEUtils.h>
# include <BLE2902.h>

BLEServer* pServer = NULL;
BLECharacteristic* pCharacteristic = NULL;
bool deviceConnected = false;
bool oldDeviceConnected = false;
uint32_t value = 0;
int a;
// See the following for generating UUIDs:
// https://www.uuidgenerator.net/

# define SERVICE_UUID        "00002220-0000-1000-8000-00805F9B34FB"
# define CHARACTERISTIC_UUID "00002221-0000-1000-8000-00805F9B34FB"


class MyServerCallbacks: public BLEServerCallbacks {
    void onConnect(BLEServer* pServer) {
      deviceConnected = true;
    };

    void onDisconnect(BLEServer* pServer) {
      deviceConnected = false;
    }
};


void setup() {
  Serial.begin(115200);

  // Create the BLE Device
  BLEDevice::init("ESP32");

  // Create the BLE Server
  pServer = BLEDevice::createServer();
  pServer->setCallbacks(new MyServerCallbacks());

  // Create the BLE Service
  BLEService *pService = pServer->createService(SERVICE_UUID);

  // Create a BLE Characteristic
  pCharacteristic = pService->createCharacteristic(
                      CHARACTERISTIC_UUID,
                      BLECharacteristic::PROPERTY_READ   |
                      BLECharacteristic::PROPERTY_WRITE  |
                      BLECharacteristic::PROPERTY_NOTIFY |
                      BLECharacteristic::PROPERTY_INDICATE
                    );

  // https://www.bluetooth.com/specifications/gatt/viewer?attributeXmlFile=org.bluetooth.descriptor.gatt.client_characteristic_configuration.xml
  // Create a BLE Descriptor
  pCharacteristic->addDescriptor(new BLE2902());

  // Start the service
  pService->start();

  // Start advertising
  BLEAdvertising *pAdvertising = BLEDevice::getAdvertising();
  pAdvertising->addServiceUUID(SERVICE_UUID);
  pAdvertising->setScanResponse(false);
  pAdvertising->setMinPreferred(0x0);  // set value to 0x00 to not advertise this parameter
  BLEDevice::startAdvertising();
  Serial.println("Waiting a client connection to notify...");
}

void loop() {
    // notify changed value
    if (deviceConnected) {
        a++;
        if ( a>100 ) a=0;
        pCharacteristic->setValue((uint8_t*)&a, 1);
        pCharacteristic->notify();
        value++;
        delay(500); // bluetooth stack will go into congestion, if too many packets are sent, in 6 hours test i was able to go as low as 3ms
    }
    // disconnecting
    if (!deviceConnected && oldDeviceConnected) {
        delay(500); // give the bluetooth stack the chance to get things ready
        pServer->startAdvertising(); // restart advertising
        Serial.println("start advertising");
        oldDeviceConnected = deviceConnected;
    }
    // connecting
    if (deviceConnected && !oldDeviceConnected) {
        // do stuff here on connecting
        oldDeviceConnected = deviceConnected;
    }
}
うまくできたかどうかはスマートホンにテストツールを入れて確認できる。
BLE Scannerとか。
Unity
スマートホンの側のアプリは以下のサイトの通りでうごいた。デバイス名は【ESP32】となるが。
http://takashiski.hatenablog.com/entry/2018/05/17/001301
ただし、Androidでしか動かないので確認がめんどくさい。adbとかいれてインストールの手間を省くかなぁ。
adbの入れ方の紹介サイト
https://sp7pc.com/google/android/34263
なんとなく面白くないので、少し改造してみた。
送信した数値をテキストとスクロールバーで表示する。
【SimpleTest】のうち、GUI部分は不要なのでコメント文にするとともに、ほかのスクリプトでも数値を参照できるように【_dataBytes】をPublicな変数とする。
/* This is a simple example to show the steps and one possible way of
 * automatically scanning for and connecting to a device to receive
 * notification data from the device.
 */

using UnityEngine;

public class SimpleTest : MonoBehaviour
{
	public string DeviceName = "RFduino";
	public string ServiceUUID = "2220";
	public string SubscribeCharacteristic = "2221";
	public string WriteCharacteristic = "2222";

	enum States
	{
		None,
		Scan,
		ScanRSSI,
		Connect,
		Subscribe,
		Unsubscribe,
		Disconnect,
	}

	private bool _connected = false;
	private float _timeout = 0f;
	private States _state = States.None;
	private string _deviceAddress;
	private bool _foundSubscribeID = false;
	private bool _foundWriteID = false;
	public byte[] _dataBytes = null;
	private bool _rssiOnly = false;
	private int _rssi = 0;

	void Reset ()
	{
		_connected = false;
		_timeout = 0f;
		_state = States.None;
		_deviceAddress = null;
		_foundSubscribeID = false;
		_foundWriteID = false;
		_dataBytes = null;
		_rssi = 0;
	}

	void SetState (States newState, float timeout)
	{
		_state = newState;
		_timeout = timeout;
	}

	void StartProcess ()
	{
		Reset ();
		BluetoothLEHardwareInterface.Initialize (true, false, () => {

			SetState (States.Scan, 0.1f);

		}, (error) => {

			BluetoothLEHardwareInterface.Log ("Error during initialize: " + error);
		});
	}

	// Use this for initialization
	void Start ()
	{
		StartProcess ();
	}

	// Update is called once per frame
	void Update ()
	{
		if (_timeout > 0f)
		{
			_timeout -= Time.deltaTime;
			if (_timeout <= 0f)
			{
				_timeout = 0f;

				switch (_state)
				{
				case States.None:
					break;

				case States.Scan:
					BluetoothLEHardwareInterface.ScanForPeripheralsWithServices (null, (address, name) => {

						// if your device does not advertise the rssi and manufacturer specific data
						// then you must use this callback because the next callback only gets called
						// if you have manufacturer specific data

						if (!_rssiOnly)
						{
							if (name.Contains (DeviceName))
							{
								BluetoothLEHardwareInterface.StopScan ();

								// found a device with the name we want
								// this example does not deal with finding more than one
								_deviceAddress = address;
								SetState (States.Connect, 0.5f);
							}
						}

					}, (address, name, rssi, bytes) => {

						// use this one if the device responses with manufacturer specific data and the rssi

						if (name.Contains (DeviceName))
						{
							if (_rssiOnly)
							{
								_rssi = rssi;
							}
							else
							{
								BluetoothLEHardwareInterface.StopScan ();

								// found a device with the name we want
								// this example does not deal with finding more than one
								_deviceAddress = address;
								SetState (States.Connect, 0.5f);
							}
						}

					}, _rssiOnly); // this last setting allows RFduino to send RSSI without having manufacturer data

					if (_rssiOnly)
						SetState (States.ScanRSSI, 0.5f);
					break;

				case States.ScanRSSI:
					break;

				case States.Connect:
					// set these flags
					_foundSubscribeID = false;
					_foundWriteID = false;

					// note that the first parameter is the address, not the name. I have not fixed this because
					// of backwards compatiblity.
					// also note that I am note using the first 2 callbacks. If you are not looking for specific characteristics you can use one of
					// the first 2, but keep in mind that the device will enumerate everything and so you will want to have a timeout
					// large enough that it will be finished enumerating before you try to subscribe or do any other operations.
					BluetoothLEHardwareInterface.ConnectToPeripheral (_deviceAddress, null, null, (address, serviceUUID, characteristicUUID) => {

						if (IsEqual (serviceUUID, ServiceUUID))
						{
							_foundSubscribeID = _foundSubscribeID || IsEqual (characteristicUUID, SubscribeCharacteristic);
							_foundWriteID = _foundWriteID || IsEqual (characteristicUUID, WriteCharacteristic);

							// if we have found both characteristics that we are waiting for
							// set the state. make sure there is enough timeout that if the
							// device is still enumerating other characteristics it finishes
							// before we try to subscribe
							if (_foundSubscribeID)
							{
								_connected = true;
								SetState (States.Subscribe, 2f);
							}
						}
					});
					break;

				case States.Subscribe:
					BluetoothLEHardwareInterface.SubscribeCharacteristicWithDeviceAddress (_deviceAddress, ServiceUUID, SubscribeCharacteristic, null, (address, characteristicUUID, bytes) => {

						// we don't have a great way to set the state other than waiting until we actually got
						// some data back. For this demo with the rfduino that means pressing the button
						// on the rfduino at least once before the GUI will update.
						_state = States.None;

						// we received some data from the device
						_dataBytes = bytes;
					});
					break;

				case States.Unsubscribe:
					BluetoothLEHardwareInterface.UnSubscribeCharacteristic (_deviceAddress, ServiceUUID, SubscribeCharacteristic, null);
					SetState (States.Disconnect, 4f);
					break;

				case States.Disconnect:
					if (_connected)
					{
						BluetoothLEHardwareInterface.DisconnectPeripheral (_deviceAddress, (address) => {
							BluetoothLEHardwareInterface.DeInitialize (() => {

								_connected = false;
								_state = States.None;
							});
						});
					}
					else
					{
						BluetoothLEHardwareInterface.DeInitialize (() => {

							_state = States.None;
						});
					}
					break;
				}
			}
		}
	}

	private bool ledON = false;
	public void OnLED ()
	{
		ledON = !ledON;
		if (ledON)
		{
			SendByte ((byte)0x01);
		}
		else
		{
			SendByte ((byte)0x00);
		}
	}

	string FullUUID (string uuid)
	{
		return "0000" + uuid + "-0000-1000-8000-00805f9b34fb";
	}

	bool IsEqual(string uuid1, string uuid2)
	{
		if (uuid1.Length == 4)
			uuid1 = FullUUID (uuid1);
		if (uuid2.Length == 4)
			uuid2 = FullUUID (uuid2);

		return (uuid1.ToUpper().CompareTo(uuid2.ToUpper()) == 0);
	}

	void SendByte (byte value)
	{
		byte[] data = new byte[] { value };
		BluetoothLEHardwareInterface.WriteCharacteristic (_deviceAddress, ServiceUUID, WriteCharacteristic, data, data.Length, true, (characteristicUUID) => {

			BluetoothLEHardwareInterface.Log ("Write Succeeded");
		});
	}

/*	void OnGUI ()
	{
		GUI.skin.textArea.fontSize = 32;
		GUI.skin.button.fontSize = 32;
		GUI.skin.toggle.fontSize = 32;
		GUI.skin.label.fontSize = 32;

		if (_connected)
		{
			if (_state == States.None)
			{
				if (GUI.Button (new Rect (10, 10, Screen.width - 10, 100), "Disconnect"))
					SetState (States.Unsubscribe, 1f);

				if (GUI.Button (new Rect (10, 210, Screen.width - 10, 100), "Write Value"))
					OnLED ();

				if (_dataBytes != null)
				{
					string data = "";
					foreach (var b in _dataBytes)
						data += b.ToString ("X") + " ";

					GUI.TextArea (new Rect (10, 400, Screen.width - 10, 300), data);
				}
			}
			else if (_state == States.Subscribe && _timeout == 0f)
			{
				GUI.TextArea (new Rect (50, 100, Screen.width - 100, Screen.height - 200), "Press the button on the RFduino");
			}
		}
		else if (_state == States.ScanRSSI)
		{
			if (GUI.Button (new Rect (10, 10, Screen.width - 10, 100), "Stop Scanning"))
			{
				BluetoothLEHardwareInterface.StopScan ();
				SetState (States.Disconnect, 0.5f);
			}

			if (_rssi != 0)
				GUI.Label (new Rect (10, 300, Screen.width - 10, 50), string.Format ("RSSI: {0}", _rssi));
		}
		else if (_state == States.None)
		{
			if (GUI.Button (new Rect (10, 10, Screen.width - 10, 100), "Connect"))
				StartProcess ();

			_rssiOnly = GUI.Toggle (new Rect (10, 200, Screen.width - 10, 50), _rssiOnly, "Just Show RSSI");
		}
	}
*/
}
さらにスクリプトを追加する。
テキストとスクロールバーの表示に使用する。
出来たら【SimpleTest】と同じ場所【MainCamera】に追加する。
using System.Collections;
using System.Collections.Generic;
using UnityEngine;
using UnityEngine.UI;

public class UiDisplay : MonoBehaviour
{
    public Text textDisplay;
    public int data;
    public float dataScroll;
    public Scrollbar scrollDisplay;

    void Start()
    {
        textDisplay.text = "Display";
    }

    void Update()
    {
        SimpleTest simpleData = GetComponent<SimpleTest>();
        data = simpleData._dataBytes[0];
        textDisplay.text = data.ToString();
        dataScroll = data;
        scrollDisplay.size = dataScroll * 0.01f;
    }
}
GameObjectとして、UIのimage(背景用),text,scrollbarを追加する。サイズは適当に。
textとscrollbarは【UiDisplay】の変数に突っ込んでやる。
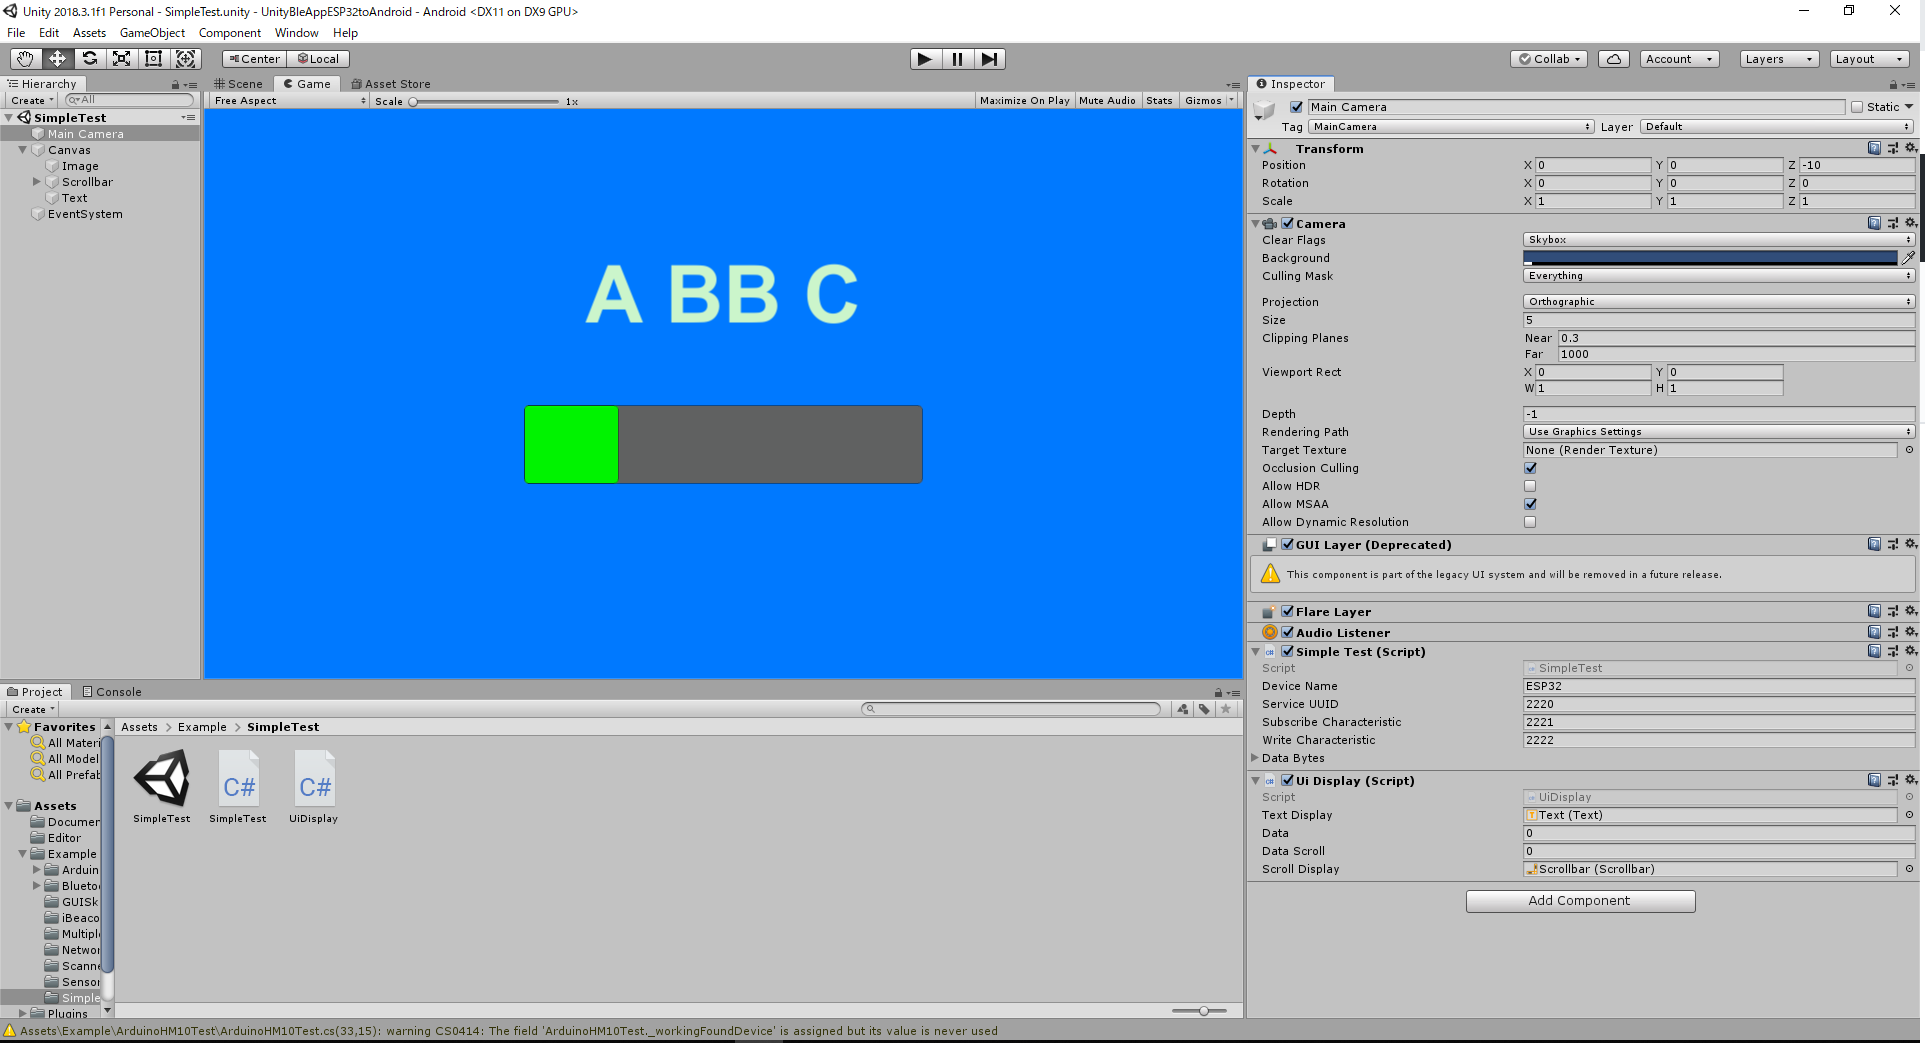
これでなんとなくだが動くようになった。何がどうなっているかはとんとわからん。コネクトとかどうするんだろう...。
まあ、とにかく動いた。以上である。