今回の題
この記事ではJWTという認証方法でミーティングを作成するところまで行います。
主に私自身のアウトプットが目的ですが、いつか誰かの参考になれば幸いです。
まだ利用途中なので適宜、加筆していきます。
2020/7/9 日本語訳付きミーティングオプションの項目を加筆しました。
2021/1/12 各ライブラリのバージョンを追記いたしました。
2021/2/2 コードをクラスを使ったものに書き直しました。
バージョン
PHP 7.2
guzzlehttp/guzzle 7.2
lcobucci/jwt 3.3
APIキーの取得
以下にアクセスし、サインアップしてください。
Zoomマーケットプレイス
サインアップしたら、画面右上の「Develop」と書かれたドロップダウンから「Build App」を選択して以下のようなページにいきます。
画像の赤枠で囲んだ部分をクリックすると、これから作成するアプリの名前を求められるので以下のように適当に埋めておきます。
すると以下のようにアプリが作成されました。
必須項目がいくつかあるので適当に入力して、画面右下の「Continue」を押してください。

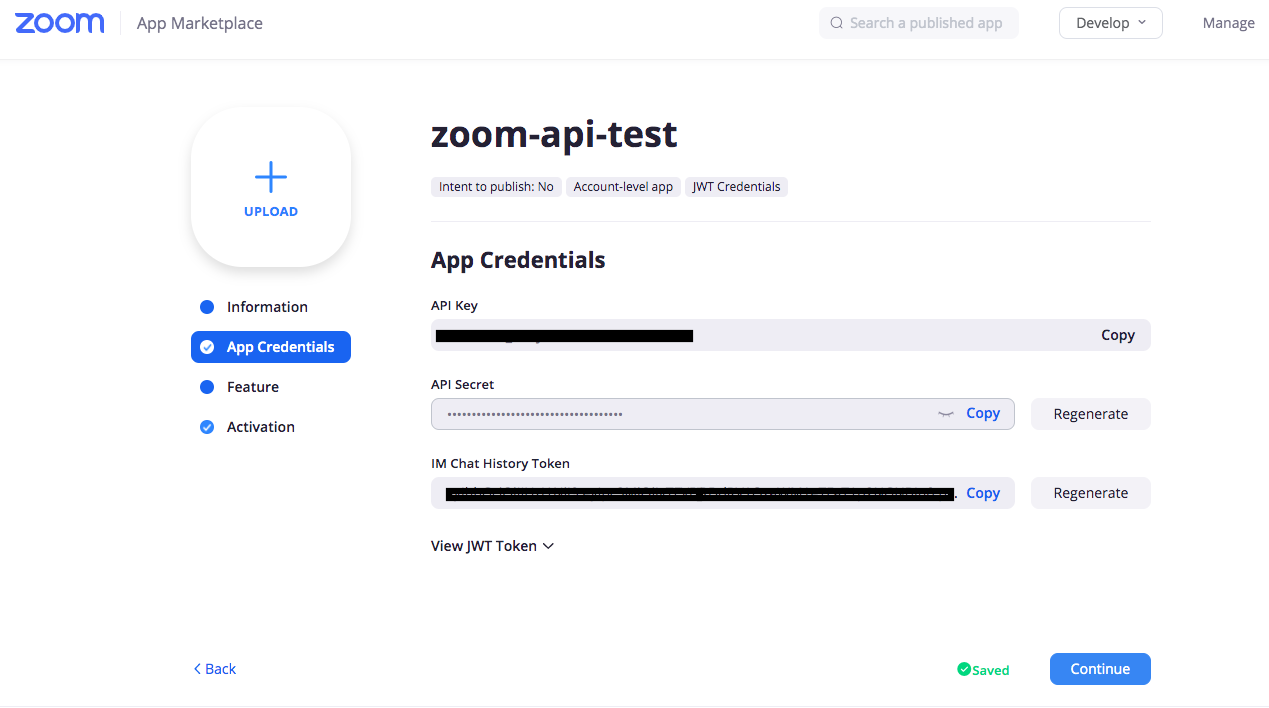
すると、画像のようなAPIキーなどの情報が記されたページに進みます。
これでAPIキーGETです。

必要なライブラリの準備
・Guzzleのインストール
APIリクエストを送信する際に使用します。
$ composer require guzzlehttp/guzzle:^7.2
・JWTのインストール
JWTトークンを生成するのに使用します。
※必ず3.3を使用してください。
$ composer require lcobucci/jwt:3.3
完成コード
<?php
require('vendor/autoload.php');

use GuzzleHttp\Client;
use Lcobucci\JWT\Signer\Hmac\Sha256;
use Lcobucci\JWT\Signer\Key;
use Lcobucci\JWT\Builder;

class Meeting {

    private const BASE_URI = 'https://api.zoom.us/v2/';

    private function createJwtToken()
    {
        $api_key = 'ここにAPIキー';
        $api_secret = 'ここにAPIキーシークレット';
        $signer = new Sha256;
        $key = new Key($api_secret);
        $time = time();
        $jwt_token = (new Builder())->setIssuer($api_key)
                                ->expiresAt($time + 3600)
                                ->sign($signer, $key)
                                ->getToken();
        return $jwt_token;
    }

    private function fetchUserId()
    {
        $method = 'GET';
        $path = 'users';
        $client_params = [
          'base_uri' => self::BASE_URI,
        ];
        $result = $this->sendRequest($method, $path, $client_params);
        $user_id = $result['users'][0]['id'];
        return $user_id;
    }

    public function createMeeting()
    {
        $user_id = $this->fetchUserId();
        $params = [
          'topic' => 'テスト',
          'type' => 1,
          'time_zone' => 'Asia/Tokyo',
          'agenda' => 'ズームAPIを試す',
          'settings' => [
            'host_video' => true,
            'participant_video' => true,
            'approval_type' => 0,
            'audio' => 'both',
            'enforce_login' => false,
            'waiting_room' => false,
          ]
        ];
        $method = 'POST';
        $path = 'users/'. $user_id .'/meetings';
        $client_params = [
          'base_uri' => self::BASE_URI,
          'json' => $params
        ];
        $result = $this->sendRequest($method, $path, $client_params);
        return $result;
    }

    private function sendRequest($method, $path, $client_params)
    {
        $client = new Client($client_params);
        $jwt_token = $this->createJwtToken();
        $response = $client->request($method,
                        $path,
                        [
                          'headers' => [
                            'Content-Type' => 'application/json',
                            'Authorization' => 'Bearer ' . $jwt_token,
                          ]
                        ]);
        $result_json = $response->getBody()->getContents();
        $result = json_decode($result_json, true);
        return $result;
    }
}
topicなどを動的にしたいのであればconstructを利用するなどして対応出来るかと思います。
それでは、このクラスを呼び出してcreateMeeting()を実行してみます。
$meeting = new Meeting();
$created_meeting = $meeting->createMeeting();
すると返り値を受け取った$created_meetingに作成されたミーティングの情報が入ってます。
Array
(
   //略
    [topic] => テスト
    [type] => 1
    [status] => waiting
    [timezone] => Asia/Tokyo
    [agenda] => ズームAPIを試す
    [created_at] => 2020-07-01T20:24:04Z
    [start_url] => https://zoom.us/s/.....
    [join_url] => https://zoom.us/j/......
     //略
    [settings] => Array
        (
            //略
        )

)
start_urlかjoin_urlに記載されたurlからミーティングに参加することができます。
ちなみにこの二つのurlの違いは、
start_url → ホストとして参加
join_url → 参加者として参加
です。
指定時間にミーティングを開催する時のオプション
例えば、2020年8月3日9時にミーティングを開催する場合。
typeは2、
timezoneはAsia/Tokyo、
start_timeは、開始時間をセット(2020-08-03T09:00:00Z)
にすればOK。
[
  'topic' => 'テスト',
  'type' => 2,
  'time_zone' => 'Asia/Tokyo',
  'start_time' => '2020-08-03T09:00:00Z',
  'agenda' => 'ズームAPIを試す',
  'settings' => [
     //略
   ]
];
日本語訳付きミーティングオプション一覧
一部動きを把握できていないものがありますが、配列で置いときます。
参考までにどうぞ!
[
  // 開催するミーティングの設定
  'topic' => 'string',// テーマ(例:テスト)
  'type' => 'integer',// ミーティングのタイプ
  'start_time' => 'string [date-time]',// 開始時間
  'duration' => 'integer',// ミーティングの開催時間
  'schedule_for' => 'string',// 招待したい人の情報(user_idかメールアドレス)
  'timezone' => 'string',// タイムゾーン(例:'Asia/Tokyo')
  'password' => 'string',// ミーティングパスワード
  'agenda' => 'string',// 議題

  // 定期ミーティングの設定
  'recurrence' => [
    'type' => 'integer', // タイプ
    'repeat_interval' => 'integer', // 会議を繰り返す間隔を定義
    'weekly_days' => 'string', // 会議を繰り返す曜日を指定
    'monthly_day' => 'integer', // 月のどの日に会議が繰り返すか
    'monthly_week' => 'integer', // 月のどの週に会議が繰り返すか(monthly_week_dayと組み合わせて使う)
    'monthly_week_day' => 'integer', // 毎月の会議を繰り返す週の特定の日を定義
    'end_times' => 'integer', // 会議がキャンセルされるまでの繰り返し回数
    'end_date_time' => 'string [date-time]' // キャンセルされる前に会議が繰り返される最終日を定義
  ],

  // 開催するミーティングの内部機能の詳細な設定
  'settings' => [
    'host_video' => 'boolean', // ホストのビデオをオンにするか
    'participant_video' => 'boolean', // 参加者のビデオをオンにするか
    'cn_meeting' => 'boolean', // ホストが中国からかどうか
    'in_meeting' => 'boolean', // ホストがインドからかどうか
    'join_before_host' => 'boolean', // ホストより前に参加者がミーティングに参加できるようにするかどうか
    'mute_upon_entry' => 'boolean', // 入室時にミュートにするかどうか
    'watermark' => 'boolean', // 画面共有時に透かしを加えるかどうか
    'use_pmi' => 'boolean',
    'approval_type' => 'integer', // 参加者の入室を許可する方法を設定する
    'registration_type' => 'integer',
    'audio' => 'string', // 参加者がどういった手段でミーティングの音声に参加するか
    'auto_recording' => 'string', // ミーティングの自動録画設定
    'enforce_login' => 'boolean',
    'enforce_login_domains' => 'string',
    'waiting_room' => 'boolean', // 参加者を一度待機させるかどうか
    'alternative_hosts' => 'string',
    'global_dial_in_countries' => [
      'string'
    ],
    'registrants_email_notification' => 'boolean'
  ]
];
参考
Zoom公式 リファレンス
Zoom公式 Create a Meeting
Zoom公式 List Users
Zoom公式 Generating JWTs
JWT(Json Web Token) をPHPで生成する

