目次
- はじめに
- データセットの取得
- YOLOv5のインストール
- データセットの前処理
- 学習と推論
- できるようになったこと(所感)
- 参考
1. はじめに
私が身を置く製薬業界は他業界と比較して規制が強く、AIの導入についてはあまり進んでいないのが現状です。
しかし、今後は間違いなくAIの導入が進んでいくと考えています。
AIの中でも、物体検知は特に医薬品製造に有用だと感じています。
物体検知モデルを実装するスキルを習得するため、
KaggleのGlobal Wheat DetectionデータセットでYOLOv5を使用した学習を行いました。
1.1 Global Wheat Detection とは
「Global Wheat Detection」は画像から麦の穂の領域を検出し、その精度を競うコンペティションです(開催済み)。
Global Wheat Detection
1.2 YOLOv5とは
代表的な物体検出アルゴリズムであるYOLO(You only Look Once)のver.5です。
YOLOは物体の検出とクラス分類を同時に行うことで、高速化を実現しています。
YOLOの詳細は以下のサイトで非常に分かり易くまとめられています。
物体検出の代表アルゴリズム YOLOシリーズを徹底解説!【AI論文解説】
1.3 動作環境
- Google Colaboratory Pro
2. データセットの取得
2.1 Google Driveのマウント
from google.colab import drive
drive.mount('/content/drive')
2.2 データセットのダウンロード
Kaggleのアカウントページから「Account」>「API」>「Create New API Token」を選択してkaggle.jsonファイルを取得します。
取得したjsonファイルを以下のコードでGoogle Colaboratoryにアップロードします。
from google.colab import files

uploaded = files.upload()
for fn in uploaded.keys():
  print('User uploaded file "{name}" with length {length} bytes'.format(
      name=fn, length=len(uploaded[fn])))
!mkdir -p ~/.kaggle/ && mv kaggle.json ~/.kaggle/ && chmod 600 ~/.kaggle/kaggle.json
#データセットのダウンロード
!kaggle competitions download -c global-wheat-detection
2.3 データセットの移動と解凍
解析を行うディレクトリとして"/content/drive/MyDrive/kaggle/wheat"を作成します。
Google Colab切断時にデータセットが消えることを防ぐ為、データセットをGoogle Driveに移動します。
#データセットの移動と解凍
%mkdir -p /content/drive/MyDrive/kaggle/wheat
%mv /content/global-wheat-detection.zip /content/drive/MyDrive/kaggle/wheat
%unzip /content/drive/MyDrive/kaggle/wheat/global-wheat-detection.zip -d /content/drive/MyDrive/kaggle/wheat

#学習時に必要となるディレクトリを作成
%cd /content/drive/MyDrive/kaggle/wheat/train
%mkdir -p images labels image_rem ../val/images ../val/labels ../learning_log

#画像データの移動
%mv *.jpg ./images
3. YOLOv5のインストール
GitHubからYOLOv5のファイルをクローンします。
!git clone https://github.com/ultralytics/yolov5 /content/drive/MyDrive/kaggle/wheat
%cd /content/drive/MyDrive/kaggle/wheat/yolov5
%pip install -qr requirements.txt
import torch
import utils
display = utils.notebook_init()
4. データセットの前処理
4.1 ライブラリのimport
import numpy as np
import pandas as pd
import os
import matplotlib.pyplot as plt
import matplotlib.image as mpimg
import re
import random
import shutil
4.2 trainデータの確認
csvファイルをデータフレームとして読み込みます。
df = pd.read_csv("/content/drive/MyDrive/kaggle/wheat/train.csv")
df[:1]
| image_id | width | height | bbox | source |
|---|---|---|---|---|
| b6ab77fd7 | 1024 | 1024 | [834.0, 222.0, 56.0, 36.0] | usask_1 |
データフレームに格納されているimage_idの数と、画像の数が一致するかどうか調べます。
print(len(df["image_id"].unique()))
print(len(os.listdir('/content/drive/MyDrive/kaggle/wheat/train/image')))
#実行結果
3373
3422
数が一致しなかったので、データフレームにimage_idがない画像を抽出して表示します。
imgs = os.listdir("/content/drive/MyDrive/kaggle/wheat/train/image")
nowheat_imgs = []
for img in imgs:
  if not img[:-4] in df["image_id"].values:
    nowheat_imgs.append(img)

fig = plt.figure(figsize=(20,40))
X = 10
Y = 5

for i, nowheat_img in enumerate(nowheat_imgs):
  image = mpimg.imread(f"/content/drive/MyDrive/kaggle/wheat/train/image/{nowheat_img}")
  ax = f"ax{i}"
  ax = fig.add_subplot(X, Y, i + 1)
  ax.set_title(id,fontsize=20)
  ax.tick_params(labelbottom=False,
               labelleft=False)
  plt.imshow(image)
小麦の穂が映っていない画像でした。今回はこれらの画像を使用せずに学習を行います。
これらの画像を別のディレクトリに移動します。
for nowheat_img in nowheat_imgs:
  new_path = shutil.move(f"/content/drive/MyDrive/kaggle/wheat/train/image/{nowheat_img}",\
  "/content/drive/MyDrive/kaggle/wheat/train/image_rem/")
4.3 ラベルの作成
データフレームの"bbox"列からYOLOv5で使用するラベルを作成します。
img_width = 1024
img_height = 1024

for id in df["image_id"].unique():
  path = f"/content/drive/MyDrive/kaggle/wheat/train/label/{id}.txt"
  txt = ""

  bbox_txt = df.loc[df["image_id"] == id, "bbox"].to_string(index=False)
  bbox_txt = re.sub("[ \[\]]", "", bbox_txt)
  bbox_txt = bbox_txt.replace("[","1 ").replace(","," ")

  for line in bbox_txt.split("\n"):
    bbox_params = line.split(" ")

    x_min = float(bbox_params[0])
    y_min = float(bbox_params[1])
    width = float(bbox_params[2])
    height = float(bbox_params[3].replace("...",""))

    x_mid = x_min + width/2
    y_mid = y_min + height/2

    x_mid_nor = x_mid/img_width
    y_mid_nor = y_mid/img_height
    width_nor = width/img_width
    height_nor = height/img_height

    modbbox_params = f"0 {x_mid_nor} {y_mid_nor} {width_nor} {height_nor}"
    txt += modbbox_params + "\n"

  f = open(path, 'w')
  f.write(txt)
  f.close()
4.4 データセットの分割(trainとvalidation)
全体の80%をtrainに、20%をvalidationに使用します。
validationで使用する画像とラベルを"/content/drive/MyDrive/kaggle/wheat/val/"に移動します。
random.seed(0)
val_list = random.sample(list(df["image_id"].unique()), len(df["image_id"].unique())//5)

for val_id in val_list:
  new_imgpath = shutil.move(f"/content/drive/MyDrive/kaggle/wheat/train/image/{val_id}.jpg", "/content/drive/MyDrive/kaggle/wheat/val/image")
  new_labelpath = shutil.move(f"/content/drive/MyDrive/kaggle/wheat/train/label/{val_id}.txt", "/content/drive/MyDrive/kaggle/wheat/val/label")
5. 学習と推論
5.1 yamlファイルの作成
学習の前に学習データの構造を示すyamlファイルを作成する必要があります。
私はVisual Studio Codeで作成しました。
作成したwheat.yamlの内容は以下の通りです。
YOLOv5は画像の場所を指定すると自動でラベルの場所を検索してくれます。
ただ、ディレクトリの名前を"labels"にしておく必要があります。
train: /content/drive/MyDrive/kaggle/wheat/train/images/
val: /content/drive/MyDrive/kaggle/wheat/val/images/
nc: 1
names: ['wheat']
5.2 学習
epoch数として100を指定していますが、mAPの値を見て30後半で止めています。
バッチサイズはメモリの性能から16を指定しています。
学習経過のログを'/content/drive/MyDrive/kaggle/wheat/learning_log'に保存するよう指定しています。
!python train.py --img 1024 --data wheat.yaml --cfg yolov5m.yaml --weights '' \
--project '/content/drive/MyDrive/kaggle/wheat/learning_log' --batch-size 16 --epochs 100
5.3 学習経過
学習経過はtensorboardを使用して確認しました。
%load_ext tensorboard
%tensorboard --logdir /content/drive/MyDrive/kaggle/wheat/learning_log
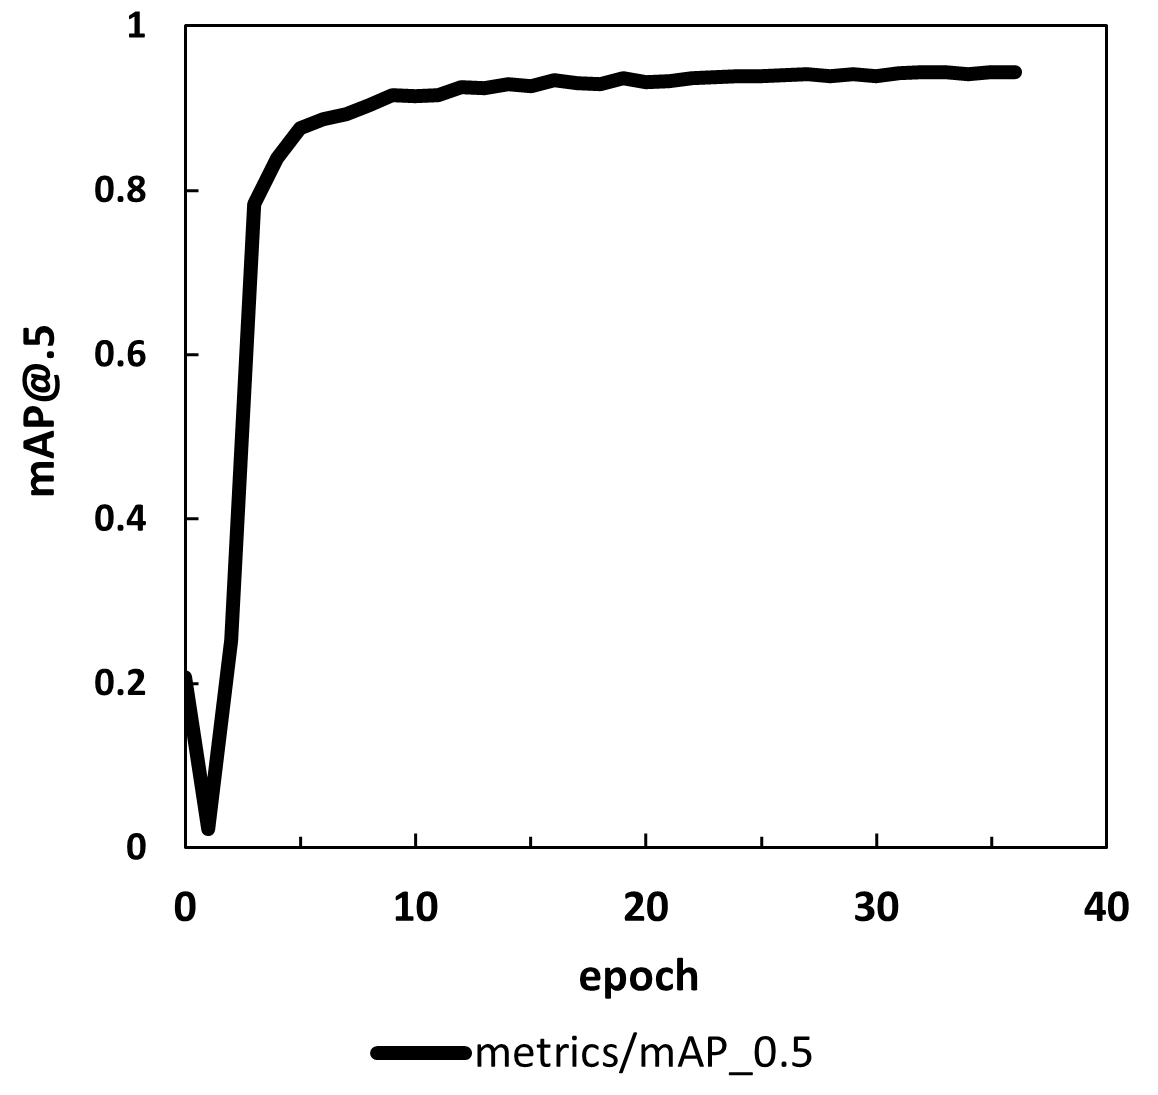

上記のグラフはYOLOv5が生成するデータをもとに作成しています。
(左)最終的なmAP@.5が0.944でした。
(右)順調に学習が進んでいました。
5.4 推論
学習させたモデルをもとに画像の推論を行います。
!python detect.py --source /content/drive/MyDrive/kaggle/wheat/test/ --conf 0.5 \
--weights /content/drive/MyDrive/kaggle/wheat/learnig_log/exp/weights/best.pt --save-conf --save-txt
(検出例)
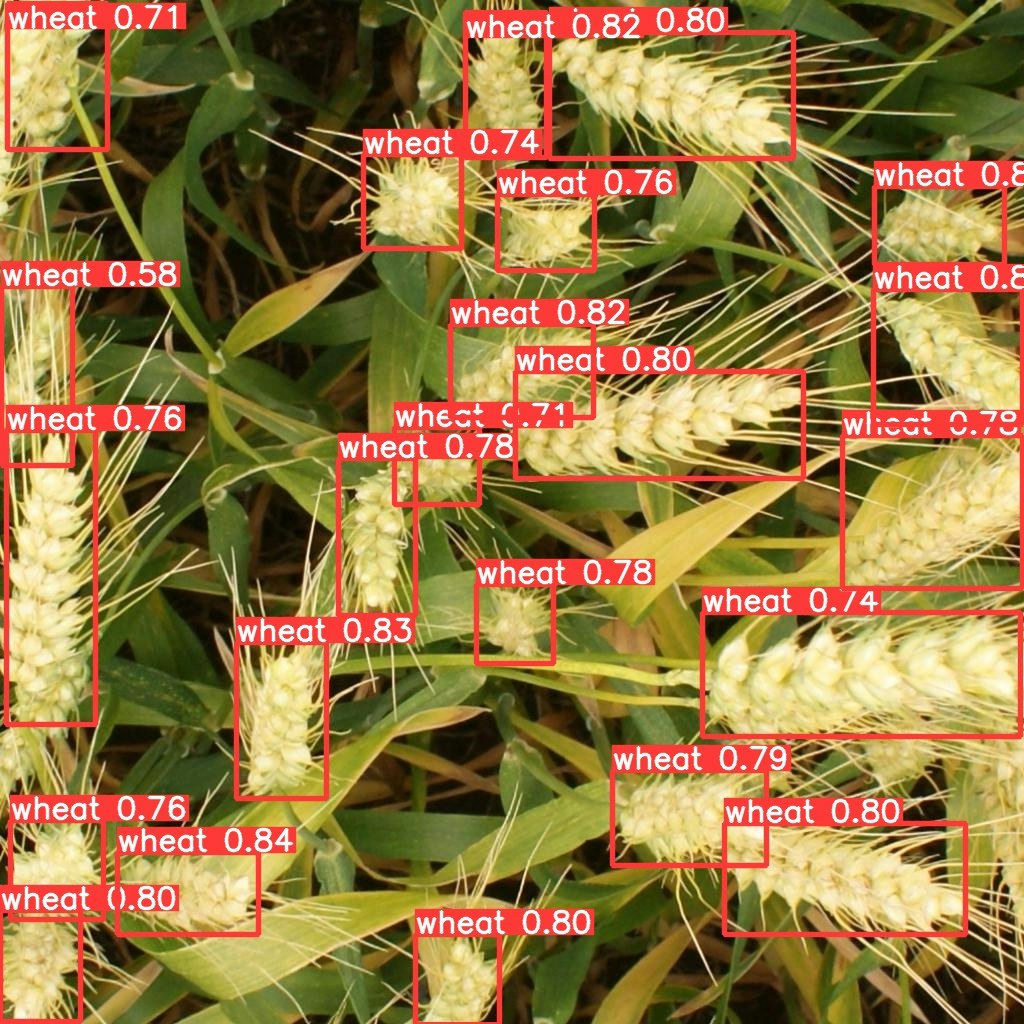
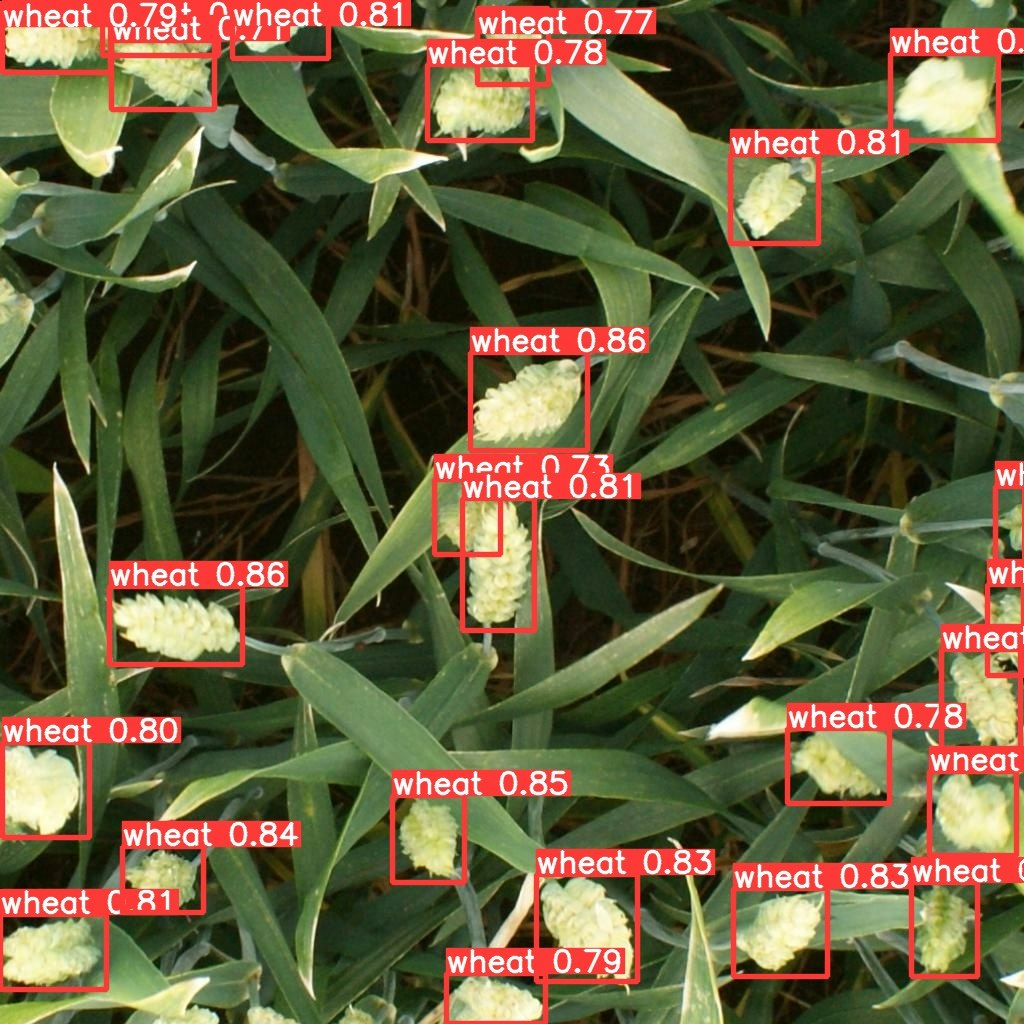
しっかり小麦の穂の部分を検出できていますね。
重なっている部分についても問題なく検出しています。
5.5 提出用ファイルの作成
4.3で行った変換を逆に行います。
test_imgs = os.listdir("/content/drive/MyDrive/kaggle/wheat/test")
predict_bboxs = []
test_ids = []
img_width = 1024
img_height = 1024

for test_img in test_imgs:
  test_img = test_img[:-4]
  test_ids.append(test_img)
  path = f"/content/drive/MyDrive/kaggle/wheat/yolov5/runs/detect/exp/labels/{test_img}.txt"
  txt = ""

  with open(path) as f:
    for line in f:
      predictbbox_params = line.split(" ")

      x_mid_nor = float(predictbbox_params[1])
      y_mid_nor = float(predictbbox_params[2])
      width_nor = float(predictbbox_params[3])
      height_nor = float(predictbbox_params[4])
      conf = float(predictbbox_params[5])

      width = width_nor * img_width
      height = height_nor * img_height
      x_min = x_mid_nor * img_width - width/2
      y_min = y_mid_nor * img_height - height/2

      bbox_params = f"{conf} {x_min} {y_min} {width} {height} "
      txt += bbox_params

    predict_bboxs.append(txt)

predict_df = pd.DataFrame({"image_id": test_ids,
                         "PredictionString": predict_bboxs})
predict_df.to_csv("/content/drive/MyDrive/kaggle/wheat/test/submission.csv", index=False)
6. できるようになったこと(所感)
- YOLOv5における単クラス検出モデルの実装
物体検出を始めて触りましたが、検出能力の高さに驚きました。
バイオ医薬品の製造において、細胞のモニタリング(細胞数や、分化したあるいは死んだ細胞の割合を求める)に非常に有用だと思います。
検証が難しいですが、、、(法令規制的に)
7. 参考
物体検出の代表アルゴリズム YOLOシリーズを徹底解説!【AI論文解説】
YOLOv5 Tutorial - Google Colaboratory (Colab)
ColabにKaggleのデータをダウンロードする
【YOLOv5】トマトの物体検出器をつくってみた