概要
ざっくりした実装手順は下記になります。
かなり手軽に実装できました。
①Stripeのアカウントを作成
②Laravel側のStripeライブラリをインストール
③APIの決済処理を実装
④フロント側の実装
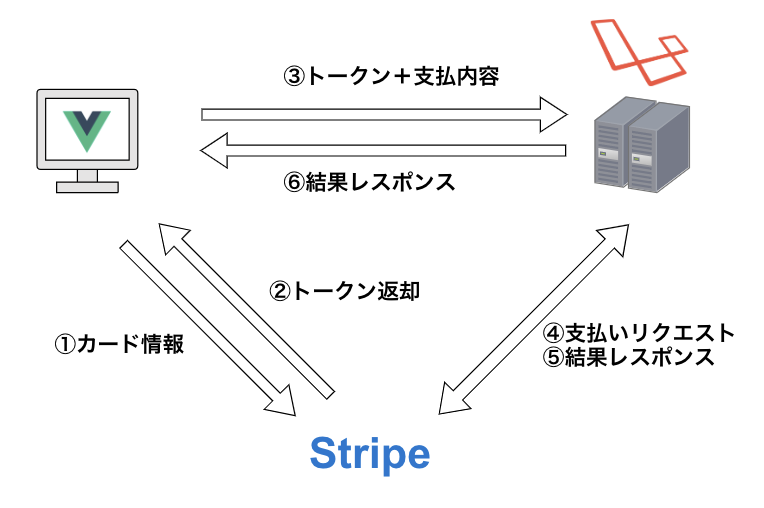
処理フロー
Stripe側にまずはカード情報を送信し、返却されたトークンと支払内容をAPIにリクエストを投げ
決済処理を実施し、処理結果を返却するという流れを行うことで
サーバ側にカード情報を持たずに決済処理を行えます。
参考
StripeCheckoutのモジュールを使用している
vue-stripe-checkout
【簡単・オシャレ】PHPでstripeの決済を導入する手順【決済システム導入】
手順
1. アカウント作成
作成するとテスト用で
公開可能キーとシークレットキーが発行されるのでAPI側でシークレットキーでVue側で公開可能キーを使用します。
2. StripeAPIライブラリをインストール
composer require stripe/stripe-php
3. API側の実装
Vue側でクレジットカード情報を入力し、クレジット情報が正しい場合tokenを発行されるので
API側でそのtokenを使用して決済処理を実行する
public function pay(Request $request)
    {
        // Set your secret key: remember to change this to your live secret key in production
        // See your keys here: https://dashboard.stripe.com/account/apikeys
        Stripe::setApiKey('sk_test_XXXXXXXXXXXXXXXXXXXXXXXX');

        try {
            // Token is created using Checkout or Elements!
            // Get the payment token ID submitted by the form:
            $token = $request->input('stripeToken');
            $charge = Charge::create([
                'amount' => $request->input('amount'),
                'currency' => 'jpy',
                'description' => 'Example charge',
                'source' => $token,
            ]);
        }catch (Stripe\Error\Card $e){
            // 決済に失敗したらエラーメッセージを返す
            return response()->json([
                'success' => false,
                'errors' => $e->getMessage()
            ], 422);
        }

        $user_wallet = $this->exchange->cashExchange($request);

        return response()->json([
            'success' => true,
            'data' => $user_wallet,
            'message' => '現金からポイントに換金が完了しました'
        ], 200);

    }
4. フロント側の実装
vue-stripe-checkoutをインストール
※現在(2019/9/1時点)最新でベータ版がリリースされてるが任意の金額でチェックアウトする機能がまだ未実装のため下記のバージョンを指定している
またアップデート版で金額指定できるようになったら記事にしたいと思います。
npm install vue-stripe-checkout@1.2.6 --save
プラグインを作成する
import Vue from 'vue'
import VueStripeCheckout from 'vue-stripe-checkout'

Vue.use(VueStripeCheckout, process.env.STRIPE_PUBLIC_KEY)
Vueのテンプレート側
クレジット決済したい画面で<vue-stripe-checkout>
<template>
  <div class="container">
    <h2 class="title is-4">クレジットで換金</h2>
    <!-- 入金額 -->
    <div class="field">
      <p class="control has-icons-left has-icons-right">
        <input
          v-model.number="amount"
          class="input is-medium"
          :class="{ 'is-danger': errors.amount }"
          type="number"
          placeholder="入金額"
        />
        <span class="icon is-small is-left">
          <i class="fas fa-yen-sign"></i>
        </span>
      </p>
      <div class="help is-danger">
        <ul v-if="errors.amount">
          <li v-for="msg in errors.amount" :key="msg">
            {{ msg }}
          </li>
        </ul>
      </div>
    </div>
    <div class="field">
      <b-field label="">
        <p>{{ current_time }} 現在</p>
      </b-field>
    </div>
    <div class="field">
      <b-field label="換金レート">
        <p>
          1000円 ⇔
          {{
            Math.floor(
              1000 *
                currency_date.credit_payment *
                currency_date.cash_rate *
                currency_date.cash_exchange
            )
          }}ポイント
        </p>
      </b-field>
    </div>
    <div class="field">
      <b-field label="購入ポイント">
        <p>
          {{
            Math.floor(
              amount *
                currency_date.credit_payment *
                currency_date.cash_rate *
                currency_date.cash_exchange
            )
          }}ポイントへ変換
        </p>
      </b-field>
    </div>

    <vue-stripe-checkout
      ref="checkoutRef"
      :name="name"
      :description="description"
      :currency="currency"
      :amount="amount"
      :locale="locale"
      :panel-label="label"
      :allow-remember-me="true"
      @done="done"
      @opened="opened"
      @closed="closed"
      @canceled="canceled"
    ></vue-stripe-checkout>

    <div class="field-button">
      <input
        class="button is-blue is-large is-fullwidth"
        value="OK"
        @click="stripeCheckout"
      />
    </div>
  </div>
</template>
スクリプト側
vue-stripe-checkout側でクレジット情報を入力し、成功したらtokenが発行されるので
それをAPI側にリクエストを投げます。
data() {
    return {
      name: 'Guild',
      description: 'カード情報を入力してください。',
      currency: 'JPY',
      label: 'カード支払い',
      locale: 'ja',
      amount: 0,
      current_time: this.$moment().format('YYYY/MM/DD HH:mm:ss'),
      currency_date: {},
      form: {
        user_id: '',
        currency_id: '',
        payment: 0,
        stripeToken: ''
      }
    }
  },
  async asyncData({ app, store }) {
    const { data } = await app.$axios.get(
      `/api/user/currency/${store.getters['event_info/currency']}`
    )
    return { currency_date: data.data[0] }
  },
  methods: {
    async stripeCheckout() {
      // this.$checkout.close()
      // is also available.
      // token - is the token object
      // args - is an object containing the billing and shipping address if enabled
      await this.$refs.checkoutRef.open()
    },
    async done({ token, args }) {
      // token - is the token object
      // args - is an object containing the billing and shipping address if enabled
      // do stuff...

      this.form.user_id = this.$nuxt.$auth.user.id
      this.form.currency_id = this.currencyId
      this.form.payment = this.amount
      this.form.stripeToken = token.id

      await this.$axios
        .$post('/api/user/wallet/pay', this.form)
        .then(data => {
          this.$router.push('/client/payment/thanks')
        })
        .catch(errors => {
          alert(JSON.stringify(errors))
        })
    },
    opened() {
      // do stuff
    },
    closed() {
      // do stuff
    },
    canceled() {
      // do stuff
    }
  }
