びっくりするほど簡単だったのでメモ
環境
Windows10 Fall Creator Update (1709)
1.前半戦
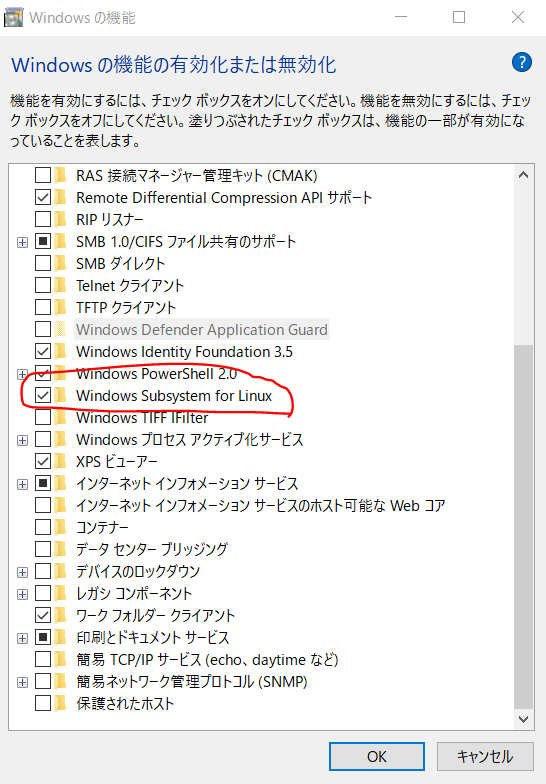
1-1.Windows Subsystem for Linux(WSL)を有効にする

1-2.Microsoft StoreからUbuntuをインストールする

1-3.Ubuntu起動 ⇒ ユーザー登録
1-4.Ubuntuバージョンチェック
cat /etc/os-release を実行してみる
Ubuntuバージョンチェック
xxx@yyyy:$ cat /etc/os-release
NAME="Ubuntu"
VERSION="16.04.4 LTS (Xenial Xerus)"
ID=ubuntu
ID_LIKE=debian
PRETTY_NAME="Ubuntu 16.04.4 LTS"
VERSION_ID="16.04"
HOME_URL="http://www.ubuntu.com/"
SUPPORT_URL="http://help.ubuntu.com/"
BUG_REPORT_URL="http://bugs.launchpad.net/ubuntu/"
VERSION_CODENAME=xenial
UBUNTU_CODENAME=xenial
1-5.Pythonバージョンチェック
Pythonは最初から入っているのでホントにいるかどうか python --version してみる
Pythonバージョンチェック
xxx@yyyy:$ python --version
The program 'python' can be found in the following packages:
 * python-minimal
 * python3
Try: sudo apt install <selected package>
※pythonは python-minimal、python3 が入っているので、それ以外を入れたかったら sudo apt install しろ、という意味
1-6.パッケージを管理しているDBを更新して、最新の状態にする
sudo apt-get update する
apt-get_update
xxx@yyyy:$ sudo apt-get update
Hit:1 http://archive.ubuntu.com/ubuntu xenial InRelease
Get:2 http://archive.ubuntu.com/ubuntu xenial-updates InRelease [109 kB]
Get:3 http://security.ubuntu.com/ubuntu xenial-security InRelease [107 kB]
・・・
Fetched 15.7 MB in 1min 14s (212 kB/s)
Reading package lists... Done
1-7.pip3なるものをインストール
- pipとはpythonのライブラリをインストールするコマンド
- Python3のpipはpip3というらしい
- とりあえず sudo apt-get install python3-pip とやればよい
pip3インストール
xxx@yyyy:$ sudo apt-get install python3-pip
Reading package lists... Done
Building dependency tree
Reading state information... Done
Setting up python3-wheel (0.29.0-1) ...
・・・
Processing triggers for libc-bin (2.23-0ubuntu10) ...
1-8.pip3がちゃんとはいったのか確認する
which pip3 してみる ⇒ どこにあるか表示されればOK
pip3がちゃんとはいったのか確認
xxx@yyyy:$ which pip3
/usr/bin/pip3
1-9.tweepyインストール
- sudo pip3 install tweepy するだけ
- tweepyとはPythonでTwitterを扱うライブラリである ⇒ tweepy
tweepyインストール
xxx@yyyy:$ sudo pip3 install tweepy
・・・
Successfully installed PySocks-1.6.8 certifi-2018.4.16 chardet-3.0.4 idna-2.6 requests-2.18.4 requests-oauthlib-1.0.0 tweepy-3.6.0 urllib3-1.22
ひとやすみ
ここまでで、ひとまず必要なものは入った。15分くらいでできちゃう感じ。
2.後半戦
2-1.Twitterの開発者登録をする
- ちょっとめんどくさいがチャッチャとやればすぐ
- ここでやります
- Twitter REST APIの使い方あたりを参考にしましょう
- 以下の情報がGetできればOk
- consumer_key
- consumer_secret
- access_token
- access_token_secret
2-2.フォローしているユーザーをCSV出力するスクリプトを作成
- ubuntuでは書きにくいのでWindows上で作成して保存
- 保存場所=C:\work
- ファイル名=twexport.py
以下コードの consumer_key、consumer_secret、access_token、access_token_secret はさっきGetしたものにおきかえるべし
twexport.py
# !/usr/bin/python

import tweepy

# ログイン設定
twitter_conf = {
    'consumer' : {
        'key'    : "consumer_key", ← おきかえるべし
        'secret' : "consumer_secret" ← おきかえるべし
    },
    'access'   : {
        'key'    : "access_key", ← おきかえるべし
        'secret' : "access_secret" ← おきかえるべし
    }
}

# 認証
auth = tweepy.OAuthHandler(
    twitter_conf['consumer']['key'],
    twitter_conf['consumer']['secret'])
auth.set_access_token(
    twitter_conf['access']['key'],
    twitter_conf['access']['secret'])

# tweepy初期化
api = tweepy.API(auth)
my_info = api.me()

friends_ids = []
# フォローした人のIDを全取得
# Cursor使うとすべて取ってきてくれるが,配列ではなくなるので配列に入れる
for friend_id in tweepy.Cursor(api.friends_ids, user_id=my_info.id).items():
    friends_ids.append(friend_id)

# 100IDsずつに詳細取得
f = open('twex.csv', 'w') # 書き込みモードで開く
for i in range(0, len(friends_ids), 100):
    for user in api.lookup_users(user_ids=friends_ids[i:i+100]):
        print(user.id_str+","+user.name+","+user.screen_name)
        f.write(user.id_str+","+user.name+","+user.screen_name+"\r\n") # 引数の文字列をファイルに書き込む
f.close() # ファイルを閉じる
※tweepy で フォローした人をリストアップする を参考にし、ちょっと修正した。
2-3.スクリプトファイルtwexport.pyをUbuntuに持ってくる
- Ubuntu上でcpコマンドでOK
- 構文=cp コピー元 コピー先、で、WSLのUbuntuにとって ホストWindowsのCドライブは /mnt/c で参照できる。(最初からマウントされている)
- したがってUbuntuからWindowsの C:\work\twexport.py を参照する場合は mnt/c/work/twexport.py でOK
- コピー先は自分のホームディレクトリを指定しましょう。以下例ではyyyyとしています。
Windowsからtwexport.pyをコピー
xxx@yyyy:$ cp /mnt/c/work/twexport.py /home/yyyy
xxx@yyyy:~ ls
twexport.py
↑ちゃんとコピーされている
2-4.スクリプト実行
twexport.py実行
xxx@yyyy:$ python3 twexport.py
368660682,connpass,connpass_jp
3233294922,MAMORIO,mamorio_jp
2795402916,Authlete, Inc.,authlete
2373589484,松本ひで吉*犬と猫とねこ色単行本6/13発売,hidekiccan
- こんな感じで自分がフォローしているユーザーの情報が出ればOk
- 形式 id,name,screen_name
- 表示している情報がそのまま twex.csv というファイル名で作成されているはずです
2-5.エクスポートされたファイルをWindowsに転送
Windowsにtwex.csvをコピー
xxx@yyyy:$ ls twex.csv
twex.csv
xxx@yyyy:$ cp twex.csv /mnt/c/work