はじめに
- これは個人的なメモである。
- ゼロから作るDeep Learning を読んだが全く理解できない。
- とりあえず、サンプルプログラムを実行してみるが、それでも理解できない。
- サンプルプログラムを書き換えまくって、どうにか理解しようとしてみた。
参考
※今回は 4.5 学習アルゴリズムの実装 のメモ
元となるサンプルソース を書き換えまくって実行してみている。
環境
- OS=Windows10
- Python=Anaconda for WIndows->Python 3.6.5 :: Anaconda, Inc.
- Editor=Visual Studio Code 1.25.1
train_neuralnet.py を読む
元となるサンプルソースでやっていること
- 数字が書かれた画像データと、数字(正解ラベル)を大量に読み込んで、学習させる
- 学習させたパラメータで画像認識テストをする、画像認識テストは学習用とは別のデータをつかう
- 認識用のパラメータは学習前の初期値は ランダム を設定
- 学習処理で、認識率は90%を超える→ 驚
ソースを書き換えて確認したこと
- 数字が書かれた画像データと、数字(正解ラベル)を画面表示してみてみる
- 認識結果を画面表示する
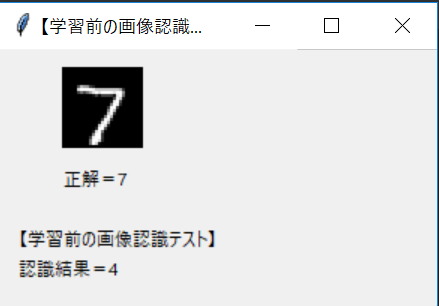
- 学習前の画像認識結果を画面に表示して、間違いが多いことを確認する
※下画像は正解=7、認識結果=4。学習前は全然認識できない。

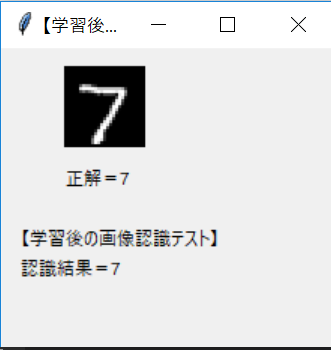
- 学習後の画像認識結果を画面に表示して、間違いが少ないことを確認する → 確かに学習していることが分かったけど・・・
※下画像は正解=7、認識結果=7。ちゃんと認識できるようになっている。

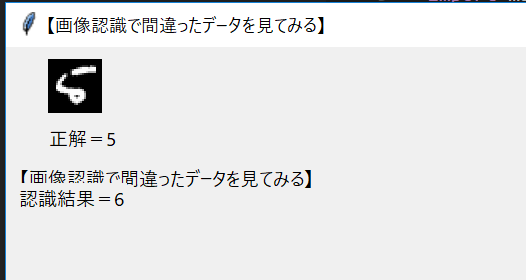
- 学習後に認識を誤った画像を画面に表示してみる
※下画像は正解=5、認識結果=6。さすがにこれは難しいだろう。

- 結局、内部の重要な処理は理解できず(悲
理解したこと
- 学習したり、認識したりする処理は おまじない としてあきらめることにした → 使い方がわかればよかろう
- numpyの使い方が分かった
- PILの使い方が分かった
- tkinterの使い方が分かった
- matplotlibはデフォルトで日本語が表示できないので、Qiita:matplotlibで日本語 を参考にしてフォントをインストールしよう→キャッシュの削除もしないとダメよ(記事を最後まで読まずハマった)
- 学習には大量の学習データが必要になる
- 学習で精度90%超えるのに1分もかからない
- 認識精度は100%にはなっていない
- 画像認識とか学習で今回数字を認識しているが、これと同じようなロジックでなんでも学習させることができるのでは
- それにしてもニューラルネットワークの学習というのは、すごい技術である!
書き換えまくったtrain_neuralnet.pyを自分用のメモとして残す
train_neuralnet_gebo.py
# coding: utf-8
import sys, os
sys.path.append(os.curdir)
import numpy as np
import matplotlib.pyplot as plt
plt.rcParams['font.family'] = 'IPAPGothic' #全体のフォントを設定
plt.rcParams["figure.figsize"] = [20, 12] # グラフのサイズを指定
plt.rcParams['font.size'] = 20 #フォントサイズを設定 default : 12
plt.rcParams['xtick.labelsize'] = 15 # 横軸のフォントサイズ
plt.rcParams['ytick.labelsize'] = 15 # 縦軸のフォントサイズ

from dataset.mnist import load_mnist
from two_layer_net import TwoLayerNet
from PIL import Image,ImageTk
import tkinter as Tkinter
from tkinter import Tk

# load_mnist()からとってきた正解ラベルを数値に変換する
def conv_from_mnistlabel_to_num(labeldata):
    # textdataは正解ラベルだが、10個の配列になっていて正解のインデックスに1が立っている
    index = labeldata.tolist().index(1)
    return(index)

# load_mnist()からとってきた画像データをPILのimageに変換する
def conv_from_mnistimage_to_pilimage(imgdata):
    #imgdataは画像データだが28*28の1次元配列
    #print(imgdata.ndim)            # 1
    #print(imgdata.shape)           # (784,)

    img = imgdata.reshape(28, 28)   # 形状を元の画像サイズに変形
    img = img*255                   # ノーマライズされているのを元に戻す
    #print(img.ndim)                # 2
    #print(img.shape)               # (28, 28)

    # PIL用のイメージobjectに変換する
    pil_img = Image.fromarray(np.uint8(img))

    # 少しおおきくしてみやすくする。引数はタプルで渡すのでこんな指定(これでハマりそう)
    pil_img = pil_img.resize((56, 56))

    return(pil_img)

# 画像データと正解ラベルを画面に表示する
def show_img_and_label(title,pil_img,numlabel,predict_ans):

    #ダイアログ
    root = Tk()
    root.title(title)
    root.geometry("400x300")

    canvas = Tkinter.Canvas(
                    root,
                    width = pil_img.width,      # 幅を設定
                    height = pil_img.height,    # 高さを設定
                    relief=Tkinter.RIDGE,       # 枠線を表示
                    bd=0                        # 枠線の幅を設定
                )
    canvas.place(x=40, y=10)                    # メインウィンドウ上に配置

    pimg = ImageTk.PhotoImage(pil_img)          # 表示するイメージを用意
    canvas.create_image(                        # キャンバス上にイメージを配置
            0,                                  # x座標
            0,                                  # y座標
            image = pimg,                       # 配置するイメージオブジェクトを指定
            anchor = Tkinter.NW                 # 配置の起点となる位置を左上隅に指定
        )

    Tkinter.Label(root,text="正解=" + str(numlabel)).place(x=40,y=20+pil_img.height)
    Tkinter.Label(root,text=title).place(x=10,y=60+pil_img.height)
    Tkinter.Label(root,text="認識結果=" + str(predict_ans)).place(x=10,y=80+pil_img.height)

    root.mainloop()


# 画像認識して結果を画面表示する
def test_predict(title,x_test,t_test,testcount,dispngonly):

    for idx,elm in enumerate(x_test):
        # x_test[idx]の画像を認識する
        predict_ansarray = network.predict(x_test[idx])
        predict_ans = np.argmax(predict_ansarray)

        dispflg=True
        if( dispngonly == True):
            if( predict_ans == conv_from_mnistlabel_to_num(t_test[idx])):
                # 正解なので表示しない
                dispflg = False

        if( dispflg == True):
            # 画面表示する
            show_img_and_label(
                    title,
                    conv_from_mnistimage_to_pilimage(x_test[idx]),  # 画像データ
                    conv_from_mnistlabel_to_num(t_test[idx]),       # 正解値
                    predict_ans                                     # 認識結果
                    )

        if idx+1 >= testcount:
            break


# ■■■■■■■ ここからmain

# データの読み込み
# x_train   =トレーニング用画像
# t_train   =トレーニング用正解ラベル
# x_test    =テスト用画像
# t_test    =テスト用正解ラベル
(x_train, t_train), (x_test, t_test) = load_mnist(normalize=True, one_hot_label=True)

# 学習&認識のクラス初期化
# input_size = 入力層のニューロンの数(入力画像が28 × 28 の784 ピクセル)
# hidden_size = 隠れ層のニューロンの数(適当な値でよい???)
# output_size = 出力層のニューロンの数(画像の認識結果の分類数-0~9のいずれかになるので10種類)
network = TwoLayerNet(input_size=784, hidden_size=50, output_size=10)

# 学習前の画像認識テスト
test_predict("【学習前の画像認識テスト】",x_test,t_test,5,True)

# 学習パラメータ
iters_num = 10000  # 学習回数

train_size = x_train.shape[0]
batch_size = 100
learning_rate = 0.1     # 学習率

train_loss_list = []
train_acc_list = []
test_acc_list = []

iter_per_epoch = int(max(train_size / batch_size, 1))

# 学習開始
print("# 学習開始:繰り返し回数="+str(iters_num)+"回"+":学習率="+str(learning_rate))

for i in range(iters_num):

    # 【トレーニングするデータを100件取り出す】
    # 最大値をtrain_size(=60000)として、ランダムな整数をbatch_size(=100)生成して1次元配列で返す
    # →batch_maskは要素100個のintの配列となり、値は0~60000の値(インデックス)
    # choiceの第1引数にintを渡すといういう動きをするらしい
    batch_mask = np.random.choice(train_size, batch_size)
    #print(batch_mask.ndim)
    #print(batch_mask.shape)

    # x_train(=60000×784の配列)からbatch_maskのインデックスの要素を取り出す
    # batch_maskがintの配列であることがミソ
    # これで、x_batchは100×784 になる
    x_batch = x_train[batch_mask]
    t_batch = t_train[batch_mask]

    # x_batchは28×28の画像データ
    # t_batchはその画像データの数字
    # 試しに表示してみる
    # show_img_and_label(x_batch[0],t_batch[0])

    # 【トレーニング】
    # 勾配の計算
    #grad = network.numerical_gradient(x_batch, t_batch)
    grad = network.gradient(x_batch, t_batch)

    # Degug 勾配の計算結果
    #print("勾配の計算結果-W1")
    #print(grad['W1'].ndim)
    #print(grad['W1'].shape)
    #print("勾配の計算結果-b1")
    #print(grad['b1'].ndim)
    #print(grad['b1'].shape)
    #print("勾配の計算結果-W2")
    #print(grad['W2'].ndim)
    #print(grad['W2'].shape)
    #print("勾配の計算結果-b2")
    #print(grad['b2'].ndim)
    #print(grad['b2'].shape)

    # トレーニングした勾配値でparamsを更新する
    # 【勾配法による学習-ここで学習率を使う】
    # P.107 4.4.1 勾配法のところ参照 → おまじない
    for key in ('W1', 'b1', 'W2', 'b2'):
        network.params[key] -= learning_rate * grad[key]

    # 損失関数の値を求める(x_batchは画像データ、t_batchは正解ラベル)
    # loss は float型
    loss = network.loss(x_batch, t_batch)
    # リストに追加する(→つかっていない?)
    train_loss_list.append(loss)

    # iter_per_epochは600なので600回に1回ここに入る
    if i % iter_per_epoch == 0:
        print("## 学習:"+str(i)+"回目")

        # 今のparamsの状態での認識精度を求める(トレーニングデータ)
        train_acc = network.accuracy(x_train, t_train)
        print("### トレーニングデータでの認識テスト:精度="+str(int(train_acc*100))+"%")

        # リストに追加(プロット用)
        #train_acc_list.append(train_acc)
        train_acc_list.append(int(train_acc*100))

        test_acc = network.accuracy(x_test, t_test)
        print("### テストデータでの認識テスト:精度="+str(int(test_acc*100))+"%")

        # リストに追加(プロット用)
        #test_acc_list.append(test_acc)
        test_acc_list.append(int(test_acc*100))

print("# 学習完了")

# 学後の画像認識テスト
test_predict("【学習後の画像認識テスト】",x_test,t_test,5,False)

# グラフの描画
markers = {'train': 'o', 'test': 's'}
x = np.arange(len(train_acc_list))
x=x*iter_per_epoch
plt.plot(x, train_acc_list, label="トレーニングデータでの認識精度")
plt.plot(x, test_acc_list, label="テストデータでの認識精度", linestyle='--')
plt.xlabel("学習回数")
plt.ylabel("認識精度")
plt.ylim(0, 100)
plt.legend(loc='lower right')
plt.show()

# ちなみに、間違えるのはどんなデータ?
# 先頭100件をテストして、間違えたものだけ表示してみる
test_predict("【画像認識で間違ったデータを見てみる】",x_test,t_test,100,True)