はじめに
どうも yoshii です。
普段は趣味でアプリやサイトを作っているゴミです。
最近"即ツイートくん"というアプリを作りました。
ほんまにエグい速度でツイートできます。
結構便利なのでぜひ使ってください。
iOS
Android
今回紹介するもの
Expo で Twitter ログインする方法を説明する日本語の記事なかったので、俺がやります。
こんな感じでログインしてツイートできます。
公式サンプル
JavaScript なのとバックエンドが express なのが微妙ですが、一応 Expo から公式サンプルが提供されています。
今回のコードもこれを参考に作りました。
GitHub
コードだけ見たい人はこのリポジトリ見てください。
src/utils/datas.ts の API_KEY と API_SECRET を自分で取得したキーに置き換えると動作確認ができるはずです。
技術構成
- OS: macOS Monterey
- 言語: TypeScript
- node: v16.15.0
- パッケージマネージャ: yarn
- フレームワーク:
- バックエンド: NestJS
- モバイルアプリ: React Native (Expo)
前提条件
Twitter Developer Account
Twitter Developer ページ から Developer account を取得しておいてください。
Twitter 連携アプリを作る時は絶対に必要になるので持っておきましょう。
以下の記事なんかを参考に必要事項を英語で入力して承認されたら Twitter API を使えるようになります。
正直、この審査は運ゲーな気がしています。頑張ってください。
Twitter APIキーを取得
上述した Twitter Developer ページ から Twitter アプリを作成し、APIキーを取得してください。
v1.1 しか使わないです。
Nest CLI の導入
以下の公式ドキュメントの通り Nest CLI を入れておきましょう。
Expo CLI の導入から環境構築まで
以下の公式ドキュメントの通り Expo CLI を入れておきましょう。
あとは Xcode 入れたりして、テンプレートプロジェクトをシミュレーターで起動し動作確認できるようにしましょう。
割と面倒な気がするので、こういう賢い人が書いた記事を読みましょう。
ログイン機能の作成
Twitter APIの認証設定
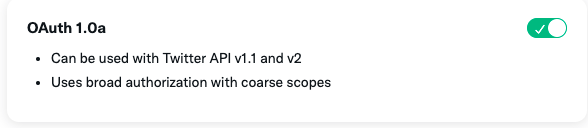
Twitter Developer ページ のアプリの設定の User authentication settings からログインできるようにしておきましょう。
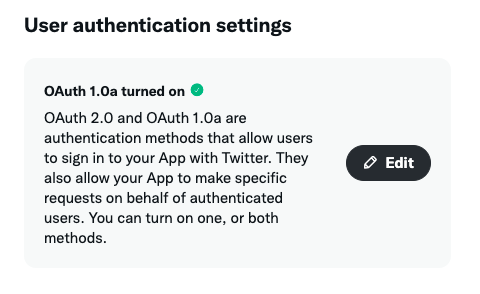
Editを押して、 OAuth 1.0a を有効にします。
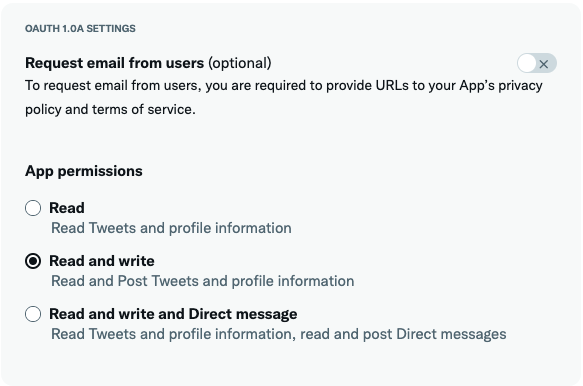
次に、Read and write の権限を追加します。
次に、コールバックURLを設定します。
以下の4つを設定します。
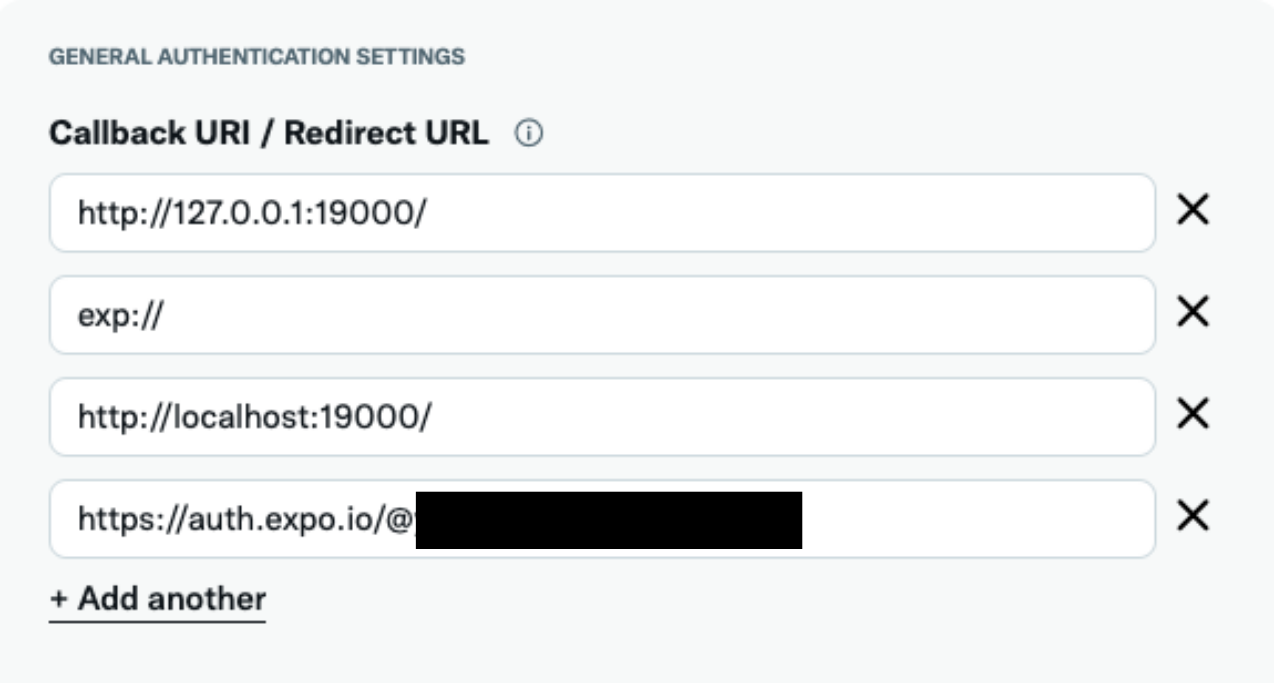
http://127.0.0.1:19000/exp://http://localhost:19000/https://auth.expo.io/@{Expo のユーザーID}/{slug}
4つ目は expo login しているアカウントのユーザーIDと、 app.json の slug が必要です。
よくわからない時は、 後で出てくる makeRedirectUri 関数で生成されるURLを入力すればOKです。
Website URL は今回サンプルなので適当に Twitter の URL でも入れときましょう。

Nest CLI でプロジェクトを作成
以下のコマンドでプロジェクトを初期化します。
プロジェクト名は login-server とします。
nest new login-server
パッケージマネージャーを聞かれるので好きなのを選んでください。
筆者は yarn を選びます。
しばらく待つとプロジェクトができます。
プロジェクトができたら src/main.ts を編集します。
デプロイした時用です。
import { NestFactory } from '@nestjs/core';
import { AppModule } from './app.module';

async function bootstrap() {
  const app = await NestFactory.create(AppModule);
  await app.listen(process.env.PORT || 3000);
}
bootstrap();
以下のコマンドでローカルサーバーが起動します。
http://localhost:3000/ にアクセスして Hello World! って表示されるはずです。
yarn start:dev
ログイン用のエンドポイントを用意
Twitter API のラッパーは twitter-api-v2 を使います。
ライブラリのリポジトリです。
別にラッパーは好きなのを使ってくれたらいいです。 twitter-lite とかでも大丈夫です。
以下のコマンドでパッケージを入れます。
yarn add twitter-api-v2
まずは、各種トークンの情報を定数で用意します。
本来は .env とかで管理するのが良いかもしれないですが、面倒なのでこんな感じにしちゃいます。
export const appKey = {APIキー};
export const appSecret = {APIシークレット};
次に、 src/app.service.ts を以下のように編集します。
import { Injectable } from '@nestjs/common';
import { TwitterApi } from 'twitter-api-v2';
import { appKey, appSecret } from './utils/datas';

@Injectable()
export class AppService {
  getClient() {
    return new TwitterApi({
      appKey,
      appSecret,
    });
  }

  async getRequestToken(callBackUrl: string) {
    return await this.getClient().generateAuthLink(callBackUrl, {
      linkMode: 'authorize',
    });
  }

  async getAccessToken(
    access_token_key: string,
    access_token_secret: string,
    oauth_verifier: string,
  ) {
    const twitter = new TwitterApi({
      appKey,
      appSecret,
      accessToken: access_token_key,
      accessSecret: access_token_secret,
    });
    const { userId, screenName, accessToken, accessSecret } =
      await twitter.login(oauth_verifier);
    return {
      userId,
      screenName,
      accessToken,
      accessSecret,
    };
  }
}
そして、 src/app.controller.ts を編集してエンドポイントを用意します。
import { Controller, Get, Req } from '@nestjs/common';
import { AppService } from './app.service';
import { Request } from 'express';

@Controller()
export class AppController {
  constructor(private readonly appService: AppService) {}

  @Get('request-token')
  async getRequestToken(@Req() request: Request) {
    const { callback_url } = request.query;
    if (!callback_url) return null;
    return this.appService.getRequestToken(callback_url as string);
  }

  @Get('access-token')
  async getAccessToken(@Req() request: Request) {
    const { oauth_token, oauth_token_secret, oauth_verifier } = request.query;
    return await this.appService.getAccessToken(
      oauth_token as string,
      oauth_token_secret as string,
      oauth_verifier as string,
    );
  }
}
コードの簡単な説明をすると、まず http://localhost:3000/request-token に GET リクエストを送信することで、ログイン画面を表示するためのトークンが取得できます。
このトークンを使ってアプリ側でログイン画面からログインして得られる oauth_verifier を使って http://localhost:3000/request-token に GET リクエストを送信することで、アクセストークンを取得できるという流れです。
このアクセストークンを使うことでそのユーザーの権限で Twitter API を使えるというわけです。
例えば、 Twitter API で鍵垢のツイートを取得する際、そのアカウントをフォローしてる Twitter アカウントでログインして取得したアクセストークンじゃないと権限がなくてエラーになるって感じです。
Expoでアプリを作成
アプリの初期化
以下のコマンドでプロジェクトを初期化します。名前は login-app にします。
expo init login-app
なんか選ばされるんで、以下を選びます。
❯ blank (TypeScript) same as blank but with TypeScript configuration
しばらく待つとプロジェクトができます。
以下のコマンドで勝手にブラウザが開きます。
cd sample-expo-login/
yarn start
著者は iOS 派なので iOS シミュレータで開きます。
さっきブラウザで開いた画面から Run on iOS simulator っていうボタンを押してしばらく待ちます。
こんな感じの画面が出てきたら成功です。

ログイン機能を追加
HTTPクライアントは ky を使います。
ky のリポジトリです。
以下のコマンドでインストールしましょう。
expo install ky
これは好きなやつでいいです。 axios でも、デフォルトの fetch でも大丈夫です。
以下のコマンドで expo-auth-session も入れます。
expo install expo-auth-session
まず、エンドポイントを定数で用意します。
さっき NestJS で作ったやつですね。
const API_BASE_URL = "http://localhost:3000/";

export const API_REQUEST_TOKEN_URL = `${API_BASE_URL}request-token`;
export const API_ACCESS_TOKEN_URL = `${API_BASE_URL}access-token`;

export const AUTH_ENDPOINT = "https://api.twitter.com/oauth/authorize";
適当に API のレスポンスの型を定義しときます。
export type AuthResult = {
  authentication: TokenResponse | null;
  error?: AuthError | null;
  errorCode: string | null;
  params: {
    [key: string]: string;
  };
  type: "error" | "success";
  url: string;
};

export type RequestToken = {
  url: string;
  oauth_token: string;
  oauth_token_secret: string;
  oauth_callback_confirmed: string;
};

export type AccountInformation = {
  userId: string;
  accessToken: string;
  accessSecret: string;
  photoUrl: string;
  screenName: string;
};
次に、ログインの処理 twitterLogin を作成します。
成功したら userId とか accessToken とかの情報を返却して、エラーが起きたら undefined を返却する関数です。
makeRedirectUri 関数でさっきのコールバックURLを作成しています。
さっきわからなかった人は、ここで作られたURLをconsole.logとかして見てみましょう。
import { Platform } from "react-native";
import { makeRedirectUri, startAsync } from "expo-auth-session";
import {
  API_ACCESS_TOKEN_URL,
  API_REQUEST_TOKEN_URL,
  AUTH_ENDPOINT,
} from "../utils/endpoints";
import { AccountInformation, AuthResult, RequestToken } from "../types";
import ky from "ky";

export const toQueryString = (params: any) =>
  "?" +
  Object.entries(params)
    .map(
      ([key, value]) =>
        `${encodeURIComponent(key)}=${encodeURIComponent(value as any)}`
    )
    .join("&");

export const twitterLogin = async () => {
  try {
    const useProxy = Platform.select({ default: true, web: false });
    const redirect = makeRedirectUri({ useProxy });
    const requestRes = await ky(
      `${API_REQUEST_TOKEN_URL}${toQueryString({
        callback_url: redirect,
      })}`,
      {
        method: "GET",
      }
    );
    const tokens = (await requestRes.json()) as RequestToken;
    const authResponse = await startAsync({
      authUrl: `${AUTH_ENDPOINT}${toQueryString(tokens)}`,
    });
    if (
      authResponse.type === "cancel" ||
      authResponse.type === "locked" ||
      authResponse.type === "error"
    )
      throw new Error("cancel auth");
    const authResponseResult = authResponse as AuthResult;
    if (authResponseResult.params && authResponseResult.params.denied)
      throw new Error("cancel auth");
    const { oauth_token, oauth_token_secret } = tokens;
    const accessRes = await ky(
      `${API_ACCESS_TOKEN_URL}${toQueryString({
        oauth_token,
        oauth_token_secret,
        oauth_verifier: authResponseResult.params.oauth_verifier,
      })}`,
      {
        method: "GET",
      }
    );
    return (await accessRes.json()) as AccountInformation;
  } catch (e) {
    console.log(e);
    return undefined;
  }
};
最後に画面を作成します。
ログインが完了したら ID とトークンが確認できます。
import { StatusBar } from "expo-status-bar";
import { useState } from "react";
import { StyleSheet, Text, TouchableOpacity, View } from "react-native";
import { twitterLogin } from "./lib/twitter";
import { AccountInformation } from "./types";

export default function App() {
  const [accountInfo, setAccountInfo] = useState<AccountInformation>();

  const onPressLoginButton = async () => {
    setAccountInfo(await twitterLogin());
  };

  return (
    <View style={styles.container}>
      <StatusBar style="auto" />
      <Text>ボタンを押してログインしてね。</Text>
      <TouchableOpacity onPress={onPressLoginButton} style={styles.button}>
        <Text style={styles.buttonLabel}>Login</Text>
      </TouchableOpacity>
      {accountInfo && (
        <View>
          <Text>{accountInfo.screenName}</Text>
          <Text>{accountInfo.accessToken}</Text>
          <Text>{accountInfo.accessSecret}</Text>
        </View>
      )}
    </View>
  );
}

const styles = StyleSheet.create({
  container: {
    flex: 1,
    backgroundColor: "#fff",
    alignItems: "center",
    justifyContent: "center",
  },
  button: {
    borderColor: "lightgray",
    borderWidth: 2,
    borderRadius: 10,
    backgroundColor: "#00acee",
    width: 200,
    height: 40,
  },
  buttonLabel: {
    color: "white",
    fontWeight: "bold",
    fontSize: 24,
    textAlign: "center",
    textAlignVertical: "center",
    lineHeight: 32,
  },
});
これでひとまずログイン機能は作成完了です!
ツイート機能の作成
ツイート用のエンドポイントを作成
NestJSプロジェクトの方でツイート用のエンドポイントを作成していきます。
まずはサービスで処理を追加します。
import { Injectable } from '@nestjs/common';
import { TwitterApi } from 'twitter-api-v2';
import { appKey, appSecret } from './utils/datas';

@Injectable()
export class AppService {
  getClient() {
    return new TwitterApi({
      appKey,
      appSecret,
    });
  }

  async getRequestToken(callBackUrl: string) {
    return await this.getClient().generateAuthLink(callBackUrl, {
      linkMode: 'authorize',
    });
  }

  async getAccessToken(
    access_token_key: string,
    access_token_secret: string,
    oauth_verifier: string,
  ) {
    const twitter = new TwitterApi({
      appKey,
      appSecret,
      accessToken: access_token_key,
      accessSecret: access_token_secret,
    });
    const { userId, screenName, accessToken, accessSecret } =
      await twitter.login(oauth_verifier);
    return {
      userId,
      screenName,
      accessToken,
      accessSecret,
    };
  }

  async postTweet(accessToken: string, accessSecret: string, text: string) {
    const twitter = new TwitterApi({
      appKey,
      appSecret,
      accessToken,
      accessSecret,
    });
    await twitter.v1.tweet(text);
  }
}
そして、コントローラーでエンドポイントを定義します。
import { Controller, Get, Post, Req } from '@nestjs/common';
import { AppService } from './app.service';
import { Request } from 'express';

@Controller()
export class AppController {
  constructor(private readonly appService: AppService) {}

  @Get('request-token')
  async getRequestToken(@Req() request: Request) {
    const { callback_url } = request.query;
    if (!callback_url) return null;
    return this.appService.getRequestToken(callback_url as string);
  }

  @Get('access-token')
  async getAccessToken(@Req() request: Request) {
    const { oauth_token, oauth_token_secret, oauth_verifier } = request.query;
    return await this.appService.getAccessToken(
      oauth_token as string,
      oauth_token_secret as string,
      oauth_verifier as string,
    );
  }

  @Post('tweet')
  async postTweet(@Req() request: Request) {
    const { accessToken, accessSecret, text } = request.body;
    await this.appService.postTweet(accessToken, accessSecret, text);
  }
}
アプリにツイート機能を追加
Expo アプリの方でツイート機能を追加していきます。
まずは utils/endpoints.ts にさっき作ったエンドポイントを追加しましょう。
const API_BASE_URL = "http://localhost:3000/";

export const API_REQUEST_TOKEN_URL = `${API_BASE_URL}request-token`;
export const API_ACCESS_TOKEN_URL = `${API_BASE_URL}access-token`;
export const API_TWEET_URL = `${API_BASE_URL}tweet`;

export const AUTH_ENDPOINT = "https://api.twitter.com/oauth/authorize";
次に、 lib/twitter.ts に postTweet 関数を作成します。
さっき作ったエンドポイントに POST リクエストを送るだけですね。
import { Platform } from "react-native";
import { makeRedirectUri, startAsync } from "expo-auth-session";
import {
  API_ACCESS_TOKEN_URL,
  API_REQUEST_TOKEN_URL,
  API_TWEET_URL,
  AUTH_ENDPOINT,
} from "../utils/endpoints";
import { AccountInformation, AuthResult, RequestToken } from "../types";
import ky from "ky";

export const toQueryString = (params: any) =>
  "?" +
  Object.entries(params)
    .map(
      ([key, value]) =>
        `${encodeURIComponent(key)}=${encodeURIComponent(value as any)}`
    )
    .join("&");

export const twitterLogin = async () => {
  try {
    const useProxy = Platform.select({ default: true, web: false });
    const redirect = makeRedirectUri({ useProxy });
    const requestRes = await ky(
      `${API_REQUEST_TOKEN_URL}${toQueryString({
        callback_url: redirect,
      })}`,
      {
        method: "GET",
      }
    );
    const tokens = (await requestRes.json()) as RequestToken;
    const authResponse = await startAsync({
      authUrl: `${AUTH_ENDPOINT}${toQueryString(tokens)}`,
    });
    if (
      authResponse.type === "cancel" ||
      authResponse.type === "locked" ||
      authResponse.type === "error"
    )
      throw new Error("cancel auth");
    const authResponseResult = authResponse as AuthResult;
    if (authResponseResult.params && authResponseResult.params.denied)
      throw new Error("cancel auth");
    const { oauth_token, oauth_token_secret } = tokens;
    const accessRes = await ky(
      `${API_ACCESS_TOKEN_URL}${toQueryString({
        oauth_token,
        oauth_token_secret,
        oauth_verifier: authResponseResult.params.oauth_verifier,
      })}`,
      {
        method: "GET",
      }
    );
    return (await accessRes.json()) as AccountInformation;
  } catch (e) {
    console.log(e);
    return undefined;
  }
};

export const postTweet = async (
  { accessToken, accessSecret }: AccountInformation,
  text: string
) => {
  await ky.post(API_TWEET_URL, {
    json: {
      accessToken,
      accessSecret,
      text,
    },
  });
};
最後に画面を作成します。
import { StatusBar } from "expo-status-bar";
import { useState } from "react";
import {
  Alert,
  StyleSheet,
  Text,
  TextInput,
  TouchableOpacity,
  View,
} from "react-native";
import { postTweet, twitterLogin } from "./lib/twitter";
import { AccountInformation } from "./types";

export default function App() {
  const [accountInfo, setAccountInfo] = useState<AccountInformation>();
  const [text, setText] = useState<string>("");

  const onPressLoginButton = async () => {
    setAccountInfo(await twitterLogin());
  };

  const onPressTweetButton = async () => {
    try {
      accountInfo && (await postTweet(accountInfo, text));
      setText("");
      Alert.alert("ツイート完了!");
    } catch (e) {
      console.log(e);
      Alert.alert("ツイート失敗...");
    }
  };

  return (
    <View style={styles.container}>
      <StatusBar style="auto" />
      {accountInfo ? (
        <View>
          <TextInput
            value={text}
            onChangeText={(value) => setText(value)}
            style={styles.input}
          />
          <TouchableOpacity onPress={onPressTweetButton} style={styles.button}>
            <Text style={styles.buttonLabel}>ツイートする</Text>
          </TouchableOpacity>
        </View>
      ) : (
        <View>
          <Text>ボタンを押してログインしてね。</Text>
          <TouchableOpacity onPress={onPressLoginButton} style={styles.button}>
            <Text style={styles.buttonLabel}>Login</Text>
          </TouchableOpacity>
        </View>
      )}
    </View>
  );
}

const styles = StyleSheet.create({
  container: {
    flex: 1,
    backgroundColor: "#fff",
    alignItems: "center",
    justifyContent: "center",
  },
  button: {
    borderColor: "lightgray",
    borderWidth: 2,
    borderRadius: 10,
    backgroundColor: "#00acee",
    width: 200,
    height: 40,
  },
  buttonLabel: {
    color: "white",
    fontWeight: "bold",
    fontSize: 24,
    textAlign: "center",
    textAlignVertical: "center",
    lineHeight: 32,
  },
  input: {
    borderWidth: 1,
    borderColor: "black",
    borderRadius: 5,
    fontSize: 18,
    padding: 2,
  },
});
これで TextInput に入力した文字をツイートできるはずです!
まとめ
Expo + NestJS で Twitter ログインする方法を丁寧に説明してみました。
わからないところとかあったらコメントで質問してください。
一緒に考えます。
あと、友達が少ないのでよかったら友達になってくれると嬉しいです…
この記事見てきたって言ってくれたらフォロー返せると思います。
それではまた〜