これは WebAssembly Advent Calendar 2017 19日目の記事です。
はじめに
この記事ではRustのプログラムをWebブラウザで動かす方法を2つご紹介します。
- asm.jsにコンパイルする方法
- WebAssembly(以下、WASM)にコンパイルする方法
事前準備
Rustコンパイラ(rustup)のインストール
$ curl https://sh.rustup.rs -sSf | sh

# 環境に合わせて .zshrc や .bashrc に以下を追記
$ source ~/.cargo/env
トラブルシューティング
先にhomebrew経由でrustをインストールしていると、下記のようなエラーが出力され、rustupのインストールに失敗します。
$ curl https://sh.rustup.rs -sSf | sh
info: downloading installer
error: it looks like you have an existing installation of Rust at:
error: /usr/local/bin
error: rustup cannot be installed alongside Rust. Please uninstall first
error: if this is what you want, restart the installation with `-y'
error: cannot install while Rust is installed
その場合は、brew uninstall --force rust でhomebrew経由のrustをアンインストールしましょう。
$ brew uninstall --force rust
Emscripten のインストール
$ git clone https://github.com/juj/emsdk.git
$ cd emsdk

# 環境に合わせて .zshrc や .bashrc に以下を追記
$ source ~/emsdk/emsdk_env.sh

# かなり重たいコンパイルが走るので注意しましょう。手元の環境では数十分かかりました。
$ ./emsdk install sdk-incoming-64bit binaryen-master-64bit

$ ./emsdk activate sdk-incoming-64bit binaryen-master-64bit
トラブルシューティング
cmakeがインストールされていないと、下記のエラーが出力されます。
[Errno 2] No such file or directory
Could not run CMake, perhaps it has not been installed?
Installing this package requires CMake. Get it via a OSX package manager (Homebrew: "brew install cmake", or MacPorts: "sudo port install cmake"), or from http://www.cmake.org/
Installation failed!
その場合は、brew install cmake しましょう。
$ brew install cmake
RustのプログラムをWebブラウザで動かす
プロジェクトの作成
まずは、cargoコマンドを使って、「Hello, world!」と出力するプロジェクトを作成します。
$ cargo new --bin hello
$ cd hello

# ファイルの中身を確認
$ cat src/main.rs
fn main() {
    println!("Hello, world!");
}

# ビルド+実行
$ cargo run
Hello, world!
このプロジェクトをWebブラウザで動かすには、asm.jsにコンパイルする方法と、WebAssembly(以下、WASM)にコンパイルする方法の2通りがあります。
それぞれ順に紹介します。
方法1:asm.jsをターゲットにビルド
# asm.jsをターゲットアーキテクチャに追加
$ rustup target add asmjs-unknown-emscripten

# asm.jsをtargetにビルド
$ cargo build --target asmjs-unknown-emscripten

# ビルドの生成物を確認
$ ls target/asmjs-unknown-emscripten/debug
build       deps        examples    hello.d     hello.js    incremental native
ams.jsをブラウザ上で動かす
プロジェクトの直下に、次のようなhtmlファイルを作りましょう。
<!DOCTYPE html>
<html>
    <head>
        <meta charset="utf-8"/>
        <title>Rust to asm.js example</title>
    </head>
    <body>
        <script src="target/asmjs-unknown-emscripten/debug/hello.js"></script>
    </body>
</html>
ローカルでHTTPサーバを立てます。これはRubyでサーバを立てる例です。
$ ruby -run -e httpd . -p 3000
http://localhost:3000/asmjs.html にブラウザでアクセスし、開発コンソールを表示しましょう。
成功すれば「Hello, world!」と表示されます。

方法2:WASMをターゲットにビルド
ターゲット名が asmjs-unknown-emscripten -> wasm32-unknown-emscripten に変わったことを除けば、asm.jsと全く同じ手順です。
# WASMをターゲットアーキテクチャに追加
$ rustup target add wasm32-unknown-emscripten

# WASMをtargetにビルド
$ cargo build --target=wasm32-unknown-emscripten

# ビルドの生成物を確認
$ ls target/wasm32-unknown-emscripten/debug
build       deps        examples    hello.d     hello.js    hello.wasm  incremental native
WASMをブラウザ上で動かす
asm.jsとほぼ同様の手順です。WASMでは次ようなhtmlを作成します。
<!DOCTYPE html>
<html>
    <head>
        <meta charset="utf-8" />
        <title>Rust to WebAssembly example</title>
    </head>
    <body>
        <script>
        var Module = {}
        fetch('target/wasm32-unknown-emscripten/debug/hello.wasm')
            .then((response) => response.arrayBuffer())
            .then((buffer) => {
                Module.wasmBinary = buffer
                var script = document.createElement('script')
                script.src = "target/wasm32-unknown-emscripten/debug/hello.js"
                document.body.appendChild(script)
            })
        </script>
    </body>
</html>
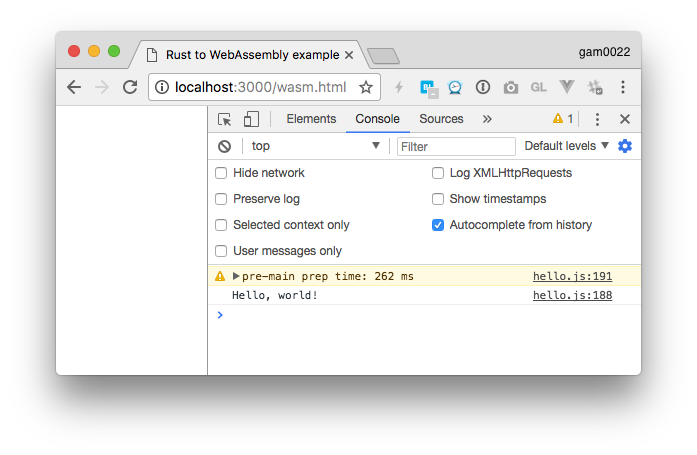
http://localhost:3000/wasm.html にブラウザでアクセスし、開発コンソールを表示しましょう。
成功すれば「Hello, world!」と表示されます。
参考記事
以下の記事を大変参考にさせていただきました。本当にありがとうございます!
次回予告
今年の秋に開催されたレイトレ合宿5‽で、Rustを使って物理ベースレンダラーを自作しました。
レイトレ合宿5‽に参加して、Rustでパストレーシングを実装しました。
— がむ😇 (@gam0022) 2017年10月1日
Rust初心者でしたが、なんとか頑張りました。
高速化の取り組みについても書いたので、ぜひ読んで下さい! #レイトレ合宿https://t.co/L2bOfQMds7
このレンダラーをぜひ多くの人に動かしてもらいたくWebに移植しようと考えたのですが、その事前調査として簡単なRustのプログラムをブラウザ上で動かすまでに試行錯誤しました。そこで、今回はその手順をまとめて記事にさせていただきました。
次回は「自作のRustによる物理ベースレンダラーをWebに移植した話」について書きたいと思います。