Gakuです。
Rails楽しいっすね。やっぱRailsだわ!と思っている今日このごろ。
ただ、どんなフレームワークを使ったとしても「認証」部分の実装でいつも消耗しちゃいますよね。
なので、今回はAuth0を使って、「サクサク」っと認証を追加する方法を備忘録程度に記載していきたいと思います。
以下のauth0の公式ドキュメントを参考に実装していきます。
https://auth0.com/docs/quickstart/backend/rails/01-authorization
また、railsの設定等は事前に済ませている前提です。
設定等のやり方がわからない方は、以前書いたこちらの記事等を参考にしてもらえると幸いです。
数年ぶりのRails入門【セットアップ編】
今回作成したコード類は以下にまとめています。よければご参照ください。
gaku3601/rails-auth0
Auth0に登録、APIを作成
まだ、Auth0に登録をしていない人は、ひとまず以下から登録しておきましょう。
Auth0
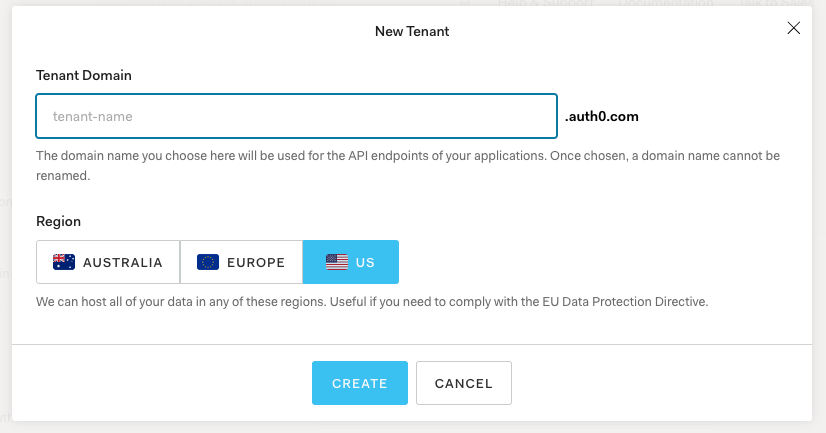
登録が完了したら、新しくTenant(Auth0はtenant単位で管理します。)を作成します。
[Tenant名].auth0.comはドメインで後ほど設定しますので、メモっておきましょう。
また、サイドメニューのAPIsからAPIを作成します。
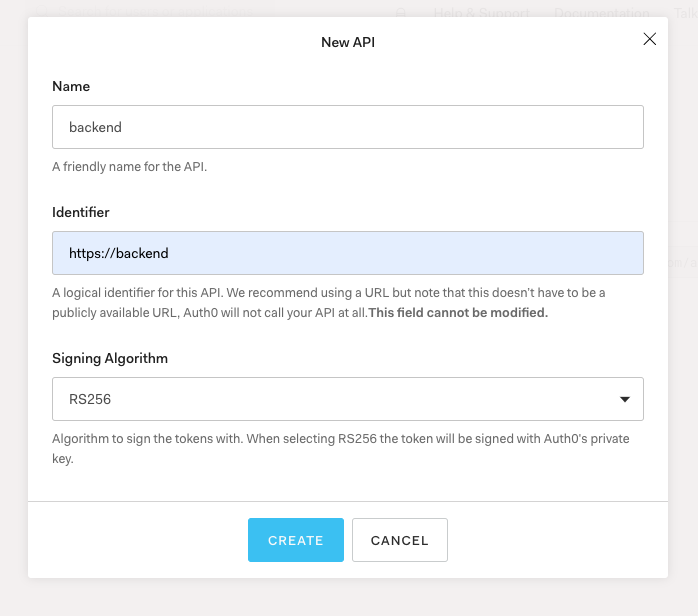
今回はnameはbackendで、Identifierは「https://backend」とし、作成しました。
Identifierで設定した値は後ほど使いますので、これもメモっておきましょう。
実装
railsに認証機能を実装していきます。
必要なGemであるjwtとdotenv-railsをGemfileに追記し、bundle installしておきます。
gem 'jwt' #追記
group :development do
  gem 'dotenv-rails' # 追記
end
lib配下にjson_web_token.rbを作成し、以下の内容で作成します。
require 'net/http'
require 'uri'

class JsonWebToken
  def self.verify(token)
    JWT.decode(token, nil,
               true, # Verify the signature of this token
               algorithm: 'RS256',
               iss: "https://#{ENV['AUTH0_DOMAIN']}/",
               verify_iss: true,
               aud: ENV['AUTH0_AUDIENCE'],
               verify_aud: true) do |header|
      jwks_hash[header['kid']]
    end
  end

  def self.jwks_hash
    jwks_raw = Net::HTTP.get URI("https://#{ENV['AUTH0_DOMAIN']}/.well-known/jwks.json")
    jwks_keys = Array(JSON.parse(jwks_raw)['keys'])
    Hash[
      jwks_keys
      .map do |k|
        [
          k['kid'],
          OpenSSL::X509::Certificate.new(
            Base64.decode64(k['x5c'].first)
          ).public_key
        ]
      end
    ]
  end
end
作成したjson_web_token.rbはinitializersとして登録しておくため、config/initializers/jwt.rbを作成します。
require 'json_web_token'
認証部分の実装をしていきます。
user modelを作成し以下のように編集。
rails g model user sub:string
class User < ApplicationRecord
    def self.from_token_payload(payload)
        find_by(sub: payload['sub']) || create!(sub: payload['sub'])
    end
end
app/controllers/concerns/secured.rbを作成し、以下のように記載します。
module Secured
    extend ActiveSupport::Concern

    SCOPES = {
      '/api/private-scoped' => ['read:messages'] # scopeが必要なrequestはこのように記載
    }

    included do
      before_action :authenticate_request!
    end

    def current_user
      @user
    end

    private

    def authenticate_request!
      @auth_payload, @auth_header = auth_token
      @user = User.from_token_payload(@auth_payload)

      render json: { errors: ['Insufficient scope'] }, status: :forbidden unless scope_included
    rescue JWT::VerificationError, JWT::DecodeError
      render json: { errors: ['Not Authenticated'] }, status: :unauthorized
    end

    def http_token
      if request.headers['Authorization'].present?
        request.headers['Authorization'].split(' ').last
      end
    end

    def auth_token
      JsonWebToken.verify(http_token)
    end

    def scope_included
      # The intersection of the scopes included in the given JWT and the ones in the SCOPES hash needed to access
      # the PATH_INFO, should contain at least one element
      if SCOPES[request.env['PATH_INFO']] == nil
        true
      else
        (String(@auth_payload['scope']).split(' ') & (SCOPES[request.env['PATH_INFO']])).any?
      end
    end
end
ここまでで、認証機能の実装は完了です。
最後にちゃんと動くか確認するため、以下ファイルを作成します。
AUTH0_DOMAIN=[Tenant名].auth0.com # さきほどメモったdomainを記述
AUTH0_AUDIENCE=https://backend # さきほどメモったIdentifierの値を記述
class PrivateController < ActionController::API
    include Secured
    def private
      render json: { message: 'Hello from a private endpoint! You need to be authenticated to see this.', user: current_user.id}
    end

    def private_scoped
      render json: { message: 'Hello from a private endpoint! You need to be authenticated and have a scope of read:messages to see this.' }
    end
end
Rails.application.routes.draw do
  get 'api/private' => 'private#private'
  get 'api/private-scoped' => 'private#private_scoped'
end
railsを起動して、api/praivate、api/private-scopedにブラウザ等でアクセスしてみましょう。
認証がないので、認証エラーが出ていれば成功です。
access token付きrequestの叩き方
認証はheaderに「Authorization: Bearer accesstoken」を仕込んでリクエストを出し、tokenが正しいものであれば正常値がサーバから返ってきます。
curlコマンドでリクエストを叩く方法もありますが、かなり面倒なので、「postman」を設定し動作確認する方法をオススメします。
ここでは多くを語りませんが、認証設定の例を画像として掲載しておきます。(書き方が独特なので、ハマりやすいので。。。)
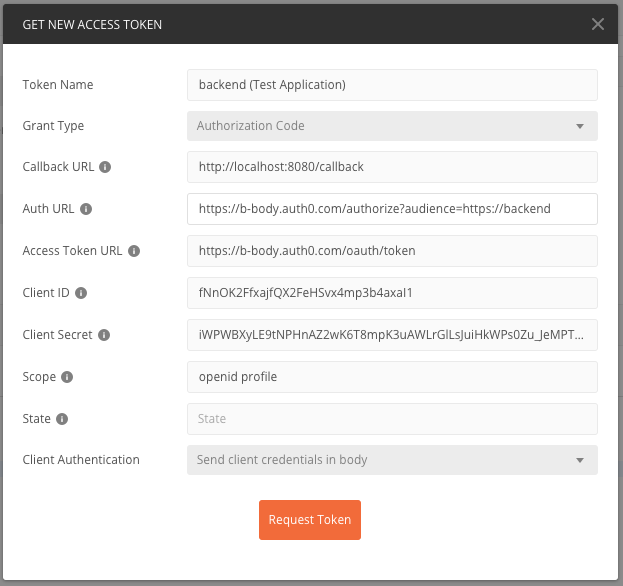
APIsを作成した際、Applicationsの方にも同じ名前でアプリケーションが作成されているので、その設定値を元に設定します。
TypeをOauth2で設定し、こんな感じで記述してあげることで、access token付きのrequestを簡単に叩けるようになるのでオススメです。
おわりに
コピペで認証付きのAPIを作成することができました。
railsでお馴染みのdeviseを使った認証機能の実装よりかは、コードも読みやすいし、精神衛生上悪くないな〜と感じています。
Auth0は無料枠もかなりあるので、基本無料でokですし興味がある方は一度触ってみるのはありなサービスかと思ってます。
それでは(´・ω・`)ノシ