【入門】はじめての Docker Desktop for Windows のインストールと CentOS の仮想環境構築のセットアップ
2019年09月にDocker version 19.03.2をベースに記述しましたが、古くなってしまったので、今回、Docker version 19.03.13をベースに修正しました。
最近では、Linuxの環境を利用したいときに 無償の Docker Desktop (for Mac and Windows ) で Linuxコンテナを使うというのがお手軽になりつつあります。
今回、Windows 10のノートPCに Doker Desktop for Windows をインストールし、CentOSの仮想環境を構築する手順について、はじめからていねいにまとめて、ご紹介します。
また、途中で Dockerコマンドなどについても詳しく説明していくので、 Docker初心者で CentOSの仮想環境を構築したいという方は、是非参考にしていただければ幸いです。
- 前提条件
- 事前準備
- Docker Desktop for Windows のインストール
- CentOS コンテナ (仮想環境) の構築
- CentOS コンテナ (仮想環境)の整備
- 作業済み CentOS コンテナ (仮想環境)の保存
なお、macOSに Doker Desktop for Mac をインストールし、CentOSの仮想環境を構築する手順については「【入門】はじめての Docker Desktop for Mac のインストールと CentOS の仮想環境構築のセットアップ」の方を参照していただければと思います。
前提条件
システム要件の詳細はこちらを参照してください。
今回のDocker Desktop for Windowsは Windows ネイティブの Hyper-V 仮想化とネットワークを使用します。Windows 10 上で Hyper-V を使用するためには、Windows 10 の Professional 以上のエディションが必要となります。Windows 10 Home で WSL2 バックエンドを使うと、インストールできます。詳細はこちらを参照願います。
なお、今回インストールしたデバイスの仕様とWindowsの仕様は次の通りです。
- プロセッサ Intel(R) COre(TM) i5-6300U CPU @ 2.40GHz 2.50DHz
- 実装RAM 8.00 GB
- システムの種類 64 ビット オペレーティング システム、x64 ベース プロセッサ-
- エディション Windows 10 Pro
事前準備
今回のDocker Desktop for Windows をインストールする事前準備として、インストールする Windows マシンの Hyper-V を有効化しておく必要があります。なお、以前はDocker公式サイトにて、Docker ID というアカウントを取得して必要がありましたが、現在は不要です。
Hyper-Vの有効化 にする
今回、Docker Desktop for Windows は Hyper-V を使用するので、無効となっている場合は有効にします。
Hyper-V を有効にするには複数の方法があります。ここでは、「コントロール パネル\すべてのコントロール パネル項目\プログラムと機能」の方法で有効化します。
[設定] で Hyper-V ロールを有効にする
- Windows ボタンを右クリックし、[アプリと機能] を選択します。
- [関連設定] の下にある [プログラムと機能] を選択します。
- [Windows の機能の有効化または無効化] を選択します。
- [Hyper-V] を選択して、[OK] をクリックします。
有効化するには Windows マシンの再起動が必要です。
Docker IDの取得 する
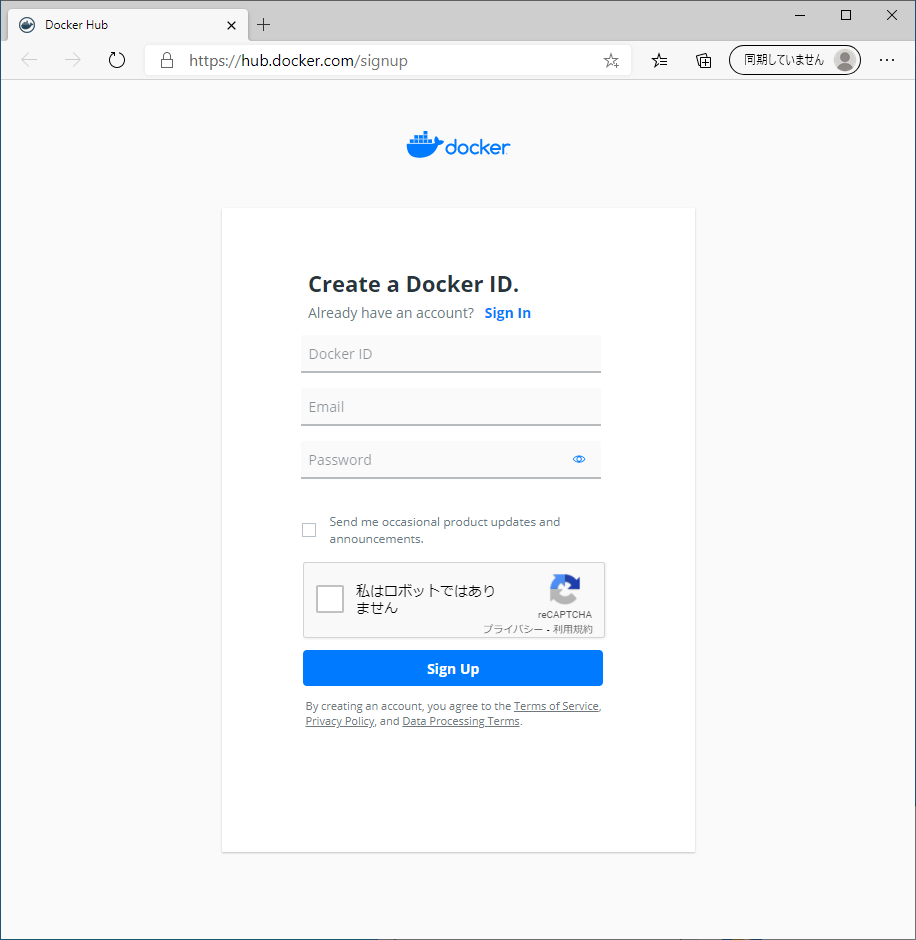
以前は、Docker Desktop をインストールするには、Docker IDというアカウントが必要でした。しかし、現在は不要です。なお、Docker IDは、Docker 公式サイトにて、取得できます。
次のURLからサインアップしアカウントを作成ができます。
https://hub.docker.com/signup
Docker Desktop for Windows のインストール
インストール
インストーラーをダウンロードする
インストールは次のサイトで Docker for Windows インストーラーをダウンロードしてインストールしていくことができます。
https://www.docker.com/products/docker-desktop
[Download Desktop Windows (stable)] のダウンロードボタンをクリックします。
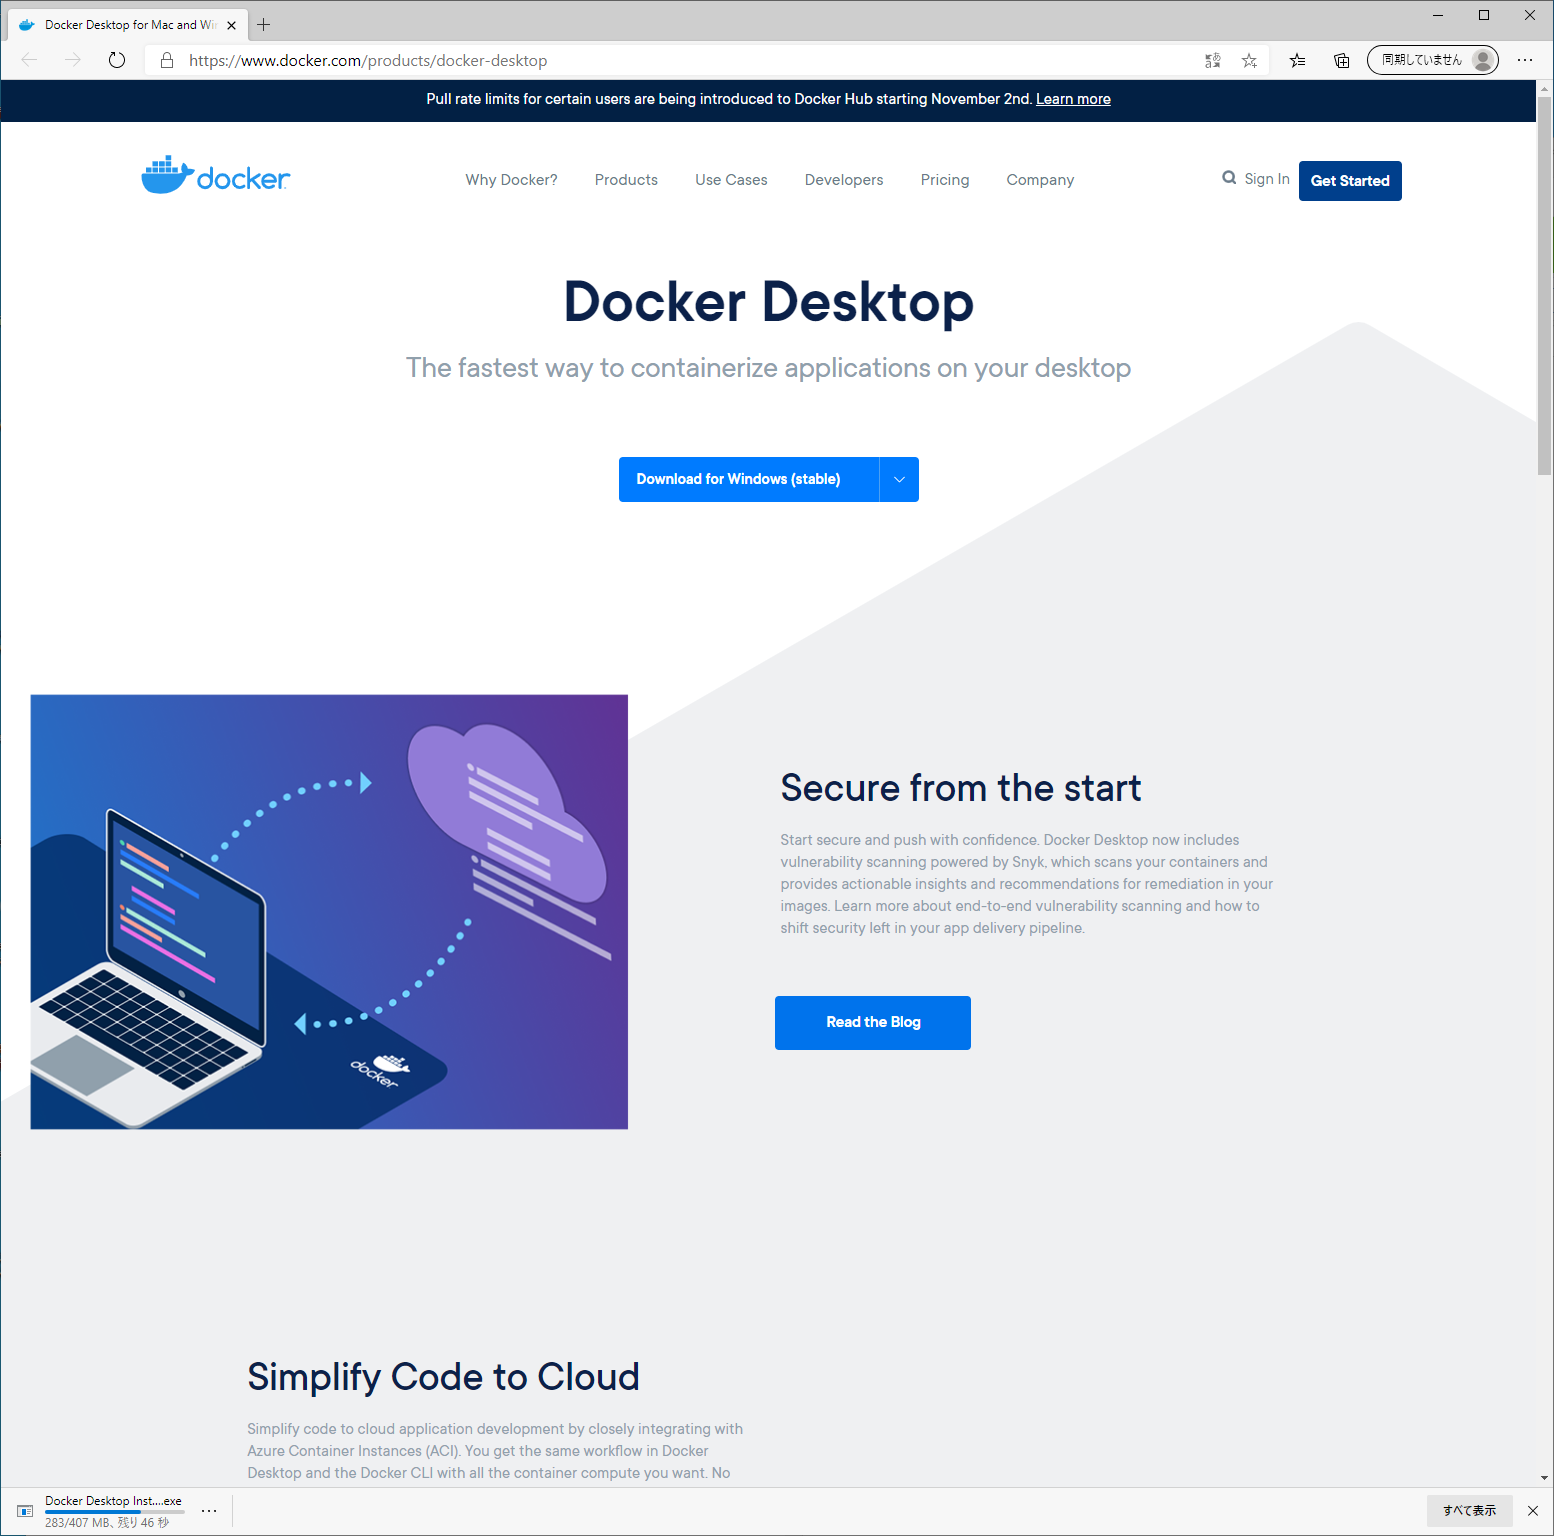
これで、[Docker for Windows Installer.exe] ファイルがダウンロードできます。ファイルは1つだけです。
ここまでで Windowsマシンへのダウンロードまでが完了です。
Windowsマシンへのインストールする
次はインストールを行います。ダウンロードした [Docker for Windows Installer.exe] ファイルを、エクスプローラーから実行してください。
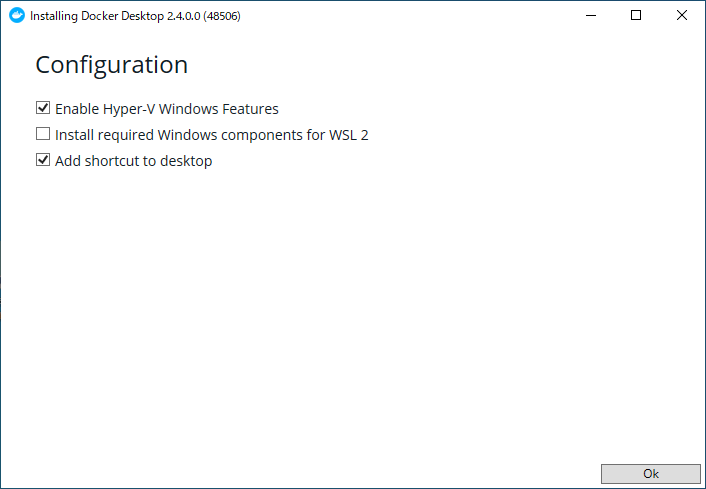
ダウンロードが完了すると、Configraton の画面が出ます。
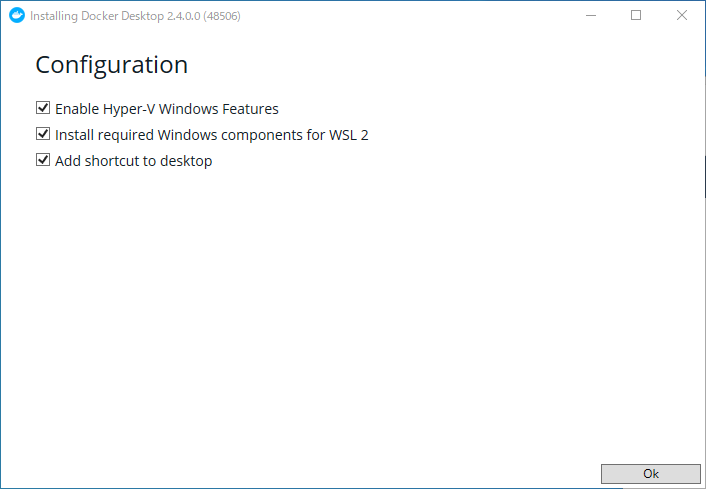
[Install required Windows components for WSL 2] の行にはチェックボックスが付いています。これはコンテナで Windows を動かす場合のオプションです。今回は CentOS を動かしたいのでこのチェックボックスは不要です。
インストールが始まります。
[Install required Windows components for WSL 2] の行にはチェックボックスをはずして、「OK」を押してください。
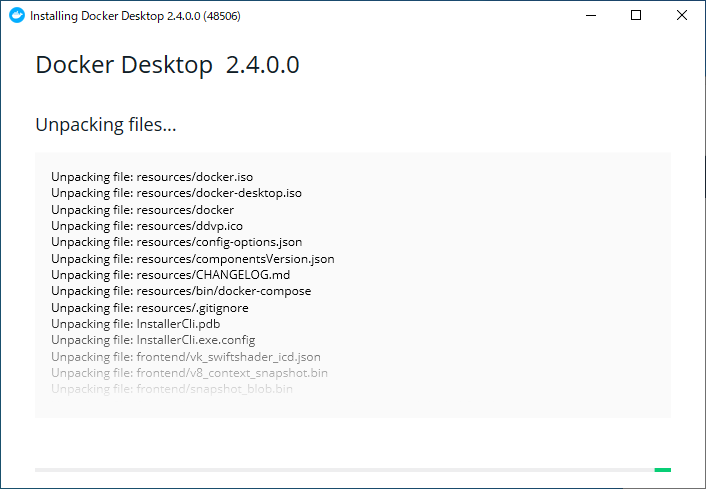
しばらく待機してください。
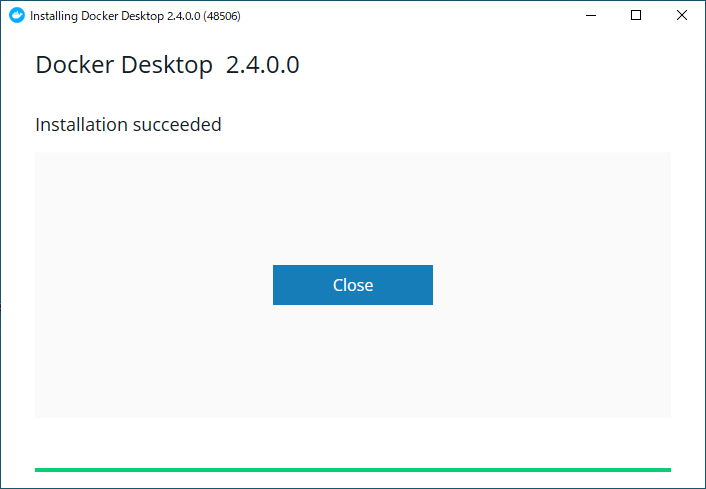
ここまでで Docker Desktop for Windows のインストールは完了です。
 注意
注意 
[Install required Windows components for WSL 2] の行にはチェックボックスが付けたままOKをクリックしてしまうと、インストールが開始され、次の画面が出力されます。
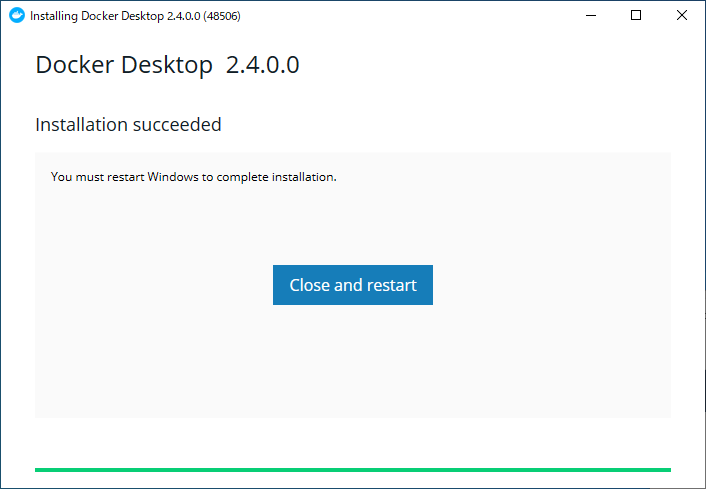
[Close and restart]をクリックするとマシンが再起動され次のウィンドウが表示されます。
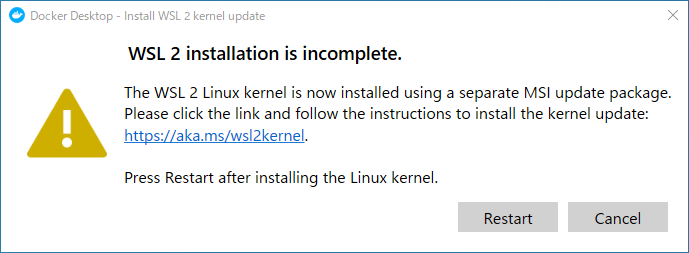
なお、アンインスールしてから、[Install required Windows components for WSL 2] の行にはチェックボックスをはずして再度インストールしても同じ状況になるみたいです。
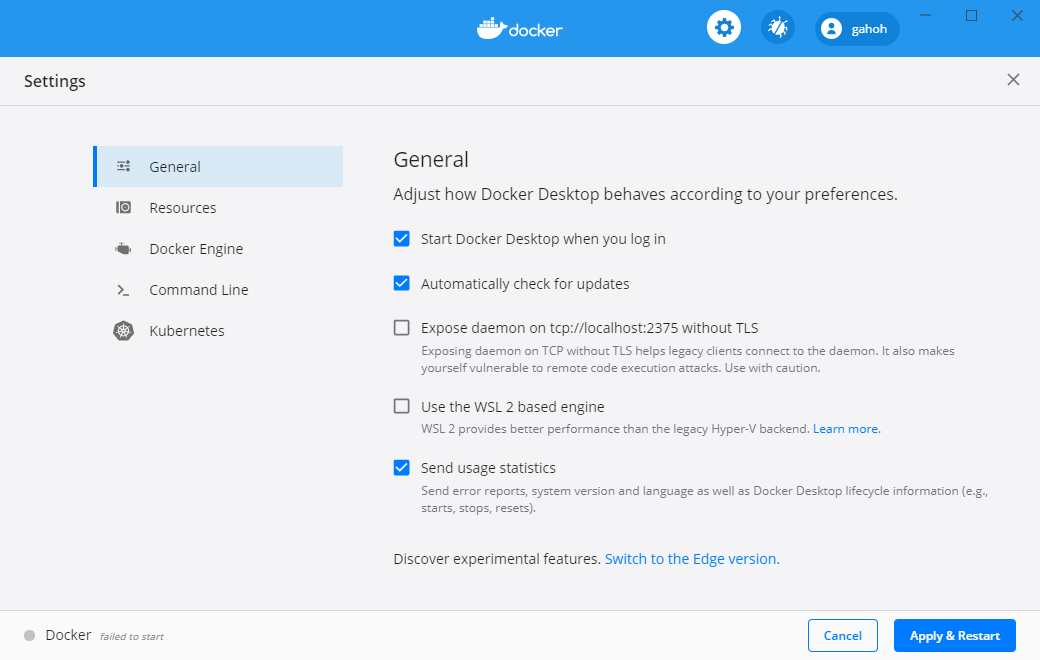
その場合は、Docker Desktopメニューで[setting]を選択し[setting]ダイアログの[General]タブを表示します。
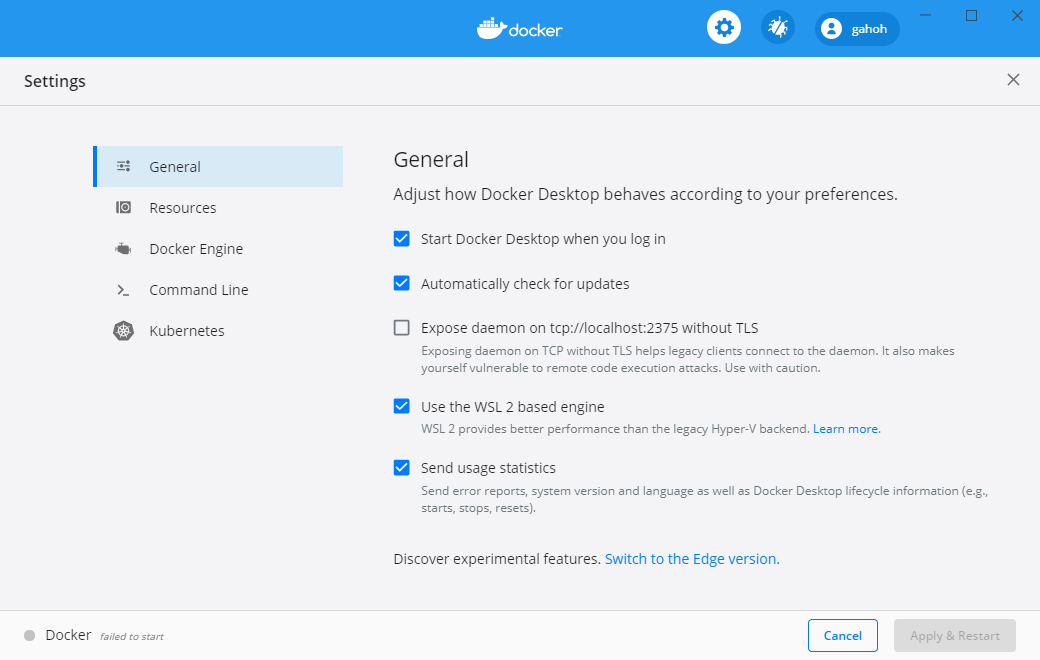
[Use the Wls 2 based Engine]の行のチェックボックスをはずして、[Apply & Restart]をクリックしてください。
動作確認
Docker のバージョンの確認をしてみる
まずは、インストールされた Docker のバージョンを確認してみましょう。
Windows PowerShell を起動して、docker version コマンドでバージョン情報が表示されます。
Windows PowerShell
Copyright (C) Microsoft Corporation. All rights reserved.

> docker version
Client: Docker Engine - Community
 Cloud integration: 1.0.4
 Version:           20.10.0
 API version:       1.41
 Go version:        go1.13.15
 Git commit:        7287ab3
 Built:             Tue Dec  8 18:55:31 2020
 OS/Arch:           windows/amd64
 Context:           default
 Experimental:      true

Server: Docker Engine - Community
 Engine:
  Version:          20.10.0
  API version:      1.41 (minimum version 1.12)
  Go version:       go1.13.15
  Git commit:       eeddea2
  Built:            Tue Dec  8 18:58:04 2020
  OS/Arch:          linux/amd64
  Experimental:     false
 containerd:
  Version:          v1.4.3
  GitCommit:        269548fa27e0089a8b8278fc4fc781d7f65a939b
 runc:
  Version:          1.0.0-rc92
  GitCommit:        ff819c7e9184c13b7c2607fe6c30ae19403a7aff
 docker-init:
  Version:          0.19.0
  GitCommit:        de40ad0
>
Hello Worldを動かしてみる
では、早速、プログラマにはおなじみの hello world をやってみましょう。
docker run コマンドは、イメージからコンテナを起動するコマンドです。
> docker run hello-world
上記のコマンドの場合、hello-world というイメージからコンテナを作成して起動するという意味になります。ただし、ローカルに hello-world イメージがないため、Docker デーモンが hello-world イメージを Docker Hub(Docker社が運営する、インターネット上でイメージを公開・共有したりする Docker Registry サービス)からダウンロードし、イメージからコンテナを起動します。一般的には、イメージはファイルシステムとアプリケーションやミドルウェア、実行時に必要とするパラメータから構成されます。
このコンテナは次のような標準出力を出して終了します。
> docker run hello-world
Unable to find image 'hello-world:latest' locally
latest: Pulling from library/hello-world
0e03bdcc26d7: Pull complete                                                                                                                          Digest: sha256:8c5aeeb6a5f3ba4883347d3747a7249f491766ca1caa47e5da5dfcf6b9b717c0
Status: Downloaded newer image for hello-world:latest

Hello from Docker!
This message shows that your installation appears to be working correctly.

To generate this message, Docker took the following steps:
 1. The Docker client contacted the Docker daemon.
 2. The Docker daemon pulled the "hello-world" image from the Docker Hub.
    (amd64)
 3. The Docker daemon created a new container from that image which runs the
    executable that produces the output you are currently reading.
 4. The Docker daemon streamed that output to the Docker client, which sent it
    to your terminal.

To try something more ambitious, you can run an Ubuntu container with:
 $ docker run -it ubuntu bash

Share images, automate workflows, and more with a free Docker ID:
 https://hub.docker.com/

For more examples and ideas, visit:
 https://docs.docker.com/get-started/

>
>  docker ps --all
CONTAINER ID        IMAGE                    COMMAND                  CREATED             STATUS                     PORTS                NAMES
ad92e9623edb        hello-world              "/hello"                 7 minutes ago       Exited (0) 7 minutes ago                        cranky_carson
 注意
注意 
次のようなエラーが発生した場合、Proxyなどのネットワーク関連の設定の問題の場合があります。
>  docker run hello-world
Unable to find image 'hello-world:latest' locally
docker: Error response from daemon: Get https://registry-1.docker.io/v2/: dial tcp: lookup registry-1.docker.io on 192.168.65.1:53: no such host.
See 'docker run --help'.
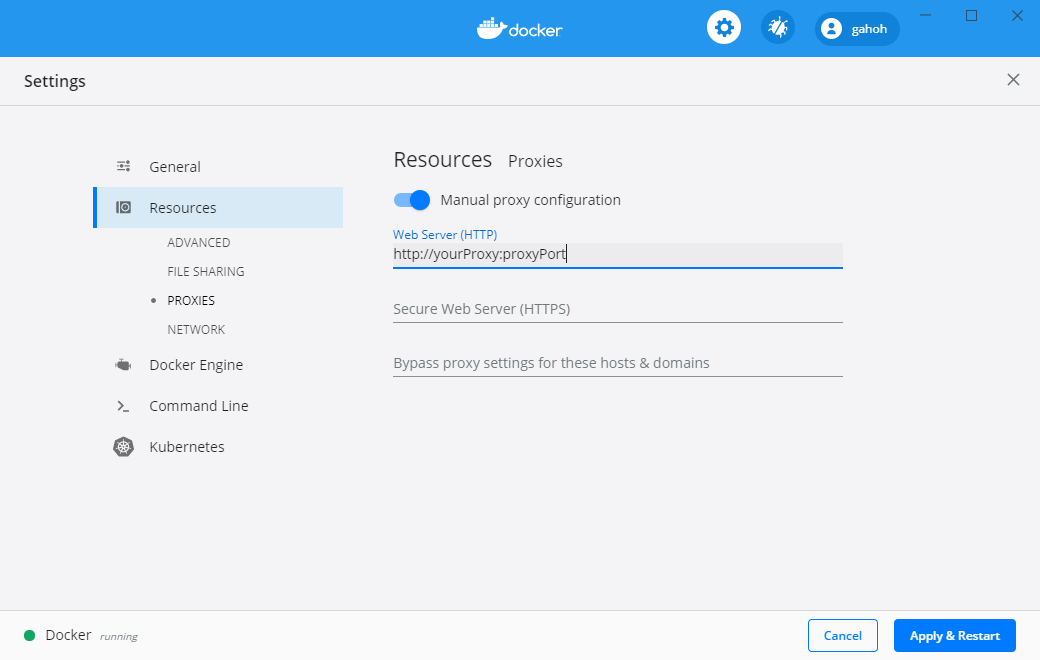
Docker Desktopメニューで[setting]を選択し[setting]ダイアログの[Resources]タブの[PROXIES]でProxyの設定をしてみてください。
CentOS コンテナ (仮想環境) の構築
先ほどの hello-world の例で、コマンドラインでイメージの取得とコンテナの作成・起動・実行が簡単にできることがおわかりいただけたと思います。
では、本題の CentOS のイメージを取得し、CentOS のコンテナ (仮想環境) を作成・起動させてみましょう。
CentOS の イメージの取得
イメージを取得する
CentOS のコンテナのイメージも Docker Hub の CentOS のリポジトリの中で、CentOS のバージョンごとにタグ付けされて管理されています。
それでは CentOS7 の Docker イメージを取得しましょう。 Docker イメージの取得は docker pull コマンドを利用します。
> docker pull centos:centos7
centos7: Pulling from library/centos
75f829a71a1c: Pull complete                                                                                                                          Digest: sha256:19a79828ca2e505eaee0ff38c2f3fd9901f4826737295157cc5212b7a372cd2b
Status: Downloaded newer image for centos:centos7
docker.io/library/centos:centos7
これで CentOS イメージのダウンロードが終わりました。環境に依存しますが数十秒で終了します。なお、pull コマンドの「centos:centos7」の意味は、centosリポジトリの、centos7タグが付いたイメージという意味です。これを理解すればいろいろなリポジトリからいろいろなイメージをダウンロードできるようになります。
取得した イメージを確認する
取得した Docker イメージは docker images コマンドで一覧表示できます。
> docker images
REPOSITORY               TAG                 IMAGE ID            CREATED             SIZE
centos                   centos7             7e6257c9f8d8        2 months ago        203MB
hello-world              latest              bf756fb1ae65        10 months ago       13.3kB
centos リポジトリの centos7 タグが付いたイメージが IMAGE ID 67fa590cfc1c で、そして Hello Worldを動かしてみる時に使用した hello-worldリポジトリのlatestタグが付いたイメージが IMAGE ID fce289e99eb9 で保管されていることを示しています。
CentOS コンテナ の作成・起動
コンテナ を作成・起動する
CentOS7 のイメージが取得できたら、さっそく CentOS コンテナを作成して起動してみましょう。
Docker イメージからコンテナを作成して起動するには docker run コマンドを利用します。次のように docker run コマンドを実行して、コンテナを作成・起動してみます。ここでは新しく作成するコンテナに "centos7f" という名前を付けています。CentOS7 のイメージから CentOS7 コンテナを作成し、同時にコンテナも起動し、そのタイミングで自動的にログインし、そのまま bash シェルに接続します。
> docker run -it --name="centos7f" centos:centos7 /bin/bash
#
このように、いきなり Centos コンテナ起動し、ログインした状態になります。このまま exit コマンドを実行すれば、このコンテナは停止します。
# exit
exit
>
起動または存在しているコンテナの確認をする
docker ps コマンドを実行してみてください。
docker ps コマンドは、コンテナリストを表示・取得するコマンドです。現在起動または存在しているコンテナをリストにしてくれます。オプションなしの場合は、現在起動中のコンテナを表示してくれます。
> docker ps
CONTAINER ID        IMAGE                    COMMAND                  CREATED             STATUS              PORTS                NAMES
今回は、停止された状態なので、現在起動中のコンテナはありません。
下記のように -a、--allオプションをつけた場合は、停止中のコンテナを含めたすべてのコンテナを表示してくれます。
> docker ps -a
CONTAINER ID        IMAGE                    COMMAND                  CREATED             STATUS                          PORTS                NAMES
1f7f96f02acf        centos:centos7           "/bin/bash"              2 minutes ago       Exited (0) About a minute ago                        centos7f
ad92e9623edb        hello-world              "/hello"                 15 minutes ago      Exited (0) 15 minutes ago                            cranky_carson
ea26a0b635a
イメージの centos:centos7 からコンテナが"centos7f"という名前で作成・起動され、bin/shコマンドを実行し、現在は、停止した状態であることを示しています。
Centos コンテナ (仮想環境) の再開・接続
停止中のコンテナを再開する
停止したコンテナを docker start コマンドで再開できます。
"centos7f" を再開させます。
> docker start centos7f
centos7f
docker ps コマンドでコンテナ"centos7f"が確かに再開していることを確認しましょう。
> docker ps
CONTAINER ID        IMAGE                    COMMAND                  CREATED             STATUS              PORTS                NAMES
1f7f96f02acf        centos:centos7           "/bin/bash"              3 minutes ago       Up 20 seconds                            centos7f
起動中のコンテナへ接続する
起動させたコンテナに接続して操作する場合は、docker attach コマンドまたは docker execコマンド を用います。
docker attach コマンドの場合は、次のようになります。
> docker attach centos7f
#
ただし docker attach コマンドでコンテナに接続後、exit コマンドで接続から抜けると、コンテナが停止してしまいます。 コンテナを稼動させたままにしたい場合は、Ctrl + P、Ctrl + Q を続けて押して抜ける必要があります。
ここでは、Ctrl + P、Ctrl + Q を続けて押して、コンテナを稼動させたまま抜けてみます。次のようなメッセージが出力されます。
# read escape sequence
>
ここで、docker ps コマンドでコンテナの状況を確認してみましょう。
CentOS コンテナ "centos7f" は稼働中です。
> docker ps -a
CONTAINER ID        IMAGE                    COMMAND                  CREATED             STATUS                      PORTS                NAMES
1f7f96f02acf        centos:centos7           "/bin/bash"              4 minutes ago       Up About a minute                                centos7f
ad92e9623edb        hello-world              "/hello"                 17 minutes ago      Exited (0) 17 minutes ago                        cranky_carson

>
この状態であれば、再度、CentOS コンテナ (centos7f) に接続することができます。
今度は、docker attach コマンドではなく docker exec コマンドも用いてコンテナに接続して操作してみましょう。ただし、動作に微妙な違いがあります。
> docker exec -it centos7f /bin/bash
#
docker attach コマンド と docker exec コマンドの動作の違いは次の通りです。
| attach コマンド | exec コマンド |
|---|---|
| 稼働中のコンテナで起動している PID=1 のプロセスの標準入出力 (STDIN/STDOUT) に接続 (attach) する。 | コンテナ内でシェルが動作していなければ接続することができない。 |
| attachコマンドで抜けるとコンテナが停止してしまう | exitコマンドで抜けるてもコンテナは停止しない |
Centos コンテナ (仮想環境) の作成・起動 (バックグランド)
コンテナを作成しバックグラウンドで起動する
別の Windows PowerShell を起動します。
次のように docker run コマンドを -d で実行して、コンテナを作成しコマンドプロンプトの裏でバックグラウンド起動してみましょう。
ここでは新しく作成するコンテナに "centos7b" という名前をつけています。
centos7 イメージからコンテナを作成してバックグラウンドで起動します。
Windows PowerShell
Copyright (C) Microsoft Corporation. All rights reserved.

> docker run -it -d --name="centos7b" centos:centos7 /bin/bash
5ba3a2a223414a5c06af543550a3abbd49b179b7b0b49804c42dd1275dc4219a
>
CentOS コンテナ (仮想環境) の停止・削除
コンテナの削除をするには、まずは動ているコンテナを停止させてから削除することになります。
では、docker ps コマンドで動作しているコンテナを確認します。
> docker ps
CONTAINER ID        IMAGE                    COMMAND                  CREATED             STATUS              PORTS                NAMES
5ba3a2a22341        centos:centos7           "/bin/bash"              30 seconds ago      Up 29 seconds                            centos7b
1f7f96f02acf        centos:centos7           "/bin/bash"              7 minutes ago       Up 4 minutes                             centos7f
Ctrl + P、Ctrl + Q を続けて押して、稼動させたまま抜けたコンテナ "centos7f" と、先ほどバックグラウンドで起動したコンテナ "centos7b" を確認することができるはずです。
起動しているコンテナの停止する
では、docker stop コマンドで、動作しているコンテナを停止させます。
> docker stop centos7b centos7f
centos7b
centos7f
docker ps コマンドで、現在のコンテナの稼働状況を確認します。
先に述べた通り、-a、--allオプションをつけた場合は、停止中のコンテナを含めたすべてのコンテナを表示してくれます。
> docker ps -a
CONTAINER ID        IMAGE                    COMMAND                  CREATED             STATUS                        PORTS                NAMES
5ba3a2a22341        centos:centos7           "/bin/bash"              2 minutes ago       Exited (137) 12 seconds ago                        centos7b
1f7f96f02acf        centos:centos7           "/bin/bash"              8 minutes ago       Exited (137) 12 seconds ago                        centos7f
ad92e9623edb        hello-world              "/hello"                 22 minutes ago      Exited (0) 22 minutes ago                          cranky_carson
現在、存在しているコンテナは、"centos7b", "centos7f", "cranky_carson" の3つであることが確認できるでしょう。"cranky_carson" というコンテナの名前はイメージ hello-world からコンテナが作成・起動された時に一意的にたまたま決まったものです。なので、違う名前が表示されているかもしれません。
では、docker rm コマンドで、3つのコンテナを削除してみましょう。
コンテナ(仮想環境)を削除する
3つのコンテナを、docker rm コマンドを用いて一度に削除します。
> docker rm centos7b centos7f laughing_lehmann
centos7b
centos7f
cranky_carson
削除が完了しますと、削除対象のコンテナ名が出力されます。
> docker ps -a
CONTAINER ID        IMAGE                    COMMAND                  CREATED             STATUS              PORTS                NAMES
これで、コンテナがすべて削除されました。
イメージを削除する
Docker イメージの削除は、docker rmi コマンドを用います。
その前にdocker images コマンドで、取得したDockerイメージを一覧表示できます。
> docker images
REPOSITORY               TAG                 IMAGE ID            CREATED             SIZE
centos                   centos7             7e6257c9f8d8        2 months ago        203MB
hello-world              latest              bf756fb1ae65        10 months ago       13.3kB
docker rmi コマンドを用いて、取得したDockerイメージを削除してみます。
> docker rmi centos:centos7 hello-world:latest
Untagged: centos:centos7
Untagged: centos@sha256:19a79828ca2e505eaee0ff38c2f3fd9901f4826737295157cc5212b7a372cd2b
Deleted: sha256:7e6257c9f8d8d4cdff5e155f196d67150b871bbe8c02761026f803a704acb3e9
Deleted: sha256:613be09ab3c0860a5216936f412f09927947012f86bfa89b263dfa087a725f81
Untagged: hello-world:latest
Untagged: hello-world@sha256:8c5aeeb6a5f3ba4883347d3747a7249f491766ca1caa47e5da5dfcf6b9b717c0
Deleted: sha256:bf756fb1ae65adf866bd8c456593cd24beb6a0a061dedf42b26a993176745f6b
Deleted: sha256:9c27e219663c25e0f28493790cc0b88bc973ba3b1686355f221c38a36978ac63
> docker images
REPOSITORY               TAG                 IMAGE ID            CREATED             SIZE
これで、docker上からすべてのイメージが削除されました。
CentOS コンテナ (仮想環境)の整備
centos:centos7 のイメージは、最小構成 (?)でインストールされた CentOS7 環境であるようなので、実際に使用するには、構築した CentOS コンテナに個別に必要なもののインストールや環境の整備の作業をしなければなりません。
参考までにとりあえず、sudoコマンドを使えるようにする手順を紹介します。
まずは、Centos7 のコンテナやイメージなど削除してしまったので、復習をかねて、再度 Docker for Windows 上の CentOS コンテナ (仮想環境) を構築をします。
CentOS コンテナ (仮想環境) の構築 【復習】
CentOS の Docker イメージを取得
> docker pull centos:centos7
centos7: Pulling from library/centos
2d473b07cdd5: Pull complete
Digest: sha256:0f4ec88e21daf75124b8a9e5ca03c37a5e937e0e108a255d890492430789b60e
Status: Downloaded newer image for centos:centos7
docker.io/library/centos:centos7
>
>
> docker images
REPOSITORY   TAG       IMAGE ID       CREATED       SIZE
centos       centos7   8652b9f0cb4c   6 weeks ago   204MB
>
CentOS コンテナの作成・起動
> docker run -it --name="centos7" centos:centos7 /bin/bash
#
コマンドのパッケージのインストール
sudo, java, git, ant, wget, unzipなどのコマンドを入力したら、次のような"コマンドが見つかりません"という旨のメッセージが出力されました。
# sudo
bash: sudo: command not found
#
まずは yum update コマンドで CentOS のパッケージを最新の状態にしておきます。
# yum update
Loaded plugins: fastestmirror, ovl
Loading mirror speeds from cached hostfile
* base: ftp.jaist.ac.jp
* extras: ftp.jaist.ac.jp
* updates: ftp.jaist.ac.jp
base | 3.6 kB 00:00:00
extras | 2.9 kB 00:00:00
updates | 2.9 kB 00:00:00
(1/4): base/7/x86_64/group_gz | 153 kB 00:00:00
(2/4): extras/7/x86_64/primary_db | 222 kB 00:00:00
(3/4): updates/7/x86_64/primary_db | 4.7 MB 00:00:06
(4/4): base/7/x86_64/primary_db | 6.1 MB 00:00:06
Resolving Dependencies
--> Running transaction check
---> Package bind-license.noarch 32:9.11.4-26.P2.el7 will be updated
---> Package bind-license.noarch 32:9.11.4-26.P2.el7_9.3 will be an update
---> Package centos-release.x86_64 0:7-9.2009.0.el7.centos will be updated
---> Package centos-release.x86_64 0:7-9.2009.1.el7.centos will be an update
---> Package coreutils.x86_64 0:8.22-24.el7 will be updated
---> Package coreutils.x86_64 0:8.22-24.el7_9.2 will be an update
---> Package curl.x86_64 0:7.29.0-59.el7 will be updated
---> Package curl.x86_64 0:7.29.0-59.el7_9.1 will be an update
---> Package device-mapper.x86_64 7:1.02.170-6.el7 will be updated
---> Package device-mapper.x86_64 7:1.02.170-6.el7_9.3 will be an update
---> Package device-mapper-libs.x86_64 7:1.02.170-6.el7 will be updated
---> Package device-mapper-libs.x86_64 7:1.02.170-6.el7_9.3 will be an update
---> Package glib2.x86_64 0:2.56.1-7.el7 will be updated
---> Package glib2.x86_64 0:2.56.1-8.el7 will be an update
---> Package kpartx.x86_64 0:0.4.9-133.el7 will be updated
---> Package kpartx.x86_64 0:0.4.9-134.el7_9 will be an update
---> Package libcurl.x86_64 0:7.29.0-59.el7 will be updated
---> Package libcurl.x86_64 0:7.29.0-59.el7_9.1 will be an update
---> Package openssl-libs.x86_64 1:1.0.2k-19.el7 will be updated
---> Package openssl-libs.x86_64 1:1.0.2k-21.el7_9 will be an update
---> Package python.x86_64 0:2.7.5-89.el7 will be updated
---> Package python.x86_64 0:2.7.5-90.el7 will be an update
---> Package python-libs.x86_64 0:2.7.5-89.el7 will be updated
---> Package python-libs.x86_64 0:2.7.5-90.el7 will be an update
---> Package systemd.x86_64 0:219-78.el7 will be updated
---> Package systemd.x86_64 0:219-78.el7_9.2 will be an update
---> Package systemd-libs.x86_64 0:219-78.el7 will be updated
---> Package systemd-libs.x86_64 0:219-78.el7_9.2 will be an update
---> Package vim-minimal.x86_64 2:7.4.629-7.el7 will be updated
---> Package vim-minimal.x86_64 2:7.4.629-8.el7_9 will be an update
--> Finished Dependency Resolution
Dependencies Resolved
========================================================================================================================
Package Arch Version Repository Size
========================================================================================================================
Updating:
bind-license noarch 32:9.11.4-26.P2.el7_9.3 updates 91 k
centos-release x86_64 7-9.2009.1.el7.centos updates 27 k
coreutils x86_64 8.22-24.el7_9.2 updates 3.3 M
curl x86_64 7.29.0-59.el7_9.1 updates 271 k
device-mapper x86_64 7:1.02.170-6.el7_9.3 updates 297 k
device-mapper-libs x86_64 7:1.02.170-6.el7_9.3 updates 325 k
glib2 x86_64 2.56.1-8.el7 updates 2.5 M
kpartx x86_64 0.4.9-134.el7_9 updates 81 k
libcurl x86_64 7.29.0-59.el7_9.1 updates 223 k
openssl-libs x86_64 1:1.0.2k-21.el7_9 updates 1.2 M
python x86_64 2.7.5-90.el7 updates 96 k
python-libs x86_64 2.7.5-90.el7 updates 5.6 M
systemd x86_64 219-78.el7_9.2 updates 5.1 M
systemd-libs x86_64 219-78.el7_9.2 updates 418 k
vim-minimal x86_64 2:7.4.629-8.el7_9 updates 443 k
Transaction Summary
========================================================================================================================
Upgrade 15 Packages
Total download size: 20 M
Is this ok [y/d/N]: y
Downloading packages:
Delta RPMs disabled because /usr/bin/applydeltarpm not installed.
warning: /var/cache/yum/x86_64/7/updates/packages/centos-release-7-9.2009.1.el7.centos.x86_64.rpm: Header V3 RSA/SHA256 Signature, key ID f4a80eb5: NOKEY
Public key for centos-release-7-9.2009.1.el7.centos.x86_64.rpm is not installed
(1/15): centos-release-7-9.2009.1.el7.centos.x86_64.rpm | 27 kB 00:00:00
(2/15): bind-license-9.11.4-26.P2.el7_9.3.noarch.rpm | 91 kB 00:00:00
(3/15): curl-7.29.0-59.el7_9.1.x86_64.rpm | 271 kB 00:00:00
(4/15): device-mapper-1.02.170-6.el7_9.3.x86_64.rpm | 297 kB 00:00:00
(5/15): coreutils-8.22-24.el7_9.2.x86_64.rpm | 3.3 MB 00:00:02
(6/15): device-mapper-libs-1.02.170-6.el7_9.3.x86_64.rpm | 325 kB 00:00:01
(7/15): python-2.7.5-90.el7.x86_64.rpm | 96 kB 00:00:00
(8/15): libcurl-7.29.0-59.el7_9.1.x86_64.rpm | 223 kB 00:00:02
(9/15): openssl-libs-1.0.2k-21.el7_9.x86_64.rpm | 1.2 MB 00:00:01
(10/15): systemd-libs-219-78.el7_9.2.x86_64.rpm | 418 kB 00:00:00
(11/15): kpartx-0.4.9-134.el7_9.x86_64.rpm | 81 kB 00:00:03
(12/15): glib2-2.56.1-8.el7.x86_64.rpm | 2.5 MB 00:00:04
(13/15): vim-minimal-7.4.629-8.el7_9.x86_64.rpm | 443 kB 00:00:02
(14/15): systemd-219-78.el7_9.2.x86_64.rpm | 5.1 MB 00:00:06
(15/15): python-libs-2.7.5-90.el7.x86_64.rpm | 5.6 MB 00:00:07
------------------------------------------------------------------------------------------------------------------------
Total 2.0 MB/s | 20 MB 00:00:09
Retrieving key from file:///etc/pki/rpm-gpg/RPM-GPG-KEY-CentOS-7
Importing GPG key 0xF4A80EB5:
Userid : "CentOS-7 Key (CentOS 7 Official Signing Key) <security@centos.org>"
Fingerprint: 6341 ab27 53d7 8a78 a7c2 7bb1 24c6 a8a7 f4a8 0eb5
Package : centos-release-7-9.2009.0.el7.centos.x86_64 (@CentOS)
From : /etc/pki/rpm-gpg/RPM-GPG-KEY-CentOS-7
Is this ok [y/N]: y
Running transaction check
Running transaction test
Transaction test succeeded
Running transaction
Updating : systemd-libs-219-78.el7_9.2.x86_64 1/30
Updating : 1:openssl-libs-1.0.2k-21.el7_9.x86_64 2/30
Updating : coreutils-8.22-24.el7_9.2.x86_64 3/30
Updating : libcurl-7.29.0-59.el7_9.1.x86_64 4/30
Updating : python-libs-2.7.5-90.el7.x86_64 5/30
Updating : centos-release-7-9.2009.1.el7.centos.x86_64 6/30
Updating : systemd-219-78.el7_9.2.x86_64 7/30
Failed to get D-Bus connection: Operation not permitted
Updating : 7:device-mapper-libs-1.02.170-6.el7_9.3.x86_64 8/30
Updating : 7:device-mapper-1.02.170-6.el7_9.3.x86_64 9/30
Updating : kpartx-0.4.9-134.el7_9.x86_64 10/30
Updating : python-2.7.5-90.el7.x86_64 11/30
Updating : curl-7.29.0-59.el7_9.1.x86_64 12/30
Updating : glib2-2.56.1-8.el7.x86_64 13/30
Updating : 2:vim-minimal-7.4.629-8.el7_9.x86_64 14/30
Updating : 32:bind-license-9.11.4-26.P2.el7_9.3.noarch 15/30
Cleanup : curl-7.29.0-59.el7.x86_64 16/30
Cleanup : kpartx-0.4.9-133.el7.x86_64 17/30
Cleanup : 7:device-mapper-1.02.170-6.el7.x86_64 18/30
Cleanup : 7:device-mapper-libs-1.02.170-6.el7.x86_64 19/30
Cleanup : systemd-219-78.el7.x86_64 20/30
Cleanup : python-2.7.5-89.el7.x86_64 21/30
Cleanup : centos-release-7-9.2009.0.el7.centos.x86_64 22/30
Cleanup : 32:bind-license-9.11.4-26.P2.el7.noarch 23/30
Cleanup : python-libs-2.7.5-89.el7.x86_64 24/30
Cleanup : coreutils-8.22-24.el7.x86_64 25/30
Cleanup : 1:openssl-libs-1.0.2k-19.el7.x86_64 26/30
Cleanup : libcurl-7.29.0-59.el7.x86_64 27/30
Cleanup : systemd-libs-219-78.el7.x86_64 28/30
Cleanup : glib2-2.56.1-7.el7.x86_64 29/30
Cleanup : 2:vim-minimal-7.4.629-7.el7.x86_64 30/30
Verifying : python-2.7.5-90.el7.x86_64 1/30
Verifying : kpartx-0.4.9-134.el7_9.x86_64 2/30
Verifying : centos-release-7-9.2009.1.el7.centos.x86_64 3/30
Verifying : 7:device-mapper-1.02.170-6.el7_9.3.x86_64 4/30
Verifying : 32:bind-license-9.11.4-26.P2.el7_9.3.noarch 5/30
Verifying : coreutils-8.22-24.el7_9.2.x86_64 6/30
Verifying : libcurl-7.29.0-59.el7_9.1.x86_64 7/30
Verifying : 1:openssl-libs-1.0.2k-21.el7_9.x86_64 8/30
Verifying : curl-7.29.0-59.el7_9.1.x86_64 9/30
Verifying : python-libs-2.7.5-90.el7.x86_64 10/30
Verifying : 2:vim-minimal-7.4.629-8.el7_9.x86_64 11/30
Verifying : 7:device-mapper-libs-1.02.170-6.el7_9.3.x86_64 12/30
Verifying : systemd-libs-219-78.el7_9.2.x86_64 13/30
Verifying : systemd-219-78.el7_9.2.x86_64 14/30
Verifying : glib2-2.56.1-8.el7.x86_64 15/30
Verifying : 2:vim-minimal-7.4.629-7.el7.x86_64 16/30
Verifying : systemd-libs-219-78.el7.x86_64 17/30
Verifying : glib2-2.56.1-7.el7.x86_64 18/30
Verifying : python-2.7.5-89.el7.x86_64 19/30
Verifying : kpartx-0.4.9-133.el7.x86_64 20/30
Verifying : 32:bind-license-9.11.4-26.P2.el7.noarch 21/30
Verifying : centos-release-7-9.2009.0.el7.centos.x86_64 22/30
Verifying : python-libs-2.7.5-89.el7.x86_64 23/30
Verifying : 7:device-mapper-1.02.170-6.el7.x86_64 24/30
Verifying : 7:device-mapper-libs-1.02.170-6.el7.x86_64 25/30
Verifying : systemd-219-78.el7.x86_64 26/30
Verifying : coreutils-8.22-24.el7.x86_64 27/30
Verifying : 1:openssl-libs-1.0.2k-19.el7.x86_64 28/30
Verifying : libcurl-7.29.0-59.el7.x86_64 29/30
Verifying : curl-7.29.0-59.el7.x86_64 30/30
Updated:
bind-license.noarch 32:9.11.4-26.P2.el7_9.3 centos-release.x86_64 0:7-9.2009.1.el7.centos
coreutils.x86_64 0:8.22-24.el7_9.2 curl.x86_64 0:7.29.0-59.el7_9.1
device-mapper.x86_64 7:1.02.170-6.el7_9.3 device-mapper-libs.x86_64 7:1.02.170-6.el7_9.3
glib2.x86_64 0:2.56.1-8.el7 kpartx.x86_64 0:0.4.9-134.el7_9
libcurl.x86_64 0:7.29.0-59.el7_9.1 openssl-libs.x86_64 1:1.0.2k-21.el7_9
python.x86_64 0:2.7.5-90.el7 python-libs.x86_64 0:2.7.5-90.el7
systemd.x86_64 0:219-78.el7_9.2 systemd-libs.x86_64 0:219-78.el7_9.2
vim-minimal.x86_64 2:7.4.629-8.el7_9
Complete!
#
yum update コマンドを実行した時、ネットワークなどの設定をしていないと、次のようなエラーが生じるかもしれません。エラーが生じた場合は、 /etc/yum.conf などの yum の設定ファイルに対して、修正・追記をしてください。
# yum update
Loaded plugins: fastestmirror, ovl
Determining fastest mirrors
Could not retrieve mirrorlist http://mirrorlist.centos.org/?release=7&arch=x86_64&repo=os&infra=container error was
14: curl#52 - "Empty reply from server"


 One of the configured repositories failed (Unknown),
 and yum doesn't have enough cached data to continue. At this point the only
 safe thing yum can do is fail. There are a few ways to work "fix" this:

     1. Contact the upstream for the repository and get them to fix the problem.

     2. Reconfigure the baseurl/etc. for the repository, to point to a working
        upstream. This is most often useful if you are using a newer
        distribution release than is supported by the repository (and the
        packages for the previous distribution release still work).

     3. Run the command with the repository temporarily disabled
            yum --disablerepo=<repoid> ...

     4. Disable the repository permanently, so yum won't use it by default. Yum
        will then just ignore the repository until you permanently enable it
        again or use --enablerepo for temporary usage:

            yum-config-manager --disable <repoid>
        or
            subscription-manager repos --disable=<repoid>

     5. Configure the failing repository to be skipped, if it is unavailable.
        Note that yum will try to contact the repo. when it runs most commands,
        so will have to try and fail each time (and thus. yum will be be much
        slower). If it is a very temporary problem though, this is often a nice
        compromise:

            yum-config-manager --save --setopt=<repoid>.skip_if_unavailable=true

Cannot find a valid baseurl for repo: base/7/x86_64
[root@2619bfaa653b /]# y
bash: y: command not found
[root@2619bfaa653b /]# yum update
Loaded plugins: fastestmirror, ovl
Loading mirror speeds from cached hostfile
Could not retrieve mirrorlist http://mirrorlist.centos.org/?release=7&arch=x86_64&repo=os&infra=container error was
14: curl#52 - "Empty reply from server"


 One of the configured repositories failed (Unknown),
 and yum doesn't have enough cached data to continue. At this point the only
 safe thing yum can do is fail. There are a few ways to work "fix" this:

     1. Contact the upstream for the repository and get them to fix the problem.

     2. Reconfigure the baseurl/etc. for the repository, to point to a working
        upstream. This is most often useful if you are using a newer
        distribution release than is supported by the repository (and the
        packages for the previous distribution release still work).

     3. Run the command with the repository temporarily disabled
            yum --disablerepo=<repoid> ...

     4. Disable the repository permanently, so yum won't use it by default. Yum
        will then just ignore the repository until you permanently enable it
        again or use --enablerepo for temporary usage:

            yum-config-manager --disable <repoid>
        or
            subscription-manager repos --disable=<repoid>

     5. Configure the failing repository to be skipped, if it is unavailable.
        Note that yum will try to contact the repo. when it runs most commands,
        so will have to try and fail each time (and thus. yum will be be much
        slower). If it is a very temporary problem though, this is often a nice
        compromise:

            yum-config-manager --save --setopt=<repoid>.skip_if_unavailable=true

Cannot find a valid baseurl for repo: base/7/x86_64
#
proxy 経由で yum を使わなければならない場合は、次のように yum.conf に proxy の設定を行います。
proxy サーバが yourProxy、proxy ポートが proxyPort の場合:
# cd
# pwd
/root
# echo "proxy=http://yourProxy:proxyPort" >> /etc/yum.conf
yum install コマンドで、sudo をインストールします。
# yum -y install sudo
Loaded plugins: fastestmirror, ovl
Loading mirror speeds from cached hostfile
 * base: ty1.mirror.newmediaexpress.com
 * extras: download.nus.edu.sg
 * updates: mirror.aktkn.sg
Resolving Dependencies
--> Running transaction check
---> Package sudo.x86_64 0:1.8.23-10.el7 will be installed
--> Finished Dependency Resolution

Dependencies Resolved

========================================================================================================================
 Package                  Arch                       Version                             Repository                Size
========================================================================================================================
Installing:
 sudo                     x86_64                     1.8.23-10.el7                       base                     842 k

Transaction Summary
========================================================================================================================
Install  1 Package

Total download size: 842 k
Installed size: 3.0 M
Downloading packages:
sudo-1.8.23-10.el7.x86_64.rpm                                                                    | 842 kB  00:00:00
Running transaction check
Running transaction test
Transaction test succeeded
Running transaction
  Installing : sudo-1.8.23-10.el7.x86_64                                                                            1/1
  Verifying  : sudo-1.8.23-10.el7.x86_64                                                                            1/1

Installed:
  sudo.x86_64 0:1.8.23-10.el7

Complete!
#
これで sudo コマンドののパッケージのインストールができました。
# sudo
usage: sudo -h | -K | -k | -V
usage: sudo -v [-AknS] [-g group] [-h host] [-p prompt] [-u user]
usage: sudo -l [-AknS] [-g group] [-h host] [-p prompt] [-U user] [-u user] [command]
usage: sudo [-AbEHknPS] [-r role] [-t type] [-C num] [-g group] [-h host] [-p prompt] [-T timeout] [-u user]
            [VAR=value] [-i|-s] [<command>]
usage: sudo -e [-AknS] [-r role] [-t type] [-C num] [-g group] [-h host] [-p prompt] [-T timeout] [-u user] file ...
#
sudo以外に 必要に応じて、java, git, ant, wget, unzipなどのコマンドのパッケージをインストールしておきます。
(必ずしもインストールし置く必要はありません。)
# yum -y install java-1.8.0-openjdk-devel java git ant wget unzip
sudo コマンドをなどのをパッケージをインストールした CentOS のコンテナの"centos7" を停止して抜けます。
# exit
exit
>
作業済み CentOS コンテナ (仮想環境)の保存
今回、CentOS コンテナ (仮想環境)に対して sudo コマンドなどのパッケージをインストールをしました。
このように設定や更新などのカスタマイズ作業をおこなったコンテナの状態をイメージとして保存しておくことができます。
では、今回のカスタマイズ作業をおこなった CentOS コンテナ からイメージを作って保存をしてみます。
保存するコンテナを停止する
まず、 オプションなしで、現在起動中のコンテナを確認します。
> docker ps
CONTAINER ID        IMAGE                    COMMAND                  CREATED             STATUS              PORTS                NAMES

>
今回は、sudo コマンドなどのパッケージをインストールしたCentOS のコンテナの"centos7" は、停止状態のはずなので、現在起動中のコンテナはありません。
コンテナが動いている状態でコンテナに接続されていない場合は docker stop コマンドで停止させることができます。
次に -a オプションをつけて、停止中のコンテナを含めたすべてのコンテナを表示します。
> docker ps -a
CONTAINER ID   IMAGE            COMMAND       CREATED          STATUS                      PORTS     NAMES
2619bfaa653b   centos:centos7   "/bin/bash"   32 minutes ago   Exited (0) 29 seconds ago             centos7
unzip コマンドのインストールなどの作業が行われ、現在停止した状態である CentOS コンテナの"centos7"が表示されます。
停止したコンテナをイメージに保存する
docker images コマンドで、作成されているイメージを確認します。
> docker images
REPOSITORY   TAG       IMAGE ID       CREATED       SIZE
centos       centos7   8652b9f0cb4c   6 weeks ago   204MB
>
カスタマイズ作業をおこなった CentOS コンテナの"centos7"を docker commit コマンドで、Docker イメージ "centos:gahoh" として保存します。
> docker commit centos7 centos:gahoh
sha256:117cf19ad19486755646f5802f2323236088ffc880ec1282be3dbeb264548e37
なお、一時停止せず、コンテナが動いたままの状態でDockerイメージを作成する場合は「--pause=false」オプションを使用します。
docker imagesコマンドにて、Dockerイメージが作成されているか確認します
> docker images
REPOSITORY   TAG       IMAGE ID       CREATED          SIZE
centos       gahoh     117cf19ad194   32 seconds ago   663MB
centos       centos7   8652b9f0cb4c   6 weeks ago      204MB
新たに Dokcer イメージ "centos:gahoh" が追加されたことがわかります。
作成されたイメージの内容を確認する
先ほど作業した内容がちゃんと反映されている イメージなのか、確認してみましょう。
docker rm コマンドで、コンテナ "centos7" を削除します。
> docker rm centos7
centos7
> docker ps -a
CONTAINER ID        IMAGE                    COMMAND                  CREATED             STATUS              PORTS                NAMES
これで、すべてのコンテナがなくなりました。
では、docker run コマンドで、イメージ "centos:gahoh" からコンテナ "centos7" を作成・起動してみます。
> docker run -it --name="centos7" centos:gahoh /bin/bash
#
sudo コマンドを実行してみます。
# sudo
usage: sudo -h | -K | -k | -V
usage: sudo -v [-AknS] [-g group] [-h host] [-p prompt] [-u user]
usage: sudo -l [-AknS] [-g group] [-h host] [-p prompt] [-U user] [-u user] [command]
usage: sudo [-AbEHknPS] [-r role] [-t type] [-C num] [-g group] [-h host] [-p prompt] [-T timeout] [-u user]
            [VAR=value] [-i|-s] [<command>]
usage: sudo -e [-AknS] [-r role] [-t type] [-C num] [-g group] [-h host] [-p prompt] [-T timeout] [-u user] file ...
#
さいごに
今回、Windows 10 のノートPCに Doker Desktop for Windows をインストールし、CentOS の仮想環境を構築・設定・保存の一連の手順を詳細に記述したつもりです。
もし、記述について誤りがあったり、気になることがあれば、編集リクエストやコメントでフィードバックしていただけると助かります。
