Diskのひっ迫を発見した経緯
最近話題のパルワールドに新バージョン v0.1.4.1 (2024/02/07)が出たのでDedicated Serverを更新しようと思い立ち、いざ更新してみると次のエラーが出たので調査してみた。
Error! App '2394010' state is 0x2A6 after update job.
調べてみると、パルワールドに関するSteamの総合掲示板に同じエラーで話題が出ている人を発見した。
下に引っ付いているコメントがこれだ。
check free space.
1-1 / 1 のコメントを表示
なるほど、確かにDiskが埋まっていたら新しいデータを取ってこれない。
パルワールド自体は、そこまでDiskを使わないのか、特に言及されていなかった。
以下がパルワールドDedicated Serverの推奨システム要件だ。
Palworld Dedicated Server 推奨システム要件
| リソース | 設定値 |
|---|---|
| CPU | 4コア (推奨) |
| RAM | 16GB 安定したサーバー稼働のためには 32GB 以上を推奨 8GBでも起動は可能ですがプレイを進めるほどメモリ不足でサーバーがクラッシュする可能性が高まります。 |
| Network | UDP Port 8211 (デフォルト) をポート開放できること |
サーバにログインし、df -hで確認してみる。
root@palwvm:/home/palworld# df -h
Filesystem                         Size  Used Avail Use% Mounted on
tmpfs                              1.6G  964K  1.6G   1% /run
/dev/mapper/ubuntu--vg-ubuntu--lv   14G   12G  488M  97% /
tmpfs                              7.9G     0  7.9G   0% /dev/shm
tmpfs                              5.0M     0  5.0M   0% /run/lock
/dev/sda2                          2.0G  130M  1.7G   8% /boot
/dev/sda1                          1.1G  6.1M  1.1G   1% /boot/efi
tmpfs                              1.6G  4.0K  1.6G   1% /run/user/1001
ルートディレクトリが 97%とひっ迫していた。サーバではバックアップとPalworldバージョン更新が常動いてしており、バックアップファイルでひっ迫したのか、もしくはアップデートを試みて途中でひっ迫してしまったのか、本来は調査せねばいけない。一旦は回避策として仮想Disk上限を引き上げることとする。
構築時は特にDiskについては記載がなかったので、OSとなるUbuntu Desktopの推奨システム要件を参考にした。
Ubuntu Desktop 推奨システム要件
| リソース | 設定値 |
|---|---|
| CPU | 2 GHzデュアルコアプロセッサ以上 |
| RAM | 4 GBシステムメモリ |
| Disk | 25 GBのハードドライブ空き容量 |
| Network | インターネットアクセス(推奨) |
Ubuntu DesktopではHDDの容量は25 GB以上あればよいので、30 GBとしている。
Diskの部分を30 GBから40 GBへ引き上げることとする。
VMに割り当てる仮想Diskの上限を引き上げる
Palworldのプロセスを停止し、稼働中のVMを止めた状態でDiskの上限を引き上げる。
VMの管理UIは載せているプラットフォームによって異なるので、ご自身の環境で読み解いてください。
| リソース | 設定値 |
|---|---|
| CPU | 4 |
| RAM | 16 GB |
| Disk | 30 GB (ここを40 GBにします) |
| Network | 8211/UDP, 1Gbps |
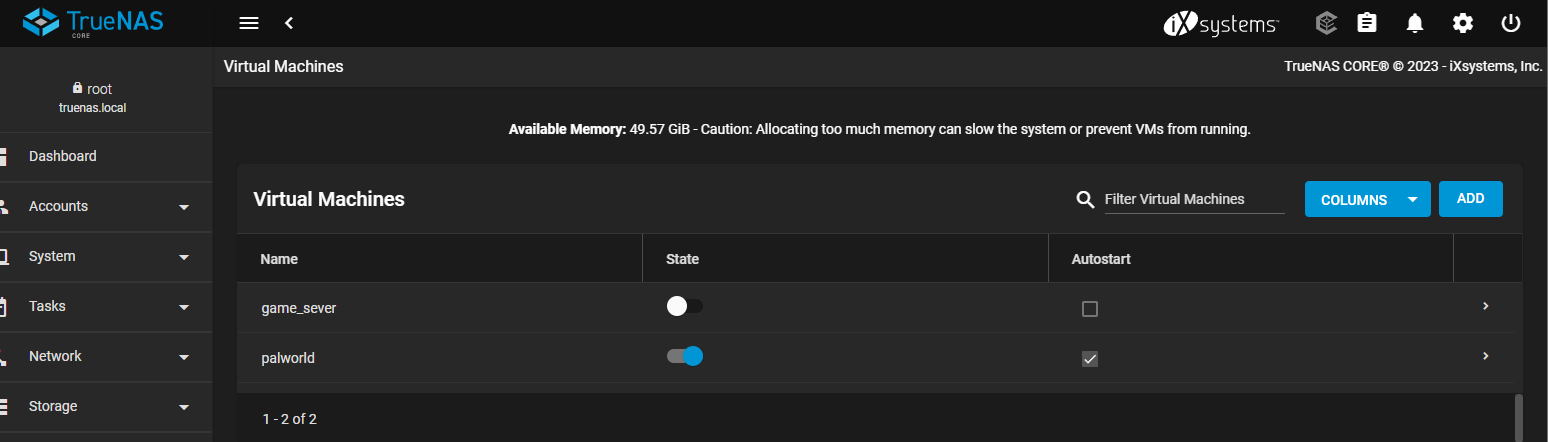
Serverを管理するPortalへログインし、Virtual Machinesタブを開きます。
ServerPalworldのトグルをクリックして、仮想マシンを停止します。
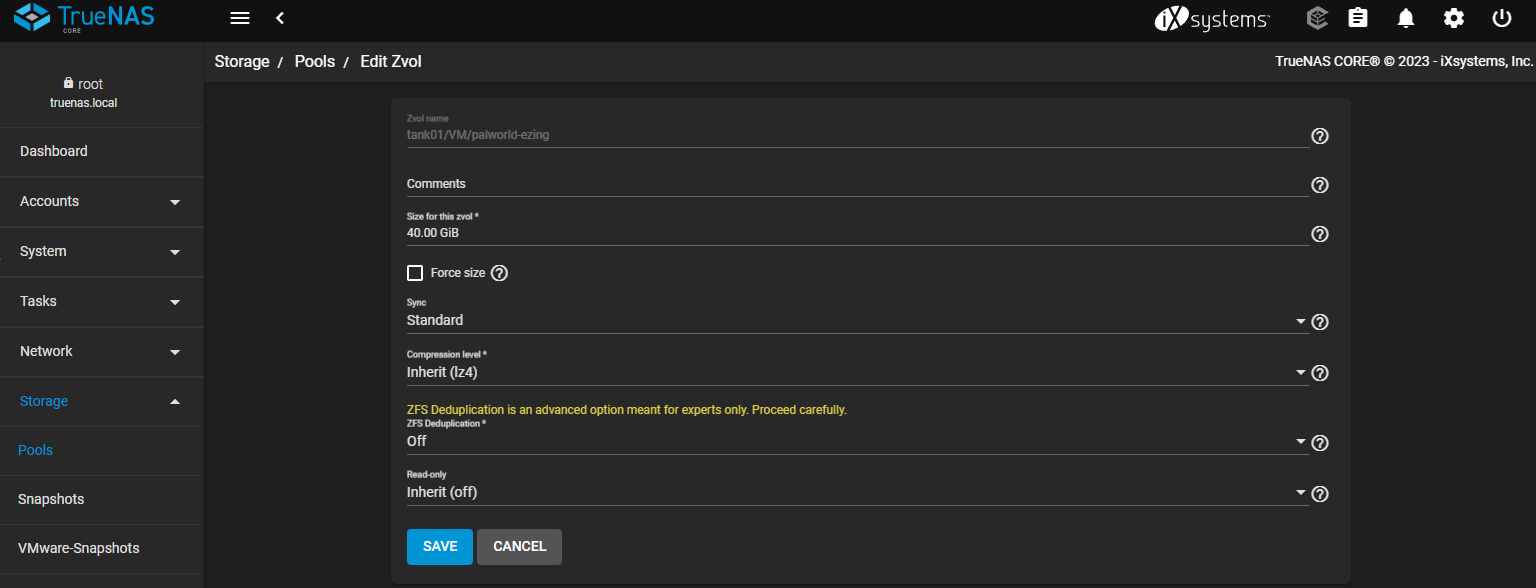
次に、VMにアタッチしている仮想Diskを開きます。
Storage>Poolsを開きま、30 GBから40 GBに引き上げます。
逆の手順で、VMを起動します。
論理ボリュームの上限を引き上げる
サーバにログインします。
論理ボリュームにはまだ触れていないので、最初のままである。
$ df -H
Filesystem                         Size  Used Avail Use% Mounted on
tmpfs                              1.7G  988k  1.7G   1% /run
/dev/mapper/ubuntu--vg-ubuntu--lv   15G   13G  512M  97% /
tmpfs                              8.4G     0  8.4G   0% /dev/shm
tmpfs                              5.3M     0  5.3M   0% /run/lock
/dev/sda2                          2.1G  137M  1.8G   8% /boot
/dev/sda1                          1.2G  6.4M  1.2G   1% /boot/efi
tmpfs                              1.7G  4.1k  1.7G   1% /run/user/1001
今回PalworldをホストしているLinuxでは、ボリュームの管理にLVMを使用している。
fdiskとかでゴニョゴニョしても良いが、素早くlvextendを使う。
ルートディレクトリのファイルシステムを引数に、lvextend -l +100%FREEで論理パーティションを拡張する。
$ sudo su
root@palwvm:/home/palworld# lvm
lvm> lvextend -l +100%FREE /dev/mapper/ubuntu--vg-ubuntu--lv
  Size of logical volume ubuntu-vg/ubuntu-lv changed from 13.47 GiB (3449 extents) to <26.95 GiB (6898 extents).
  Logical volume ubuntu-vg/ubuntu-lv successfully resized.
lvm> exit
次に、resize2fsでファイルシステムを拡張する(ログを残し忘れたのでコマンドのみ)。
root@palwvm:/home/palworld# resize2fs /dev/mapper/ubuntu--vg-ubuntu--lv
論理ボリュームの拡張が完了した。df -hで状況を見てみよう。
root@palwvm:/home/palworld# df -h
Filesystem                         Size  Used Avail Use% Mounted on
tmpfs                              1.6G  960K  1.6G   1% /run
/dev/mapper/ubuntu--vg-ubuntu--lv   27G   12G   14G  48% /
tmpfs                              7.9G     0  7.9G   0% /dev/shm
tmpfs                              5.0M     0  5.0M   0% /run/lock
/dev/sda2                          2.0G  130M  1.7G   8% /boot
/dev/sda1                          1.1G  6.1M  1.1G   1% /boot/efi
tmpfs                              1.6G  4.0K  1.6G   1% /run/user/1001
ルートディレクトリの使用率が 97% から 48% に収まった。
(追記 2024/03/03)
使用されていないDisk領域が / に割り当てられただけで、40 GB になっていないとの指摘をいただきました。
OSからは40GBで認識されているはずなので、拡張する。
手順は、
- 追加したDisk容量分のパーティションを作成する
- 新規作成のパーティションを使ったPVを作成する
- 作成したPhysical Volume(PV)をLVMのVolume Group(VG)に割り当てる
- LVMを100%に拡張する
- FileSystemのサイズを変更する
パーティションの作成
# fdisk -l

(略)

Disk /dev/sda: 40 GiB, 42949672960 bytes, 83886080 sectors
Disk model: BHYVE SATA DISK
Units: sectors of 1 * 512 = 512 bytes
Sector size (logical/physical): 512 bytes / 16384 bytes
I/O size (minimum/optimal): 16384 bytes / 16384 bytes
Disklabel type: gpt
Disk identifier: 6977EAA3-74B2-4695-9045-D674A543F85B

Device       Start      End  Sectors  Size Type
/dev/sda1     2048  2203647  2201600    1G EFI System
/dev/sda2  2203648  6397951  4194304    2G Linux filesystem
/dev/sda3  6397952 62912511 56514560 26.9G Linux filesystem


Disk /dev/mapper/ubuntu--vg-ubuntu--lv: 26.95 GiB, 28932308992 bytes, 56508416 sectors
Units: sectors of 1 * 512 = 512 bytes
Sector size (logical/physical): 512 bytes / 16384 bytes
I/O size (minimum/optimal): 16384 bytes / 16384 bytes
/dev/sda に 40 GB が割り当たっていることが読み取れるので、パーティションの変更を実施する。
パーティション変更前の状態は、/dev/sda1が 1G、 /dev/sda2が2G、/dev/sda3が 26.9Gとして割り当てられている。
fdisk /dev/sda を実行して、拡張したDiskにラベルを付与する。
# fdisk /dev/sda

Welcome to fdisk (util-linux 2.37.2).
Changes will remain in memory only, until you decide to write them.
Be careful before using the write command.

GPT PMBR size mismatch (62914559 != 83886079) will be corrected by write.
The backup GPT table is not on the end of the device. This problem will be corrected by write.
This disk is currently in use - repartitioning is probably a bad idea.
It's recommended to umount all file systems, and swapoff all swap
partitions on this disk.


Command (m for help):
fdisk p コマンドを実行し、現在のパーティションを表示することができ、sda1, sda2, sda3 が既に存在している。
Command (m for help): p

Disk /dev/sda: 40 GiB, 42949672960 bytes, 83886080 sectors
Disk model: BHYVE SATA DISK
Units: sectors of 1 * 512 = 512 bytes
Sector size (logical/physical): 512 bytes / 16384 bytes
I/O size (minimum/optimal): 16384 bytes / 16384 bytes
Disklabel type: gpt
Disk identifier: 6977EAA3-74B2-4695-9045-D674A543F85B

Device       Start      End  Sectors  Size Type
/dev/sda1     2048  2203647  2201600    1G EFI System
/dev/sda2  2203648  6397951  4194304    2G Linux filesystem
/dev/sda3  6397952 62912511 56514560 26.9G Linux filesystem
fdisk n コマンドを実行して、LVMに追加するパーティションを新規作成する。
Command (m for help): n
Partition number (4-128, default 4):
First sector (62912512-83886046, default 62912512):
Last sector, +/-sectors or +/-size{K,M,G,T,P} (62912512-83886046, default 83886046):

Created a new partition 4 of type 'Linux filesystem' and of size 10 GiB.
10 GBの/dev/sda4が作成されたので、fdisk p コマンドで確認する。
Command (m for help): p
Disk /dev/sda: 40 GiB, 42949672960 bytes, 83886080 sectors
Disk model: BHYVE SATA DISK
Units: sectors of 1 * 512 = 512 bytes
Sector size (logical/physical): 512 bytes / 16384 bytes
I/O size (minimum/optimal): 16384 bytes / 16384 bytes
Disklabel type: gpt
Disk identifier: 6977EAA3-74B2-4695-9045-D674A543F85B

Device        Start      End  Sectors  Size Type
/dev/sda1      2048  2203647  2201600    1G EFI System
/dev/sda2   2203648  6397951  4194304    2G Linux filesystem
/dev/sda3   6397952 62912511 56514560 26.9G Linux filesystem
/dev/sda4  62912512 83886046 20973535   10G Linux filesyste
fdisk w コマンドでパーティションを更新する。
Command (m for help): w
The partition table has been altered.
Syncing disks.
PVの作成とVGへの割り当て
まず、PVの状態をpvdisplayで確認する。
# pvdisplay
  --- Physical volume ---
  PV Name               /dev/sda3
  VG Name               ubuntu-vg
  PV Size               <26.95 GiB / not usable 3.00 MiB
  Allocatable           yes (but full)
  PE Size               4.00 MiB
  Total PE              6898
  Free PE               0
  Allocated PE          6898
  PV UUID               qC9wnm-rMKP-ZpnP-sL7B-LxRt-5RJw-rPEiDR
前節で作成した/dev/sda4のPVを作成する。
# pvcreate /dev/sda4
  Physical volume "/dev/sda4" successfully created.
作成後のPVの状態をpvdisplayで確認する。
# pvdisplay
  --- Physical volume ---
  PV Name               /dev/sda3
  VG Name               ubuntu-vg
  PV Size               <26.95 GiB / not usable 3.00 MiB
  Allocatable           yes (but full)
  PE Size               4.00 MiB
  Total PE              6898
  Free PE               0
  Allocated PE          6898
  PV UUID               qC9wnm-rMKP-ZpnP-sL7B-LxRt-5RJw-rPEiDR

  "/dev/sda4" is a new physical volume of "10.00 GiB"
  --- NEW Physical volume ---
  PV Name               /dev/sda4
  VG Name
  PV Size               10.00 GiB
  Allocatable           NO
  PE Size               0
  Total PE              0
  Free PE               0
  Allocated PE          0
  PV UUID               Ng4Zqz-gJWu-TOPX-bJxa-ga7g-HLfn-UBB5uO
sda3, sda4のPVが存在していることが確認できた。
次に、LVMのVolume GroupにPVを追加する。Volume Groupをvgdisplayで確認する。
# vgdisplay
  --- Volume group ---
  VG Name               ubuntu-vg
  System ID
  Format                lvm2
  Metadata Areas        1
  Metadata Sequence No  3
  VG Access             read/write
  VG Status             resizable
  MAX LV                0
  Cur LV                1
  Open LV               1
  Max PV                0
  Cur PV                1
  Act PV                1
  VG Size               <26.95 GiB
  PE Size               4.00 MiB
  Total PE              6898
  Alloc PE / Size       6898 / <26.95 GiB
  Free  PE / Size       0 / 0
  VG UUID               Al2PwZ-8SXm-hqtd-ueSG-VF63-z63H-hjmrzo
Volume Groupの名前がubuntu-vgであることを確認できた。
このVolume Groupにsda4のPVを追加する。
# vgextend ubuntu-vg /dev/sda4
  Volume group "ubuntu-vg" successfully extended
root@palwvm:/home/palworld# vgdisplay
  --- Volume group ---
  VG Name               ubuntu-vg
  System ID
  Format                lvm2
  Metadata Areas        2
  Metadata Sequence No  4
  VG Access             read/write
  VG Status             resizable
  MAX LV                0
  Cur LV                1
  Open LV               1
  Max PV                0
  Cur PV                2
  Act PV                2
  VG Size               36.94 GiB
  PE Size               4.00 MiB
  Total PE              9457
  Alloc PE / Size       6898 / <26.95 GiB
  Free  PE / Size       2559 / <10.00 GiB
  VG UUID               Al2PwZ-8SXm-hqtd-ueSG-VF63-z63H-hjmrzo
サイズが26.95 GiBから36.94 GiBに拡張されていることを確認できた。
LVMの拡張
拡張前の状態をlvdisplayで確認する。
# lvdisplay
  --- Logical volume ---
  LV Path                /dev/ubuntu-vg/ubuntu-lv
  LV Name                ubuntu-lv
  VG Name                ubuntu-vg
  LV UUID                khKwxL-vzJm-Tv9N-mayV-T4eq-Y20O-wEj0WG
  LV Write Access        read/write
  LV Creation host, time ubuntu-server, 2024-02-03 15:47:55 +0900
  LV Status              available
  # open                 1
  LV Size                <26.95 GiB
  Current LE             6898
  Segments               1
  Allocation             inherit
  Read ahead sectors     auto
  - currently set to     256
  Block device           253:0
ここで、lvextendを使って追加したVolumeまで拡張する。
# lvextend  -l +100%FREE /dev/mapper/ubuntu--vg-ubuntu--lv
  Size of logical volume ubuntu-vg/ubuntu-lv changed from <26.95 GiB (6898 extents) to 36.94 GiB (9457 extents).
  Logical volume ubuntu-vg/ubuntu-lv successfully resized.
再度、LVMが拡張されたか確認する。
# lvdisplay
  --- Logical volume ---
  LV Path                /dev/ubuntu-vg/ubuntu-lv
  LV Name                ubuntu-lv
  VG Name                ubuntu-vg
  LV UUID                khKwxL-vzJm-Tv9N-mayV-T4eq-Y20O-wEj0WG
  LV Write Access        read/write
  LV Creation host, time ubuntu-server, 2024-02-03 15:47:55 +0900
  LV Status              available
  # open                 1
  LV Size                36.94 GiB
  Current LE             9457
  Segments               2
  Allocation             inherit
  Read ahead sectors     auto
  - currently set to     256
  Block device           253:0
FileSystemの拡張
ここまでの作業で、LVMのサイズを拡張できた。
最後に、/に割り当てているFileSystemのサイズを引き上げる。
現在のFileSystemの容量を確認する。
# df -h
Filesystem                         Size  Used Avail Use% Mounted on
tmpfs                              1.6G  984K  1.6G   1% /run
/dev/mapper/ubuntu--vg-ubuntu--lv   27G   12G   14G  46% /
tmpfs                              7.9G     0  7.9G   0% /dev/shm
tmpfs                              5.0M     0  5.0M   0% /run/lock
/dev/sda2                          2.0G  252M  1.6G  14% /boot
/dev/sda1                          1.1G  6.1M  1.1G   1% /boot/efi
tmpfs                              1.6G  4.0K  1.6G   1% /run/user/1001
/が 27G であることを確認できた。
resize2fsでサイズを拡張する。
# resize2fs /dev/mapper/ubuntu--vg-ubuntu--lv
resize2fs 1.46.5 (30-Dec-2021)
Filesystem at /dev/mapper/ubuntu--vg-ubuntu--lv is mounted on /; on-line resizing required
old_desc_blocks = 4, new_desc_blocks = 5
The filesystem on /dev/mapper/ubuntu--vg-ubuntu--lv is now 9683968 (4k) blocks long.
拡張できたか確認する。
# df -h
Filesystem                         Size  Used Avail Use% Mounted on
tmpfs                              1.6G  984K  1.6G   1% /run
/dev/mapper/ubuntu--vg-ubuntu--lv   37G   12G   24G  34% /
tmpfs                              7.9G     0  7.9G   0% /dev/shm
tmpfs                              5.0M     0  5.0M   0% /run/lock
/dev/sda2                          2.0G  252M  1.6G  14% /boot
/dev/sda1                          1.1G  6.1M  1.1G   1% /boot/efi
tmpfs                              1.6G  4.0K  1.6G   1% /run/user/1001
無事に/のサイズを 27GBから37 GBと、約40 GB に拡張できた。
最後に
さて、これにてDedicated Serverを新しいバージョンに更新する準備ができました。
後はsteamcmdで更新するだけです。
それでは、良きパルライフをお過ごしください。