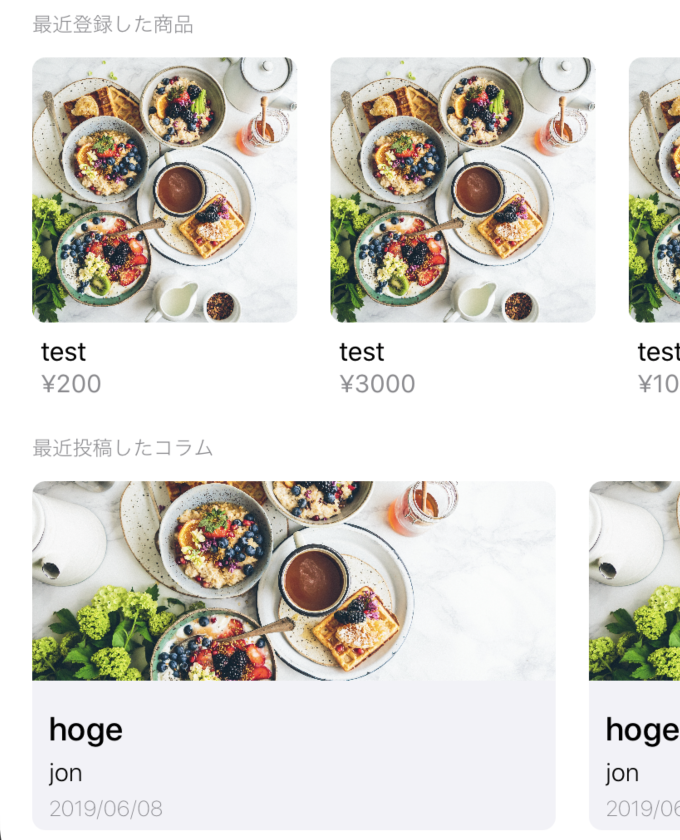
完成形
 ## Viewの構成
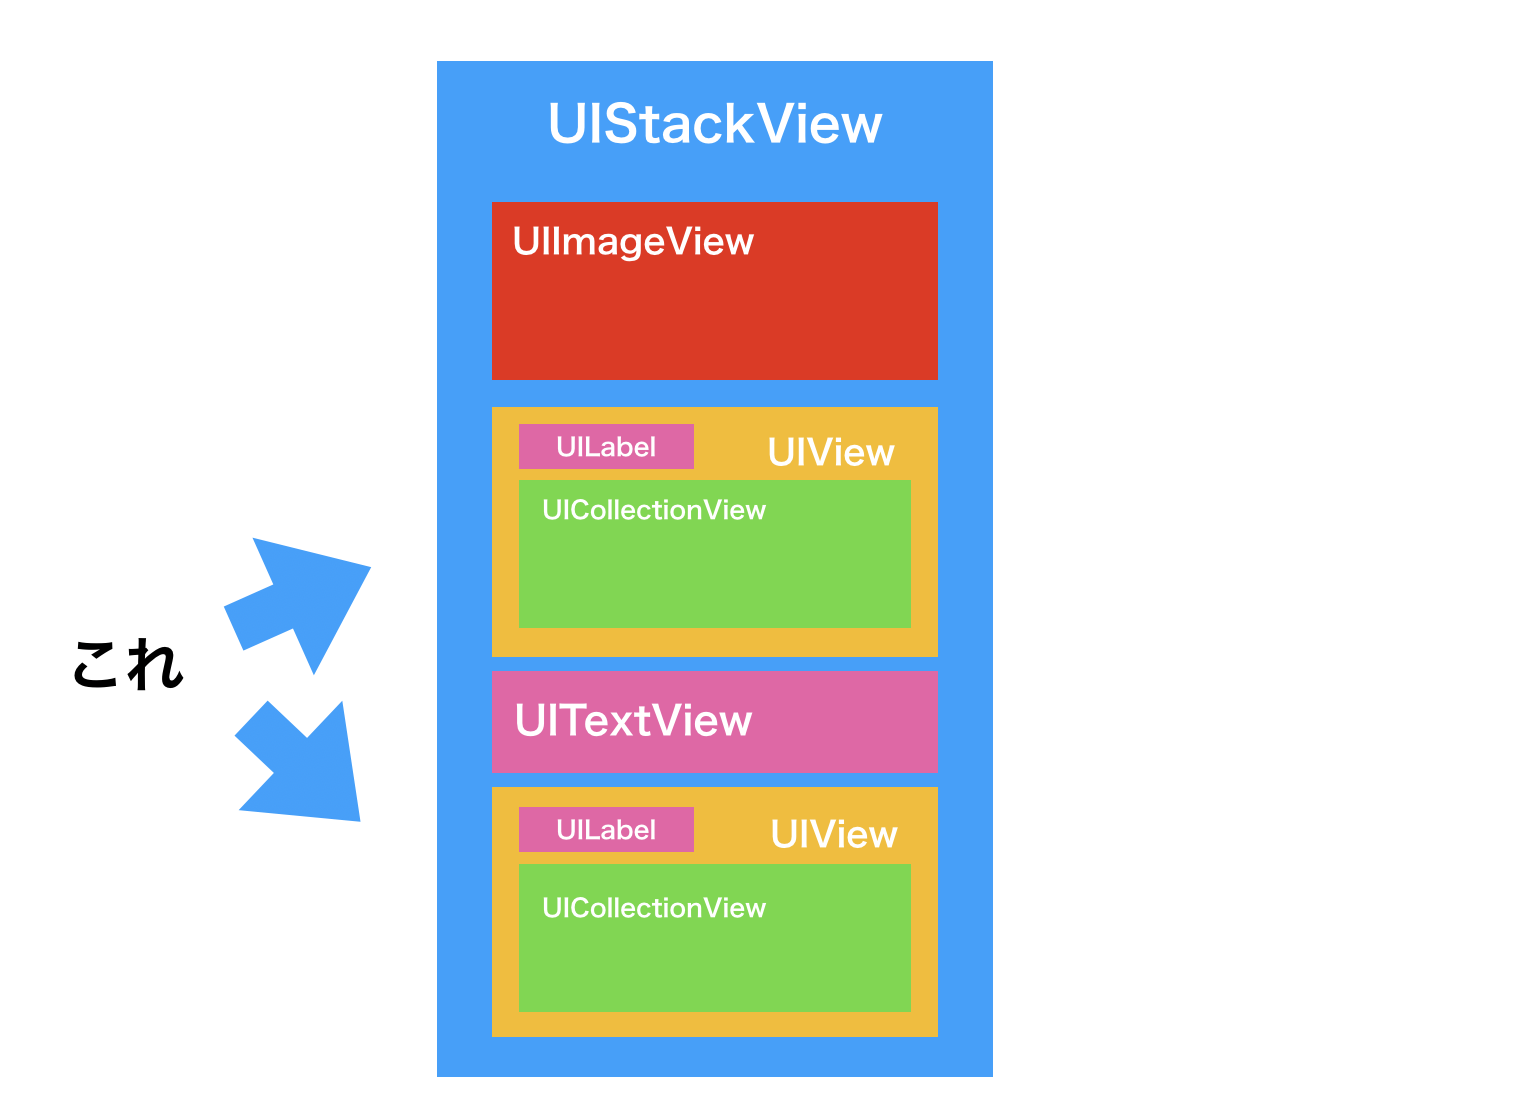
今回はECサービスなどで見かけるUIStackViewで積み上げていく商品詳細画面を作ってみました。構成はUICollectionViewの中にUICollectionViewを入れるのではなく、UIStackViewの中にUIViewを入れて、その中にUICollectionViewを入れる実装になります。
## Viewの構成
今回はECサービスなどで見かけるUIStackViewで積み上げていく商品詳細画面を作ってみました。構成はUICollectionViewの中にUICollectionViewを入れるのではなく、UIStackViewの中にUIViewを入れて、その中にUICollectionViewを入れる実装になります。
 ## 実装
※クラス名などは悩み中なので、適当な名前を付けています。
※ビューのレイアウト部分は所々端折ります。
### UICollectionViewCellの拡張
cellの登録でUINibのnameで使用します
## 実装
※クラス名などは悩み中なので、適当な名前を付けています。
※ビューのレイアウト部分は所々端折ります。
### UICollectionViewCellの拡張
cellの登録でUINibのnameで使用します
extension UICollectionViewCell {
    static var className: String {
        return String(describing: self)
    }
}
Controllerの定義
protocol ItemsSectionController {
    associatedtype Item
    associatedtype Cell: UICollectionViewCell
    var data: BehaviorRelay<[Item]> { get }
    var headerText: String { get }
    var cellIdentifier: String { get }
    func config(cell: Cell, item: Item)
}
ここにheaderTextとcellIdentifierを入れていいのか不明
共通するビューの実装
今回はCellのサイズ計算をUICollectionViewCellのサブクラスで
preferredLayoutAttributesFitting(UICollectionViewLayoutAttributes) -> UICollectionViewLayoutAttributes
をoverrideさせてサイズを決定しているので、
layout.itemSize = UICollectionViewFlowLayout.automaticSize
を設定しているのと
estimatedItemSizeには想定しているcellの高さを入れています。
class ItemsSectionView<Controller: ItemsSectionController>: UIView {
    struct CellIdentity {
        let identifier: String
        let nibname: String
        let cellType: UICollectionViewCell.Type
        init(identifier: String, type: UICollectionViewCell.Type) {
            self.identifier = identifier
            cellType = type
            nibname = type.className
        }
    }

    private lazy headerLabel: UILabel = UILabel()
    private lazy var horizontalCollectionView: UICollectionView = {
        let flowLayout: UICollectionViewFlowLayout = {
            let layout = UICollectionViewFlowLayout()
            layout.scrollDirection = .horizontal
            layout.itemSize = UICollectionViewFlowLayout.automaticSize
            layout.estimatedItemSize = CGSize(width: 210, height: 210)
            return layout
        }()
        let view = UICollectionView(frame: .zero, collectionViewLayout: flowLayout)
        view.translatesAutoresizingMaskIntoConstraints = false
        return view
    }()

    private let controller: Controller
    private let disposeBag = DisposeBag()

    init(controller: Controller, frame: CGRect = .zero) {
        self.controller = controller
        super.init(frame: frame)
        headerLabel.text = controller.headerText
        horizontalCollectionView.register(UINib(nibName: Controller.Cell.className, bundle: nil), forCellWithReuseIdentifier: controller.cellIdentifier)
        controller.data.asDriver(onErrorJustReturn: [])
            .drive(horizontalCollectionView.rx.items(cellIdentifier: controller.cellIdentifier, cellType: Controller.Cell.self)) { _, item, cell in
                controller.config(cell: cell, item: item)
            }
            .disposed(by: disposeBag)
        viewConfigure()
    }

    required init?(coder: NSCoder) {
        fatalError("init(coder:) has not been implemented")
    }

    private func viewConfigure() {
        addSubview(headerLabel)
        addSubview(horizontalCollectionView)
        //レイアウト処理
    }
}
Controllerの実装
実際に先ほど定義したControllerに準拠したクラスを定義します。
ItemはCollectionViewに表示するためのものなので、エンティティレイヤーで定義したものを入れるよりは表示する必要最低限のコンポーネントをControllerに構造体で定義してあげるのが自然なのかなって思います。
class NoteItemsSectionController: ItemsSectionController {
    struct Note {
        let title: String
        let editor: String
        let image: UIImage
        let publishedDate: Date
    }

    typealias Item = Note
    typealias Cell = NoteItemCollectionViewCell

    var headerText: String {
        return "最近投稿したコラム"
    }
    let data: BehaviorRelay<[NoteItemsSectionController.Column]> = .init(value: [])

    let cellIdentifier: String = "note"

    func config(cell: NoteItemsCollectionViewCell, item: NoteItemsSectionController.Note) {
        cell.imageView.image = item.image
        cell.titleLabel.text = item.title
        cell.editorLabel.text = item.editor
        cell.publishedDateLabel.text = publishedDate.toString() //独自拡張
    }
}
ViewModelの実装
class ShopAnalyticsViewModel {
    let productSectionController: ItemsSectionController = ProductItemsSectionController()
    let noteSectionController: ItemsSectionController = NoteItemsSectionController()

    private let repository = Repository()
    private let disposeBag = DisposeBag()

    init(id: String) {
        repository.producs(id: id, limit: 10)
            .catchErrorJustReturn([])
            .asObservable()
            .bind(to: productSectionController.data)
            .disposed(by: disposeBag)
        repository.notes(id: id, limit: 3)
            .catchErrorJustReturn([])
            .asObservable()
            .bind(to:noteSectionController.data)
            .disposed(by: disposeBag)
    }
}
ViewControllerの実装
class ItemDetailsViewController: UIViewController {
    @IBOutlet weak var stackView: UIStackView!

    private let viewModel: ViewModel

    init(id: String) {
        viewModel = ViewModel(itemID: id)
        super.init(nibName: String(describing: type(of: self)), bundle: nil)
    }

    required init?(coder: NSCoder) {
        fatalError("init(coder:) has not been implemented")
    }

    override func loadView() {
        super.loadView()
        sectionView.addArrangedSubview({
            let view = generateSectionView(controller: viewModel.productSectionController)
            view.heightAnchor.constraint(equalToConstant: 250).isActive = true
            return view
        }())
        sectionView.addArrangedSubview({
            let view = generateSectionView(controller: viewModel.noteSectionController)
            view.heightAnchor.constraint(equalToConstant: 300).isActive = true
            return view
        }())
    }
    private func generateSectionView<Controller: ItemsSectionController>(controller: Controller) -> UIView {
        let view = ItemsSectionView(controller: controller)
        view.translatesAutoresizingMaskIntoConstraints = false
    }
}
まとめ
フワッとした考えからとりあえず手を動かしてみたので所々無駄がある感じですが、一応動くところまで持っていけました。associatedtypeがあるprotocolを使おうとするとどこかで汚くなってしまい、納得のいく実装にはなりませんでした。
StackViewのサブビュー生成はUIViewControllerではなく、ViewModelがやってもいいのではとかいろいろ悩んでいます。