SwiftUIのTextEditor/TextFieldとキーボードとの間隔を調整する
SwiftUIでTextEditorやTextFieldは、フォーカスが当たると自動でキーボードを避けて上に持ち上がります
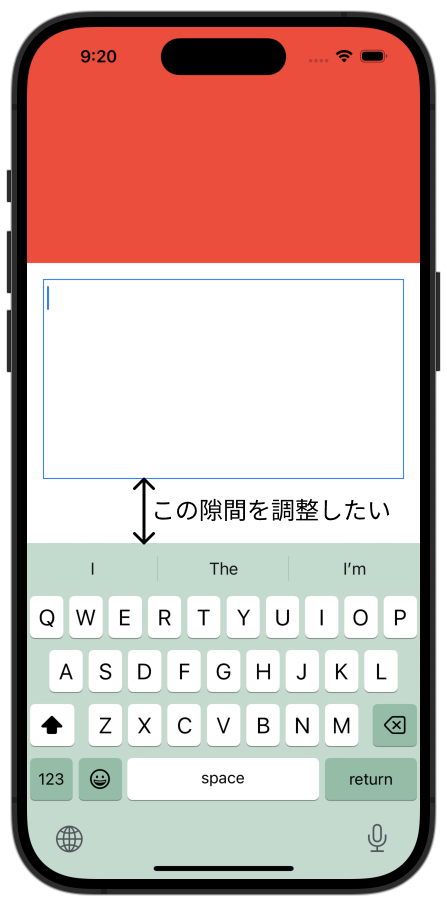
デフォルトだとTextEditorやTextFieldのコンポーネントの底部とキーボードの上部には隙間がありません
このコンポーネントの底部とキーボードの上部を隙間を調整しようとした際に、思いの外ハマったので備忘録です
| デフォルト | 期待動作 |
|---|---|
 |
 |
TextEditor/TextFieldの実装
コード
まずは、シンプルなTextEditorを実装してみた
struct ContentView: View {
    @FocusState var focus:Bool

    @State var text: String = ""

    var body: some View {
        ScrollView {
            VStack(spacing: 0) {
                Color.red
                    .frame(height: 600)

                TextEditor(text: $text)
                    .frame(height: 200)
                    .border(Color.blue, width: 1)
                    .padding(.init(top: 16, leading: 16, bottom: 64, trailing: 16))
                    // TextEditor上でタップしても `focus = false` させない
                    .onTapGesture {}
                    .focused($focus)

                Color.green
                    .frame(height: 600)
            }
        }
        .onTapGesture {
            focus = false
        }
    }
}
結果
TextEditorにフォーカスが当たると、キーボードを避けてTextEditorが持ち上がりますが、TextEditorの底部とキーボードの上部に隙間がありません
TextEditorについた上左右16pt、下64ptのpaddingが無視されているので、これを考慮した位置にTextEditorが移動して欲しいです
safeAreaInsetを付ける
コード
私が調べた限り最もシンプルな実現方法はフォーカスが当たっている間、safeAreaInsetでinsetをつけるという手法です
struct ContentView: View {
    @FocusState var focus:Bool

    @State var text: String = ""

    var body: some View {
        ScrollView {
            VStack(spacing: 0) {
                Color.red
                    .frame(height: 600)

                TextEditor(text: $text)
                    .frame(height: 200)
                    .border(Color.blue, width: 1)
                    .padding(.init(top: 16, leading: 16, bottom: 64, trailing: 16))
                    // TextEditor上でタップしても `focus = false` させない
                    .onTapGesture {}
                    .focused($focus)

                Color.green
                    .frame(height: 600)
            }
        }
        .safeAreaInset(edge: .bottom, spacing: 0) {
            if focus {
                Color.clear.frame(height: 64)
            }
        }
        .onTapGesture {
            focus = false
        }
    }
}
結果
TextEditorにフォーカスが当たった際に、自動でinsetを考慮した位置までスクロールされます

しかし、safeAreaInsetの部分は、ScrollViewのコンテンツが触れません
そのため、例えばTextEditorの下にボタンを配置して、それを押すことができません
| キーボード表示時 | キーボード非表示時 |
|---|---|
 |
 |
手動でTextEditorを移動させる
safeAreaInsetを付けるとScrollViewのコンテンツが触れられなくなるので、手動でTextEditorを移動させてみました
.ignoresSafeArea(.keyboard) で自動でキーボードを避けないようにします
合わせてキーボードが表示された際に、キーボードの大きさに合わせて手動でsafeAreaInsetを付けます
また、キーボードのsafeAreaInsetが付くのに合わせて、ScrollViewReaderを利用して指定したViewまでスクロールさせます
struct ContentView: View {
    @FocusState var focus:Bool
    @State var keyboardHeight: CGFloat = 0

    @State var text: String = ""

    var body: some View {
        ScrollViewReader { proxy in
            ScrollView {
                VStack(spacing: 0) {
                    Color.red
                        .frame(height: 600)

                    TextEditor(text: $text)
                        .frame(height: 200)
                        .border(Color.blue, width: 1)
                        .padding(.init(top: 16, leading: 16, bottom: 64, trailing: 16))
                        // TextEditor上でタップしても `focus = false` させない
                        .onTapGesture {}
                        .focused($focus)
                        .id("TextEditor")

                    Color.green
                        .frame(height: 600)
                }
            }
            .onTapGesture {
                focus = false
            }
            .onReceive(keyboardHeightPublisher) { value in
                keyboardHeight = value
            }
            .onChange(of: keyboardHeight) { oldValue, newValue in
                withAnimation {
                    if focus, newValue > 0 {
                        proxy.scrollTo("TextEditor")
                    }
                }
            }
        }
        .safeAreaInset(edge: .bottom, spacing: 0) {
            if keyboardHeight > 0 {
                Color.clear.frame(height: keyboardHeight)
            }
        }
        .ignoresSafeArea(.keyboard)
    }

    var keyboardHeightPublisher: some Publisher<CGFloat, Never> {
        Publishers.Merge(
            NotificationCenter.default
                .publisher(for: UIResponder.keyboardWillShowNotification)
                .compactMap {
                    ($0.userInfo?[UIResponder.keyboardFrameEndUserInfoKey] as? NSValue)?
                        .cgRectValue.height
                }
                .map { keyboardHeight in
                    let scene = UIApplication.shared.connectedScenes
                        .first(where: { $0.activationState == .foregroundActive }) as? UIWindowScene
                    return max(0, keyboardHeight - (scene?.windows.first?.safeAreaInsets.bottom ?? 0))
                },
            NotificationCenter.default
                .publisher(for: UIResponder.keyboardWillHideNotification)
                .map { _ in 0 }
        )
        .eraseToAnyPublisher()
    }
}
結果
TextEditorにフォーカスが当たった際に、好きな位置で表示できるようになりました
スクロールの位置を移動しているので、TextEditorの下のコンテンツが触れない問題も発生しません
まとめ
SwiftUIのTextEditor/TextFieldとキーボードとの間隔を調整する方法の備忘録でした
結構大変なので、より良いやり方をご存知でしたら教えて頂けると嬉しいです