[Unity]macOSでバックグラウンド(非フォーカス)時にキー入力を受け取る
UnityEngine.Inputではバックグラウンド(非フォーカス)時にキー入力を受け取れなかったので、バックグラウンド時にキー入力を受け取れるUnityのNative Pluginを作成しました
テキストエディットのアプリにフォーカスが当たって入力してますが、Unityでもキーボードの入力を検出できています
macのunityでフォーカス当たってない時もキーボードの入力の検知するやつ公開しましたっ!https://t.co/danGo8WHgG pic.twitter.com/uKtZb6JKNX
— ふじき (@fzkqi) July 16, 2022
作成したもの
ソースコードとunitypackageを公開しています
macOSでバックグラウンド(非フォーカス)時にキー入力を受け取る実装
NSEvent.addGlobalMonitorForEventsを使うとmacOSでバックグラウンドでキー入力を受け取る事が可能です
import AppKit
// start
let eventMonitor: Any? = NSEvent.addGlobalMonitorForEvents(matching: [.keyDown]) { (event: NSEvent) in
    print("event: \(event)")
}
// stop
NSEvent.removeMonitor(eventMonitor)
バックグラウンド時にキー入力を受け取るロジックの実装
jsonで設定を受け取って、addGlobalMonitorForEventsし、モニタリングしたeventをjsonにして返します
import AppKit
import Foundation

public struct UnityAppEventMonitorConfiguration: Decodable {
    public let targets: UInt64
}

public struct UnityAppEventMonitorEvent: Encodable {
    public let characters: String
}

public class UnityAppEventMonitor {
    public static let shared = UnityAppEventMonitor()

    private var handler: ((String) -> Void)?
    private var eventMonitor: Any?

    public func start(configuration: String,
                      handler: @escaping (String) -> Void) {
        stop()
        guard let data = configuration.data(using: .utf8),
              let config = try? JSONDecoder().decode(UnityAppEventMonitorConfiguration.self, from: data) else {
            return
        }
        self.handler = handler
        let mask = NSEvent.EventTypeMask(rawValue: config.targets)
        addGlobalMonitor(matching: mask)
    }

    private func addGlobalMonitor(matching mask: NSEvent.EventTypeMask) {
        eventMonitor = NSEvent.addGlobalMonitorForEvents(matching: mask) { [weak self] (event: NSEvent) in
            let res = UnityAppEventMonitorEvent(characters: event.characters ?? "")
            guard let data = try? JSONEncoder().encode(res),
                  let str = String(data: data, encoding: .utf8) else {
                return
            }
            self?.handler?(str)
        }
    }

    public func stop() {
        if let eventMonitor = eventMonitor {
            NSEvent.removeMonitor(eventMonitor)
        }
        handler = nil
        eventMonitor = nil
    }
}
UnityのInterfaceの実装
上で作成したAppEventMonitorを呼び出すためのCのインタフェースを定義します
@_cdecl("AppEventMonitor_Start")
public func AppEventMonitor_Start(_ configStrPtr: UnsafePointer<CChar>?,
                                  _ handler: @escaping @convention(c) (UnsafePointer<CChar>) -> Void) {
    let configStr = String(cString: configStrPtr!)
    UnityAppEventMonitor.shared.start(configuration: configStr) { (resStr: String) in
        let resNsStr = resStr as NSString
        let resNsStrPtr: UnsafePointer<CChar> = resNsStr.utf8String!
        let resNsStrPtrDup: UnsafeMutablePointer<CChar> = strdup(resNsStrPtr)
        handler(resNsStrPtrDup)
    }
}
@_cdecl("AppEventMonitor_Stop")
public func AppEventMonitor_Stop() {
    UnityAppEventMonitor.shared.stop()
}
bundleの作成
bundleターゲットを追加してビルドします
詳しくはこちら↓
C#の実装
Swiftで用意したCのインタフェースの関数の定義と、コールバック用の関数を作成します
コールバックが呼ばれたらパースしてActionに流します
using AOT;
using System;
using System.Runtime.InteropServices;
using UnityEngine;

namespace AppEventMonitor
{
    public static class AppEventMonitorManager
    {
        [Serializable]
        class AppEventMonitorEvent
        {
            public string characters;
        }

        [UnmanagedFunctionPointer(CallingConvention.Cdecl)]
        private delegate void AppEventMonitor_CallbackType([MarshalAs(UnmanagedType.LPStr), In] string message);

        [DllImport("AppEventMonitor.bundle")]
        private static extern void AppEventMonitor_Start(string config, [MarshalAs(UnmanagedType.FunctionPtr)] AppEventMonitor_CallbackType callback);

        [MonoPInvokeCallback(typeof(AppEventMonitor_CallbackType))]
        private static void AppEventMonitor_CallbackTypeHandler(string message)
        {
            var e = JsonUtility.FromJson<AppEventMonitorEvent>(message);
            OnKeyDown.Invoke(e.characters);
        }

        [DllImport("AppEventMonitor.bundle")]
        private static extern void AppEventMonitor_Stop();

        /// <summary>
        /// Detect on key down.
        /// </summary>
        public static event Action<string> OnKeyDown;

        /// <summary>
        /// Start monitoring.
        /// </summary>
        public static void Start()
        {
            // detect keydown
            string config = "{ \"targets\" : 1024 }";
            AppEventMonitor_Start(config, AppEventMonitor_CallbackTypeHandler);
        }

        /// <summary>
        /// Stop monitoring.
        /// </summary>
        public static void Stop()
        {
            AppEventMonitor_Stop();
        }
    }
}
作成した関数の呼び出し
Actionを登録してStartします
using AppEventMonitor;

public class Cube : MonoBehaviour
{
    // Start is called before the first frame update
    void Start()
    {
        AppEventMonitorManager.OnKeyDown += OnKeyDown;

        Debug.Log("Start!!");
        AppEventMonitorManager.Start();
    }

    void OnDestroy()
    {
        Debug.Log("Stop!!");
        AppEventMonitorManager.Stop();
    }

    private void OnKeyDown(string key)
    {
        Debug.Log($"OnKeyDown: {key}");
    }
}
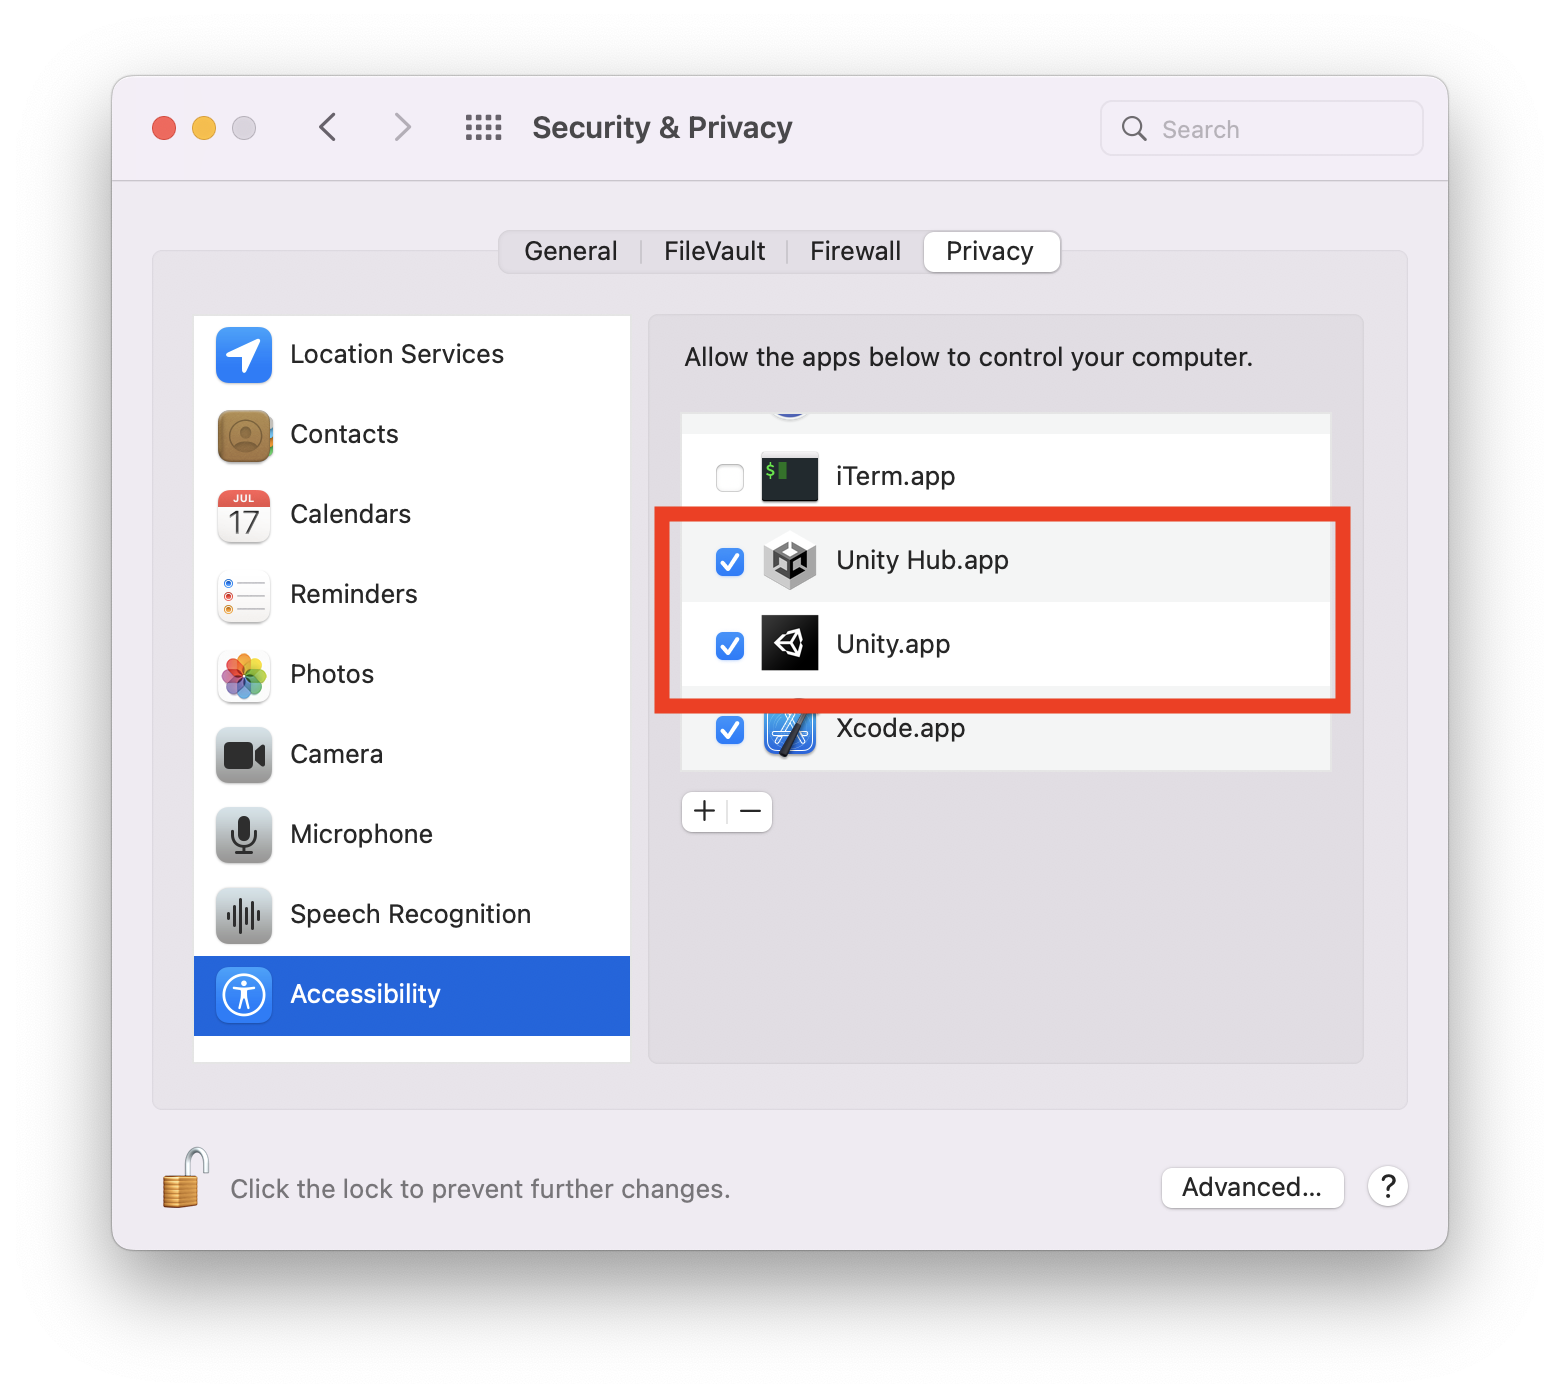
アクセシビリティの登録
開いている間は設定が更新されないので、Unity.app(とUnity Hub.app)を終了します
システム環境設定 > セキュリティとプライバシー > プライバシー > アクセシビリティにUnity.appを追加します
もしUnity Hubを利用している場合は、Unity Hub.appも追加します
動作確認
Unityを実行し、Unity以外にフォーカスがある時にキーボードに入力した時に検出できていれば完成です
終わりに
Zoomにアバターで参加している時にアバターを動かすために、バックグランドでもUnityにキー入力をしたくて実装を始めました
アクセシビリティ周りの話があるので、複雑かなと思ったのですが、Unity.app追加するだけで良く、安心しました
キーボードの押下だけでなく、キーボードを離した時やマウスの動きでも検出できるようなので、拡張していきたいです