MetalFXのMTLFXSpatialScalerでUpscalingしてみた
MetalFXはWWDC22で発表されたリアルタイムアップスケーリング技術です
低解像度で描画したフレームを高解像度に拡大して表示することで、GPU負荷を小さくし、フレームレートを向上させることができます

MetalFXでは各フレームを個別にUpscalingする「MTLFXSpatialScaler」と、前フレームの情報やモーションベクターを活用してUpscalingする「MTLFXTemporalScaler」の2つの方法が提供されています
この2つのうち、シンプルに導入できるMTLFXSpatialScalerを試してみました
| 入力画像 | 2倍Upscaling画像 |
|---|---|
 |
 |
WWDC22での発表はこちらです
Appleのサンプルコードはこちらです
今回初めて知ったのですが、英語ではアプコン/アップコンバートではなくUpscalingということが多いようです
MTLFXSpatialScalerでUpscalingする
MTLTextureをUpscalingするサンプルコード
さっそく、MTLFXSpatialScalerを使って、inputTextureをoutputTextureにUpscalingするサンプルコードです
// 前準備
let inputTexture: any MTLTexture = //...
let outputTexture: any MTLTexture = //...

let device: any MTLDevice = MTLCreateSystemDefaultDevice()!
let commandQueue: any MTLCommandQueue = device.makeCommandQueue()!

let desc = MTLFXSpatialScalerDescriptor()
desc.inputWidth = inputTexture.width
desc.inputHeight = inputTexture.height
desc.outputWidth = outputTexture.width
desc.outputHeight = outputTexture.height
desc.colorTextureFormat = inputTexture.pixelFormat
desc.outputTextureFormat = outputTexture.pixelFormat
desc.colorProcessingMode = .perceptual
let mfxSpatialScaler: any MTLFXSpatialScaler = desc.makeSpatialScaler(device: device)!

// Upscalingの実行
let commandBuffer: any MTLCommandBuffer = commandQueue.makeCommandBuffer()!
mfxSpatialScaler.colorTexture = inputTexture
mfxSpatialScaler.outputTexture = outputTexture
mfxSpatialScaler.encode(commandBuffer: commandBuffer)
commandBuffer.commit()
commandBuffer.waitUntilCompleted()
実装のポイント
- inputTexture
-
usageがMTLTextureUsage.shaderReadに設定されている必要があります
-
- outputTexture
-
usageがMTLTextureUsage.renderTargetに、storageModeがMTLStorageMode.privateに設定されている必要があります - また、inputTextureとpixelFormatを一致させる必要があるようです
-
- colorProcessingMode
- MTLFXSpatialScalerColorProcessingModeはperceptualとlinear、hdrの3種類があります
- linearとhdrの場合は、sRGBのinputTextureには対応していないようです
- MTLFXSpatialScalerの使いまわし
- 実際にゲームなどで毎フレーム実行する場合は、MTLFXSpatialScalerを使いまわすようにするのが良いそうです
- MTLFXSpatialScalerのインスタンス作成には時間がかかるそうです
参考) https://developer.apple.com/documentation/metalfx#overview
実行結果
こちらが実行結果です!
| 入力画像 | 2倍Upscaling画像 |
|---|---|
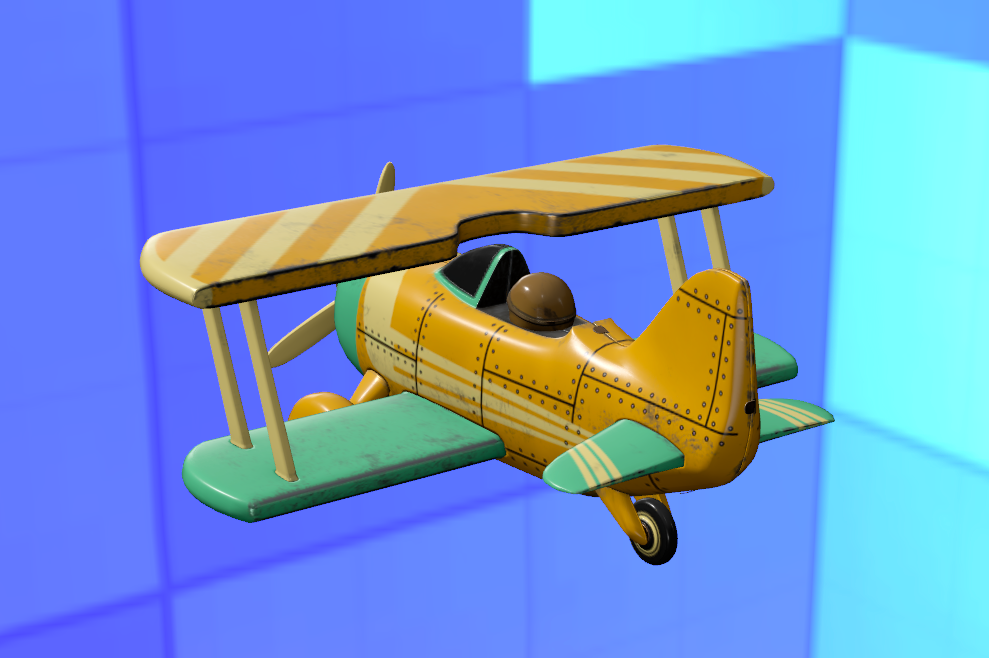 |
 |
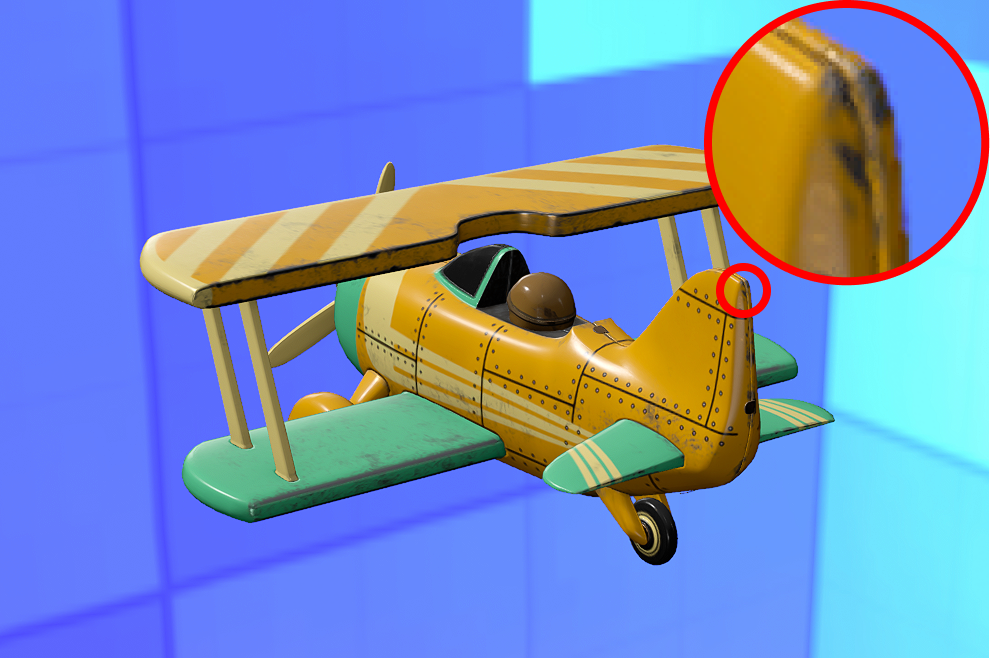
少し効果がわかりにくいですが、、、
以下の画像は末端の部分を拡大してみました
たしかに、滑らかにUpscalingしていることがわかります
| 入力画像 | 2倍Upscaling画像 |
|---|---|
|
|
まとめ
MetalFXのMTLFXSpatialScalerでUpscalingするのを試してみました
簡単に、滑らかにUpscalingすることができました
シンプルに組み込むことができるので、簡単にMetalベースのパイプラインのゲームやARに導入できそうです
ただ、あまりにも荒い画像や、セルルックのアウトラインのような細い線は苦手のようなので、使い所を見極める必要がありそうな印象でした
今後の展望
MTLFXSpatialScalerは各フレームを独立してUpscalingするので、シンプルに実現できました
一方で、MTLFXTemporalScalerは各フレームに加えて、depth情報やモーションベクターなどを使ってUpscalingします
これにより、動きのあるシーンでも高精度なUpscalingを実現できるそうですが、RealityKit / SceneKitでサクッとこれらの対応を入れられなさそうなので、今回は断念しましたがいつかチャレンジしてみたいです
具体的には、MTLFXTemporalScalerでは各フレームのカラーバッファに加えて以下が必要です
- depthTexture: MTLTexture
- カラーバッファに対応する深度バッファ(Zバッファ)
- motionTexture: MTLTexture
- モーションベクタ(velocity buffer)、各ピクセルが前フレームからどこに移動したかを示す
- RG16Float などで、X/Y のベクトル成分を格納
- jitterOffset
- サブピクセル単位のジッターオフセット
- テンポラル・アンチエイリアシング (TAA) 用
- カラーバッファの描画の時点で少しずつサンプリング位置をずらす
MTLFXSpatialScalerを使ってUIImageをUpscalingするアプリコード全文
最後に、動作するアプリのコード全文を掲載しておきます
UIImageからMTLTextureへ変換し、Upscalingして、再度MTLTextureからUIImageへ変換して画面に表示します
実際に動作するアプリのコード全文はこちら!
import SwiftUI
import Metal
import MetalKit
import MetalFX

struct ContentView: View {
    @State var vm = ContentViewModel()

    var body: some View {
        VStack {
            Image(uiImage: vm.original)
                .resizable()
                .scaledToFit()
            if let result = vm.result {
                Image(uiImage: result)
                    .resizable()
                    .scaledToFit()
            }
        }
        .onAppear {
            vm.upscale()
        }
    }
}

@Observable
class ContentViewModel {
    let original = UIImage(resource: .image)
    var result: UIImage?

    private let device: any MTLDevice
    private let commandQueue: any MTLCommandQueue
    private let upscaler: Upscaler

    init() {
        device = MTLCreateSystemDefaultDevice()!
        commandQueue = device.makeCommandQueue()!
        upscaler = Upscaler(device: device)
    }

    func upscale() {
        let inputTexture = original.toTexture(device: device)
        let commandBuffer: any MTLCommandBuffer = commandQueue.makeCommandBuffer()!
        let outputTexture = upscaler.upscale(commandBuffer: commandBuffer, inputTexture: inputTexture, scale: 2)
        commandBuffer.commit()
        commandBuffer.waitUntilCompleted()
        result = outputTexture.toUIImage()
    }
}

class Upscaler {
    private let device: any MTLDevice
    private var mfxSpatialScaler: (any MTLFXSpatialScaler)!
    private var outputTexture: (any MTLTexture)!

    init(device: any MTLDevice) {
        self.device = device
    }

    func upscale(commandBuffer: any MTLCommandBuffer, inputTexture: any MTLTexture, scale: Float) -> any MTLTexture {
        // TODO: サイズやpixelFormatが異なる場合も作り直す
        if mfxSpatialScaler == nil {
            outputTexture = createEmptyTexture(
                width: Int(Float(inputTexture.width) * scale),
                height: Int(Float(inputTexture.height) * scale),
                pixelFormat: inputTexture.pixelFormat
            )
            let desc = MTLFXSpatialScalerDescriptor()
            desc.inputWidth = inputTexture.width
            desc.inputHeight = inputTexture.height
            desc.outputWidth = outputTexture.width
            desc.outputHeight = outputTexture.height
            desc.colorTextureFormat = inputTexture.pixelFormat
            desc.outputTextureFormat = outputTexture.pixelFormat
            desc.colorProcessingMode = .perceptual
            mfxSpatialScaler = desc.makeSpatialScaler(device: device)!
        }

        mfxSpatialScaler.colorTexture = inputTexture
        mfxSpatialScaler.outputTexture = outputTexture
        mfxSpatialScaler.encode(commandBuffer: commandBuffer)
        return outputTexture
    }

    private func createEmptyTexture(width: Int, height: Int, pixelFormat: MTLPixelFormat) -> any MTLTexture {
        let descriptor = MTLTextureDescriptor()
        descriptor.pixelFormat = pixelFormat
        descriptor.width = width
        descriptor.height = height
        // .renderTargetは、Upscalingのために必要
        // .shaderReadは、UIImage変換のために必要
        descriptor.usage = [.renderTarget, .shaderRead]
        descriptor.storageMode = .private
        descriptor.textureType = .type2D
        descriptor.mipmapLevelCount = 1
        return device.makeTexture(descriptor: descriptor)!
    }
}

extension UIImage {
    func toTexture(device: any MTLDevice) -> any MTLTexture {
        let loader = MTKTextureLoader(device: device)
        return try! loader.newTexture(cgImage: cgImage!, options: [:])
    }
}

extension MTLTexture {
    func toUIImage() -> UIImage {
        let ci = CIImage(mtlTexture: self, options: [:])!
        let mat = CGAffineTransform(a: 1, b: 0, c: 0, d: -1, tx: 0, ty: ci.extent.height)
        let context = CIContext()
        let cg = context.createCGImage(ci.transformed(by: mat), from: ci.extent)!
        return UIImage(cgImage: cg)
    }
}