OpenVPNによる暗号化通信
VPN技術はインターネット間での通信を暗号化したトンネル上で行う機能を提供し、通信の秘匿性を担保する。
IPSEC VPNやSSL VPNがインターネットVPNには存在するが、OpenVPNではSSL VPN方式となる。
(SSL VPNのメリットは安定性・セキュリティ面両立できる一方で、デメリットは対応していないクライアントがあることである。)
機能を再現するためにAWSリージョン間のVPNをOpenVPNにて実装する。
OpenVPNで専用NWを形成した後は、
- ルーティング構成にした場合は、設定によりクライアント側のサブネット上のIP→サーバ側のサブネット上のIP→への通信、またその逆もいずれも可能である。
- NAT構成にした場合は、クライアント側のサブネット上のIP→サーバ側のサブネット上のIP→への通信のみ可能。(firewalldによるマスカレードが必須)
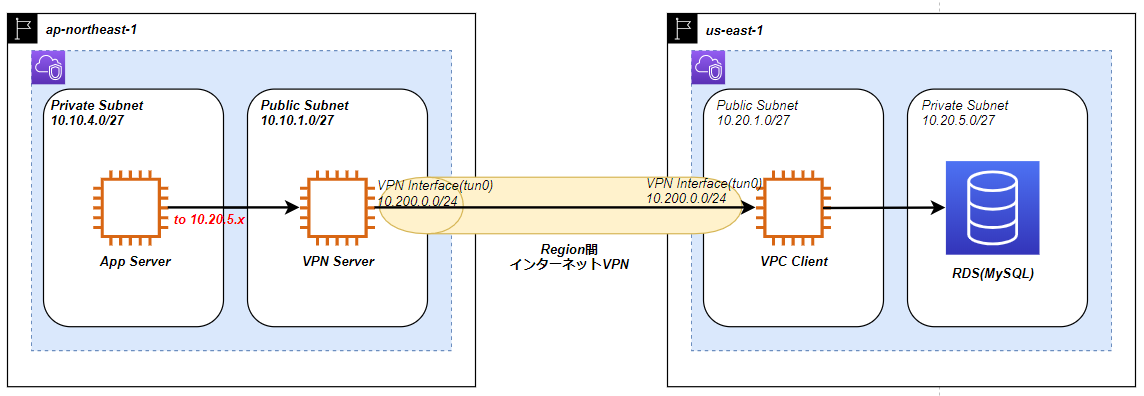
構成図(ルーティング構成)
シナリオ的には、ap-northeast-1リージョンのプライベートサブネット上のEC2から、us-east-1リージョンのプライベートサブネット上のRDSへ接続する。この時、ap-northeast-1リージョンのプライベートサブネット上のEC2はus-east-1リージョンのRDSに対して、プライベートサブネットIP帯を直接指定して接続可能なように構成する。
OpenVPN設定値
OS共通設定
# epelレポジトリからinstallする。
yum --enablerepo=epel -y install openvpn easy-rsa
# VPN Server/Clientと共にパケットをフォワードする必要があるため、カーネルパラメータでパケット転送を許可

# cat /etc/sysctl.conf
net.ipv4.ip_forward = 1
サーバ設定
# 初期化(pkiディレクトリを作成)
[root@master0 ~]# cd /usr/share/easy-rsa/3
[root@master0 3]# ./easyrsa init-pki

init-pki complete; you may now create a CA or requests.
Your newly created PKI dir is: /usr/share/easy-rsa/3/pki

# プライベート認証局作成
[root@master0 3]# ./easyrsa build-ca
Generating a 2048 bit RSA private key
.......................................................+++
.............................................................................+++
writing new private key to '/usr/share/easy-rsa/3/pki/private/ca.key.PxNiLd6P9E'
# パスワードは任意
Enter PEM pass phrase:
Verifying - Enter PEM pass phrase:
-----
You are about to be asked to enter information that will be incorporated
into your certificate request.
What you are about to enter is what is called a Distinguished Name or a DN.
There are quite a few fields but you can leave some blank
For some fields there will be a default value,
If you enter '.', the field will be left blank.
-----
Common Name (eg: your user, host, or server name) [Easy-RSA CA]:VPN-CA

CA creation complete and you may now import and sign cert requests.
Your new CA certificate file for publishing is at:
/usr/share/easy-rsa/3/pki/ca.crt

# サーバ証明書作成
[root@master0 3]# ./easyrsa build-server-full vpn-server1 nopass
Generating a 2048 bit RSA private key
......................+++
.....+++
writing new private key to '/usr/share/easy-rsa/3/pki/private/vpn-server1.key.rlq3SbsITm'
-----
Using configuration from ./openssl-1.0.cnf
# プライベートCA作成時に指定したパスワード
Enter pass phrase for /usr/share/easy-rsa/3/pki/private/ca.key:
Check that the request matches the signature
Signature ok
The Subject's Distinguished Name is as follows
commonName            :ASN.1 12:'vpn-server1'
Certificate is to be certified until Jul 12 00:24:03 2029 GMT (3650 days)

Write out database with 1 new entries
Data Base Updated

# クライアント証明書作成
[root@master0 3]# ./easyrsa build-client-full client1 nopass
Generating a 2048 bit RSA private key
....................+++
............................................................+++
writing new private key to '/usr/share/easy-rsa/3/pki/private/vpn-client1.key.FuWZbgCngi'
-----
Using configuration from ./openssl-1.0.cnf
# プライベートCA作成時に指定したパスワード
Enter pass phrase for /usr/share/easy-rsa/3/pki/private/ca.key:
Check that the request matches the signature
Signature ok
The Subject's Distinguished Name is as follows
commonName            :ASN.1 12:'vpn-client1'
Certificate is to be certified until Jul 12 00:25:32 2029 GMT (3650 days)

Write out database with 1 new entries
Data Base Updated

# DHパラメータ生成
[root@master0 3]# ./easyrsa gen-dh
Generating DH parameters, 2048 bit long safe prime, generator 2
This is going to take a long time

### 長時間掛かる

DH parameters of size 2048 created at /usr/share/easy-rsa/3/pki/dh.pem

# TLS-Auth キー作成
[root@master0 3]# openvpn --genkey --secret ./pki/ta.key

# ここまででCA秘密鍵・証明書、サーバ秘密鍵・証明書、クライアント秘密鍵・証明書、DHパラメータ、 TLS-Auth キーが完成
[root@master0 3]# find /usr/share/easy-rsa/3/pki | grep -E '.key|.crt|dh.pem'
/usr/share/easy-rsa/3/pki/private/ca.key
/usr/share/easy-rsa/3/pki/private/vpn-server1.key
/usr/share/easy-rsa/3/pki/private/vpn-client1.key
/usr/share/easy-rsa/3/pki/issued/vpn-server1.crt
/usr/share/easy-rsa/3/pki/issued/vpn-client1.crt
/usr/share/easy-rsa/3/pki/ca.crt
/usr/share/easy-rsa/3/pki/dh.pem
/usr/share/easy-rsa/3/pki/ta.key
# IPフォワードを有効化
echo 'net.ipv4.ip_forward = 1' >> /etc/sysctl.conf && sysctl --system

# OpenVPN用ディレクトリにCOPY
cp -pR /usr/share/easy-rsa/3/pki/{issued,private,ca.crt,dh.pem,ta.key} /etc/openvpn/server/

# confの設定
cp /usr/share/doc/openvpn-*/sample/sample-config-files/server.conf /etc/openvpn/server/
vi /etc/openvpn/server/server.conf
---------------------------------------------------
# OpenVPN待ち受けポート
port 1194

# プロトコルの指定。通常はUDP
;proto tcp
proto udp

# CA証明書、サーバ証明書、サーバ秘密鍵指定(設定ファイルがある場所をRootディレクトリと考えてよい)
ca   ca.crt
cert issued/vpn-server1.crt
key  private/vpn-server1.key

# DHファイル指定
dh dh.pem

# VPNネットワークで使用するネットワークアドレス指定(何でもよいが既存のものと重複させないこと)
server 10.8.0.0 255.255.255.0

# クライアントがローカルネットワーク(ここでは192.168.1.0/24)に自由に通信できるようにルーティングテーブル指定
# 複数ネットワーク指定の場合は複数行に分割して記載
push "route 192.168.1.0 255.255.255.0"

# キープアライブタイムアウト (10秒毎に生存確認, 120秒無応答でダウン判決)
keepalive 10 120

# TLS-Auth キーを指定
tls-auth ta.key
----------------------------------------------
※ログの出力先や他設定もあるが割愛

# OpenVPN Serverサービス起動
systemctl enable openvpn-server@server --now

# (重要)ファイアウォール設定(アクセス許可&ルーティング)
firewall-cmd --add-service=openvpn --permanent
firewall-cmd --direct --permanent --passthrough ipv4 -t nat -A POSTROUTING -s 10.8.0.0/24 -o enp1 -j MASQUERADE
firewall-cmd --reload
※-sではVPNのネットワークアドレス指定。-oではpushで指定したセグメントのNIC名
サーバ→クライアントへは以下ファイルを転送しておく。
/etc/openvpn/client/に/etc/openvpn/serverより配下をすべて配置するとよい。
・/etc/openvpn/server/ca.crt
・/etc/openvpn/server/ta.key
・/etc/openvpn/server/issued/client1.crt
・/etc/openvpn/server/private/client1.key
クライアント設定
# クライアント用の設定ファイルコピーして設定
cp -pR/usr/share/doc/openvpn-*/sample/sample-config-files/client.conf /etc/openvpn/client/
vi /etc/openvpn/client/client.conf
---------------------------------------------
# clientを指定
client

# サーバと同じ値を設定
;dev tap
dev tun

# OpenVPN サーバーの設定ファイルで指定したプロトコル
proto udp

# OpenVPNサーバーのグローバルIPとポート指定 (自身の環境に合わせて置き換え)
remote [OpenVPNサーバのIPまたはホスト名] 1194

# OpenVPNサーバホスト名の解決を永久に試みる。ラップトップのようなインターネットに常時接続していない
# クライアントには非常に有効
resolv-retry infinite

# クライアント接続時特定のローカルポートをバインドしない
nobind

# persist オプションを有効にする
persist-key
persist-tun

# 証明書や秘密鍵のパス
ca   ca.crt
cert issued/client1.crt
key  private/client1.key

# TLS-Auth キーのパス
tls-auth ta.key 1

# ログレベル
verb 3
---------------------------------------------

# OpenVPN Clientサービス起動
systemctl enable openvpn-client@client --now
参考)
https://freescitech.net/2/ovpn2_howto_ja.html
AWS側で考慮すべき設計(重要)
● 送信元/送信先アドレスの変更チェック無効化
VPN Server/Clientは今回互いのサブネット上のIPに対してパケット転送を行う(NAT無し)ので、EC2の設定変更が必要。
EC2に付随するネットワークインターフェースは、デフォルトで送信元のIPアドレスまたは送信先のIPアドレスが自身のIPアドレスでない場合は、届くパケットをはじくようになっているので、ルーティング構成にする場合は自身以外のサーバへパケットを転送する役割を果たす以上、無効化が必要。他方NAT構成だった場合は、届くパケットの送信先のアドレスは自身のネットワークインターフェースのアドレスになるので特に無効化は要らない。
● ルートテーブルの変更
AWS上のリソースのルーティングテーブルは各サブネットに紐づくルートテーブルで設定する。
- Route Table①
(App Serverが送信元の別リージョンのサービスと通信可能にする追加設定)
10.20.0.0/16 --> VPN ServerのNetwork Interface Id
(別リージョンのVPN Clientが送信元の通信の戻りをVPN Clientへ返すための追加設定)
10.200.0.0/24 --> VPN ServerのNetwork Interface Id
- Route Table②
(VPN Serverが別リージョンのサービスと通信可能にする追加設定)
10.20.0.0/16 --> VPN ServerのNetwork Interface Id
(別リージョンのVPN Clientが送信元の通信の戻りをVPN Clientへ返すための追加設定。VPN Serverとしてはtun0を持つので不要だが同一サブネットに別のサーバが送信元の通信には必須)
10.200.0.0/24 --> VPN ServerのNetwork Interface Id
- Route Table③
(VPN Clientが別リージョンのサービスと通信可能にする追加設定)
10.10.0.0/16 --> VPN ClientのNetwork Interface Id
(別リージョンのVPN Serverが送信元の通信の戻りをVPN Serverへ返すための追加設定。VPN Clientとしてはtun0を持つので不要だが同一サブネットの別のサーバが送信元の通信には必須)
10.200.0.0/24 --> VPN ClientのNetwork Interface Id
- Route Table④
(RDSが別リージョンのサービスと通信可能にする追加設定)
10.10.0.0/16 --> VPN ClientのNetwork Interface Id
(別リージョンのVPN Serverが送信元の通信の戻りをVPN Serverへ返すための追加設定)
10.200.0.0/24 --> VPN ServerのNetwork Interface Id

● セキュリティグループ
- (App Server→VPN Server)当たり前だがセキュリティグループの制限はかかる。そのため、App ServerからのRDS(MySQL)のポート3306のインバウンド通信をVPN Serverに対して許可の必要あり。
- (VPN Server→VPN Client)tun0上の通信に対してはAWSのセキュリティグループの制限はかからない。セキュリティグループで許可されていない例えばtelnet通信などはふつうに可能だった。
- (VPN Client→RDS)当たり前だがセキュリティグループの制限はかかる。そのため、VPN ClientからのRDS(MySQL)のポート3306のインバウンド通信をRDSに対して許可の必要あり。