この記事でやること
AWSでk8sを構築する場合、LoadBalancerタイプのSerivceは、ClassicLoadBalancerが起動します。
v1.9からalphaではありますが、NetworkLoadBalancer(以下、NLB)も使えるようになりました。
AWSブログでは、PublicSubnetにNLBを構築する記事が紹介されていますが、
NLBはInternalELBで利用するシーンが多いのかなと思いましたので、
PrivateSubnetにNLBを構築し、クラスタ内のPODに負荷分散してみました。
NLBとは
2017年9月に誕生した、レイヤ4のLoadBalancerで次のような特徴があります。
- パフォーマンスが高い
- クライアントIPを保持する
- LoadBalancerに静的IPアドレスを付けられる
ALB、CLB、NLBの比較については以下のサイトが参考になります。
構築手順
本手順では、kopsを使ってk8sクラスタを構築します。
s3バケット作成
バケット名をランダムに生成し、ステートストアとして設定する
# export S3_BUCKET=example-state-store-$(cat /dev/random | LC_ALL=C tr -dc "[:alpha:]" | tr '[:upper:]' '[:lower:]' | head -c 32)
# export KOPS_STATE_STORE=s3://${S3_BUCKET}

AWS CLIを使ってS3バケットを作成する
# aws s3 mb $KOPS_STATE_STORE

バージョニングを有効にする
# aws s3api put-bucket-versioning \
  --bucket $S3_BUCKET \
  --versioning-configuration \
  Status=Enabled
k8sクラスタ構築
クラスタを構築する(検証目的のため、小さいインスタンスにしています)
# kops create cluster \
  --name example.cluster.k8s.local \
  --master-size t2.medium \
  --node-size t2.small \
  --node-volume-size 20 \
  --zones ap-northeast-1a,ap-northeast-1c \
  --kubernetes-version 1.9.1 \
  --networking calico \
  --topology private \
  --yes
IAM権限追加
# CLUSTER_NAME=example.cluster.k8s.local
# cat << EOF > nlb-iam-permissions.json
{
    "Version": "2012-10-17",
    "Statement": [
        {
            "Sid": "kopsK8sNLBMasterPermsRestrictive",
            "Effect": "Allow",
            "Action": [
                "ec2:DescribeVpcs",
                "elasticloadbalancing:AddTags",
                "elasticloadbalancing:CreateListener",
                "elasticloadbalancing:CreateTargetGroup",
                "elasticloadbalancing:DeleteListener",
                "elasticloadbalancing:DeleteTargetGroup",
                "elasticloadbalancing:DescribeListeners",
                "elasticloadbalancing:DescribeLoadBalancerPolicies",
                "elasticloadbalancing:DescribeTargetGroups",
                "elasticloadbalancing:DescribeTargetHealth",
                "elasticloadbalancing:ModifyListener",
                "elasticloadbalancing:ModifyTargetGroup",
                "elasticloadbalancing:RegisterTargets",
                "elasticloadbalancing:SetLoadBalancerPoliciesOfListener"
            ],
            "Resource": [
                "*"
            ]
        }
    ]
}
EOF

# aws iam put-role-policy \
    --role-name masters.$CLUSTER_NAME \
    --policy-name masters19.$CLUSTER_NAME \
    --policy-document file://nlb-iam-permissions.json
クラスタの確認
数分するとクラスタが出来上がります

# kops validate cluster
Using cluster from kubectl context: example.cluster.k8s.local

Validating cluster example.cluster.k8s.local

INSTANCE GROUPS
NAME                    ROLE    MACHINETYPE     MIN     MAX     SUBNETS
master-ap-northeast-1a  Master  t2.medium       1       1       ap-northeast-1a
nodes                   Node    t2.small        2       2       ap-northeast-1a,ap-northeast-1c

NODE STATUS
NAME                                                    ROLE    READY
ip-172-20-36-81.ap-northeast-1.compute.internal         node    True
ip-172-20-49-174.ap-northeast-1.compute.internal        master  True
ip-172-20-95-76.ap-northeast-1.compute.internal         node    True


# kops get cluster
NAME                            CLOUD   ZONES
example.cluster.k8s.local       aws     ap-northeast-1a,ap-northeast-1c
bastionインスタンスの作成
新しく作成されたVPCのPublicSubnet(utility-ap-northeast-1a.example.cluster.k8s.local)にEC2インスタンスをローンチし、
kops、kubectlをインストールする。
これ以降の手順は、bastionインスタンスから実施します。
Pod作成
# vi ~/.kube/config

ローカルマシンの同名ファイルの内容をコピペする

# export S3_BUCKET=example-state-store-xxxxxxxxxx
# export KOPS_STATE_STORE=s3://${S3_BUCKET}
# kops validate cluster

# kubectl run nginx --image=nginx --port=80 --labels app=nginx --replicas=2
deployment "nginx" created

# kubectl get pod
NAME                     READY     STATUS    RESTARTS   AGE
nginx-679dc9c764-4n4qc   1/1       Running   0          7s
nginx-679dc9c764-jxl2t   1/1       Running   0          7s
Service作成
# cat << EOF > nlb-service-local.yml
apiVersion: v1
kind: Service
metadata:
name: nginx
namespace: default
labels:
app: nginx
annotations:
service.beta.kubernetes.io/aws-load-balancer-type: "nlb" ←NLBを指定
service.beta.kubernetes.io/aws-load-balancer-internal: 0.0.0.0/0 ←InternalLoadBalancerを指定
spec:
externalTrafficPolicy: Local (後述)
ports:
- name: http
port: 80
protocol: TCP
targetPort: 80
selector:
app: nginx
type: LoadBalancer
EOF
# kubectl create -f nlb-service-local.yml
service "nginx" created
# kubectl describe svc nginx
Name: nginx-local
Namespace: default
Labels: app=nginx
Annotations: service.beta.kubernetes.io/aws-load-balancer-internal=0.0.0.0/0
service.beta.kubernetes.io/aws-load-balancer-type=nlb
Selector: app=nginx
Type: LoadBalancer
IP: 100.71.135.50
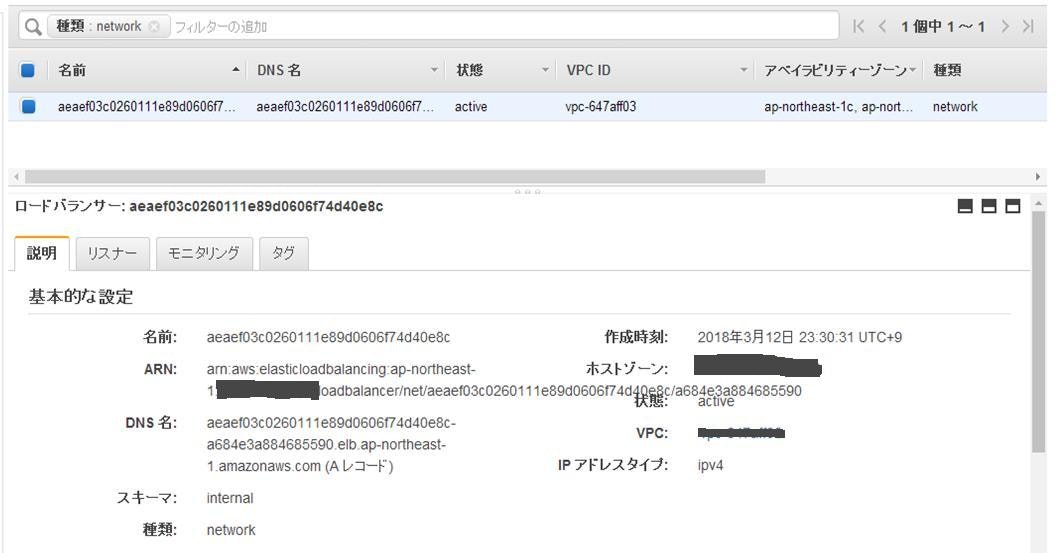
LoadBalancer Ingress: aeaef03c0260111e89d0606f74d40e8c-a684e3a884685590.elb.ap-northeast-1.amazonaws.com
Port: http 80/TCP
TargetPort: 80/TCP
NodePort: http 30191/TCP
Endpoints: 100.103.49.197:80,100.116.189.132:80
Session Affinity: None
External Traffic Policy: Local
HealthCheck NodePort: 31829
Events:
Type Reason Age From Message
---- ------ ---- ---- -------
Normal EnsuringLoadBalancer 35m (x2 over 38m) service-controller Ensuring load balancer
Normal EnsuredLoadBalancer 35m (x2 over 38m) service-controller Ensured load balancer

動作確認
[ec2-user@ip-172-20-2-145 ~]$ curl http://aeaef03c0260111e89d0606f74d40e8c-a684e3a884685590.elb.ap-northeast-1.amazonaws.com/

# kubectl logs -f nginx-679dc9c764-4n4qc
172.20.2.145 - - [12/Mar/2018:15:13:13 +0000] "GET / HTTP/1.1" 200 612 "-" "curl/7.53.1" "-"
172.20.2.145 - - [12/Mar/2018:15:13:14 +0000] "GET / HTTP/1.1" 200 612 "-" "curl/7.53.1" "-"
172.20.2.145 - - [12/Mar/2018:15:13:15 +0000] "GET / HTTP/1.1" 200 612 "-" "curl/7.53.1" "-"
172.20.2.145 - - [12/Mar/2018:15:13:16 +0000] "GET / HTTP/1.1" 200 612 "-" "curl/7.53.1" "-"
172.20.2.145 - - [12/Mar/2018:15:13:22 +0000] "GET / HTTP/1.1" 200 612 "-" "curl/7.53.1" "-"

# kubectl logs nginx-679dc9c764-jxl2t
172.20.2.145 - - [12/Mar/2018:15:12:57 +0000] "GET / HTTP/1.1" 200 612 "-" "curl/7.53.1" "-"
172.20.2.145 - - [12/Mar/2018:15:13:13 +0000] "GET / HTTP/1.1" 200 612 "-" "curl/7.53.1" "-"
172.20.2.145 - - [12/Mar/2018:15:13:15 +0000] "GET / HTTP/1.1" 200 612 "-" "curl/7.53.1" "-"
172.20.2.145 - - [12/Mar/2018:15:13:16 +0000] "GET / HTTP/1.1" 200 612 "-" "curl/7.53.1" "-"
172.20.2.145 - - [12/Mar/2018:15:13:20 +0000] "GET / HTTP/1.1" 200 612 "-" "curl/7.53.1" "-"

ちゃんとクライアントIPが保持されてます。
externalTrafficPolicyについて
デフォルトのCLUSTERの場合、
kube-proxyのIPがクライアントIPとなってしまうため、Localを指定しました。
詳細は公式サイトをご確認ください。
さいごに
alphaではあるものの、ServiceにNLBという選択肢が増えたのは、喜ばしいことだと思いました。早くstableになってほしいです。
参考サイト
https://aws.amazon.com/jp/blogs/opensource/network-load-balancer-support-in-kubernetes-1-9/
https://kubernetes.io/docs/concepts/services-networking/service/