はじめに
今回、Firebaseを使ってiOS版簡易SNSを作成する記事になっています。
この記事ではアカウント作成までの部分を行なっています。
対象者
- Xcodeがインストールされている。
- GoogleAccountを所持している。
- Cocoapodsの環境が整っている。
やっておいてもらうこと
- Xcodeプロジェクトの作成 (当記事ではSNSAppという名前で進めていきます。)
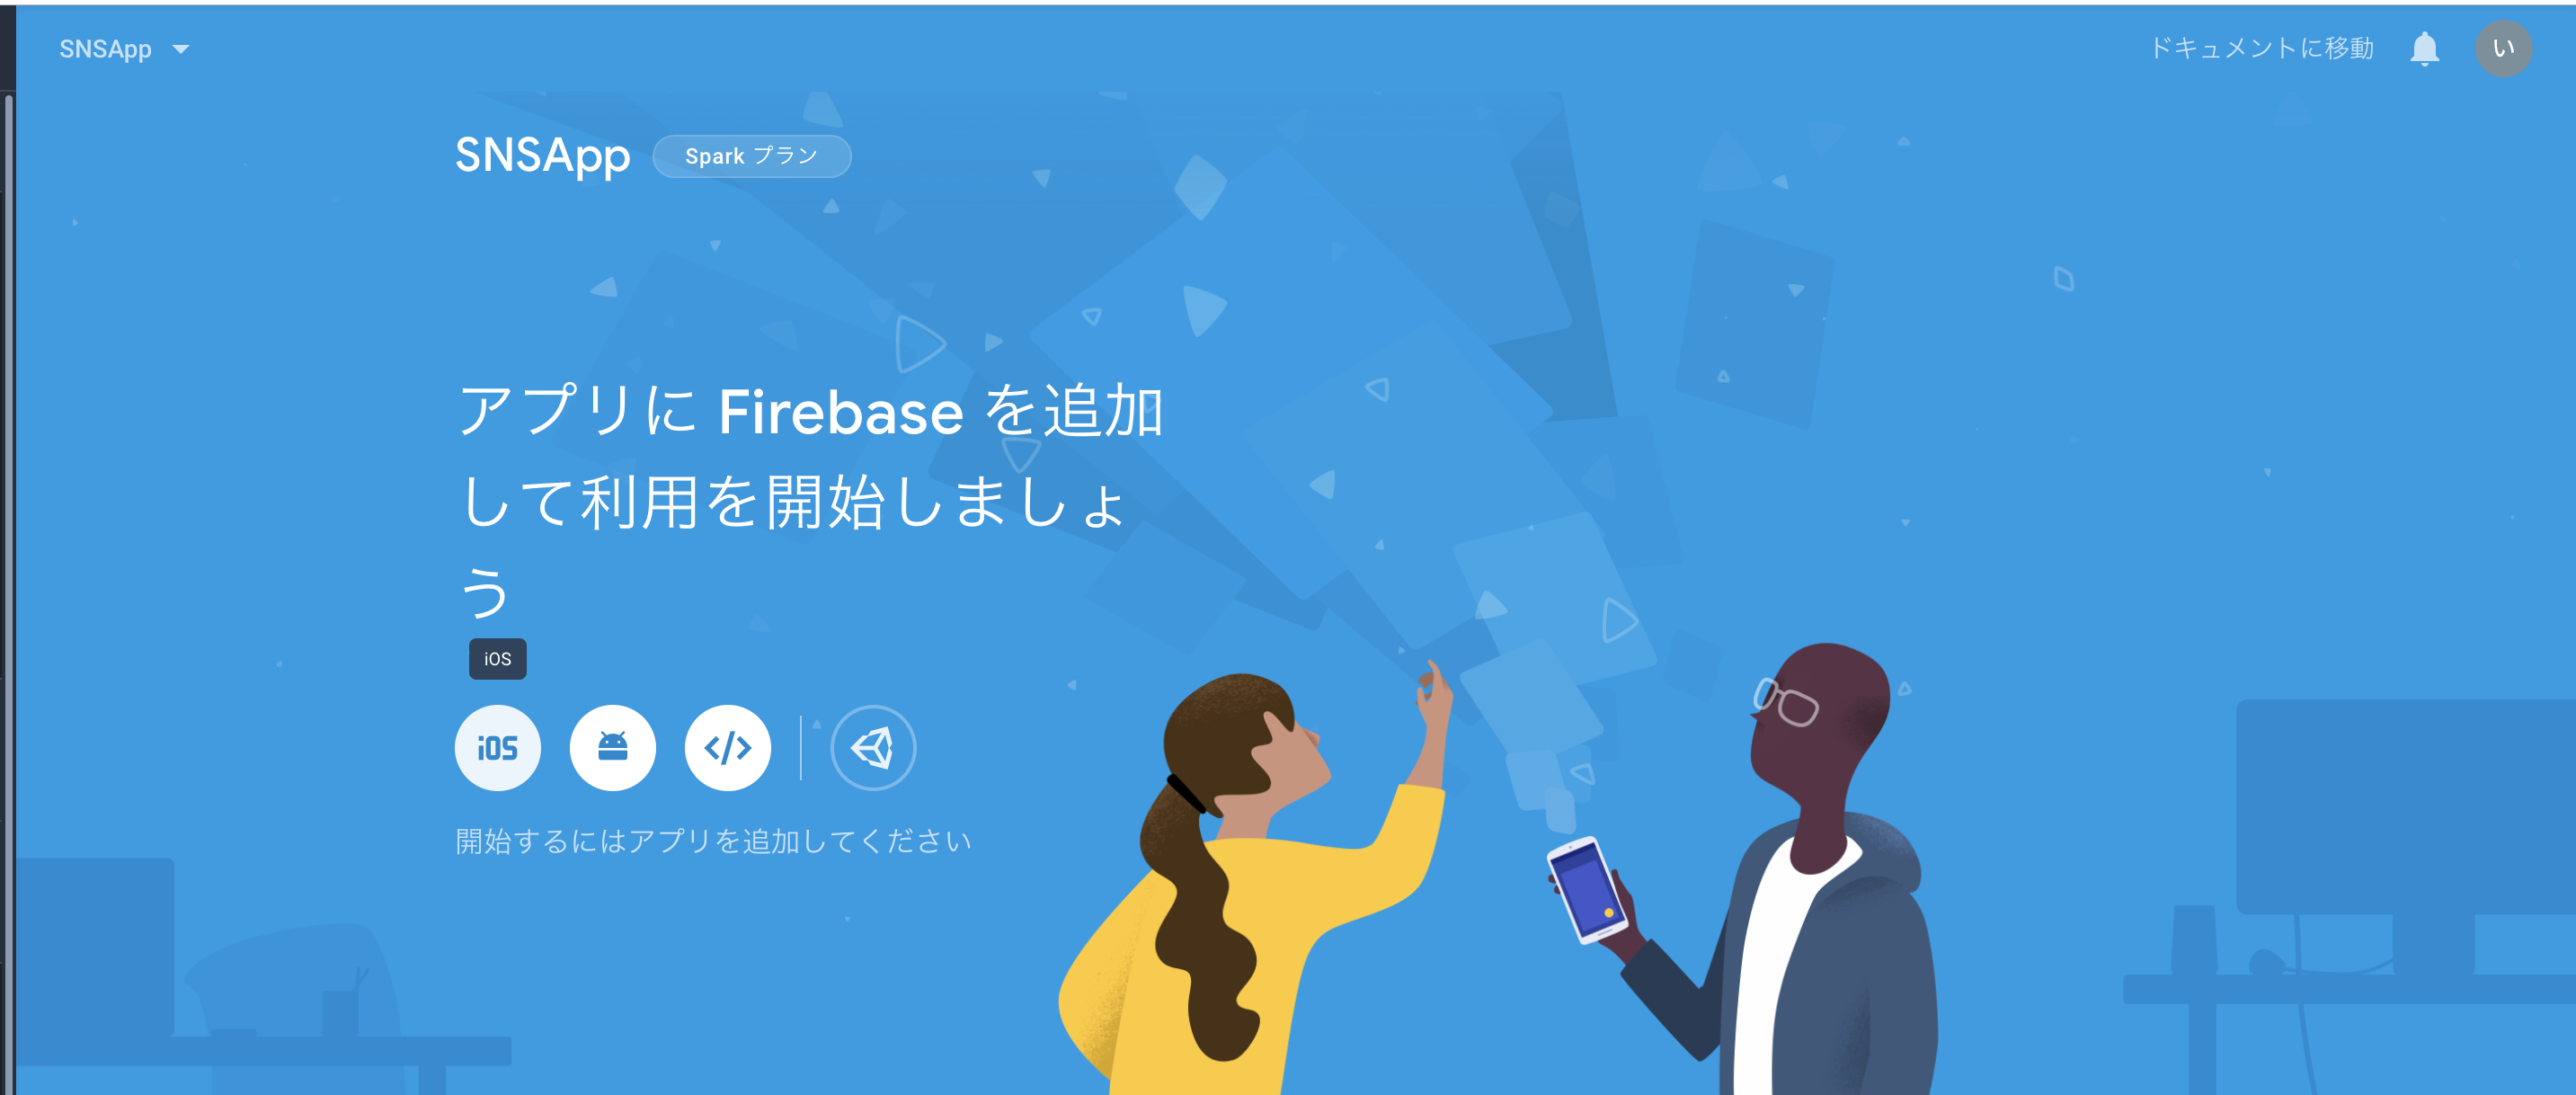
- Firebaseプロジェクトの作成
- Cocoapodsのインストール・セットアップ
Firebaseの事前準備
FirebaseプロジェクトにiOSアプリを追加する。
-
ここから事前に作成していただいたFirebaseのプロジェクトを選択します。
-
以下の画面のiOSを選択します。
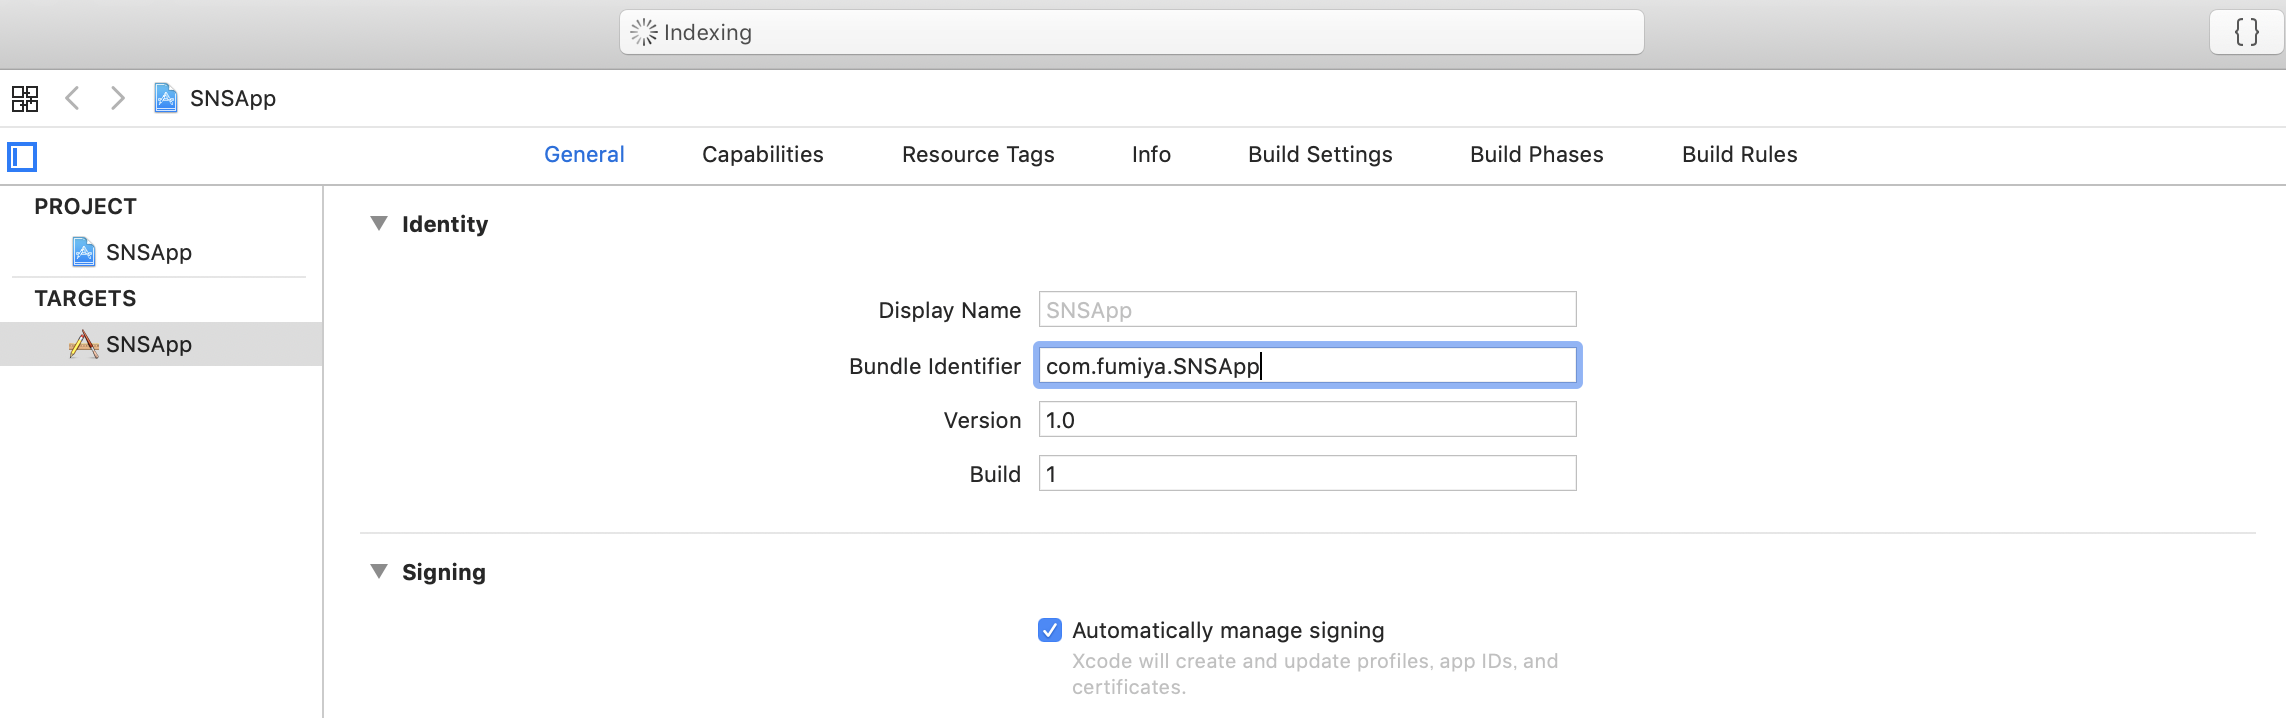
- 手順に沿って進めていきます。注意として
Bundle IdentifierはXcodeから以下の画面で確認します。
CocoaPodsからFirebaseをインストールする
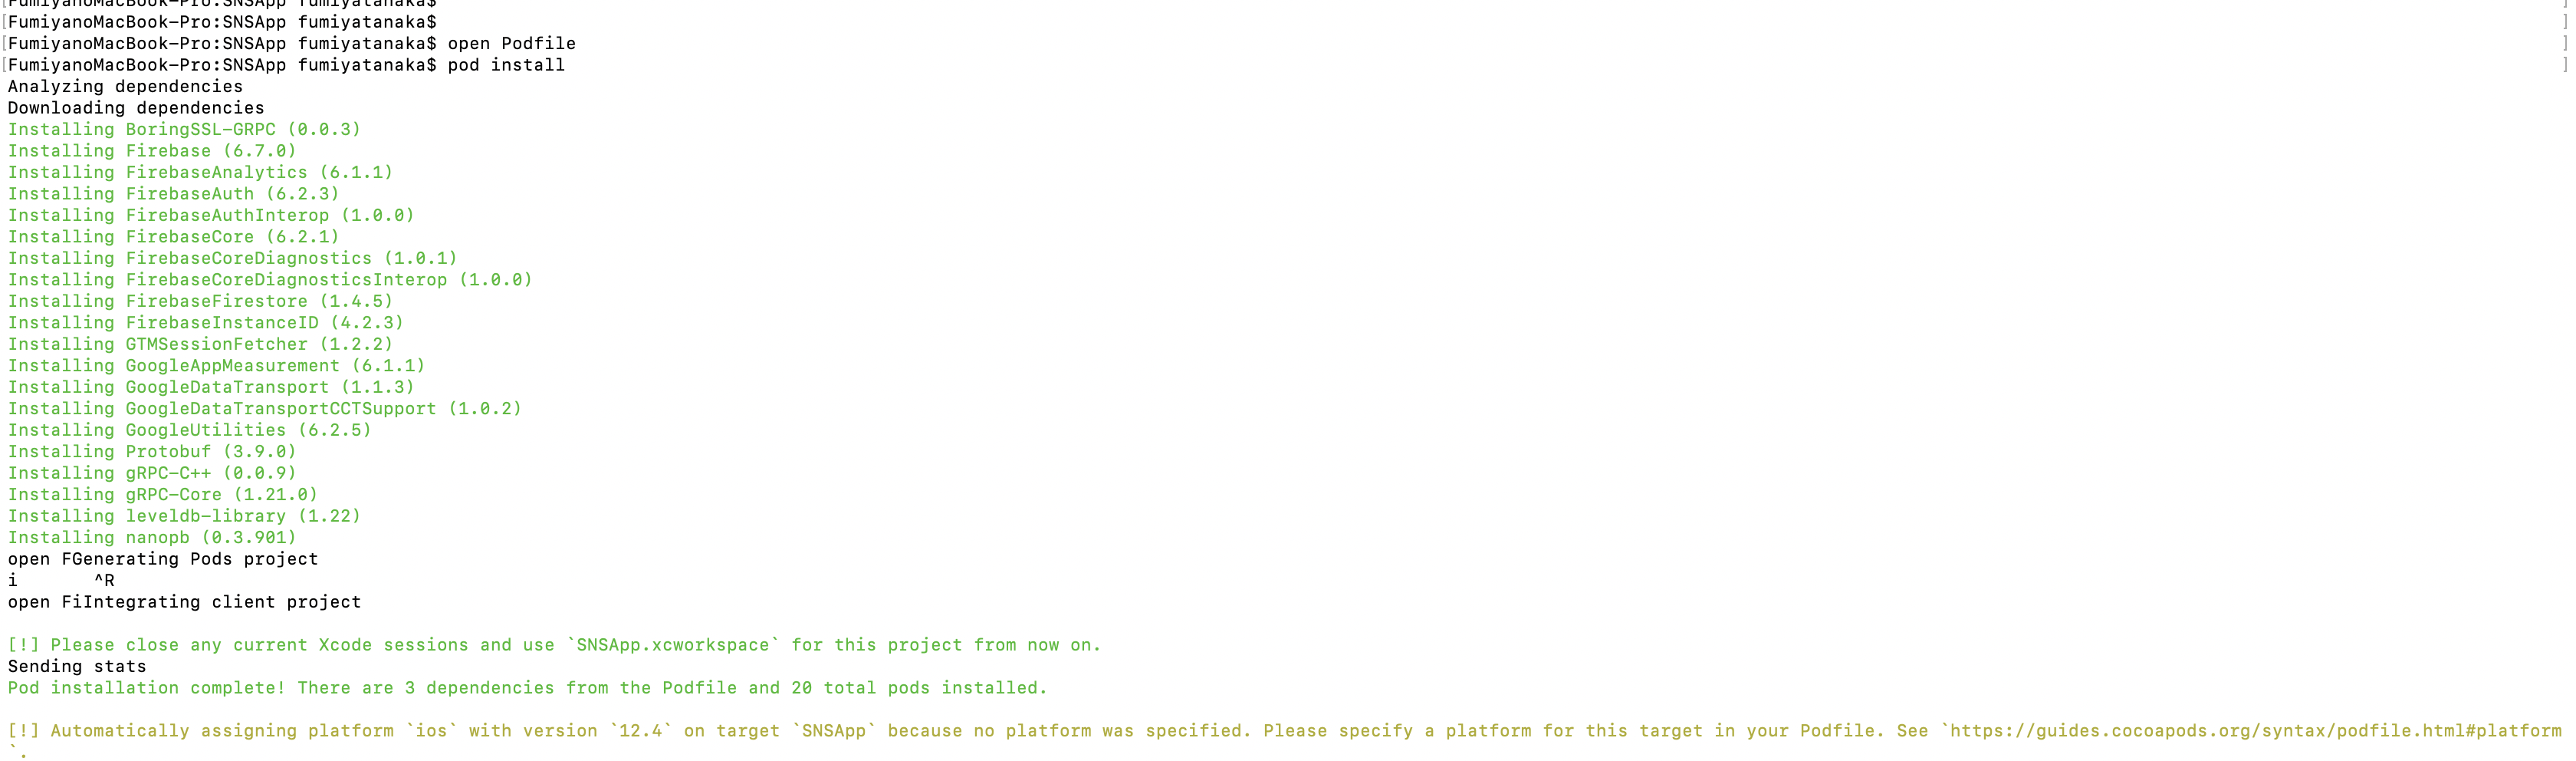
- Terminalを使用して自分のプロジェクトまで潜ります。その後、
pod initと打ってください。
cd ~/Download/iPhone_Dev/SNSApp
pod init
- Terminalに
open Podfileと入力します。これを打つと適切なアプリケーション(今回はテキストエディタ)でPodfileを開いてくれます。その後、以下のようにPodfileを編集していきます。
# Uncomment the next line to define a global platform for your project
# platform :ios, '9.0'

target 'SNSApp' do
  # Comment the next line if you don't want to use dynamic frameworks
  use_frameworks!

  # Pods for SNSApp

pod 'Firebase/Core'
pod 'Firebase/Firestore'
pod 'Firebase/Auth'


end
# この3行を追加する。
pod 'Firebase/Core'
pod 'Firebase/Firestore'
pod 'Firebase/Auth'
-
⌘ + Sで保存をしてテキストエディタを終了します。 - Podfileに書いたライブラリは
pod installを行うことでインストールされます。Terminalにpod installと打ってください。
-
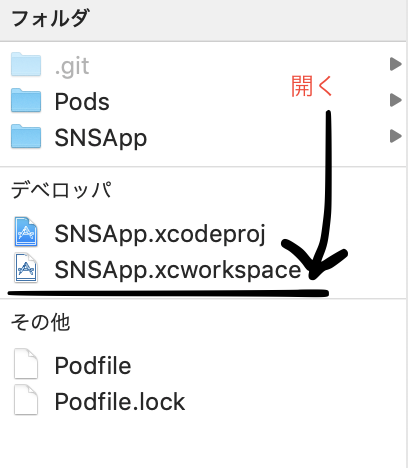
SNSApp.xcworkspaceを開きます。
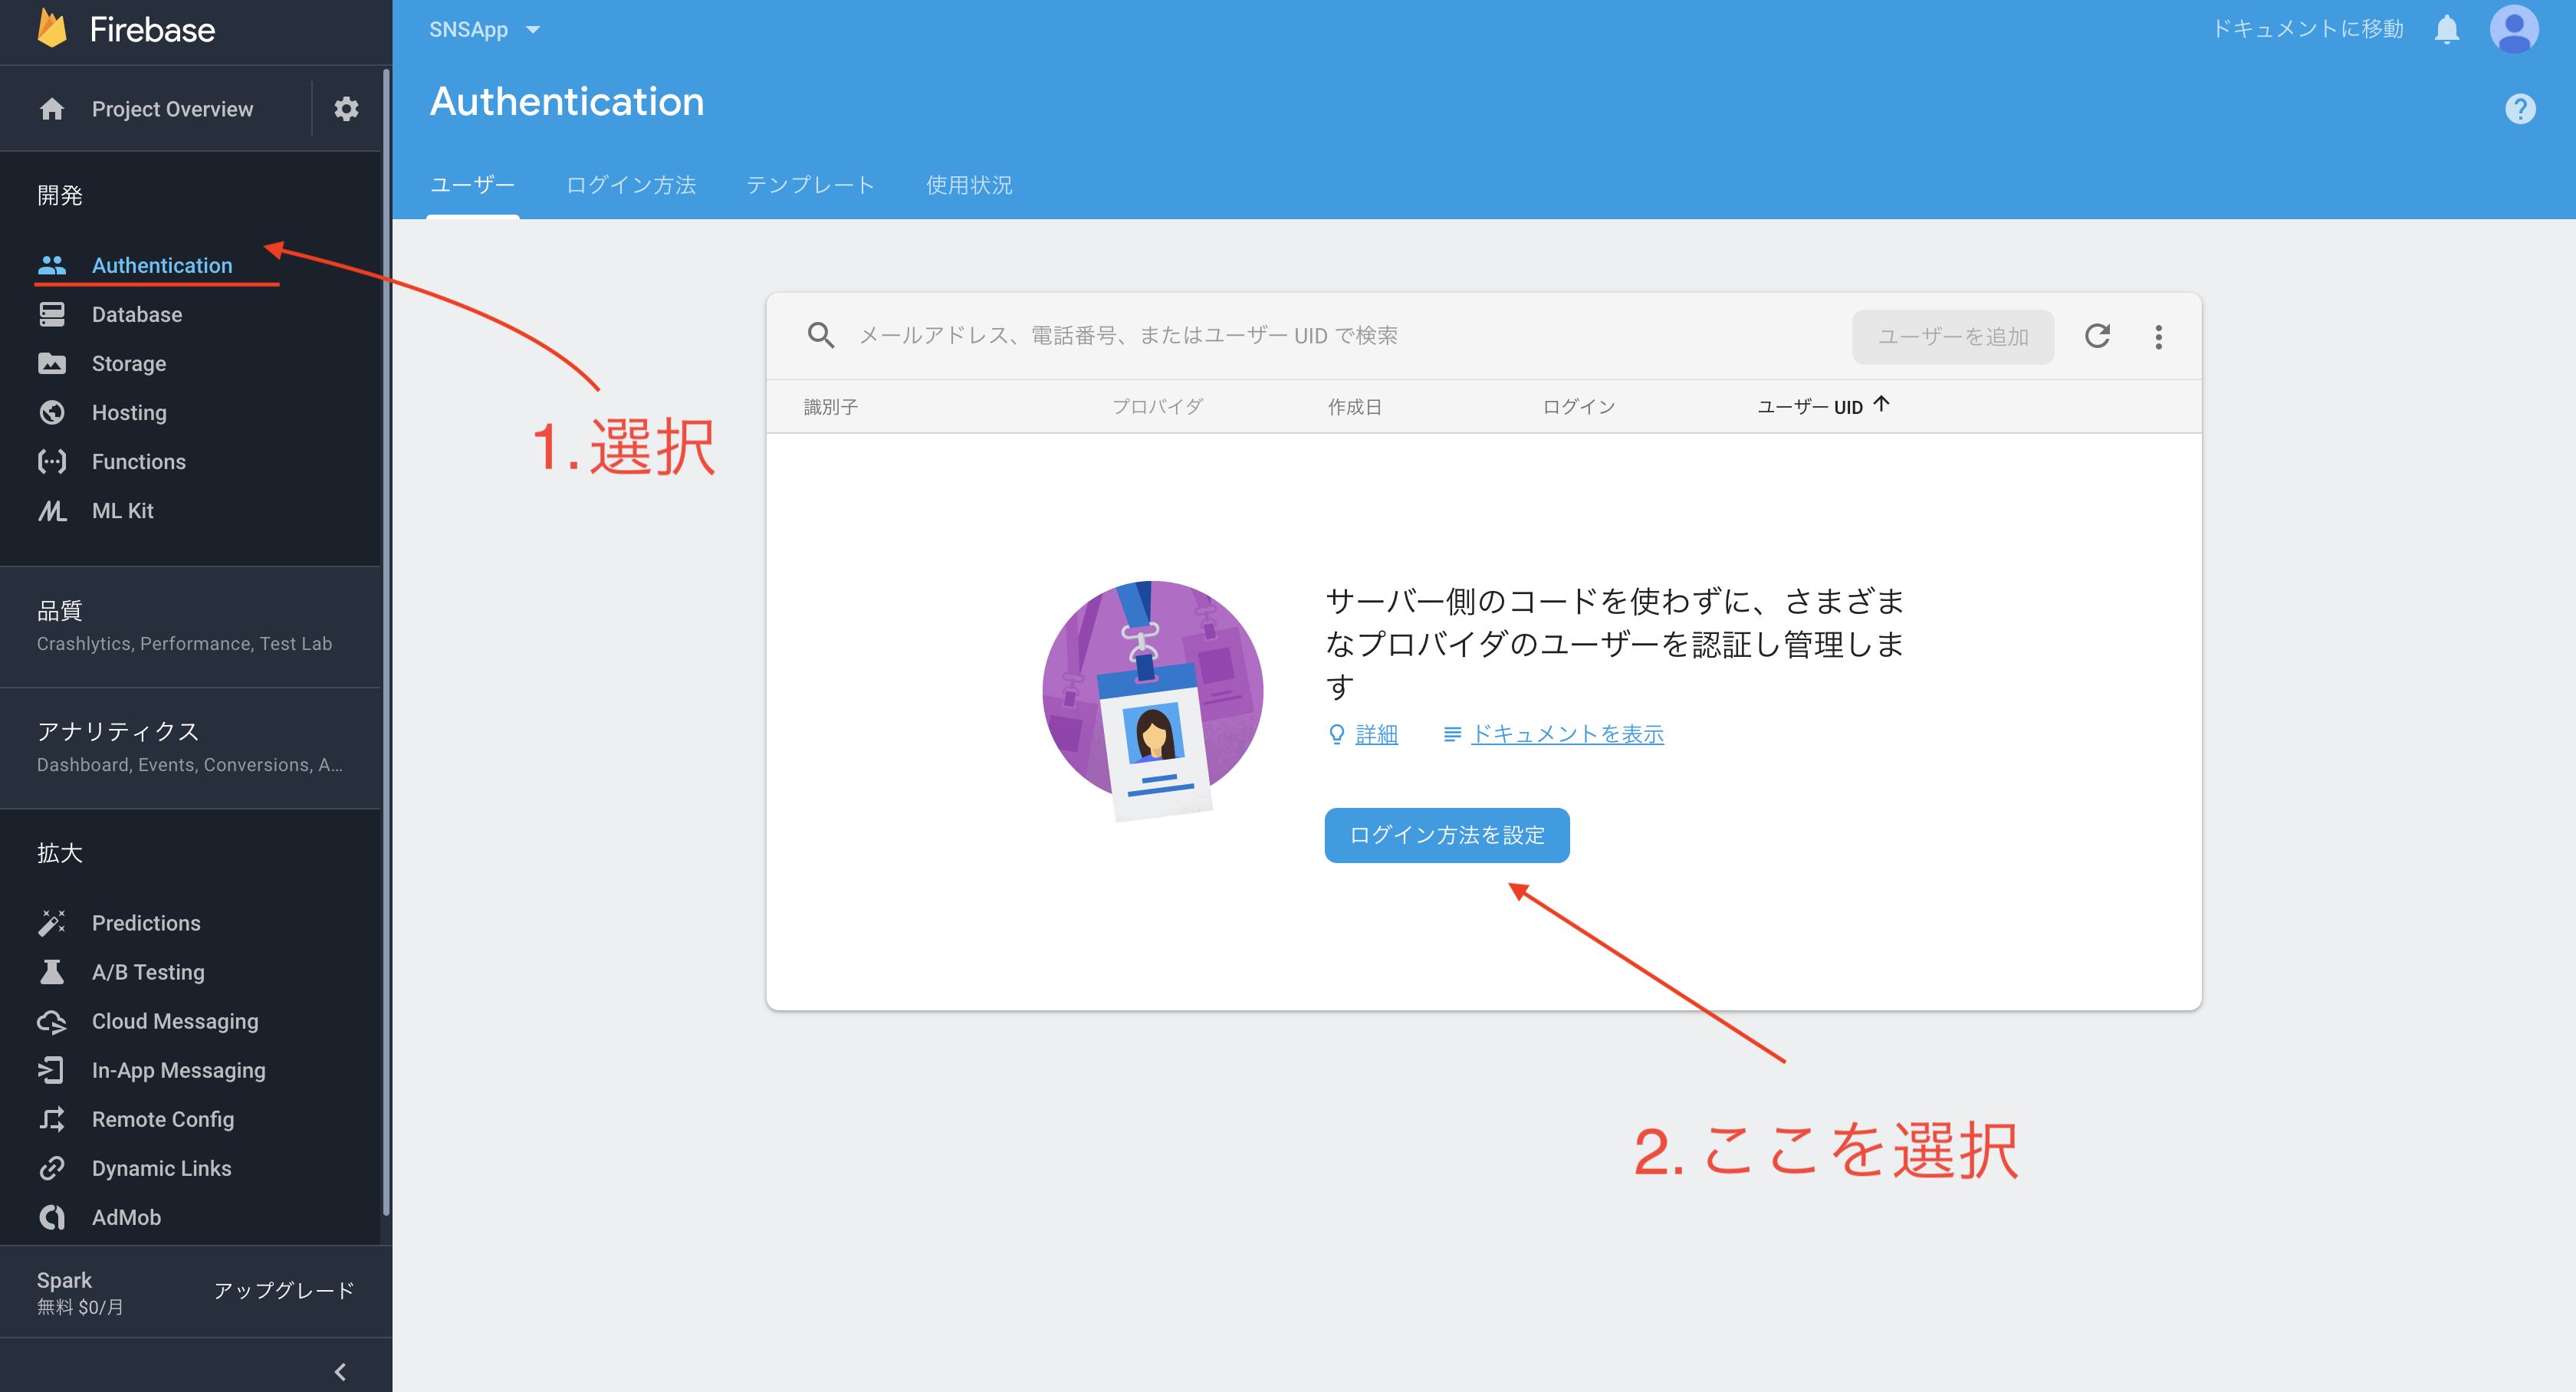
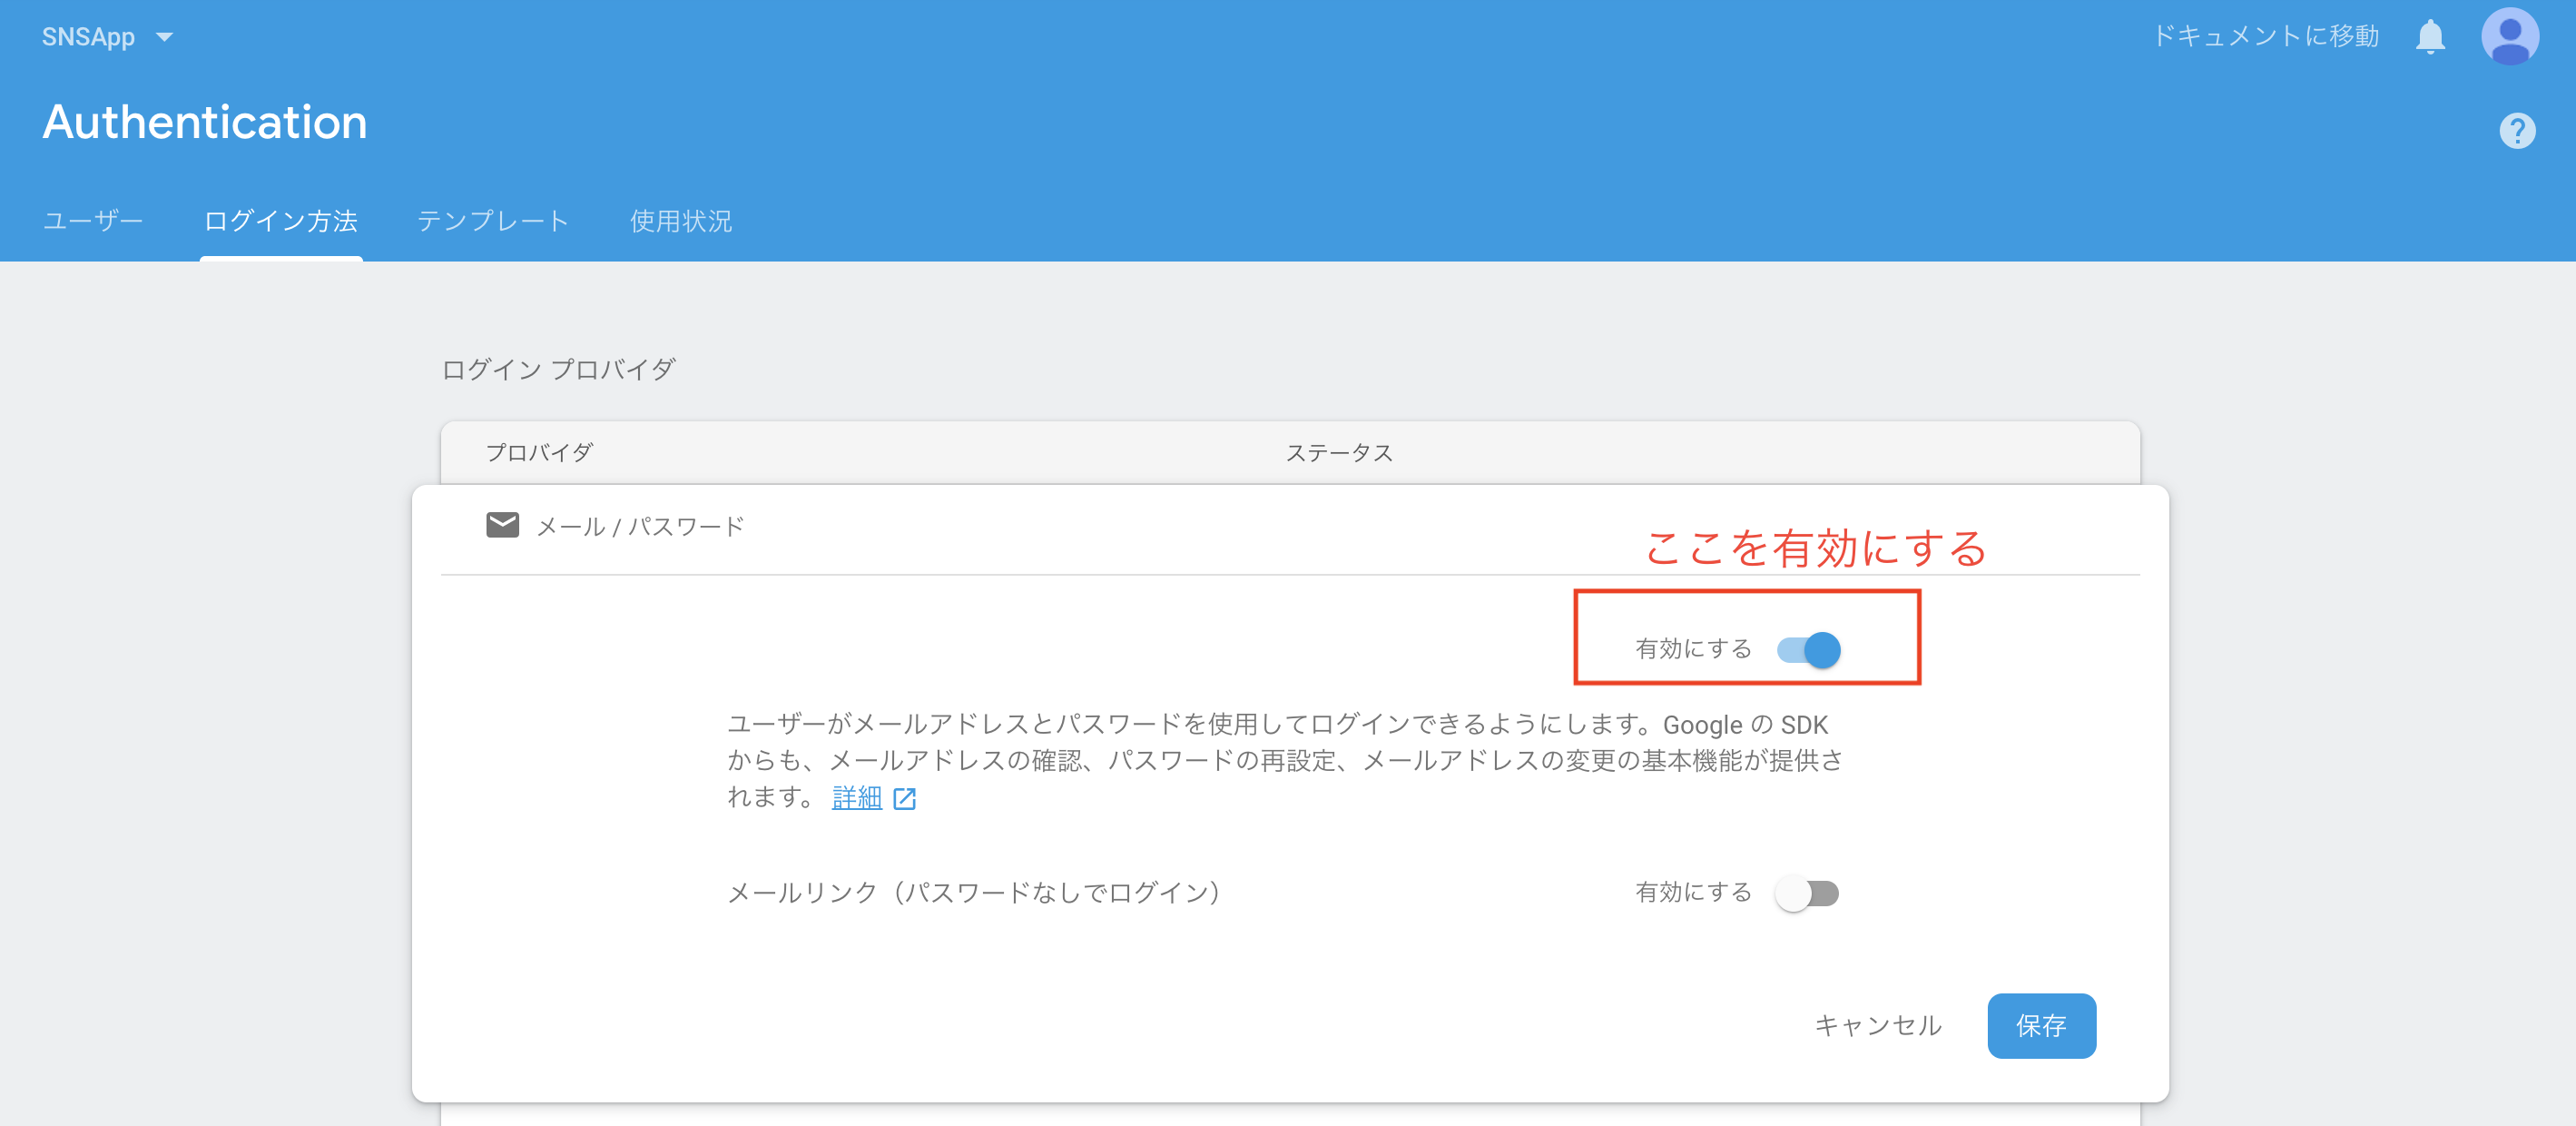
FirebaseAuthenticationの有効化
- Web上のFirebaseコンソールから以下のように選択していきます。


Firebaseの初期設定 (Xcode編)
- iOSプロジェクトを追加した段階でやっておいてもらったFirebaseの初期設定をするコードを書きます。既に書いた方は大丈夫です。
import UIKit
import Firebase

@UIApplicationMain
class AppDelegate: UIResponder, UIApplicationDelegate {

    var window: UIWindow?


    func application(_ application: UIApplication, didFinishLaunchingWithOptions launchOptions: [UIApplication.LaunchOptionsKey: Any]?) -> Bool {
        FirebaseApp.configure() // ここを追加します。
        return true
    }
}
モデルの作成
最初にデータをまとめるモデルという存在のクラスを定義します。
モデルはFirestoreにデータを書き込む際に便利になるので作った方が良いと思います。
なので、まずはPostモデルを作成します。
XcodeからFile -> New File -> Swift Fileを選択し、Post.swiftというファイルを作ります。
今回保存したいデータは下の5つのデータです。
| 変数名 | 説明 |
|---|---|
| content | 投稿の文章 |
| postID | 投稿それぞれのID |
| senderID | 投稿者のUserID |
| createdAt | 投稿が作成された時間 |
| updatedAt | 投稿が更新された時間 |
さらに、AppUserモデルも作成しておきます。(UserモデルだとFirebaseAuthのUserクラスとかぶる為に避けています。)
XcodeからFile -> New File -> Swift Fileを選択し、AppUser.swiftというファイルを作ります。
| 変数名 | 説明 |
|---|---|
| userID | FirebaseAuthのユーザーID |
| userName | ユーザーの名前 |
- 次に。以下のコードをそれぞれのファイルに入力してください。
import Foundation
import Firebase

struct Post {
    let content: String
    let postID: String
    let senderID: String
    let createdAt: Timestamp
    let updatedAt: Timestamp

    init(data: [String: Any]) {
        content = data["content"] as! String
        postID = data["postID"] as! String
        senderID = data["senderID"] as! String
        createdAt = data["createdAt"] as! Timestamp
        updatedAt = data["updatedAt"] as! Timestamp
    }
}
Timestampは場所に依存しない時間であるそうで、記述するにはimport Firebaseを書く必要があります。
import Foundation
import Firebase

struct AppUser {
    let userID: String
    let userName: String

    init(data: [String: Any]) {
        userID = data["userID"] as! String
        userName = data["userName"] as! String
    }
}
Codableを使用してもいいのですが、今回は簡易的に[String: Any]を手動でパースしています。
TimelineViewController.swiftをコーディング
-
Xcodeから
File->New File->Cocoa Touch Classを選択し、TimelineViewControllerというクラスを作ります。 -
中身は以下のように編集しておきます。この
meはアカウント登録成功後に前の画面(AccountViewController)から値渡しで受け取る変数です。meから連想できるように私自身のユーザーデータを表しています。
import UIKit
import Firebase // 追加

class TimelineViewController: UIViewController {

    var me: AppUser! // 追加

    override func viewDidLoad() {
        super.viewDidLoad()
    }
}
AccountViewController.swiftをコーディング
-
Xcodeから
File->New File->Cocoa Touch Classを選択し、AccountViewControllerというクラスを作ります。 -
UIKitの宣言・デリゲートメソッドの記述を行います。
import UIKit
import Firebase // Firebaseをインポート

class AccountViewController: UIViewController {

    @IBOutlet var emailTextField: UITextField!
    @IBOutlet var passwordTextField: UITextField!

    override func viewDidLoad() {
        super.viewDidLoad()
        emailTextField.delegate = self
        passwordTextField.delegate = self
    }

   // 登録ボタンを押したときに呼ぶメソッド。
    @IBAction func registerAccount() {

    }
}

// デリゲートメソッドは可読性のためextensionで分けて記述します。
extension AccountViewController: UITextFieldDelegate {
    func textFieldShouldReturn(_ textField: UITextField) -> Bool {
        textField.resignFirstResponder()
        return true
    }
}
いよいよ、Firebaseを使用してユーザーを作成していきます。
- プロパティとして、FirebaseAuthのクラスを宣言します。
import UIKit
import Firebase

class AccountViewController: UIViewController {

    (省略)
    var auth: Auth // 追加

    override func viewDidLoad() {
        super.viewDidLoad()
        auth = Auth.auth() // 追加
        emailTextField.delegate = self
        passwordTextField.delegate = self
    }

    (省略)

}
次に、アカウント登録する処理を書いていきます。
-
registerAccountというメソッドを定義してユーザーがボタンを押した時にアカウント登録を行うような実装をします。
auth.createUser(withEmail: "メールアドレス", password: "パスワード") { (result, error) in
    // アカウント登録後に呼ばれる。
    // error変数が nil -> 成功
    //            nilではない -> 失敗
    // result変数 ... user情報などをプロパティとして格納している。
}
実装したコードとしては、
import UIKit
import Firebase

class AccountViewController: UIViewController {

    (省略)

    @IBAction func registerAccount() {
        let email = emailTextField.text!
        let password = passwordTextField.text!
        auth.createUser(withEmail: email, password: password) { (result, error) in
            if error == nil, let result = result {
                // errorが nil であり、resultがnilではない == user情報がきちんと取得されている。
                self.performSegue(withIdentifier: "Timeline", sender: result.user) // 遷移先の画面でuser情報を渡している。
            }
        }
    }
}
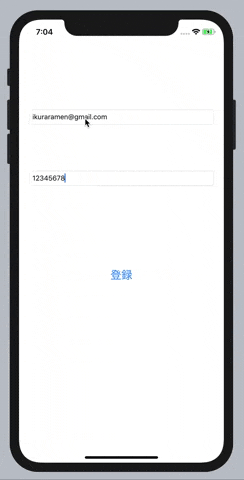
Main.storyboardを編集
-
UITextFieldを2つとUIButtonを1つずつ用意する。
-
ViewControllerのクラスを
AccountViewControllerに変更する。

- 関連付けを行う。
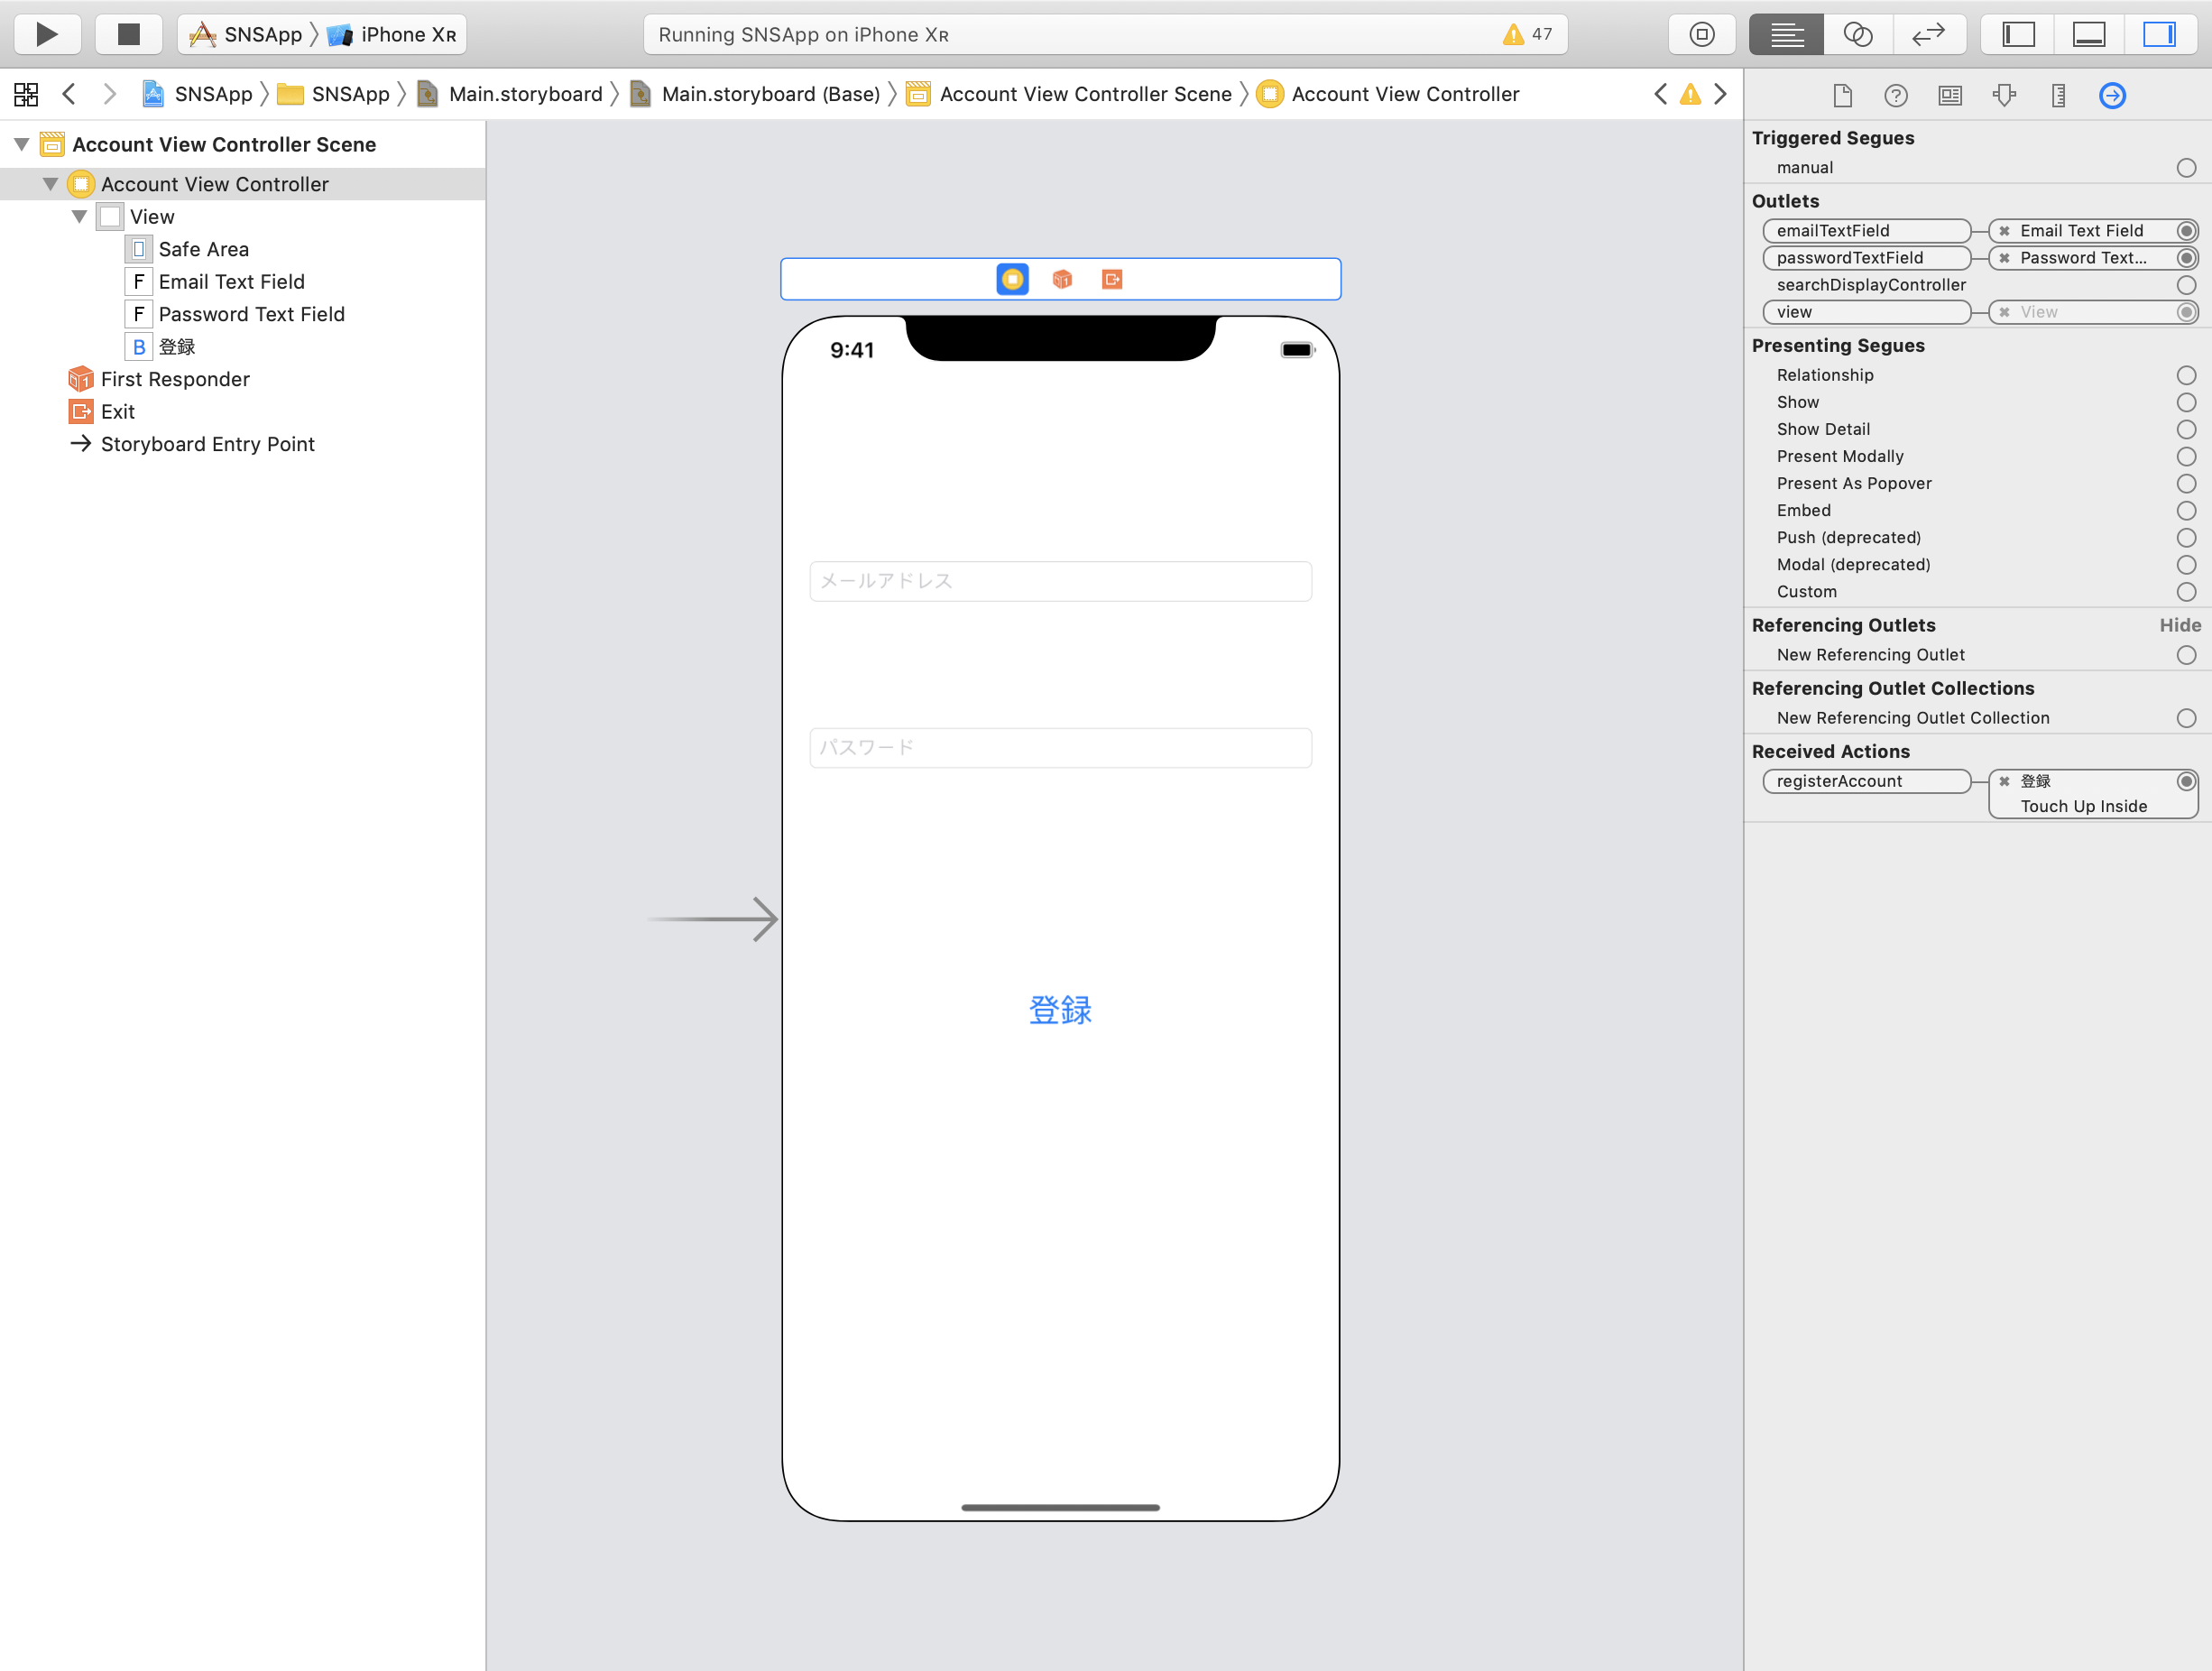
-
新しくViewControllerを作成して、クラスを
TimelineViewControllerに設定する。 -
セグエを
AccountViewController→TimelineViewControllerに繋げて作成する。 -
セグエのidentifierを
Timelineに設定する。

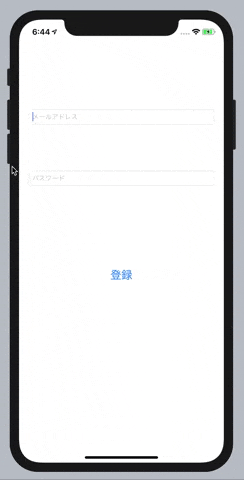
現在、このようにアカウントを作成するところまで進めました。
AccountViewController.swiftを編集
- 一度ログインしていたらアカウント作成画面を飛ばす。
- メール認証機能を実装する。
この2つを最後に実装していきます。
一度ログインしていたらアカウント作成画面を飛ばす。
import UIKit
import Firebase

class AccountViewController: UIViewController {

    var auth: Auth!

    (省略)

    override func viewDidAppear(_ animated: Bool) {
        super.viewDidAppear(animated)
        if auth.currentUser != nil {
            // もし既にユーザーにログインができていれば、タイムラインの画面に遷移する。
            // このときに、ユーザーの情報を次の画面の変数に値渡ししておく。(直接取得することも可能。)
            performSegue(withIdentifier: "Timeline", sender: auth.currentUser!)
        }
    }

    override func prepare(for segue: UIStoryboardSegue, sender: Any?) {
        let nextViewController = segue.destination as! TimelineViewController
        let user = sender as! User
        nextViewController.me = AppUser(data: ["userID": user.uid])
    }

    @IBAction func registerAccount() {
        let email = emailTextField.text!
        let password = passwordTextField.text!
        auth.createUser(withEmail: email, password: password) { (result, error) in
            if error == nil, let result = result {
                self.performSegue(withIdentifier: "Timeline", sender: result.user)
            }
        }
    }
}
ポイントは、
override func viewDidAppear(_ animated: Bool) {
    super.viewDidAppear(animated)
    if auth.currentUser != nil {
        performSegue(withIdentifier: "Timeline", sender: auth.currentUser!)
    }
}
-
viewDidAppearで 既にユーザーを所持している == ログインしたことがある ならば、
performSegueで画面遷移を実行しています。 -
senderにユーザー情報を渡していますが、これは最新の状態を
Auth.auth().currentUserで取得できるのでこれの限りではないです。
また、AppUserを扱っているので、注意が必要です。nextViewController.me = userとしないようにしてください。
override func prepare(for segue: UIStoryboardSegue, sender: Any?) {
    let nextViewController = segue.destination as! TimelineViewController
    let user = sender as! User
    nextViewController.me = AppUser(data: ["userID": user.uid])
}
-
prepareはセグエによる画面遷移が行われる際に呼ばれます。 -
この実装で、既にログインを行なっていれば、画面遷移時が行われ、サインアップをする画面をスキップできます。
メール認証機能を実装する。
- ここでいうメール認証機能とは 入力したメールアドレス宛に確認メールがFirebaseから送られてきて、それに応じれば正しいアカウントと見なせる という意味でのメール認証機能です。
コード全体です。
import UIKit
import Firebase

class AccountViewController: UIViewController {

    var auth: Auth!

    @IBOutlet var emailTextField: UITextField!
    @IBOutlet var passwordTextField: UITextField!

    override func viewDidLoad() {
        super.viewDidLoad()
        auth = Auth.auth()
        emailTextField.delegate = self
        passwordTextField.delegate = self
    }

    override func viewDidAppear(_ animated: Bool) {
        super.viewDidAppear(animated)
        if auth.currentUser != nil {
            auth.currentUser?.reload(completion: { error in
                if error == nil {
                    if self.auth.currentUser?.isEmailVerified == true {
                        self.performSegue(withIdentifier: "Timeline", sender: self.auth.currentUser!)
                    } else if self.auth.currentUser?.isEmailVerified == false {
                        let alert = UIAlertController(title: "確認用メールを送信しているので確認をお願いします。", message: "まだメール認証が完了していません。", preferredStyle: .alert)
                        alert.addAction(UIAlertAction(title: "OK", style: .default, handler: nil))
                        self.present(alert, animated: true, completion: nil)
                    }
                }
            })
        }
    }

    override func prepare(for segue: UIStoryboardSegue, sender: Any?) {
        let nextViewController = segue.destination as! TimelineViewController
        let user = sender as! User
        nextViewController.me = AppUser(data: ["userID": user.uid])
    }

    @IBAction func registerAccount() {
        let email = emailTextField.text!
        let password = passwordTextField.text!
        auth.createUser(withEmail: email, password: password) { (result, error) in
            if error == nil, let result = result {
                result.user.sendEmailVerification(completion: { (error) in
                    if error == nil {
                        let alert = UIAlertController(title: "仮登録を行いました。", message: "入力したメールアドレス宛に確認メールを送信しました。", preferredStyle: .alert)
                        alert.addAction(UIAlertAction(title: "OK", style: .default, handler: nil))
                        self.present(alert, animated: true, completion: nil)
                    }
                })
            }
        }
    }
}

// デリゲートメソッドは可読性のためextensionで分けて記述します。
extension AccountViewController: UITextFieldDelegate {
    func textFieldShouldReturn(_ textField: UITextField) -> Bool {
        textField.resignFirstResponder()
        return true
    }
}
ポイントは、
auth.createUser(withEmail: email, password: password) { (result, error) in
    if error == nil, let result = result {
        result.user.sendEmailVerification(completion: { (error) in
            if error == nil {
                let alert = UIAlertController(title: "仮登録を行いました。", message: "入力したメールアドレス宛に確認メールを送信しました。", preferredStyle: .alert)
                alert.addAction(UIAlertAction(title: "OK", style: .default, handler: nil))
                self.present(alert, animated: true, completion: nil)
            }
        })
    }
}
ここの部分の
result.user.sendEmailVerification(compeltion: @escaping (Error?) -> ())
で入力したメールアドレスに対して確認用メールを送信します。
-
コールバックで指定されている引数は確認用メールの送信に成功していれば
nilで失敗していればError型が入っています。 -
もしエラーがnilであればメールボックスを確認してもらうようにユーザーに促すようにアラートを表示します。
次に、メールボックスから送信されたメールを見つけ、リンクを開きます。

その後、アプリをもう一度開くと、画面遷移が行われるはずです。
コードの説明に戻りますが、
override func viewDidAppear(_ animated: Bool) {
    super.viewDidAppear(animated)
    if auth.currentUser != nil {
        auth.currentUser?.reload(completion: { error in
            if error == nil {
                if self.auth.currentUser?.isEmailVerified == true {
                    self.performSegue(withIdentifier: "Timeline", sender: self.auth.currentUser!)
                } else if self.auth.currentUser?.isEmailVerified == false {
                    let alert = UIAlertController(title: "まだメール認証が完了していません。", message: "確認用メールを送信しているので確認をお願いします。", preferredStyle: .alert)
                    alert.addAction(UIAlertAction(title: "OK", style: .default, handler: nil))
                    self.present(alert, animated: true, completion: nil)
                }
            }
        })
    }
}
ここの部分で、ポイントは
self.auth.currentUser?.isEmailVerified
-
これで現在のユーザーがメール認証済みかのチェックが可能です。
-
また、メール認証を実際に行なったかをアプリ側で自動更新はしてくれないので、以下のメソッドを呼んでわざと更新処理を行います。
auth.currentUser?.reload(completion: @escaping (Error?) -> ())
- その後
if self.auth.currentUser?.isEmailVerified == trueのようにif文でチェックします。
最後に
この記事では、
- FirebaseAuthを利用してアカウント登録を行う。
- ユーザーログイン済みの場合、勝手に画面遷移を行わせることでUXの向上
- 確認用メールを送信
この3つを実装しました。
次の記事では続編としてFirestoreを使用して、タイムライン画面を作成していきます。