| module | version |
|---|---|
| Electron | v0.34.2 |
| Vue.js | 1.0.4 |
Electronが面白そうだったので色々試してみました。
ElectronもVueも最近のJavaScriptも知見を持っておらず、勉強のために作った物ですので、何らかの正しい情報を記録した物ではなく、あくまでそういうトライをした記録です。
作りたかった物
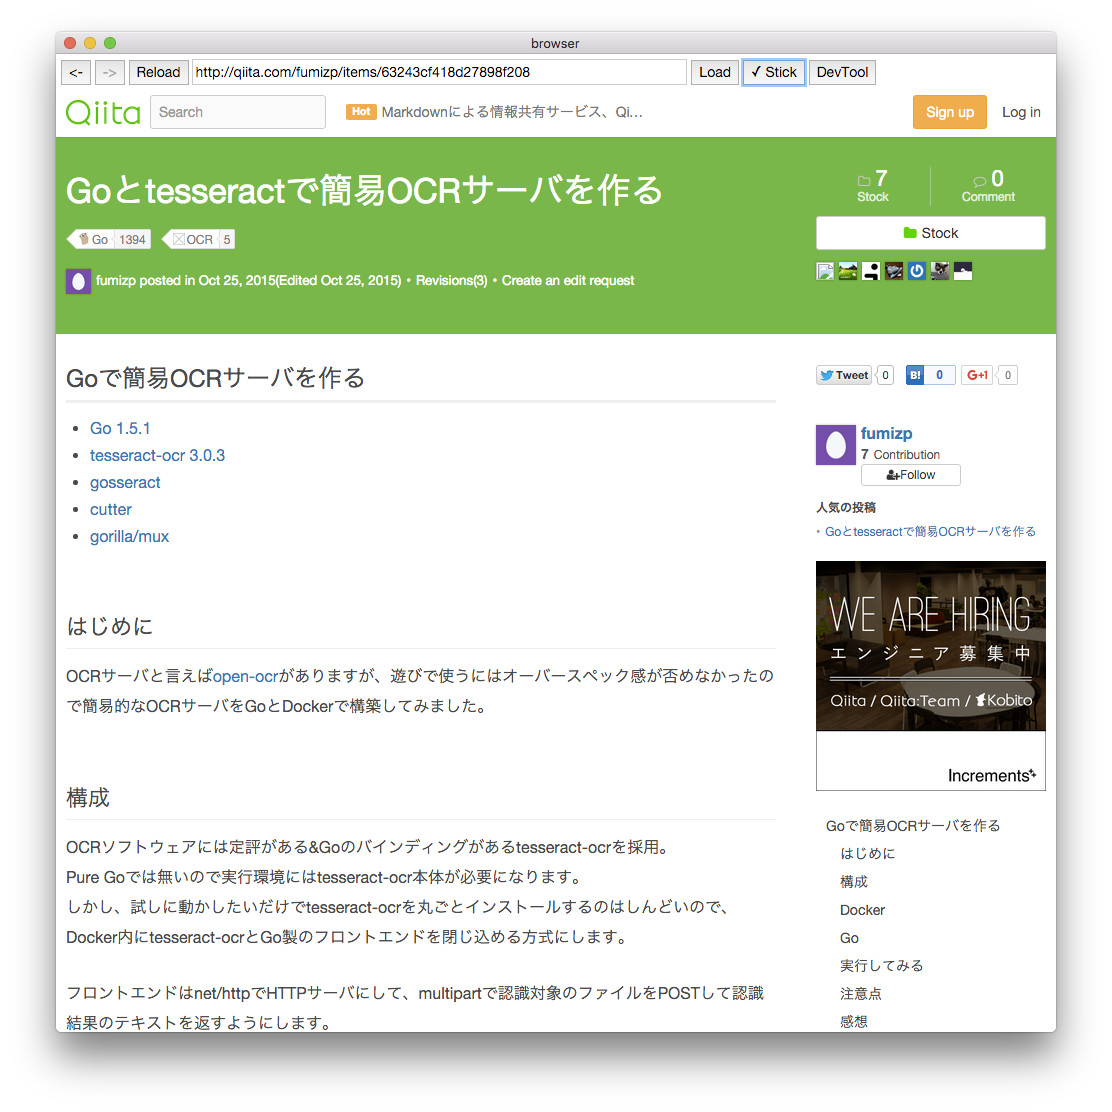
ウィンドウを最前面に固定する機能を持ったブラウザっぽく動く何か
完成品
Githubに置きました
https://github.com/fumiz/ForegroundBrowser
実験用に作ったコードということ以上に
SSL証明書の検証結果を表示する機能も無いし、そもそも野良ブラウザを使う行為自体が危険
なので、実際に使用することはお勧めしません。
中身
.
├── README.md
├── node_modules
├── package.json
└── src
    ├── app.js
    ├── browser
    │   ├── api
    │   │   ├── lib
    │   │   │   └── messages.js
    │   │   └── main.js
    │   ├── lib
    │   ├── net
    │   └── resources
    └── renderer
        ├── browser
        │   ├── api
        │   │   └── main.js
        │   ├── index.html
        │   ├── lib
        │   ├── main.css
        │   └── main.js
        └── shared
            ├── images
            │   └── spinner.gif
            └── vendor
Vue.jsはpackage.jsonに書いてnpm install、bootstrapはshared/vendorに突っ込みました。
app.jsをエントリポイントにしてブラウザ画面をrenderer/browserディレクトリにまとめた感じです。
app.js
アプリケーション起動用の定形コードと、アプリケーション本体を処理するコード。
「最前面に固定」する機能の実装にはBrowserWindowオブジェクトを操作する必要がありますが、
renderer processからmain processのオブジェクトを触りに行くのがちょっと嫌な感じがしたので、
renderer processからipc経由でmain processにメッセージを送って、main process側で処理する方式にしてみました。
しかし、やりたいことに対して大掛かりになってしまった感は否めません。
'use strict';

var app = require('app');
var application = null;

app.on('window-all-closed', function () {
    if (process.platform != 'darwin') {
        app.quit();
    }
});

app.on('ready', function () {
    application = new Application();
    application.start();
});

var ipc = require('ipc');
var messages = require('./browser/api/lib/messages.js');

function Application() {
    this.listeners = [
        [messages.stick, this.stick],
        [messages.unstick, this.unstick]
    ];
}
Application.prototype = {
    start: function () {
        this.init();

        var browser = require('./renderer/browser/api/main.js');
        browser.open('about:blank');
    },
    init: function () {
        var self = this;

		 // ipcでrenderer processが送出するメッセージと
		 // そのメッセージを受け取るメソッドを紐付ける
        var listeners = this.listeners;
        for (var idx = 0; idx < listeners.length; idx++) {
            (function (message, func) {
                ipc.on(message, function (event, obj) {
                    // this, eventEmitter, event
                    func.call(self, {
                        emitter: this,
                        event: event
                    }, obj);
                });
            })(listeners[idx][0], listeners[idx][1]);
        }
    },
    stick: function (event) {
        var browserWindow = event.event.sender.getOwnerBrowserWindow();
        browserWindow.setAlwaysOnTop(true);
    },
    unstick: function (event) {
        var browserWindow = event.event.sender.getOwnerBrowserWindow();
        browserWindow.setAlwaysOnTop(false);
    }
};
renderer/browser
ブラウザの動きはVue.jsで実装してみました。
とりあえずマニュアルを見ながら埋め込んでみたレベルですが、そんなに複雑にもならずにそれなりに動いているので第一印象は悪くなかった感じです。
また、見ての通りnpmでインストールしたvueモジュールをrequireで読み込んで使っていますが、普通に<script srcで読み込んだ場合と特に変わらず使えていいなと思いました。
<!DOCTYPE html>
<html>
<head>
<meta charset="UTF-8">
<title>browser</title>
<link rel="stylesheet" href="../shared/vendor/bootstrap-3.3.5-dist/css/bootstrap.min.css">
<link rel="stylesheet" href="main.css">
</head>
<body>
<div id="app">
<div class="menu">
<button v-bind:class="canGoBackClass" v-on:click.prevent="back"><-</button>
<button v-bind:class="canGoForwardClass" v-on:click.prevent="forward">-></button>
<button v-on:click.prevent="reload">Reload</button>
<input type="text" v-on:keyup.enter="load" v-model="currentUrlText" v-bind:class="{ 'loading': loading }"
class="address">
<button v-on:click.prevent="load">Load</button>
<button v-on:click.prevent="stick"><span v-bind:class="{ 'disabled': !sticky }">✓</span> Stick</button>
<button v-on:click.prevent="devTool">DevTool</button>
</div>
<div class="browser-container">
<webview class="browser" src="about:blank"></webview>
</div>
</div>
<script>
window.jQuery = window.$ = require('../shared/vendor/jquery-2.1.4.min.js');
</script>
<script src="../shared/vendor/bootstrap-3.3.5-dist/js/bootstrap.min.js"></script>
<script src="main.js"></script>
</body>
</html>
'use strict';

var ipc = require('ipc');
var Vue = require('vue');
var mainApp = require('../../browser/api/main.js');


function Application(id) {
    var self = this;
    this.webview = document.getElementById(id).getElementsByTagName('webview')[0];
    this.browser = {
        'currentUrlText': 'about:blank',
        'canGoBack': false,
        'canGoForward': false,
        'loading': false,
        'sticky': false
    };
    this.vue = new Vue({
        el: '#' + id,
        data: this.browser,
        methods: {
            back: function (event) {
                self.goBack();
            },
            forward: function (event) {
                self.goForward();
            },
            reload: function (event) {
                self.reload();
            },
            load: function (event) {
                self.open(self.browser.currentUrlText);
            },
            devTool: function (event) {
                self.openDevTools();
            },
            stick: function (event) {
                self.toggleStick();
            },
        },
        computed: {
            canGoForwardClass: function () {
                return {
                    'ready': self.browser.canGoForward,
                    'disabled': !self.browser.canGoForward
                };
            },
            canGoBackClass: function () {
                return {
                    'ready': self.browser.canGoBack,
                    'disabled': !self.browser.canGoBack
                };
            }
        }
    });

    this.webview.addEventListener('did-start-loading', function (e) {
        self.setLoading(true);
    });
    this.webview.addEventListener('did-stop-loading', function (e) {
        self.setLoading(false);
    });
    this.webview.addEventListener('did-finish-load', function (e) {
        self.browser.currentUrlText = e.target.getAttribute('src');
        self.browser.canGoBack = e.target.canGoBack();
        self.browser.canGoForward = e.target.canGoForward();
    });
}
Application.prototype.setLoading = function (nowLoading) {
    this.browser.loading = nowLoading;
};
Application.prototype.open = function (url) {
    this.webview.setAttribute('src', url);
};
Application.prototype.goBack = function () {
    if (!this.webview.canGoBack()) {
        return;
    }
    this.webview.goBack();
};
Application.prototype.goForward = function () {
    if (!this.webview.canGoForward()) {
        return;
    }
    this.webview.goForward();
};
Application.prototype.reload = function () {
    this.webview.reload();
};
Application.prototype.openDevTools = function () {
    this.webview.openDevTools();
};
Application.prototype.toggleStick = function () {
    this.browser.sticky = !this.browser.sticky;
    if (this.browser.sticky) {
        mainApp.stick();
    } else {
        mainApp.unstick();
    }
};

var app = null;

ipc.on('app-ready', function (url) {
    app = new Application('app');
    app.open(url);
});
ipc.on('app-end', function () {
    app = null;
});
その他
新しいウィンドウを開く(新しいrenderer processを開始する)時にパラメータを渡したかったんですが、方法がわからなかったため、ウィンドウが開いてロードが終わった時にイベントを送出して、それをrenderer process内で受け取るようにしてみましたが、最も良い方法を知りたいところです。
'use strict';

var BrowserWindow = require('browser-window');

module.exports = {
    open: function(url){
        var window = new BrowserWindow({width: 1000, height: 1000});
        window.loadUrl('file://' + __dirname + '/../index.html');
        window.webContents.on('did-finish-load', function(){
            this.send('app-ready', url);
        });
        window.on('close', function(){
            this.send('app-end');
        });
        return window;
    }
};
var app = null;

ipc.on('app-ready', function (url) {
    app = new Application('app');
    app.open(url);
});
ipc.on('app-end', function () {
    app = null;
});
感想
- Electronはちょっとのコードでそれなりに動いて見えて楽しい
- ブラウザ内でnodeのコードが動くのが面白い
- Vue.jsはとっつきやすくて使いやすかった
- WebViewは機能が豊富で面白い。
preloadで任意のJSを読みこませることもできるので色々楽しいことができる - アプリケーション本体も各ウィンドウもそこに埋め込まれるWebViewも全部違うプロセスで動いており、やり取りは基本的にipcを使うことを意識しておかないと変なところでハマったりすると思う
作っていてよくわからなかったこと
ディレクトリレイアウト
今回のディレクトリレイアウトはElectronのドキュメントに沿ってみたものの、そのディレクトリ内に格納するファイルをどのように記述すべきかが今ひとつわかりませんでした。
例えば、新しいrenderer processを起動したい場合、renderer/apiの中にそのようなAPIを用意してmain processから呼び出すのかなあと漠然と考えたものの、ではそのAPIはどのように実装されているべきなのか、といったことがうまく読み取れなかった。
また、Electronのドキュメントではrenderer process用のディレクトリは一つだけになっていますが、複数の画面を持ったアプリケーションを作成したい場合は、その画面ごとにディレクトリを用意したかったため今回はrendererディレクトリの中に更に画面ごとのディレクトリを用意しました。
SPAで作るならrendererディレクトリ一つで問題なさそうだけれど?
更に、画面上で使うCSSや画像などを格納するディレクトリも用意されていないように見受けられ、今回は複数の画面で使う画像やCSSを勝手に作ったsharedディレクトリの中に入れて、それ以外はその画面用のディレクトリ内に平板に配置しました。
Atomのコードは全く異なるレイアウトだし、どうするのがベストプラクティスなんだろう……。
今後
このままではFlash Playerが動かないので、対応したい
