1. はじめに
皆様お疲れ様です。Swift愛好会AdventCalendarの3日目を担当させて頂きます、fumiyasac(Fumiya Sakai)と申します。何卒よろしくお願い致します。
今回は、以前に公開した記事:__「できるだけUI系のライブラリを用いないアニメーションを盛り込んだサンプル実装まとめ(前編)」__の続編にあたる解説をしていこうと思います。
Swift愛好会では、引き続きUIの実装に関わるTipsやサンプルの紹介に関わる登壇や発表をメインに行っていこともあって、皆様からは「UI番長」という称号を頂き光栄に思うと同時にその名前に恥じないようにこれからも精進しなければと襟を正していかなければと思う所存です(笑)
今回は前回のサンプルで作成途中のままであった、サンプルソース内のStory.storyboard部分の実装に関しての部分のUI実装に関する部分を中心に解説を行っていきます。また前回では分量の関係で紹介できなかった部分に関しての補足も加えて行ければと思います。
※ ボリュームの関係で前編・後編を分割してお送り致します。
Githubでのサンプルコード:
サンプルの全体的な動きの動画:
※こちらのサンプルはPullRequestやIssue等はお気軽にどうぞ!
また、前編の記事でもご紹介した実装に関する部分のダイジェストは、potatotips #45で登壇をした際の資料にもまとめております。
更新履歴:
- 2018.11.21: サンプルコードをバージョンアップしました(Xcode10.1 & Swift4.2)
2. 今回の参考にしたTipsとサンプル概要について
前編では下記の動きをライブラリを用いずに実装した部分を中心に解説を行いました。
- UITableViewのセルが出現した際にふわっとフェードインがかかる動き
- スクロールの変化量に伴って他のView要素の位置が切り替わる動き
- UIButtonやUILabelに一工夫を加えた動き
後編では、前編で作りかけの状態になっていた部分での動きやアニメーションの実装に関しての解説になります。
★2-1. インスパイアを受けた参考記事に関して:
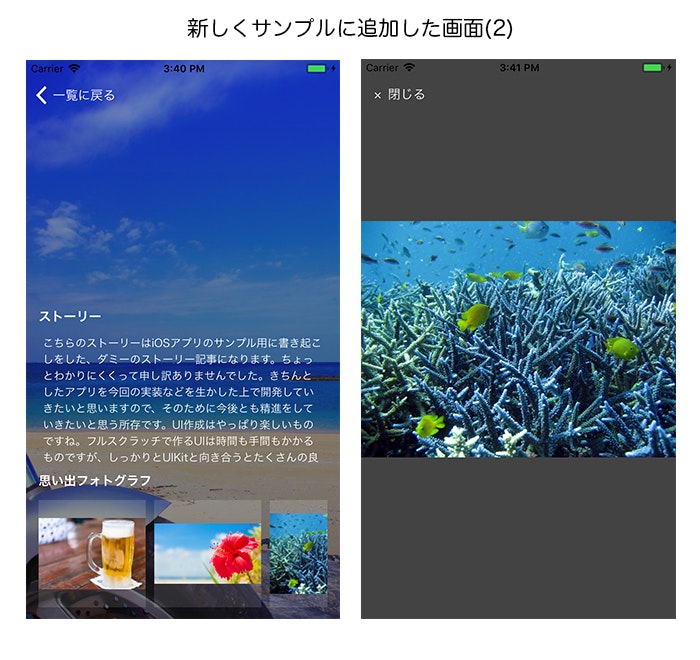
動きの部分に関しては今回新しく追加をした、主に下記の3つの機能についてを実装しています。
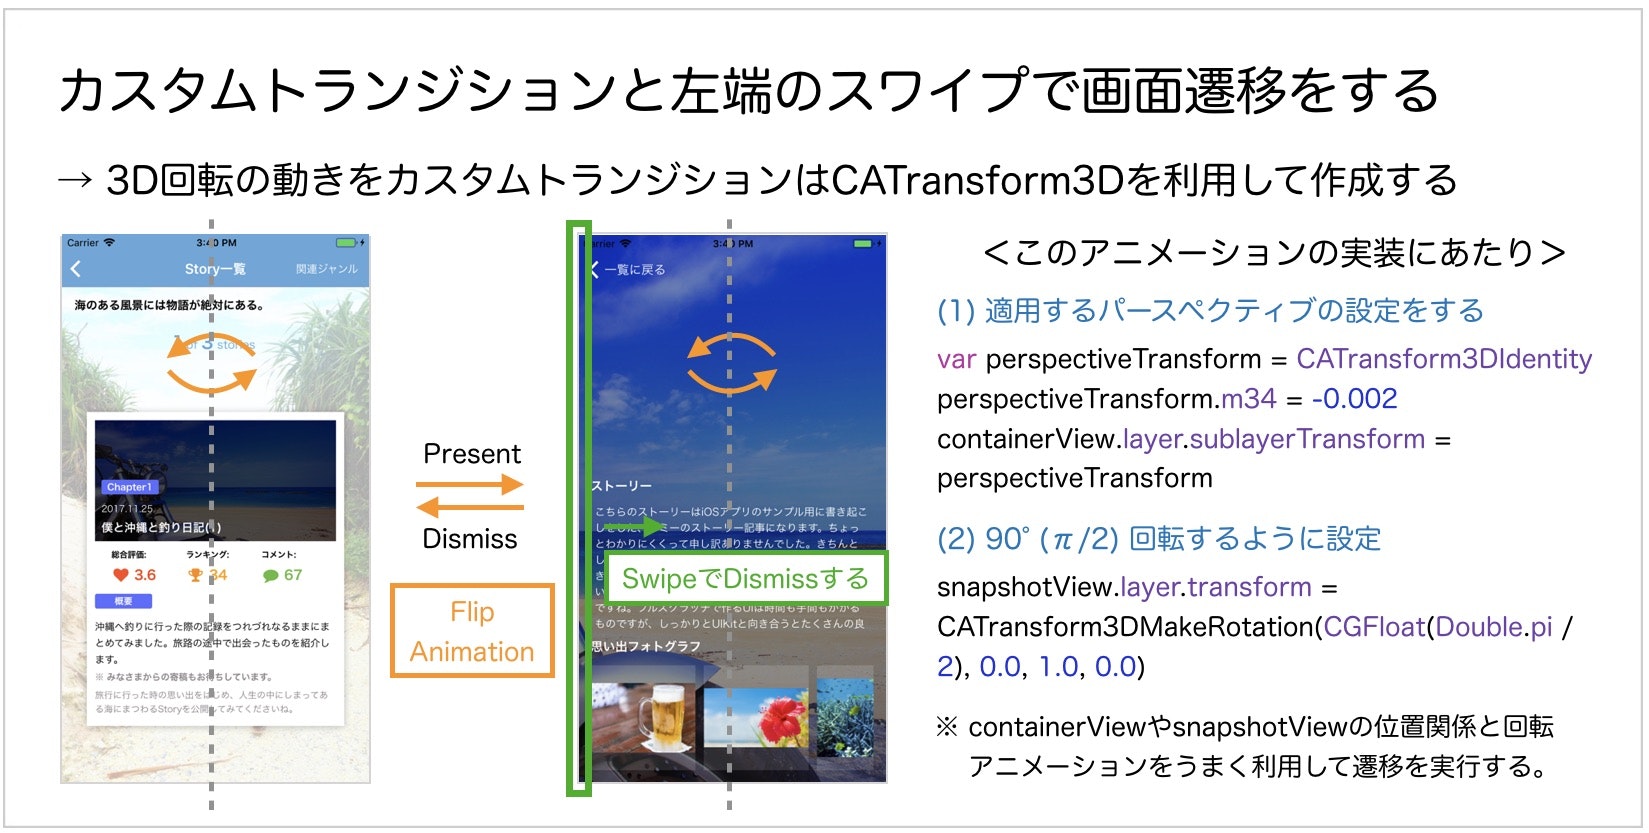
- カスタムトランジションとアファイン変換を活用した3D回転のような画面遷移
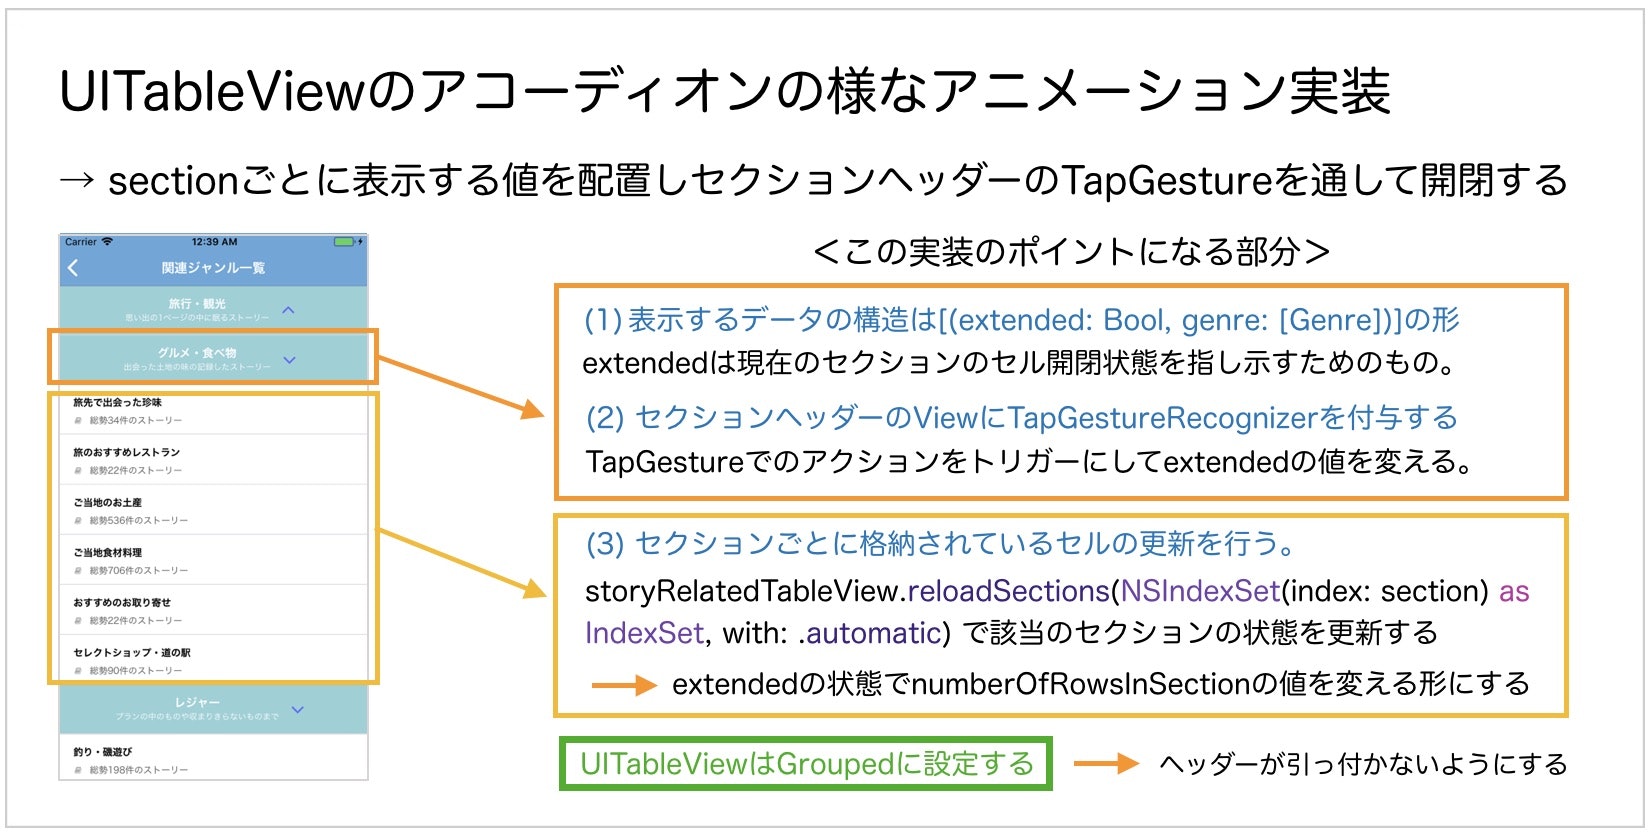
- アコーディオンのようにコンテンツを開閉して表示するUITableView
- UIScrollViewとUIImageViewを組み合わせて拡大・縮小ができるフォトギャラリー
今回実装の際に参考にしたアプリは特にありませんが、下記の記事で紹介されていた実装や紹介されていたサンプルを参考して、サンプル内のコードを読み解いて組み込んみました。
(コード内でも処理のポイントになりそうな部分に関しては、コメントを残しています。)
動きの参考にした記事:
- Custom UIViewController Transitions: Getting Started (raywnderlich.com)
- UIScrollViewの中央にUIImageViewを配置しつつズーム可能にする
- セクション単位で折りたためる、アコーディオン効果付きのUITableViewの作り方
★2-2. 今回のサンプルについて:
サンプルのキャプチャ画像その1:
サンプルのキャプチャ画像その2:
※ 使用したライブラリ及び環境やバージョンに関しては、前編でまとめたものと同じです。
3. 今回作成したサンプルの画面遷移図とStoryboard構成・Extensionに関する解説
後編ではStory.storyboardに関連する部分に関して部分と、今回の実装で使ったExtensionmについてここでは紹介をしていきます。
★3-1. Storyboard構成:
Storyboardの設計に関しては、下記のような形で構成しています。
Story.storyboardの中で展開しているスクロール移動の部分は、UIPageViewControllerで表現をしています。
ざっくりと構造の解説をすると、
1. カード状のUIを表示ための土台になる部分:
- StoryPageViewController.swift → StoryboardにはContainerViewが設置されており、PageViewControllerが「Embed Segue」にて接続されている状態にしています。
2. カード状のUIを表示する実体になる部分:
- StoryViewController.swift → この中にカード状のUIを表現するための部品を配置し、画面遷移のためのSegue等はこちら側に設定しています。
という構成になっています。そしてスライドする画面を設定するためのコードを下記のように記載します。このコードではPresenterから取得したデータを変数:storyContentsに代入した段階でPageViewControllerのセットアップを行うようにしています。
import UIKit

class StoryPageViewController: UIViewController {

    ・・・(省略)・・・

    //ContainerViewにEmbedしたUIPageViewControllerのインスタンスを保持する
    fileprivate var pageViewController: UIPageViewController?

    //ページングして表示させるViewControllerを保持する配列
    fileprivate var storyViewControllerLists = [StoryViewController]()

    //Storyデータを格納するための変数
    fileprivate var storyContents: [Story] = [] {
        didSet {
            self.setupStoryViewControllerLists()
            self.setupPageViewController()
        }
    }

    //StoryPresenterに設定したプロトコルを適用するための変数
    fileprivate var presenter: StoryPresenter!

    override func viewDidLoad() {
        super.viewDidLoad()

        ・・・(省略)・・・
        setupStoryPresenter()
    }

    ・・・(省略)・・・

    //Presenterとの接続に関する設定を行う
    private func setupStoryPresenter() {
        presenter = StoryPresenter(presenter: self)
        presenter.getStory()
    }

    private func setupPageViewController() {

        //ContainerViewにEmbedしたUIPageViewControllerを取得する
        pageViewController = childViewControllers[0] as? UIPageViewController

        //UIPageViewControllerのデータソースの宣言
        pageViewController!.delegate = self
        pageViewController!.dataSource = self

        //MEMO: UIPageViewControllerでUIScrollViewDelegateが欲しい場合はこのように適用する
        //for view in pageViewController!.view.subviews {
        //    if let scrollView = view as? UIScrollView {
        //        scrollView.delegate = self
        //    }
        //}

        //最初に表示する画面として配列の先頭のViewControllerを設定する
        pageViewController!.setViewControllers([storyViewControllerLists[0]], direction: .forward, animated: false, completion: nil)
    }

    //Storyboard上に配置したViewController(StoryboardID = StoryViewController)をインスタンス化して配列に追加する
    private func setupStoryViewControllerLists() {

        for index in 0..<storyContents.count {
            let storyboard: UIStoryboard = UIStoryboard(name: "Story", bundle: Bundle.main)
            let storyViewController = storyboard.instantiateViewController(withIdentifier: "StoryViewController") as! StoryViewController

            //「タグ番号 = インデックスの値」でスワイプ完了時にどのViewControllerかを判別できるようにする & ストーリーデータをセットする
            storyViewController.view.tag = index
            storyViewController.setStoryCardView(storyContents[index])

            //storyViewControllerListsに追加する
            storyViewControllerLists.append(storyViewController)
        }

        //StoryViewControllerの総数をセットする
        totalIndexLabel.text = "\(storyContents.count)"
    }
}

//MARK: - StoryPresenterProtocol

extension StoryPageViewController: StoryPresenterProtocol {

    //表示するデータを取得した場合の処理
    func showStory(_ story: [Story]) {
        storyContents = story
    }
}
★3-2. Extensionの実装:
今回のサンプル全般では、UITableViewCellの数が多いことやUITableViewで表示する部分が多いので、今回はUITableViewCell及びUICollectionViewに関するExtensionを書くことで、使用するセルの登録処理とセルのインスタンス作成時の処理を簡素化するようにしています。
1. NSObjectProtocolに対する拡張:
import Foundation
import UIKit

//NSObjectProtocolの拡張
extension NSObjectProtocol {

    //クラス名を返す変数"className"を返す
    static var className: String {
        return String(describing: self)
    }
}
2. UITableViewCellクラスに対する拡張:
import Foundation
import UIKit

//UITableViewCellの拡張
extension UITableViewCell {

    //独自に定義したセルのクラス名を返す
    static var identifier: String {
        return className
    }
}

//UITableViewの拡張
extension UITableView {

    //作成した独自のカスタムセルを初期化するメソッド
    func registerCustomCell<T: UITableViewCell>(_ cellType: T.Type) {
        register(UINib(nibName: T.identifier, bundle: nil), forCellReuseIdentifier: T.identifier)
    }

    //作成した独自のカスタムセルをインスタンス化するメソッド
    func dequeueReusableCustomCell<T: UITableViewCell>(with cellType: T.Type) -> T {
        return dequeueReusableCell(withIdentifier: T.identifier) as! T
    }
}

/**
 * ※1 初期化の際は、
 * sampleTableView.registerCustomCell(SampleTableViewCell.self)
 * と記載すればセルの登録ができる。
 *
 * ※2 セルをインスタンス化する際は、
 * func tableView(_ tableView: UITableView, cellForRowAt indexPath: IndexPath) -> UITableViewCell {
 *     let cell = tableView.dequeueReusableCustomCell(with: SampleTableViewCell.self)
 *     ・・・(以下処理が続く)・・・
 * }
 * と記載すればセルをインスタンス化することができる。
 */
3. UICollectionViewCellクラスに対する拡張:
import Foundation
import UIKit

//UICollectionReusableViewの拡張
extension UICollectionReusableView {

    //独自に定義したセルのクラス名を返す
    static var identifier: String {
        return className
    }
}

//UICollectionViewの拡張
extension UICollectionView {

    //作成した独自のカスタムセルを初期化するメソッド
    func registerCustomCell<T: UICollectionViewCell>(_ cellType: T.Type) {
        register(UINib(nibName: T.identifier, bundle: nil), forCellWithReuseIdentifier: T.identifier)
    }

    //作成した独自のカスタムセルをインスタンス化するメソッド
    func dequeueReusableCustomCell<T: UICollectionViewCell>(with cellType: T.Type, indexPath: IndexPath) -> T {
        return dequeueReusableCell(withReuseIdentifier: T.identifier, for: indexPath) as! T
    }

    //作成した独自のカスタムヘッダービューをインスタンス化するメソッド
    func dequeueReusableCustomHeaderView<T: UICollectionReusableView>(with cellType: T.Type, indexPath: IndexPath) -> T {
        return dequeueReusableSupplementaryView(ofKind: UICollectionElementKindSectionHeader, withReuseIdentifier: T.identifier, for: indexPath) as! T
    }

    //作成した独自のカスタムフッタービューをインスタンス化するメソッド
    func dequeueReusableCustomFooterView<T: UICollectionReusableView>(with cellType: T.Type, indexPath: IndexPath) -> T {
        return dequeueReusableSupplementaryView(ofKind: UICollectionElementKindSectionFooter, withReuseIdentifier: T.identifier, for: indexPath) as! T
    }
}

/**
 * ※1 初期化の際は、
 * sampleCollectionView.registerCustomCell(SampleCollectionViewCell.self)
 * と記載すればセルの登録ができる。
 *
 * ※2 セルをインスタンス化する際は、
 * func collectionView(_ collectionView: UICollectionView, cellForItemAt indexPath: IndexPath) -> UICollectionViewCell {
 *     let cell = collectionView.dequeueReusableCustomCell(with: SampleCollectionViewCell.self, indexPath: indexPath)
 *     ・・・(以下処理が続く)・・・
 * }
 * と記載すればセルをインスタンス化することができる。
 *
 * ※3 ヘッダー及びフッターをインスタンス化する際は、
 * func collectionView(_ collectionView: UICollectionView, viewForSupplementaryElementOfKind kind: String, at indexPath: IndexPath) -> UICollectionReusableView {
 *     var collectionReusableView: UICollectionReusableView
 *     if kind == UICollectionElementKindSectionHeader {
 *         collectionReusableView = collectionView.dequeueReusableCustomHeaderView(with: SampleCollectionHeaderView.self, indexPath: indexPath)
 *     } else if kind == UICollectionElementKindSectionFooter {
 *         collectionReusableView = collectionView.dequeueReusableCustomFooterView(with: SampleCollectionFooterView.self, indexPath: indexPath)
 *     }
 *     ・・・(以下処理が続く)・・・
 * }
 * と記載すればヘッダー及びフッターをインスタンス化することができる。
 */
このExtensionの他にも、
- 元画像からサムネイル画像を切り出すためのUIImageクラスのExtension
- 16進数のカラーコードを変換するためのUIColorクラスのExtension
- NavigationControllerの戻るボタンの文言を削除したUIViewControllerクラスのExtension
がこのサンプルでは使用されています。しかしながら、Extensionを追加する場合には煩雑にならないように全体に配慮する必要があるので、その点では注意が必要です。
UITableView・UICollectionViewの拡張の際に参考にした書籍:
4. カスタムトランジションとアファイン変換を活用した3D回転のような画面遷移に関する解説
今回の画面遷移に関しては、前編でも紹介したようなカスタムトランジションを活用した画面遷移を利用しています。
カード状のUIと画面がくるりと回転して画面が切り替わるような形のUIを実現するための部分を中心に解説をしていきます。
★4-1. 3D回転のような画面遷移をするためのカスタムトランジションの設定:
ポイントとしては、「進む・戻る」のアニメーションCATranform3Dを使用してページフリップの様なアニメーションを付与する実装に関する部分になります。
アニメーションでもよく形状の変化をする際に用いられるアファイン変換の実装や遷移先・遷移元の継ぎ目になるViewのSnapshotViewに関するに関しては下記の記事も参考にしました。
1. 進む(Present)の画面遷移のクラス:
import Foundation
import UIKit

class FlipPresentCustomTransition: NSObject {

    //トランジション(実行)の秒数
    fileprivate let duration: TimeInterval = 0.72

    //ディレイ(遅延)の秒数
    fileprivate let delay: TimeInterval = 0.00
}

extension FlipPresentCustomTransition: UIViewControllerAnimatedTransitioning {

    //アニメーションの時間を定義する
    func transitionDuration(using transitionContext: UIViewControllerContextTransitioning?) -> TimeInterval {
        return duration
    }

    /**
     * アニメーションの実装を定義する
     * この場合には画面遷移コンテキスト(UIViewControllerContextTransitioningを採用したオブジェクト)
     * → 遷移元や遷移先のViewControllerやそのほか関連する情報が格納されているもの
     */
    func animateTransition(using transitionContext: UIViewControllerContextTransitioning) {

        //コンテキストを元にViewControllerのインスタンスを取得する(存在しない場合は処理を終了)
        guard let fromViewController = transitionContext.viewController(forKey: UITransitionContextViewControllerKey.from) else {
            return
        }

        guard let toViewController = transitionContext.viewController(forKey: UITransitionContextViewControllerKey.to) else {
            return
        }

        //アニメーションの実態となるコンテナビューを作成する
        let containerView = transitionContext.containerView

        //遷移前と遷移後のframe(大きさと位置)を定義する
        let initialFrame = CGRect(x: 0, y: 0, width: UIScreen.main.bounds.width, height: UIScreen.main.bounds.height)
        let finalFrame = transitionContext.finalFrame(for: toViewController)

        //UIViewのスナップショットを取得する
        // (参考) snapshotViewに関する公式ドキュメント
        // https://developer.apple.com/documentation/uikit/uiview/1622531-snapshotview
        guard let snapshotView = toViewController.view.snapshotView(afterScreenUpdates: true) else {
            return
        }

        //スナップショットの設定
        snapshotView.frame = initialFrame
        snapshotView.layer.masksToBounds = true

        //コンテナビューの中に遷移先のViewControllerを配置し、更にその上にスナップショットのViewを配置する
        containerView.addSubview(toViewController.view)
        containerView.addSubview(snapshotView)

        //遷移先のViewControllerは非表示の状態にしておく
        toViewController.view.isHidden = true

        //CoreAnimationを用いて回転して切り替える処理を登録しておく
        /**
         * 今回のサンプルの動きに関しては下記の記事で紹介されているサンプルを元に実装している
         *
         * 参考: Custom UIViewController Transitions: Getting Started
         * https://www.raywenderlich.com/170144/custom-uiviewcontroller-transitions-getting-started
         */

        //コンテナビューに適用するパースペクティブを設定する
        /**
         * 参考: [Objective-C] フリップアニメーションでビューを切り替える
         * https://qiita.com/edo_m18/items/45fcbc67154eb68ef469
         */
        var perspectiveTransform = CATransform3DIdentity
        perspectiveTransform.m34 = -0.002
        containerView.layer.sublayerTransform = perspectiveTransform

        //X軸に対して90°(π/2ラジアン)回転させる
        /**
         * 角度の計算を利用して裏返しをして画面遷移を行うようにする
         *
         * 参考1: 【iOS Swift入門 #233】表裏(両面)をもつViewを作る
         * http://swift.swift-studying.com/entry/2015/07/18/115735
         * 参考2: Effect – UIViewで裏返せるパネルをつくる
         * http://lepetit-prince.net/ios/?p=631
         */
        snapshotView.layer.transform = CATransform3DMakeRotation(CGFloat(Double.pi / 2), 0.0, 1.0, 0.0)

        //アニメーションを実行する秒数設定する
        let targetDuration = transitionDuration(using: transitionContext)

        //キーフレームアニメーションを設定する
        UIView.animateKeyframes(withDuration: targetDuration, delay: delay, options: .calculationModeCubic, animations: {

            //キーフレーム(1)
            UIView.addKeyframe(withRelativeStartTime: 0.0, relativeDuration: 1/3, animations: {
               fromViewController.view.layer.transform = CATransform3DMakeRotation(CGFloat(-Double.pi / 2), 0.0, 1.0, 0.0)
            })

            //キーフレーム(2)
            UIView.addKeyframe(withRelativeStartTime: 1/3, relativeDuration: 1/3, animations: {
                snapshotView.layer.transform = CATransform3DMakeRotation(0.0, 0.0, 1.0, 0.0)
            })

            //キーフレーム(3)
            UIView.addKeyframe(withRelativeStartTime: 2/3, relativeDuration: 1/3, animations: {
                snapshotView.frame = finalFrame
            })

        }, completion: { _ in

            //アニメーションが完了した際の処理を実行する
            toViewController.view.isHidden = false
            snapshotView.removeFromSuperview()
            transitionContext.completeTransition(!transitionContext.transitionWasCancelled)
        })
    }
}
2. 戻る(Dismiss)の画面遷移のクラス:
import Foundation
import UIKit

class FlipDismissCustomTransition: NSObject {

    //トランジション(実行)の秒数
    fileprivate let duration: TimeInterval = 0.72

    //ディレイ(遅延)の秒数
    fileprivate let delay: TimeInterval = 0.00
}

extension FlipDismissCustomTransition: UIViewControllerAnimatedTransitioning {

    //アニメーションの時間を定義する
    func transitionDuration(using transitionContext: UIViewControllerContextTransitioning?) -> TimeInterval {
        return duration
    }

    //アニメーションの実装を定義する
    func animateTransition(using transitionContext: UIViewControllerContextTransitioning) {

        //コンテキストを元にViewControllerのインスタンスを取得する(存在しない場合は処理を終了)
        guard let fromViewController = transitionContext.viewController(forKey: UITransitionContextViewControllerKey.from) else {
            return
        }

        guard let toViewController = transitionContext.viewController(forKey: UITransitionContextViewControllerKey.to) else {
            return
        }

        //アニメーションの実態となるコンテナビューを作成する
        let containerView = transitionContext.containerView

        //遷移後のframe(大きさと位置)を定義する
        let finalFrame = CGRect(x: 0, y: 0, width: UIScreen.main.bounds.width, height: UIScreen.main.bounds.height)

        //UIViewのスナップショットを取得する
        guard let snapshotView = fromViewController.view.snapshotView(afterScreenUpdates: true) else {
            return
        }

        //スナップショットの設定
        snapshotView.layer.masksToBounds = true

        //コンテナビューの中に遷移先のViewControllerを配置し、更にその上にスナップショットのViewを配置する
        containerView.addSubview(toViewController.view)
        containerView.addSubview(snapshotView)

        //遷移元のViewControllerは非表示の状態にしておく
        fromViewController.view.isHidden = true

        //CoreAnimationを用いて回転して切り替える処理を登録しておく ※FlipPresentCustomTransition.swiftとほぼ同じ

        //コンテナビューに適用するパースペクティブを設定する
        var perspectiveTransform = CATransform3DIdentity
        perspectiveTransform.m34 = -0.002
        containerView.layer.sublayerTransform = perspectiveTransform

        //X軸に対して-90°(-π/2ラジアン)回転させる
        toViewController.view.layer.transform = CATransform3DMakeRotation(CGFloat(-Double.pi / 2), 0.0, 1.0, 0.0)

        //アニメーションを実行する秒数設定する
        let targetDuration = transitionDuration(using: transitionContext)

        //キーフレームアニメーションを設定する
        UIView.animateKeyframes(withDuration: targetDuration, delay: delay, options: .calculationModeCubic, animations: {

            //キーフレーム(1)
            UIView.addKeyframe(withRelativeStartTime: 0.0, relativeDuration: 1/3, animations: {
                snapshotView.frame = finalFrame
            })

            //キーフレーム(2)
            UIView.addKeyframe(withRelativeStartTime: 1/3, relativeDuration: 1/3, animations: {
                snapshotView.layer.transform = CATransform3DMakeRotation(CGFloat(Double.pi / 2), 0.0, 1.0, 0.0)
            })

            //キーフレーム(3)
            UIView.addKeyframe(withRelativeStartTime: 2/3, relativeDuration: 1/3, animations: {
                toViewController.view.layer.transform = CATransform3DMakeRotation(0.0, 0.0, 1.0, 0.0)
            })

        }, completion: { _ in

            //アニメーションが完了した際の処理を実行する
            fromViewController.view.isHidden = false
            snapshotView.removeFromSuperview()
            transitionContext.completeTransition(!transitionContext.transitionWasCancelled)
        })
    }
}
UIView.animateKeyframes()をで、アニメーションの順次実行ができるので異なったアニメーションを組み合わせて複雑な動きを表現することもできるので、UIView.animate()やCoreAnimationと使い分けることで様々な表現や演出ができそうですね。
キーフレームアニメーションの参考:
- iOSでアニメーションを行う方法”回転”
- UIViewのアニメーションを連続で実行させるにはどうすれば良いですか。
- Swiftアニメーション実装
- iOSのアニメーションあれこれ(Objective-C/Swift(※随時更新中))
★4-2. NavigationControllerの様に左隅からスワイプして前画面に戻るようにする:
UINavigationControllerの様に、左端をスワイプすると元の画面に戻るようなアニメーションも実装しています。下記のコードの様にUIPercentDrivenInteractiveTransitionクラスを継承したクラスを作成し、wireToViewController(_ viewController: UIViewController!)メソッドで該当のViewControllerに定義した動きを適用するようにします。
また、UIPercentDrivenInteractiveTransitionに関する実装では、下記の記事が理解の参考になるかと思います。
UIPercentDrivenInteractiveTransitionの実装参考:
- 画像がズームインしながら画面遷移するSwiftライブラリを公開しました
- [iOS]Twitterっぽい画像の閉じ方を実装してみる
- UIPercentDrivenInteractiveTransitionを使ってModalをDismissする
- 【iOS】Swipeで簡単に戻れるNavigationControllerを作ってみた
import Foundation
import UIKit

class SwipeInteractionController: UIPercentDrivenInteractiveTransition {

    //動かしている状態か否かを判定する変数
    var interactionInProgress = false

    //トランジションが終了したか否かを判定する変数
    private var shouldCompleteTransition = false

    //該当するViewControllerを格納する変数 ※弱参照にしておく
    private weak var viewController: UIViewController!

    //MARK: - Function

    //受け取った遷移対象のViewControllerの画面左にGestureRecognizer(UIScreenEdgePanGestureRecognizer)を追加する
    func wireToViewController(_ viewController: UIViewController!) {
        self.viewController = viewController
        prepareGestureRecognizerInView(viewController.view)
    }

    //MARK: - Private Function

    //UIScreenEdgePanGestureRecognizerが発火した際のアクションを定義する
    @objc private func handleGesture(_ gestureRecognizer: UIScreenEdgePanGestureRecognizer) {

        guard let gestureRecognizerView = gestureRecognizer.view else {
            return
        }

        guard let gestureRecognizerSuperview = gestureRecognizerView.superview else {
            return
        }

        //X軸方向の変化量を算出する
        let translation = gestureRecognizer.translation(in: gestureRecognizerSuperview)
        var progress = (translation.x / 200)
        progress = CGFloat(fminf(fmaxf(Float(progress), 0.0), 1.0))

        //UIScreenEdgePanGestureRecognizerの状態によって動き方の場合分けにする
        switch gestureRecognizer.state {

        //(1)開始時
        case .began:
            interactionInProgress = true
            viewController.dismiss(animated: true, completion: nil)

        //(2)変更時
        case .changed:
            shouldCompleteTransition = (progress > 0.5)
            update(progress)

        //(3)キャンセル時
        case .cancelled:
            interactionInProgress = false
            cancel()

        //(4)終了時
        case .ended:
            interactionInProgress = false
            if shouldCompleteTransition {
                finish()
            } else {
                cancel()
            }

        default:
            print("This state is unsupported to UIScreenEdgePanGestureRecognizer.")
        }
    }

    //UIScreenEdgePanGestureRecognizerを追加する
    private func prepareGestureRecognizerInView(_ view: UIView) {
        let gesture = UIScreenEdgePanGestureRecognizer(target: self, action: #selector(self.handleGesture(_:)))
        gesture.edges = UIRectEdge.left
        view.addGestureRecognizer(gesture)
    }
}
上記のクラスを含め、前述した3D回転を伴うカスタムトランジションを該当のViewControllerのUIViewControllerTransitioningDelegateに適用させる形で実装することで実装したアニメーションとスワイプで戻る動きを適用させます。
import UIKit

class StoryViewController: UIViewController {

    ・・・(省略)・・・

    //適用するカスタムトランジションのクラス
    fileprivate let flipPresentCustomTransition = FlipPresentCustomTransition()
    fileprivate let flipDismissCustomTransition = FlipDismissCustomTransition()

    //スワイプアクションに関するControllerのインスタンス
    fileprivate let swipeInteractionController = SwipeInteractionController()

    ・・・(省略)・・・

    override func prepare(for segue: UIStoryboardSegue, sender: Any?) {
        if segue.identifier == "ToStoryDetailViewController", let destinationViewController = segue.destination as? StoryDetailViewController {

            //MEMO: InterfaceBuilder上での設定
            //・Kind → 「Present Modally」に設定
            //・Presntation → 「Full Screen」に設定
            //・Transition → 「Cover Vertical」に設定

            destinationViewController.setStoryDetail(targetStory)
            destinationViewController.transitioningDelegate = self
            swipeInteractionController.wireToViewController(destinationViewController)
        }
    }

    ・・・(省略)・・・
}

//MARK: - UIViewControllerTransitioningDelegate

extension StoryViewController: UIViewControllerTransitioningDelegate {

    func animationController(forPresented presented: UIViewController, presenting: UIViewController, source: UIViewController) -> UIViewControllerAnimatedTransitioning? {
        return flipPresentCustomTransition
    }

    func animationController(forDismissed dismissed: UIViewController) -> UIViewControllerAnimatedTransitioning? {
        return flipDismissCustomTransition
    }

    func interactionControllerForDismissal(using animator: UIViewControllerAnimatedTransitioning) -> UIViewControllerInteractiveTransitioning? {
        return swipeInteractionController.interactionInProgress ? swipeInteractionController : nil
    }
}
このようにカスタムトランジションについては複雑なアニメーションを伴う様な画面遷移も実現できるので、色々とカスタマイズすることで普通の画面遷移とは一味違った表現ができます。
今回は上記でピックアップした記事の表現を読み解く様な形でアレンジをした形の実装にしましたが、今後も色々と研究を重ねて美しい画面遷移の動きに磨きをかけていきたいと感じている次第です。
5. アコーディオンのようにコンテンツを開閉して表示するUITableViewに関する解説
アコーディオンのようにコンテンツを開閉する際の実装を行う場合も、UITableViewを利用して実装を行います。
設計の概略としては下記のような形にします。
-
ヘッダー部分: → セクションヘッダーを利用し、タップ検知を行うために
UITapGestureRecognizerを付与する。 - コンテンツ部分: → UITableViewCellで従来通りに実装する。
ここで気をつけたい点としては、UITableViewのセクションヘッダーはデフォルトの状態では、スクロールした際に上に残ってしまうので、ここでは__Styleを「Plain」から「Grouped」へ変更__しておくようにします。
そしてUITableViewのスタイルをGroupedに変更した際には、セクションヘッダーとフッターの間に余白ができてしまうので、この部分を消す必要があるので下記の記事を参考に対応をします。
以上の点を踏まえた上での実装をまとめると下記のようになります。
class StoryRelatedViewController: UIViewController {

    //UI部品の配置
    @IBOutlet weak fileprivate var storyRelatedTableView: UITableView!

    private let storyRelatedHeaderViewHeight: CGFloat = 60.0

    //セクションごとに分けられたジャンルデータを格納する変数
    fileprivate var sectionStateLists: [(extended: Bool, genre: Genre)] = []

    //GenrePresenterに設定したプロトコルを適用するための変数
    fileprivate var presenter: GenrePresenter!

    override func viewDidLoad() {
        super.viewDidLoad()

        ・・・(省略)・・・
        setupStoryRelatedTableView()
        setupGenrePresenter()
    }

    ・・・(省略)・・・

    //テーブルビューの初期化を行う
    private func setupStoryRelatedTableView() {
        storyRelatedTableView.delegate           = self
        storyRelatedTableView.dataSource         = self
        storyRelatedTableView.estimatedRowHeight = 60
        storyRelatedTableView.rowHeight = UITableViewAutomaticDimension
        storyRelatedTableView.delaysContentTouches = false

        storyRelatedTableView.registerCustomCell(StoryRelatedTableViewCell.self)
    }

    //Presenterとの接続に関する設定を行う
    private func setupGenrePresenter() {
        presenter = GenrePresenter(presenter: self)
        presenter.getGenreList()
    }
}

//MARK: - GenrePresenterProtocol

extension StoryRelatedViewController: GenrePresenterProtocol {

    //表示するデータを取得した場合の処理
    func showGenreList(_ genre: [Genre]) {
        var genreList: [(extended: Bool, genre: Genre)] = []
        for genreData in genre {
            let genreDataSet: (extended: Bool, genre: Genre) = (extended: false, genre: genreData)
            genreList.append(genreDataSet)
        }
        sectionStateLists = genreList
        storyRelatedTableView.reloadData()
    }
}

//MARK: - UITableViewDelegate, UITableViewDataSource

extension StoryRelatedViewController: UITableViewDelegate, UITableViewDataSource {

    func numberOfSections(in tableView: UITableView) -> Int {
        return sectionStateLists.count
    }

    func tableView(_ tableView: UITableView, numberOfRowsInSection section: Int) -> Int {
        if sectionStateLists.count > 0 {
            return sectionStateLists[section].extended ? sectionStateLists[section].genre.genreDetail.count : 0
        } else {
            return 0
        }
    }

    func tableView(_ tableView: UITableView, cellForRowAt indexPath: IndexPath) -> UITableViewCell {
        let cell = tableView.dequeueReusableCustomCell(with: StoryRelatedTableViewCell.self)
        cell.setCell(sectionStateLists[indexPath.section].genre.genreDetail[indexPath.row])
        return cell
    }

    func tableView(_ tableView: UITableView, viewForHeaderInSection section: Int) -> UIView? {
        let headerView = StoryRelatedHeaderView.init(frame: CGRect(x: 0, y: 0, width: tableView.frame.width, height: storyRelatedHeaderViewHeight))

        //ヘッダーに表示するデータ等の設定を行う
        headerView.tag = section
        headerView.initIconImageView(sectionStateLists[section].extended)
        headerView.setHeader(sectionStateLists[section].genre)

        //タップジェスチャーの付与を行う
        let tapGestureRecognizer = UITapGestureRecognizer(target: self, action: #selector(self.storyRelatedHeaderWrappedViewTapped(sender:)))
        headerView.addGestureRecognizer(tapGestureRecognizer)
        return headerView
    }

    func tableView(_ tableView: UITableView, heightForHeaderInSection section: Int) -> CGFloat {
        return storyRelatedHeaderViewHeight
    }

    func tableView(_ tableView: UITableView, heightForFooterInSection section: Int) -> CGFloat {
        return CGFloat.leastNormalMagnitude
    }

    //TapGestureRecognizerが発動した際に実行されるアクション
    @objc private func storyRelatedHeaderWrappedViewTapped(sender: UITapGestureRecognizer) {
        guard let headerView = sender.view as? StoryRelatedHeaderView else {
            return
        }

        //該当セクションの値をタグから取得する
        let section = Int(headerView.tag)

        //該当セクションの開閉状態を更新する
        let changedExtended = !sectionStateLists[section].extended
        sectionStateLists[section].extended = changedExtended
        headerView.rotateIconImageView(changedExtended)

        //該当セクション番号のUITableViewを更新する
        storyRelatedTableView.reloadSections(NSIndexSet(index: section) as IndexSet, with: .automatic)
    }
}
セクションごとの開閉情報はメンバ変数sectionStateLists: [(extended: Bool, genre: Genre)]に持たせるようにし、タップジェスチャーが発動したタイミングで開閉のフラグを更新するようにします。セクションごとの更新をしたいので、storyRelatedTableView.reloadSections(NSIndexSet(index: section) as IndexSet, with: .automatic)で更新をかけてextendedの状態に応じてtableView(_ tableView: UITableView, numberOfRowsInSection section: Int) -> Intの値を変化させて表示・非表示を決定させる形になります。
今回はヘッダー側にも矢印アイコンを状態が変化するタイミングで回転させるようなアニメーションも加えていますが、このようにデフォルトで開閉する実装に合わせてのワンポイントを加えてあげるとより心地の良いUIの演出ができるかなと思います。
6. UIScrollViewとUIImageViewを組み合わせて拡大・縮小ができるフォトギャラリーに関する解説
こちらもよくアプリのフォトギャラリーページで見かけるような動きになります。
まずはUIScrollViewを画面全体に配置し、その中にUIImageViewを配置して下記のような手順で制約をつけます。
- (1) storyPictureImageViewに対して、上下左右:0(優先度:1000)の制約をつける
- (2) このままだと警告が出てしまうのでダミーの画像をInterfaceBuilder経由で入れておく
- (3) storyPictureImageViewの「Clip to Bounds」にチェックをつけておく
- (4) storyPictureImageViewのContentModeを「Aspect Fit」にしておく
- (5) storyPictureImageViewの「User Interaction Enabled」と「Multiple Touch」のチェックをはずす
- (6) storyPictureScrollViewの「User Interaction Enabled」と「Multiple Touch」のチェックをつけておく
UIScrollViewの中のUIImageView下記のような形で設定ができていればひとまずは、OKです。
そして下記のように2つのUIScrollViewDelegateのメソッドを活用して、内部に配置しているUIImageViewの上下左右につけている制約をズームに合わせて変更することで、UIImageViewの画像の大きさを変更するような形にします。
-
viewForZooming(in scrollView: UIScrollView) -> UIView?→ ズーム中に実行されてズームの値に対応する要素を返す -
scrollViewDidZoom(_ scrollView: UIScrollView)→ ズームしたら呼び出されるメソッド
全体のコードをまとめると、下記のような形になります。
import UIKit

class StoryPictureViewController: UIViewController {

    //UI部品の配置
    @IBOutlet weak fileprivate var storyPictureScrollView: UIScrollView!
    @IBOutlet weak fileprivate var storyPictureImageView: UIImageView!
    @IBOutlet weak private var storyPictureCloseButton: UIButton!

    //UIScrollViewの中にあるUIImageViewの上下左右の制約
    @IBOutlet weak fileprivate var storyPictureImageTopConstraint: NSLayoutConstraint!
    @IBOutlet weak fileprivate var storyPictureImageBottomConstraint: NSLayoutConstraint!
    @IBOutlet weak fileprivate var storyPictureImageLeftConstraint: NSLayoutConstraint!
    @IBOutlet weak fileprivate var storyPictureImageRightConstraint: NSLayoutConstraint!

    private var targetStoryPicture: Photo? = nil {
        didSet {
            if let photo = targetStoryPicture {
                self.storyPictureImageView.image = photo.imageData
                self.setStoryPictureImageViewScale(self.view.bounds.size)
            }
        }
    }

    override func viewDidLoad() {
        super.viewDidLoad()

        setupStoryPictureScrollView()
        setupStoryDetailBackButton()
    }

    override func viewDidLayoutSubviews() {
        super.viewDidLayoutSubviews()

        //画像スライダー用のUIScrollView等の初期設定を行う
        setStoryPictureImageViewScale(self.view.bounds.size)
    }

    override func didReceiveMemoryWarning() {
        super.didReceiveMemoryWarning()
    }

    //MARK: - Function

    func setPicture(_ photo: Photo) {
        targetStoryPicture = photo
    }

    //MARK: - Private Function

    //一覧に戻るボタンをタップした際に実行されるアクションとの紐付け
    @objc private func onTouchUpInsideStoryPictureCloseButton() {
        self.dismiss(animated: true, completion: nil)
    }

    //Story用の写真を配置したUIScrollViewの初期設定
    private func setupStoryPictureScrollView() {
        storyPictureScrollView.delegate = self
    }

    //Story用の写真の拡大縮小比を設定する
    private func setStoryPictureImageViewScale(_ size: CGSize) {

        //self.viewのサイズを元にUIImageViewに表示する画像の縦横サイズの比を取り、小さい方を適用する
        let widthScale = size.width / storyPictureImageView.bounds.width
        let heightScale = size.height / storyPictureImageView.bounds.height
        let minScale = min(widthScale, heightScale)

        //最小の拡大縮小比
        storyPictureScrollView.minimumZoomScale = minScale

        //現在時点での拡大縮小比
        storyPictureScrollView.zoomScale = minScale
    }

    //戻るボタンの設定を行う
    private func setupStoryDetailBackButton() {
        storyPictureCloseButton.addTarget(self, action: #selector(self.onTouchUpInsideStoryPictureCloseButton), for: .touchUpInside)
    }
}

//MARK: - UIScrollViewDelegate

extension StoryPictureViewController: UIScrollViewDelegate {

    //(重要)UIScrollViewのデリゲートメソッドの一覧:
    //参考にした記事:よく使うデリゲートのテンプレート:
    //https://qiita.com/hoshi005/items/92771d82857e08460e5c

    //ズーム中に実行されてズームの値に対応する要素を返すメソッド
    func viewForZooming(in scrollView: UIScrollView) -> UIView? {
        return storyPictureImageView
    }

    //ズームしたら呼び出されるメソッド ※UIScrollView内のUIImageViewの制約を更新する為に使用する
    func scrollViewDidZoom(_ scrollView: UIScrollView) {
        updateStoryPictureImageViewScale(self.view.bounds.size)
    }

    //UIScrollViewの中で拡大・縮小の動きに合わせて、中のUIImageViewの大きさを変更する
    private func updateStoryPictureImageViewScale(_ size: CGSize) {

        //Y軸方向のAutoLayoutの制約を加算する
        let yOffset = max(0, (size.height - storyPictureImageView.frame.height) / 2)
        storyPictureImageTopConstraint.constant = yOffset
        storyPictureImageBottomConstraint.constant = yOffset

        //X軸方向のAutoLayoutの制約を加算する
        let xOffset = max(0, (size.width - storyPictureImageView.frame.width) / 2)
        storyPictureImageLeftConstraint.constant = xOffset
        storyPictureImageRightConstraint.constant = xOffset

        view.layoutIfNeeded()
    }
}
7. あとがき
今回は前編・後編に分割してお送りしましたが、UIまわりの表現をできるだけライブラリを用いない & 設計や構造も扱いやすく整理された状態で実装するというポイントに自分なりにではありますが、できるだけこだわってサンプル作成をしてみました。
その過程の中でアニメーションを組み合わせてのUI表現のポイントやUIライブラリに近しい挙動の再現をする際にどの辺りがヒントになるかという部分が少しずつではありますが、イメージが湧くようになりつつある様になるかなと感じました。また、UIサンプルの内部構造に関してもUI部品構造やアーキテクチャにも考慮して作成することで、選択したアーキテクチャ(今回はMVPパターン)の理解も深めることができた点は大きな収穫だったので機会あらば実務でも導入できればと思うところです。
かなり長丁場の記事になってしまいましたが、読んで頂きまして本当にありがとうございましたm(_ _)m
Swift愛好会で参加や登壇をするようになって早2年が経過し、僕も今年からiOSアプリのエンジニアを本職になりました。
本当にお世話になっていますし、僕でできることがあれば引き続き貢献することができればと思う所存であります。


