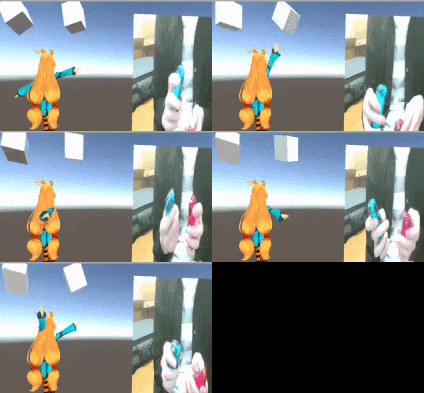
今回やったこと
3Dモデルキャラクター(ユニティちゃん)の腕を、
Nintendo SwitchのJoy-Conに搭載されているジャイロセンサーを使って動かしています。

具体的なアイデア
「JoyconLib」なるものを使うことで、Joy-Conのジャイロ・加速度・傾きの値を取得することができます。
参考:コガネブログ様
【Unity】Nintendo Switch の Joy-Con のジャイロ・加速度・傾きの値を取得したり、振動させたりすることができる「JoyconLib」紹介
また、3Dモデルキャラクターのボーンを動かすには、事前にボーンの初期クオータニオンを保存しておき、その逆回転を加える必要があります。
参考:私の過去の記事
ユニティちゃんの関節を動かしたい話
この2つの方法を組み合わせます。
実装
1.Joy-Conとの連携
コガネブログ様の記事を参考にしながら、UnityとJoy-Conの連携を行います。
参考:コガネブログ様
【Unity】Nintendo Switch の Joy-Con を使用する方法
【Unity】Nintendo Switch の Joy-Con のジャイロ・加速度・傾きの値を取得したり、振動させたりすることができる「JoyconLib」紹介
また、アセットストアからユニティちゃんをインポートしておきます。
プロジェクトウィンドウはこんな感じになります。

2.オブジェクトの配置
以下のもの配置します。
- ユニティちゃんオブジェクト
- 動作検証用のCube(2個)
- 空のGameObject
- 手元を映すためのPlane
こんな感じになります。

3.スクリプトの記述
3.1 ジャイロセンサーの値をCubeおよびユニティちゃんの腕に反映させるスクリプト
参考:コガネブログ様
【Unity】Nintendo Switch の Joy-Con のジャイロ・加速度・傾きの値を取得したり、振動させたりすることができる「JoyconLib」紹介
コガネブログ様が紹介している、Example.csに処理を書き加えたExample_gyro.csが下記になります。
このスクリプトと、JoyConManager.csを空のGameObjectにアタッチします。
using System;
using System.Collections.Generic;
using System.Linq;
using UnityEngine;

public class Example_gyro : MonoBehaviour
{
	private static readonly Joycon.Button[] m_buttons =
		Enum.GetValues( typeof( Joycon.Button ) ) as Joycon.Button[];

	private List<Joycon>    m_joycons;
	private Joycon          m_joyconL;
	private Joycon          m_joyconR;
	private Joycon.Button?  m_pressedButtonL;
	private Joycon.Button?  m_pressedButtonR;


	//以下が追記のコード
	private GameObject rCube,lCube;
	private Quaternion rciq,lciq,riq,liq;
	private Animator anim;
	private Transform RS_bone,LS_bone;

	private void Start()
	{

		m_joycons = JoyconManager.Instance.j;

		if ( m_joycons == null || m_joycons.Count <= 0 ) return;

		m_joyconL = m_joycons.Find( c =>  c.isLeft );
		m_joyconR = m_joycons.Find( c => !c.isLeft );

		// 以下が追記のコード
		anim = (Animator)FindObjectOfType (typeof(Animator));

		rCube = GameObject.Find ("RightCube");
		lCube = GameObject.Find ("LeftCube");

		RS_bone = anim.GetBoneTransform (HumanBodyBones.RightUpperArm);
		LS_bone = anim.GetBoneTransform (HumanBodyBones.LeftUpperArm);

		rciq = rCube.transform.rotation;
		lciq = lCube.transform.rotation;
		riq = RS_bone.rotation;
		liq = LS_bone.rotation;
	}

	private void Update()
	{
		m_pressedButtonL = null;
		m_pressedButtonR = null;

		foreach ( var button in m_buttons )
		{
			if ( m_joyconL.GetButton( button ) )
			{
				m_pressedButtonL = button;
			}
			if ( m_joyconR.GetButton( button ) )
			{
				m_pressedButtonR = button;
			}
		}

		if ( m_joycons == null || m_joycons.Count <= 0 ) return;

		if ( Input.GetKeyDown( KeyCode.Z ) )
		{
			m_joyconL.SetRumble( 160, 320, 0.6f, 200 );
		}
		if ( Input.GetKeyDown( KeyCode.X ) )
		{
			m_joyconR.SetRumble( 160, 320, 0.6f, 200 );
		}

		// 以下が追記のコード
		const float MOVE_PER_CLOCK = 0.01f;
		Vector3 joyconGyro;
		// 右の箱
		joyconGyro = m_joycons[0].GetGyro();
		Quaternion rcqt = rCube.transform.rotation;
		rcqt.x += -joyconGyro[1] * MOVE_PER_CLOCK;
		rcqt.y += -joyconGyro[0] * MOVE_PER_CLOCK;
		rcqt.z += -joyconGyro[2] * MOVE_PER_CLOCK;
		rCube.transform.rotation = rcqt;

		// 右肩
		Quaternion rb = RS_bone.transform.rotation * Quaternion.Inverse(riq);
		rb.x += -joyconGyro [1] * MOVE_PER_CLOCK;
		rb.y += -joyconGyro [0] * MOVE_PER_CLOCK;
		rb.z += -joyconGyro [2] * MOVE_PER_CLOCK;
		RS_bone.rotation = rb * riq;

		// 右のジョイコンのAボタンが押されたら、右の箱と右肩は初期ポジションに戻る
		if (m_joyconR.GetButtonDown(m_buttons[1])) {
			rCube.transform.rotation = rciq;
			RS_bone.rotation = riq;
		}

		// 左の箱
		joyconGyro = m_joycons[1].GetGyro();
		Quaternion lcqt = lCube.transform.rotation;
		lcqt.x += -joyconGyro[1] * MOVE_PER_CLOCK;
		lcqt.y += -joyconGyro[0] * MOVE_PER_CLOCK;
		lcqt.z += -joyconGyro[2] * MOVE_PER_CLOCK;
		lCube.transform.rotation = lcqt;

		// 左肩
		Quaternion lb = LS_bone.transform.rotation * Quaternion.Inverse(liq);
		lb.x += -joyconGyro [1] * MOVE_PER_CLOCK;
		lb.y += -joyconGyro [0] * MOVE_PER_CLOCK;
		lb.z += -joyconGyro [2] * MOVE_PER_CLOCK;
		LS_bone.rotation = lb * liq;

		// 左のジョイコンのAボタンが押されたら、左の箱と左肩は初期ポジションに戻る
		if (m_joyconL.GetButtonDown(m_buttons[1])) {
			lCube.transform.rotation = lciq;
			LS_bone.rotation = liq;
		}

	}

	private void OnGUI()
	{
		var style = GUI.skin.GetStyle( "label" );
		style.fontSize = 24;

		if ( m_joycons == null || m_joycons.Count <= 0 )
		{
			GUILayout.Label( "Joy-Con が接続されていません" );
			return;
		}

		if ( !m_joycons.Any( c => c.isLeft ) )
		{
			GUILayout.Label( "Joy-Con (L) が接続されていません" );
			return;
		}

		if ( !m_joycons.Any( c => !c.isLeft ) )
		{
			GUILayout.Label( "Joy-Con (R) が接続されていません" );
			return;
		}

		GUILayout.BeginHorizontal( GUILayout.Width( 960 ) );

		foreach ( var joycon in m_joycons )
		{
			var isLeft      = joycon.isLeft;
			var name        = isLeft ? "Joy-Con (L)" : "Joy-Con (R)";
			var key         = isLeft ? "Z キー" : "X キー";
			var button      = isLeft ? m_pressedButtonL : m_pressedButtonR;
			var stick       = joycon.GetStick();
			var gyro        = joycon.GetGyro();
			var accel       = joycon.GetAccel();
			var orientation = joycon.GetVector();

//			GUILayout.BeginVertical( GUILayout.Width( 480 ) );
//			GUILayout.Label( name );
//			GUILayout.Label( key + ":振動" );
//			GUILayout.Label( "押されているボタン:" + button );
//			GUILayout.Label( string.Format( "スティック:({0}, {1})", stick[ 0 ], stick[ 1 ] ) );
//			GUILayout.Label( "ジャイロ:" + gyro );
//			GUILayout.Label( "加速度:" + accel );
//			GUILayout.Label( "傾き:" + orientation );
//			GUILayout.EndVertical();
		}

		GUILayout.EndHorizontal();
	}
}
主な追記箇所は以下の通りです。
-
Start()関数- Cube、ボーンの初期クオータニオンを保存
-
Update()関数- Cube、ボーンに、ジャイロセンサーから得た値を加算
- ボーンの操作の場合は、事前に初期クオータニオンの逆を乗算しておき、ジャイロセンサーの値の加算後にもとに戻す
- Aボタンが押されたら、箱とボーンを初期状態に戻す
-
onGUI()関数- 画面に情報が出力されるが、今回は必要ないのでコメントアウト
3.2 手元を映すためのスクリプト
参考:おもちゃラボ様
【Unity】Webカメラの画像を加工して表示する
おもちゃラボ様が紹介しているスクリプトを、Planeにアタッチします。
結果
考察
動画だけ見るとうまくいってるようにも見えますが、
実際に色々動かしているとなんか変な気がします・・・。
おそらく、回転処理がなにか間違っているんだと思います。
Unityの回転処理、難しすぎませんかねぇ・・・。
おわりに
Joy-ConとUnityの連携は、環境構築が容易かつ、通信速度も非常に高速なのでとてもおすすめです。
ただ、実際にセンサーの値を用いてオブジェクトを操作しようとすると、一筋縄ではいかないことも多いかと思います。
今回は腕だけを動かしましたが、
もっとデバイスを増やすか、あるいはIKを駆使することで、全身を動かすことも可能かと思います。
この作品はユニティちゃんライセンス条項の元に提供されています
