2017.03.09
1. 概要
PATLITE PHU-3はUSB I/Fを持った3色(RED, YELLOW, GREEN)LED表示灯である。これをラズパイのUSBに接続し、Node-REDからLEDの点灯を制御する。
2. 準備
- PATLITEをラズパイのUSBに接続する
- ラズパイを起動する
- Mac/PCからラズパイにSSHで接続する
3. 現状確認
lsusbコマンドを実行する。下記の場合Device 006がPATLITEに相当し、vendor ID = 191a, Product Id = 8002 であることがわかる。
$ lsusb
Bus 001 Device 006: ID 191a:8002
Bus 001 Device 005: ID 0566:3029 Monterey International Corp.
Bus 001 Device 004: ID 15d9:0a4f Trust International B.V.
Bus 001 Device 003: ID 0424:ec00 Standard Microsystems Corp. SMSC9512/9514 Fast Ethernet Adapter
Bus 001 Device 002: ID 0424:9514 Standard Microsystems Corp.
Bus 001 Device 001: ID 1d6b:0002 Linux Foundation 2.0 root hub
次に以下のコマンドを実行する。何もみつからないのでttyUSB deviceとは認識されていないことがわかる。
$ ls /dev/ttyUSB*
次に以下のコマンドを実行する。
$ dmesg | grep USB
最後の数行に以下の表示があり、ラズパイがどのようにPATLITEを認識しているかがわかる。
[ 6012.586434] usb 1-1.4: new full-speed USB device number 6 using dwc_otg
[ 6012.741414] usb 1-1.4: New USB device found, idVendor=191a, idProduct=8002
[ 6012.741429] usb 1-1.4: New USB device strings: Mfr=1, Product=2, SerialNumber=0
[ 6012.741438] usb 1-1.4: Product: USB/FTDI PATLITE
4 ドライバーのインストール
ドライバーのインストールは以下のコマンドを実行する。
$ sudo su
modprobe ftdi-sio
echo 191a 8002 > /sys/bus/usb-serial/drivers/ftdi_sio/new_id
exit
ドライバーがインストールされたことを確認するには以下のコマンドを実行し、
$ dmesg | grep USB
表示に以下のメッセージが含まれることでわかる。
FTDI USB Serial Device converter now attached to ttyUSB0
さらに、ttyUSBデバイスが作成されていることを確認する。
$  ls /dev/ttyUSB*
/dev/ttyUSB0
5 Node-REDを使った動作確認
5.1 Flowの実行
ラズパイへのNode-REDのインストールはここでは説明しない。ただし、Node-RED(v0.16.2)にはserial nodeが無かったので、下記を参照してインストールした。
[{"id":"8a8aa705.6f2d38","type":"inject","z":"67a4aa13.675414","name":"","topic":"","payload":"","payloadType":"date","repeat":"","crontab":"","once":false,"x":138.5,"y":181,"wires":[["e150861.bb54278"]]},{"id":"4990ddcd.0a29d4","type":"serial out","z":"67a4aa13.675414","name":"","serial":"fe45a1c8.bbbb4","x":601.5,"y":181,"wires":[]},{"id":"e150861.bb54278","type":"function","z":"67a4aa13.675414","name":"msg.payload = 1","func":"msg.payload = 1;\nreturn msg;\n\n// 0: 消灯\n// 1: RED\n// 2: YELLOW\n// 3: RED, YELLOW\n// 4: GREEN\n// 5: RED, GREEN\n// 6: YELLOW, GREEN\n// 7: RED, YELLOW, GREEN","outputs":1,"noerr":0,"x":372.5,"y":181,"wires":[["4990ddcd.0a29d4"]]},{"id":"8a641bbb.bb83a8","type":"comment","z":"67a4aa13.675414","name":"Test Flow: PATLITE","info":"","x":142.5,"y":136,"wires":[]},{"id":"fe45a1c8.bbbb4","type":"serial-port","z":"","serialport":"/dev/ttyUSB0","serialbaud":"19200","databits":"8","parity":"none","stopbits":"1","newline":"\\n","bin":"false","out":"char","addchar":false}]
このFLOWをimportし、Deployし、timestamp nodeの左側をクリックすると、PATLITEのREDが点灯する。
function node内のJavaScriptでmsg.payloadに代入する値を1~7に変更すると、点灯するLEDのパターンが変更できる。
1:RED, 2:YELLOW, 4:GREENとbitmapで実装されている。
5.2 Flowの解説
timesamp nodeはトリガーだけである。function nodeには、以下のJavaScriptが記述されている。
msg.payload = 1;
return msg;
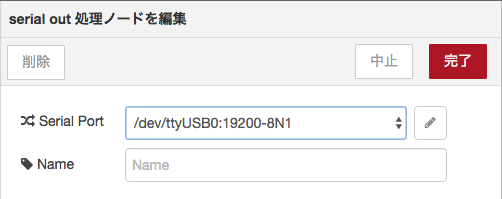
serial nodeは以下のように設定されている。
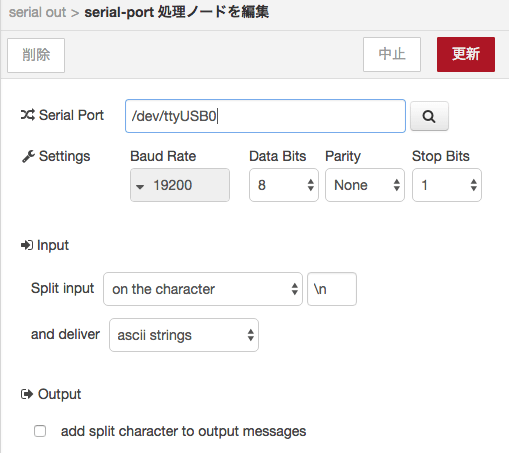
Serial Portの右側の鉛筆のアイコンをクリックすると、以下のようにシリアル通信の設定画面が現れる。
6. NOTE
このままだと再起動等すると接続できなくなるので
/etc/rc.localに追記する。
$ cd /etc
$ sudo nano rc.local
# !/bin/sh -e
#
# rc.local
#
# This script is executed at the end of each multiuser runlevel.
# Make sure that the script will "exit 0" on success or any other
# value on error.
#
# In order to enable or disable this script just change the execution
# bits.
#
# By default this script does nothing.

# Print the IP address
_IP=$(hostname -I) || true
if [ "$_IP" ]; then
  printf "My IP address is %s\n" "$_IP"
fi

# add device driver for PATLITE
modprobe ftdi-sio
echo 191a 8002 > /sys/bus/usb-serial/drivers/ftdi_sio/new_id

exit 0


