Windows10 PC 間で共有フォルダが見えるように設定する
ネットワークの設定やファイル共有方法は次のサイトを参考にしてください
https://www.techdevicetv.com/ch_windows10/18/
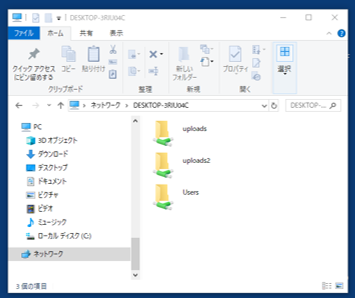
うまくいけば、「ネットワーク」のアイコンをダブルクリックすると隣のPCが表示されます
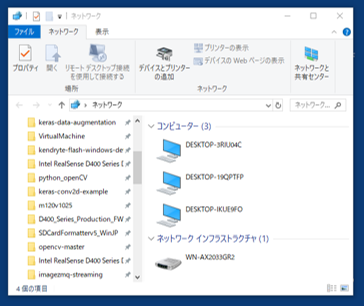
PCのアイコンをダブルクリックすると共有設定したフォルダが表示されます
コマンドを送る側のPCのプログラム
キー操作でコマンドを送る
# !/usr/bin/python
# coding: UTF-8
# =============================================
#   OpenCV image command remote controll
#
#   Ver.1  2020-3-19  T.F.
#
# =============================================
import cv2
import numpy as np
import time

# ---------------------------------------------
# valt
# ---------------------------------------------
# ---------------------------------------------
# mother_PC make image command (Command Flag)
# ---------------------------------------------
img=np.zeros((100,100,3),np.uint8)
cv2.imwrite("C:\Common\img_ZERO.bmp",img)
img_ZERO=cv2.imread("C:\Common\img_ZERO.bmp")
# --------------------------------------
img[:,:]=[255,0,0]
cv2.imwrite("C:\Common\img_UP.bmp",img)
img_UP=cv2.imread("C:\Common\img_UP.bmp")
# --------------------------------------
img[:,:]=[0,255,0]
cv2.imwrite("C:\Common\img_DWN.bmp",img)
img_DWN=cv2.imread("C:\Common\img_DWN.bmp")
# --------------------------------------
img[:,:]=[0,0,255]
cv2.imwrite("C:\Common\img_FWD.bmp",img)
img_FWD=cv2.imread("C:\Common\img_FWD.bmp")
# --------------------------------------

# ---------------------------------------------
# init
# ---------------------------------------------
# cv2.namedWindow('key',cv2.WINDOW_AUTOSIZE)
# ---------------------------------------------
cv2.namedWindow('Command Flag',cv2.WINDOW_NORMAL)
cv2.imshow('Command Flag', img_ZERO)

# ---------------------------------------------
# looop
# ---------------------------------------------
while True:
    #---------------------------------------------
    # key interupt
    #---------------------------------------------a
    key = cv2.waitKey(3)

    if key == 27:
        break

    elif key == ord("0"):
        cv2.imwrite("C:\Common\command.bmp",img_ZERO)
        cv2.imshow('Command Flag', img_ZERO)
        print("cmd:0 ZERO")

    elif key == ord("1"):
        cv2.imwrite("C:\Common\command.bmp",img_UP)
        cv2.imshow('Command Flag', img_UP)
        print("cmd:1 UP")

    elif key == ord("2"):
        cv2.imwrite("C:\Common\command.bmp",img_DWN)
        cv2.imshow('Command Flag', img_DWN)
        print("cmd:2 DWN")

    elif key == ord("3"):
        cv2.imwrite("C:\Common\command.bmp",img_FWD)
        cv2.imshow('Command Flag', img_FWD)
        print("cmd:3 FWD")

# ---------------------------------------------
# end
# ---------------------------------------------
cv2.destroyAllWindows()
操作される側のPCのプログラム
コマンドを送る側のPCの共有フォホルダのコマンド画像を定期的に読取る
これを行うのが、OpenCVのimread関数でネットの指定は至って簡単で次の1行です
cmd=cv2.imread(r"\\DESKTOP-19QPTFP\Common\command.bmp")
各コマンドに対応した画像を作成します
圧縮操作されるipeg画像より非圧縮のbmp画像の方が安定してるようです
念のためにOpenCVで書き込んで読取るという作業を行ってます
# ---------------------------------------
img=np.zeros((100,100,3),np.uint8)
cv2.imwrite("C:\Common\img_ZERO.bmp",img)
img_ZERO=cv2.imread(r"C:\Common\img_ZERO.bmp")
# ---------------------------------------
img[:,:]=[255,0,0]
cv2.imwrite("C:\Common\img_UP.bmp",img)
img_UP=cv2.imread(r"C:\Common\img_UP.bmp")
読取った画像を各コマンドに対応した画像と照合します
openCVの画像は、numpy配列なのでnp.array_equal(img1,img2)関数で照合できます
    if np.array_equal(cmd,img_ZERO):
        now_cmd_num=0
    elif np.array_equal(cmd,img_UP):
        now_cmd_num=1
    elif np.array_equal(cmd,img_DWN):
        now_cmd_num=2
    elif np.array_equal(cmd,img_FWD):
        now_cmd_num=3
# !/usr/bin/python
# coding: UTF-8
# ============================================
#   OpenCV image command remote controller
#   using Command_Flag
#
#   2020-3-19  T.F.
#
# ============================================
import cv2
import numpy as np
import time

# ----------------------
# Val
# ----------------------
pre_cmd_num=0
now_cmd_num=0
# ---------------------------------------
img=np.zeros((100,100,3),np.uint8)
cv2.imwrite("C:\Common\img_ZERO.bmp",img)
img_ZERO=cv2.imread(r"C:\Common\img_ZERO.bmp")
# ---------------------------------------
img[:,:]=[255,0,0]
cv2.imwrite("C:\Common\img_UP.bmp",img)
img_UP=cv2.imread(r"C:\Common\img_UP.bmp")
# ----------------------------------------
img[:,:]=[0,255,0]
cv2.imwrite("C:\Common\img_DWN.bmp",img)
img_DWN=cv2.imread(r"C:\Common\img_DWN.bmp")
# ----------------------------------------
img[:,:]=[0,0,255]
cv2.imwrite("C:\Common\img_FWD.bmp",img)
img_FWD=cv2.imread(r"C:\Common\img_FWD.bmp")
# ----------------------------------------

# ----------------------
# init
# ----------------------
cv2.namedWindow('Command Flag', cv2.WINDOW_NORMAL)
# cv2.namedWindow('Key', cv2.WINDOW_AUTOSIZE)

# ----------------------
# loop
# ----------------------
while True:

    #------------------------------------------------------
    # network mother PC common folder
    #------------------------------------------------------
    cmd=cv2.imread(r"\\DESKTOP-19QPTFP\Common\command.bmp")
    cv2.imshow('Command Flag', cmd)
    #-------------------------------
    # decoder
    #-------------------------------
#    print("cmd:",pre_cmd_num,now_cmd_num)
    if np.array_equal(cmd,img_ZERO):
        now_cmd_num=0
    elif np.array_equal(cmd,img_UP):
        now_cmd_num=1
    elif np.array_equal(cmd,img_DWN):
        now_cmd_num=2
    elif np.array_equal(cmd,img_FWD):
        now_cmd_num=3
    #---------------------------------------------
    if  now_cmd_num==0 and pre_cmd_num!=0:
        cv2.imwrite("C:\Common\command.bmp",cmd)
        pre_cmd_num=0
        print("cmd: UP",pre_cmd_num,now_cmd_num)

    elif  now_cmd_num==1 and pre_cmd_num!=1:
        cv2.imwrite("C:\Common\command.bmp",cmd)
        pre_cmd_num=1
        print("cmd: UP",pre_cmd_num,now_cmd_num)

    elif  now_cmd_num==2 and pre_cmd_num!=2:
        cv2.imwrite("C:\Common\command.bmp",cmd)
        pre_cmd_num=2
        print("cmd: UP",pre_cmd_num,now_cmd_num)

    elif  now_cmd_num==3 and pre_cmd_num!=3:
        cv2.imwrite("C:\Common\command.bmp",cmd)
        pre_cmd_num=3
        print("cmd: UP",pre_cmd_num,now_cmd_num)

    #---------------------------
    # break
    #---------------------------
    key = cv2.waitKey(3)
    if key == 27: break
    time.sleep(0.1)

# ----------------------
# end
# ----------------------
cv2.destroyAllWindows()
画像の色をコマンドとパラメータに使う方法
OpenCVの画像は、numpy配列では、(B,G,R)の順に並んでいます
コマンド画像として(10,10,3)の小さな画像を使います
Bの100画素の階調をコマンドに充てます
例えば、階調10はロボットハンド上昇、20は下降といった具合
Gの100画素の階調をパラメータ1とし距離[mm]、角度[deg]、時間[sec]に充てます
Rの100画素の階調をパラメータ2とし速度[mm/s]、[deg/s]などに充てます
100画素全部に同じ値を設定して共有フォルダに書き込んだ後、スレーブPCがこの画像を読み取る訳ですが
実際にはノイズが乗ったりしてどこかの画素の値が変わることを考えて、100画素の値の最頻値(モード)を真の値として使うことで誤動作を防げて、信頼性が高い通信が行えるはずです
モード計算にはscipyのstats関数を使います
次のサイトを参照してください
https://python.atelierkobato.com/mode/
ここの例は同じ数字がダブらないので最小の数字がモード結果になっています
https://docs.scipy.org/doc/scipy-0.19.0/reference/generated/scipy.stats.mode.html
画像配列(10,10,3)の列方向の最頻値を求めるとモード配列(1,10,3)が出力されます
さらにこのモード配列の列方向の最頻値を求めると画像100画素全部の最頻値として配列(1,3)が出力されます
最終的には(B,G,R)100画素の最頻値として、(com,prm1,prm2)が出力できます
# !/usr/bin/python
# coding: UTF-8
# ============================================
#   OpenCV
#   Image Command using Color_Flag
#
#   2020-3-20  T.F.
# ============================================
import cv2
import numpy as np
import scipy.stats as stats
# ---------------------------
# command:(com,prm1,prm2)
# ---------------------------
img1=np.zeros((10,10,3),np.uint8)
img1[:,:]=[255,100,10]
# --------------------
# noise
# --------------------
img1[0,0]=[254,100,10]
img1[1,1]=[253,101,8]
img1[0,8]=[254,98,9]
img1[5,:]=[0,0,255]
# ----------------------------------------
# imwrite,imread
# ----------------------------------------
cv2.imwrite("C:\Common\img_CMD.bmp",img1)
img2=cv2.imread(r"C:\Common\img_CMD.bmp")
# ----------------------------------------
# imwrite,imread
# ----------------------------------------
print(img2)
print("画像:{0}\n{1}".format(img2.shape,img2))
# ----------------------------------------------------------------------------
mode1,cnt1=stats.mode(img2, axis=0)
print("列ごとの最頻値と頻度:{0}\n{1}\n{2}".format(mode1.shape,mode1, cnt1))
# ----------------------------------------------------------------------------
mode2,cnt2=stats.mode(mode1[0,:], axis=0)
print("面ごとの最頻値と頻度:{0}\n{1}\n{2}".format(mode2.shape,mode2, cnt2))
# -----------------------------------------------------------------------------
print("cmd:{0}\nprm1:{1}\nprm2:{2}".format(mode2[0,0],mode2[0,1], mode2[0,2]))
プリント結果
画像:(10, 10, 3)
[[[254 100  10]
  [255 100  10]
  [255 100  10]
  [255 100  10]
  [255 100  10]
  [255 100  10]
  [255 100  10]
  [255 100  10]
  [254  98   9]
  [255 100  10]]

 [[255 100  10]
  [253 101   8]
  [255 100  10]
  [255 100  10]
  [255 100  10]
  [255 100  10]
  [255 100  10]
  [255 100  10]
  [255 100  10]
  [255 100  10]]

 [[255 100  10]
  [255 100  10]
  [255 100  10]
  [255 100  10]
  [255 100  10]
  [255 100  10]
  [255 100  10]
  [255 100  10]
  [255 100  10]
  [255 100  10]]

 [[255 100  10]
  [255 100  10]
  [255 100  10]
  [255 100  10]
  [255 100  10]
  [255 100  10]
  [255 100  10]
  [255 100  10]
  [255 100  10]
  [255 100  10]]

 [[255 100  10]
  [255 100  10]
  [255 100  10]
  [255 100  10]
  [255 100  10]
  [255 100  10]
  [255 100  10]
  [255 100  10]
  [255 100  10]
  [255 100  10]]

 [[  0   0 255]
  [  0   0 255]
  [  0   0 255]
  [  0   0 255]
  [  0   0 255]
  [  0   0 255]
  [  0   0 255]
  [  0   0 255]
  [  0   0 255]
  [  0   0 255]]

 [[255 100  10]
  [255 100  10]
  [255 100  10]
  [255 100  10]
  [255 100  10]
  [255 100  10]
  [255 100  10]
  [255 100  10]
  [255 100  10]
  [255 100  10]]

 [[255 100  10]
  [255 100  10]
  [255 100  10]
  [255 100  10]
  [255 100  10]
  [255 100  10]
  [255 100  10]
  [255 100  10]
  [255 100  10]
  [255 100  10]]

 [[255 100  10]
  [255 100  10]
  [255 100  10]
  [255 100  10]
  [255 100  10]
  [255 100  10]
  [255 100  10]
  [255 100  10]
  [255 100  10]
  [255 100  10]]

 [[255 100  10]
  [255 100  10]
  [255 100  10]
  [255 100  10]
  [255 100  10]
  [255 100  10]
  [255 100  10]
  [255 100  10]
  [255 100  10]
  [255 100  10]]]
列ごとの最頻値と頻度:(1, 10, 3)
[[[255 100  10]
  [255 100  10]
  [255 100  10]
  [255 100  10]
  [255 100  10]
  [255 100  10]
  [255 100  10]
  [255 100  10]
  [255 100  10]
  [255 100  10]]]
[[[8 9 9]
  [8 8 8]
  [9 9 9]
  [9 9 9]
  [9 9 9]
  [9 9 9]
  [9 9 9]
  [9 9 9]
  [8 8 8]
  [9 9 9]]]
面ごとの最頻値と頻度:(1, 3)
[[255 100  10]]
[[10 10 10]]
cmd:255
prm1:100
prm2:10