基本となる画像処理を一から勉強していくシリーズ (4)。
OpenCV-Pythonチュートリアルを参考に、
画像認識本 https://www.amazon.co.jp/dp/4061529129/
でやっている処理の理解を進める方針です。
目次
- 環境
- 輪郭抽出
- 輪郭近似
- 外接図形
環境
Python 3.7.0
OpenCV 4.1.0
Jupyter Notebook
輪郭抽出
2値化したパンダ画像に対して輪郭抽出を実行。
findContoursの返り値contoursは輪郭毎の座標組、hierarchyはその輪郭の階層構造が入る。
今回は輪郭を2階層にした。
元のパンダ画像に輪郭を描画した。
rinkaku.py
import cv2
import numpy as np
from matplotlib import pyplot as plt
from pylab import rcParams #画像表示の大きさを変える
%matplotlib inline
rcParams['figure.figsize'] = 25, 20  #画像表示の大きさ

img = cv2.imread('/brabra/6.jpg',0)
# 画像を圧縮しておく
img = cv2.resize(img, dsize=None, fx=0.15, fy=0.15)
# 2値化(閾値は大津の二値化から)
ret,thresh = cv2.threshold(img,59,255,0)
# 反転
thresh= cv2.bitwise_not(thresh)

# 輪郭抽出(RETR_CCOMPは2階層にする)
contours, hierarchy = cv2.findContours(thresh, cv2.RETR_CCOMP, cv2.CHAIN_APPROX_SIMPLE)

img = cv2.cvtColor(img,cv2.COLOR_BGR2RGB) #RGB形式に変換する

# 見つけた輪郭を元画像に描画
for i in range(len(contours)):

    #最上層の階層を描画(緑)
    if hierarchy[0][i][3] == -1:
        cv2.drawContours(img, contours, i, (0, 255, 0), 2)
    #2階層目を描画(水色)
    else:
        cv2.drawContours(img, contours, i, (0, 255, 255), 2)

plt.imshow(img)
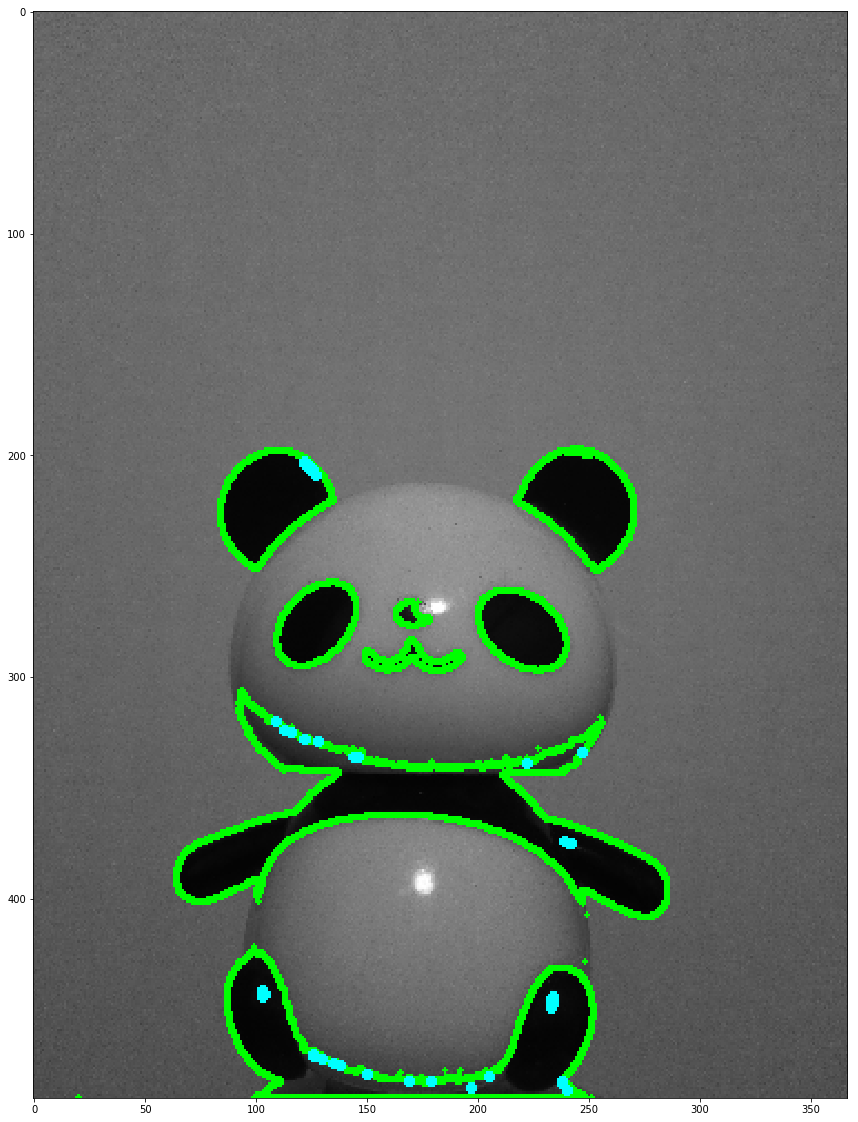
完璧とまではいかないが輪郭を概ね抽出している。
輪郭近似
輪郭は細部にこだわる場合は多くの頂点で描画するが、そこまでの頂点がいらない場合は、輪郭を近似することができる。
ここでは足の部分の輪郭に対して輪郭近似をしてみた。
rinkakukinzi.py
img = cv2.imread('/brabra/6.jpg',0)
img = cv2.resize(img, dsize=None, fx=0.15, fy=0.15)
ret,thresh = cv2.threshold(img,59,255,0)
thresh= cv2.bitwise_not(thresh)

# 輪郭抽出
contours, hierarchy = cv2.findContours(thresh, cv2.RETR_CCOMP, cv2.CHAIN_APPROX_SIMPLE)

img = cv2.cvtColor(img,cv2.COLOR_BGR2RGB) #RGB形式に変換する

# 足の部分の輪郭
cnt = contours[7]

# 輪郭近似 epsilonは近似の程度
epsilon = 0.01*cv2.arcLength(cnt,True)
approx = cv2.approxPolyDP(cnt,epsilon,True)

# 近似輪郭を元画像に描画
cv2.drawContours(img, [approx], -1, (0, 255, 0), 2)

plt.imshow(img)
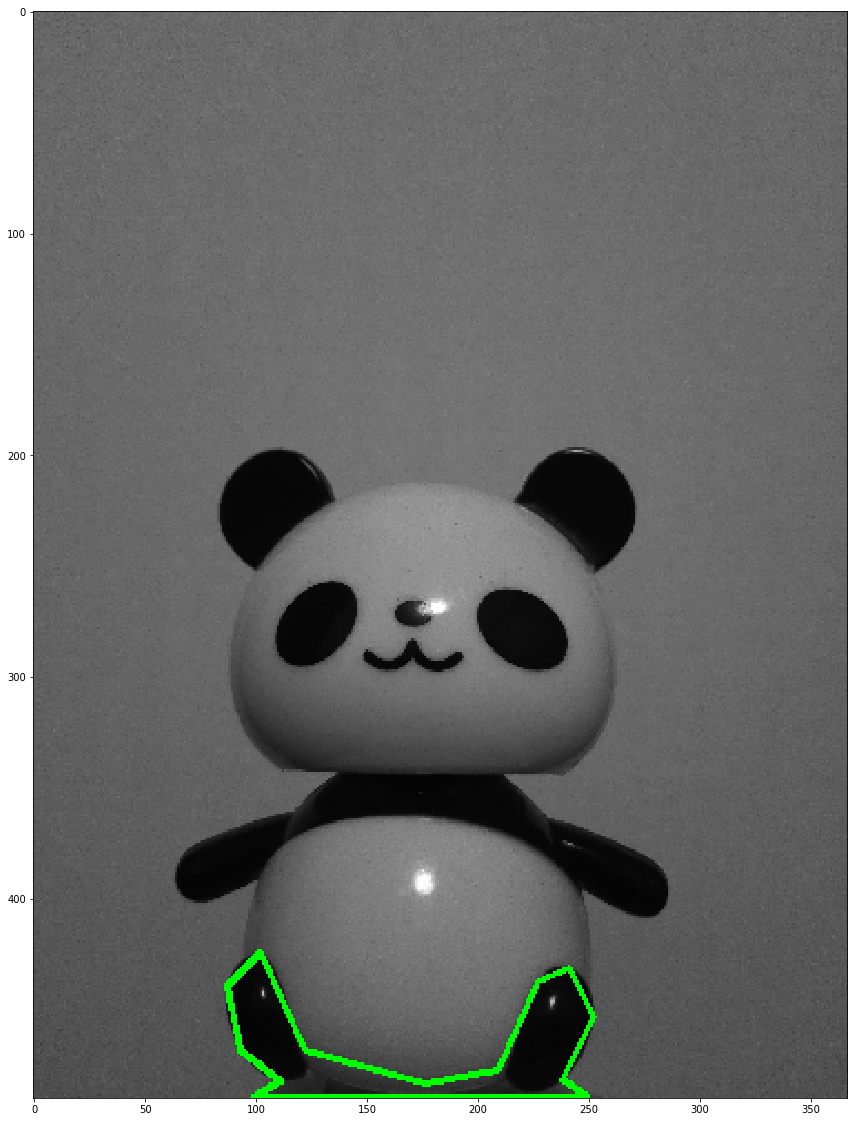
いい感じに角ばった。
外接図形
輪郭に対して外接する図形を描画することができる。
四角形、円、楕円で外接するもの、近似する線を描画した。
gaisetsu.py
img = cv2.imread('C:/brabra/6.jpg',0)
img = cv2.resize(img, dsize=None, fx=0.15, fy=0.15)
ret,thresh = cv2.threshold(img,59,255,0)
thresh= cv2.bitwise_not(thresh)

# 輪郭抽出
contours, hierarchy = cv2.findContours(thresh, cv2.RETR_CCOMP, cv2.CHAIN_APPROX_SIMPLE)

img = cv2.cvtColor(img,cv2.COLOR_BGR2RGB) #RGB形式に変換する

# 足部の輪郭を描画
cv2.drawContours(img, contours, 7, (0, 255, 0), 2)

cnt = contours[7]

# 外接矩形
x,y,w,h = cv2.boundingRect(cnt)
img0 = img.copy()
img0 = cv2.rectangle(img0,(x,y),(x+w,y+h),(0,255,0),2)

# 回転を考慮した外接矩形
rect = cv2.minAreaRect(cnt)
box = cv2.boxPoints(rect)
box = np.int0(box)
img00 = img.copy()
img00 = cv2.drawContours(img00,[box],0,(0,0,255),2)

# 最小外接円
(x,y),radius = cv2.minEnclosingCircle(cnt)
center = (int(x),int(y))
radius = int(radius)
img1 = img.copy()
img1 = cv2.circle(img1,center,radius,(0,255,255),2)

# 楕円fitting
ellipse = cv2.fitEllipse(cnt)
img2 = img.copy()
img2 = cv2.ellipse(img2,ellipse,(255,255,0),2)

# 直線fitting
rows,cols = img.shape[:2]
[vx,vy,x,y] = cv2.fitLine(cnt, cv2.DIST_L2,0,0.01,0.01)
lefty = int((-x*vy/vx) + y)
righty = int(((cols-x)*vy/vx)+y)
img3 = img.copy()
img3 = cv2.line(img3,(cols-1,righty),(0,lefty),(255,255,255),2)

plt.subplot(231),plt.imshow(img0)
plt.title('en'), plt.xticks([]), plt.yticks([])
plt.subplot(232),plt.imshow(img00)
plt.title('en'), plt.xticks([]), plt.yticks([])
plt.subplot(233),plt.imshow(img1)
plt.title('en'), plt.xticks([]), plt.yticks([])
plt.subplot(234),plt.imshow(img2)
plt.title('daen'), plt.xticks([]), plt.yticks([])
plt.subplot(235),plt.imshow(img3)
plt.title('line'), plt.xticks([]), plt.yticks([])

plt.show()

まとめ
輪郭抽出について理解を深めた。
参考文献
-
OpenCVを使った画像処理(OpenCV-Pythonチュートリアル)
http://labs.eecs.tottori-u.ac.jp/sd/Member/oyamada/OpenCV/html/py_tutorials/py_imgproc/py_table_of_contents_imgproc/py_table_of_contents_imgproc.html#py-table-of-content-imgproc -
画像認識(機械学習プロフェッショナルシリーズ)
https://www.amazon.co.jp/dp/4061529129/