得られる知識
- 画面間での遷移方法
- データの受け渡し方法
Navigation Componentとは
画面間の遷移の実装を楽にしてくれるGoogleが開発しているライブラリです。
環境
Android Studio4.0 Canary2
準備
Navigation Componentを導入する
dependencies {
    // 追加するものたち
    def nav_version = "2.1.0"

    implementation "androidx.navigation:navigation-fragment-ktx:$nav_version"
    implementation "androidx.navigation:navigation-ui-ktx:$nav_version"
}
ナビゲーショングラフを作成する
ナビゲーショングラフとは、すべてのデスティネーション(ユーザがアプリ内で移動できる画面)とアクション(どの画面からどの画面に移動するか)を格納するリソースファイルです。
リソースファイルの作成
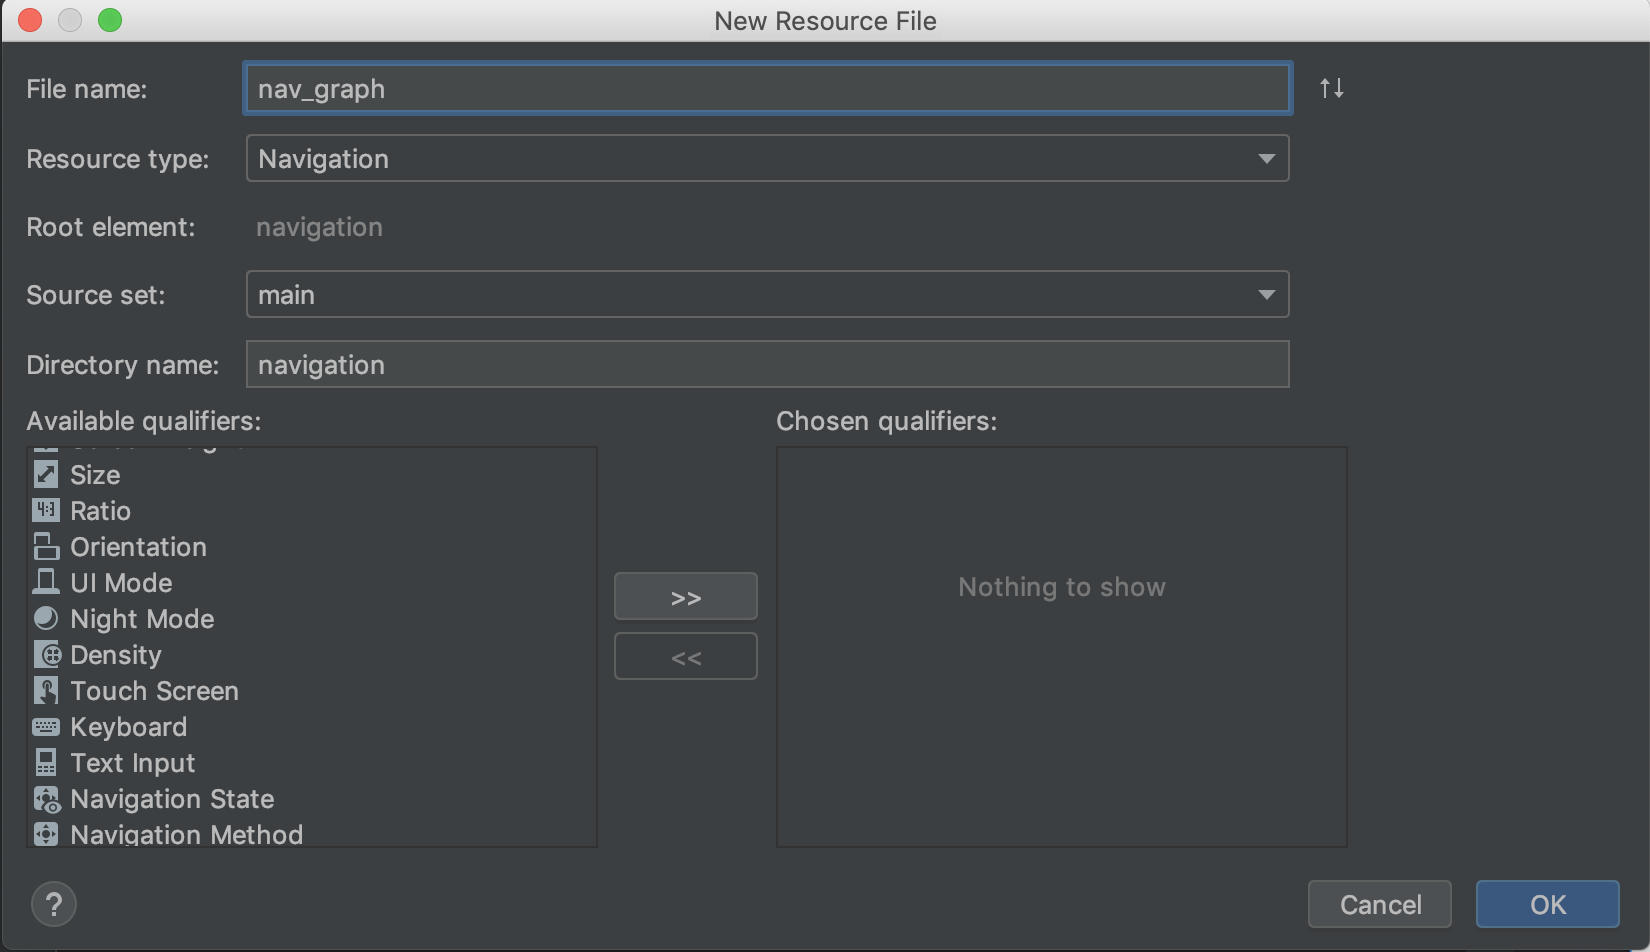
resディレクトリを右クリック > [New] > [Android Resource File] を選択し、New Resource Fileダイアログに以下の内容を入力します。
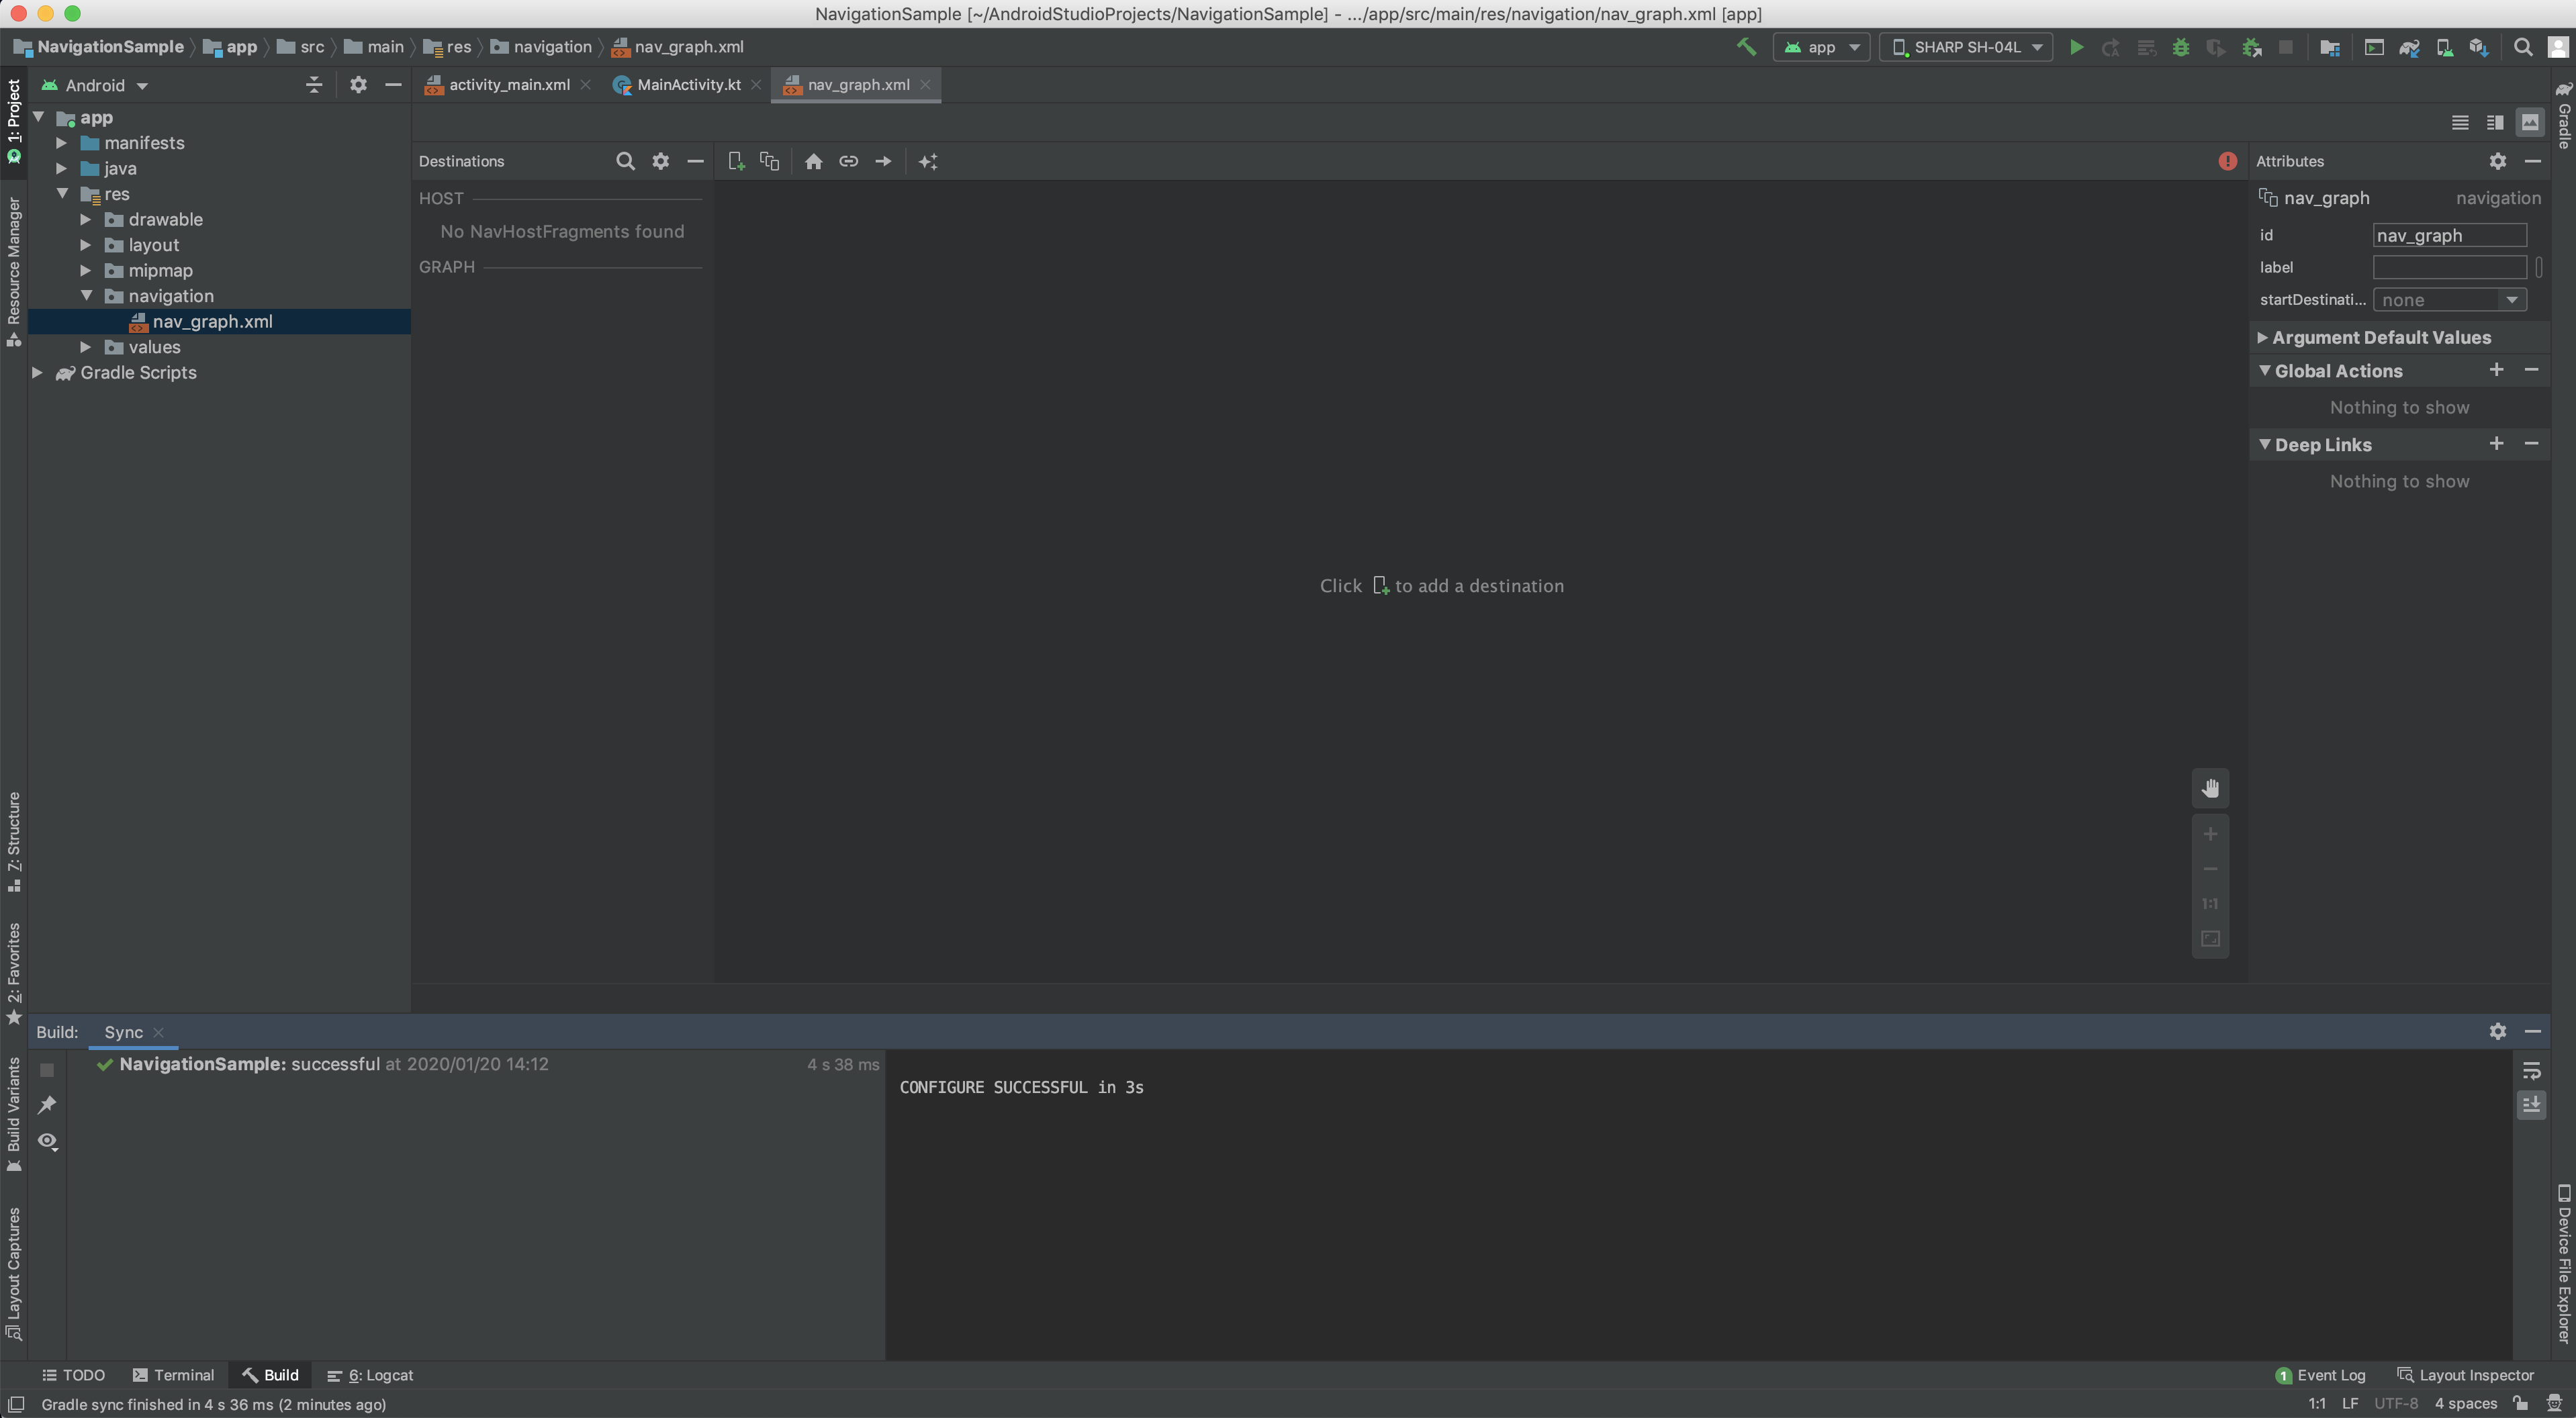
リソースファイルを作成すると、Navigation Editorが開きます。
デスティネーションの作成
リソースファイルの作成ができたので、デスティネーションを作成していきます。
新規フラグメントからデスティネーションを作成する
Navigation EditorからNew Destinationアイコンをクリックするとプルダウンメニューが表示されます。
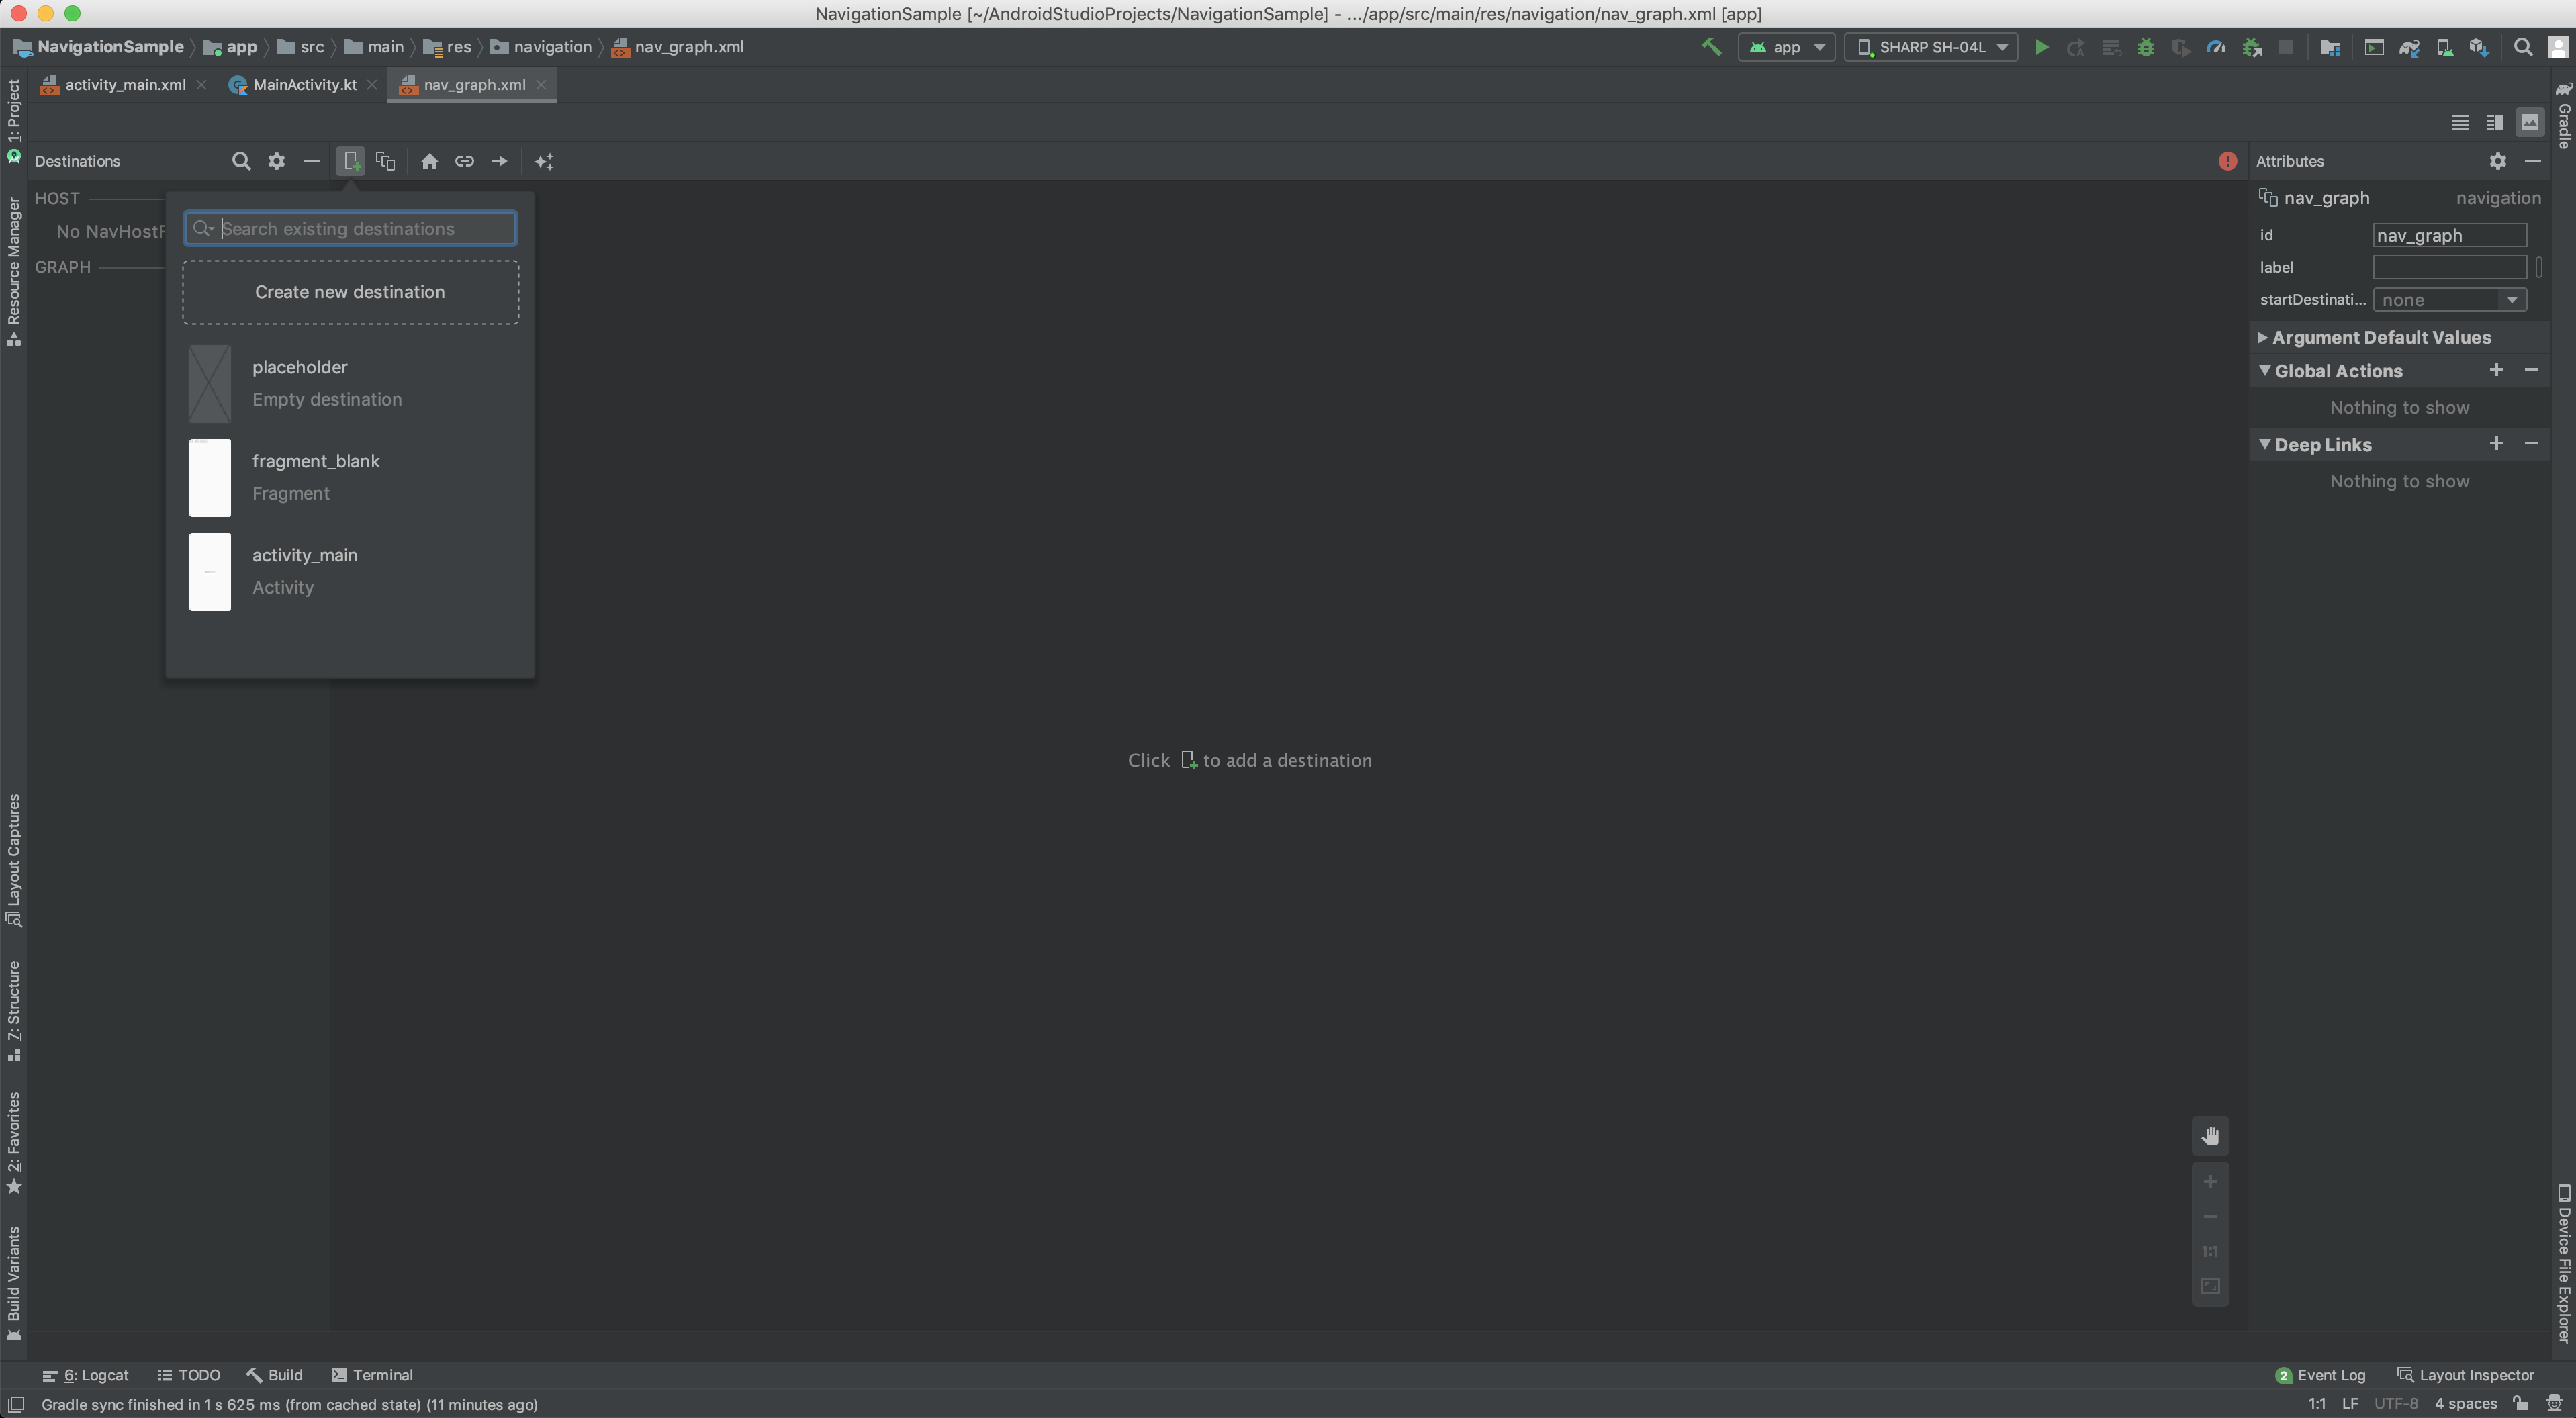
プルダウンメニューのCreate New Destinationをクリックすると、New Android Fragmentが表示されるので、作成したいFragmentを選択してNextをクリックしてください。今回は、Fragment(Blank)を選択しました。
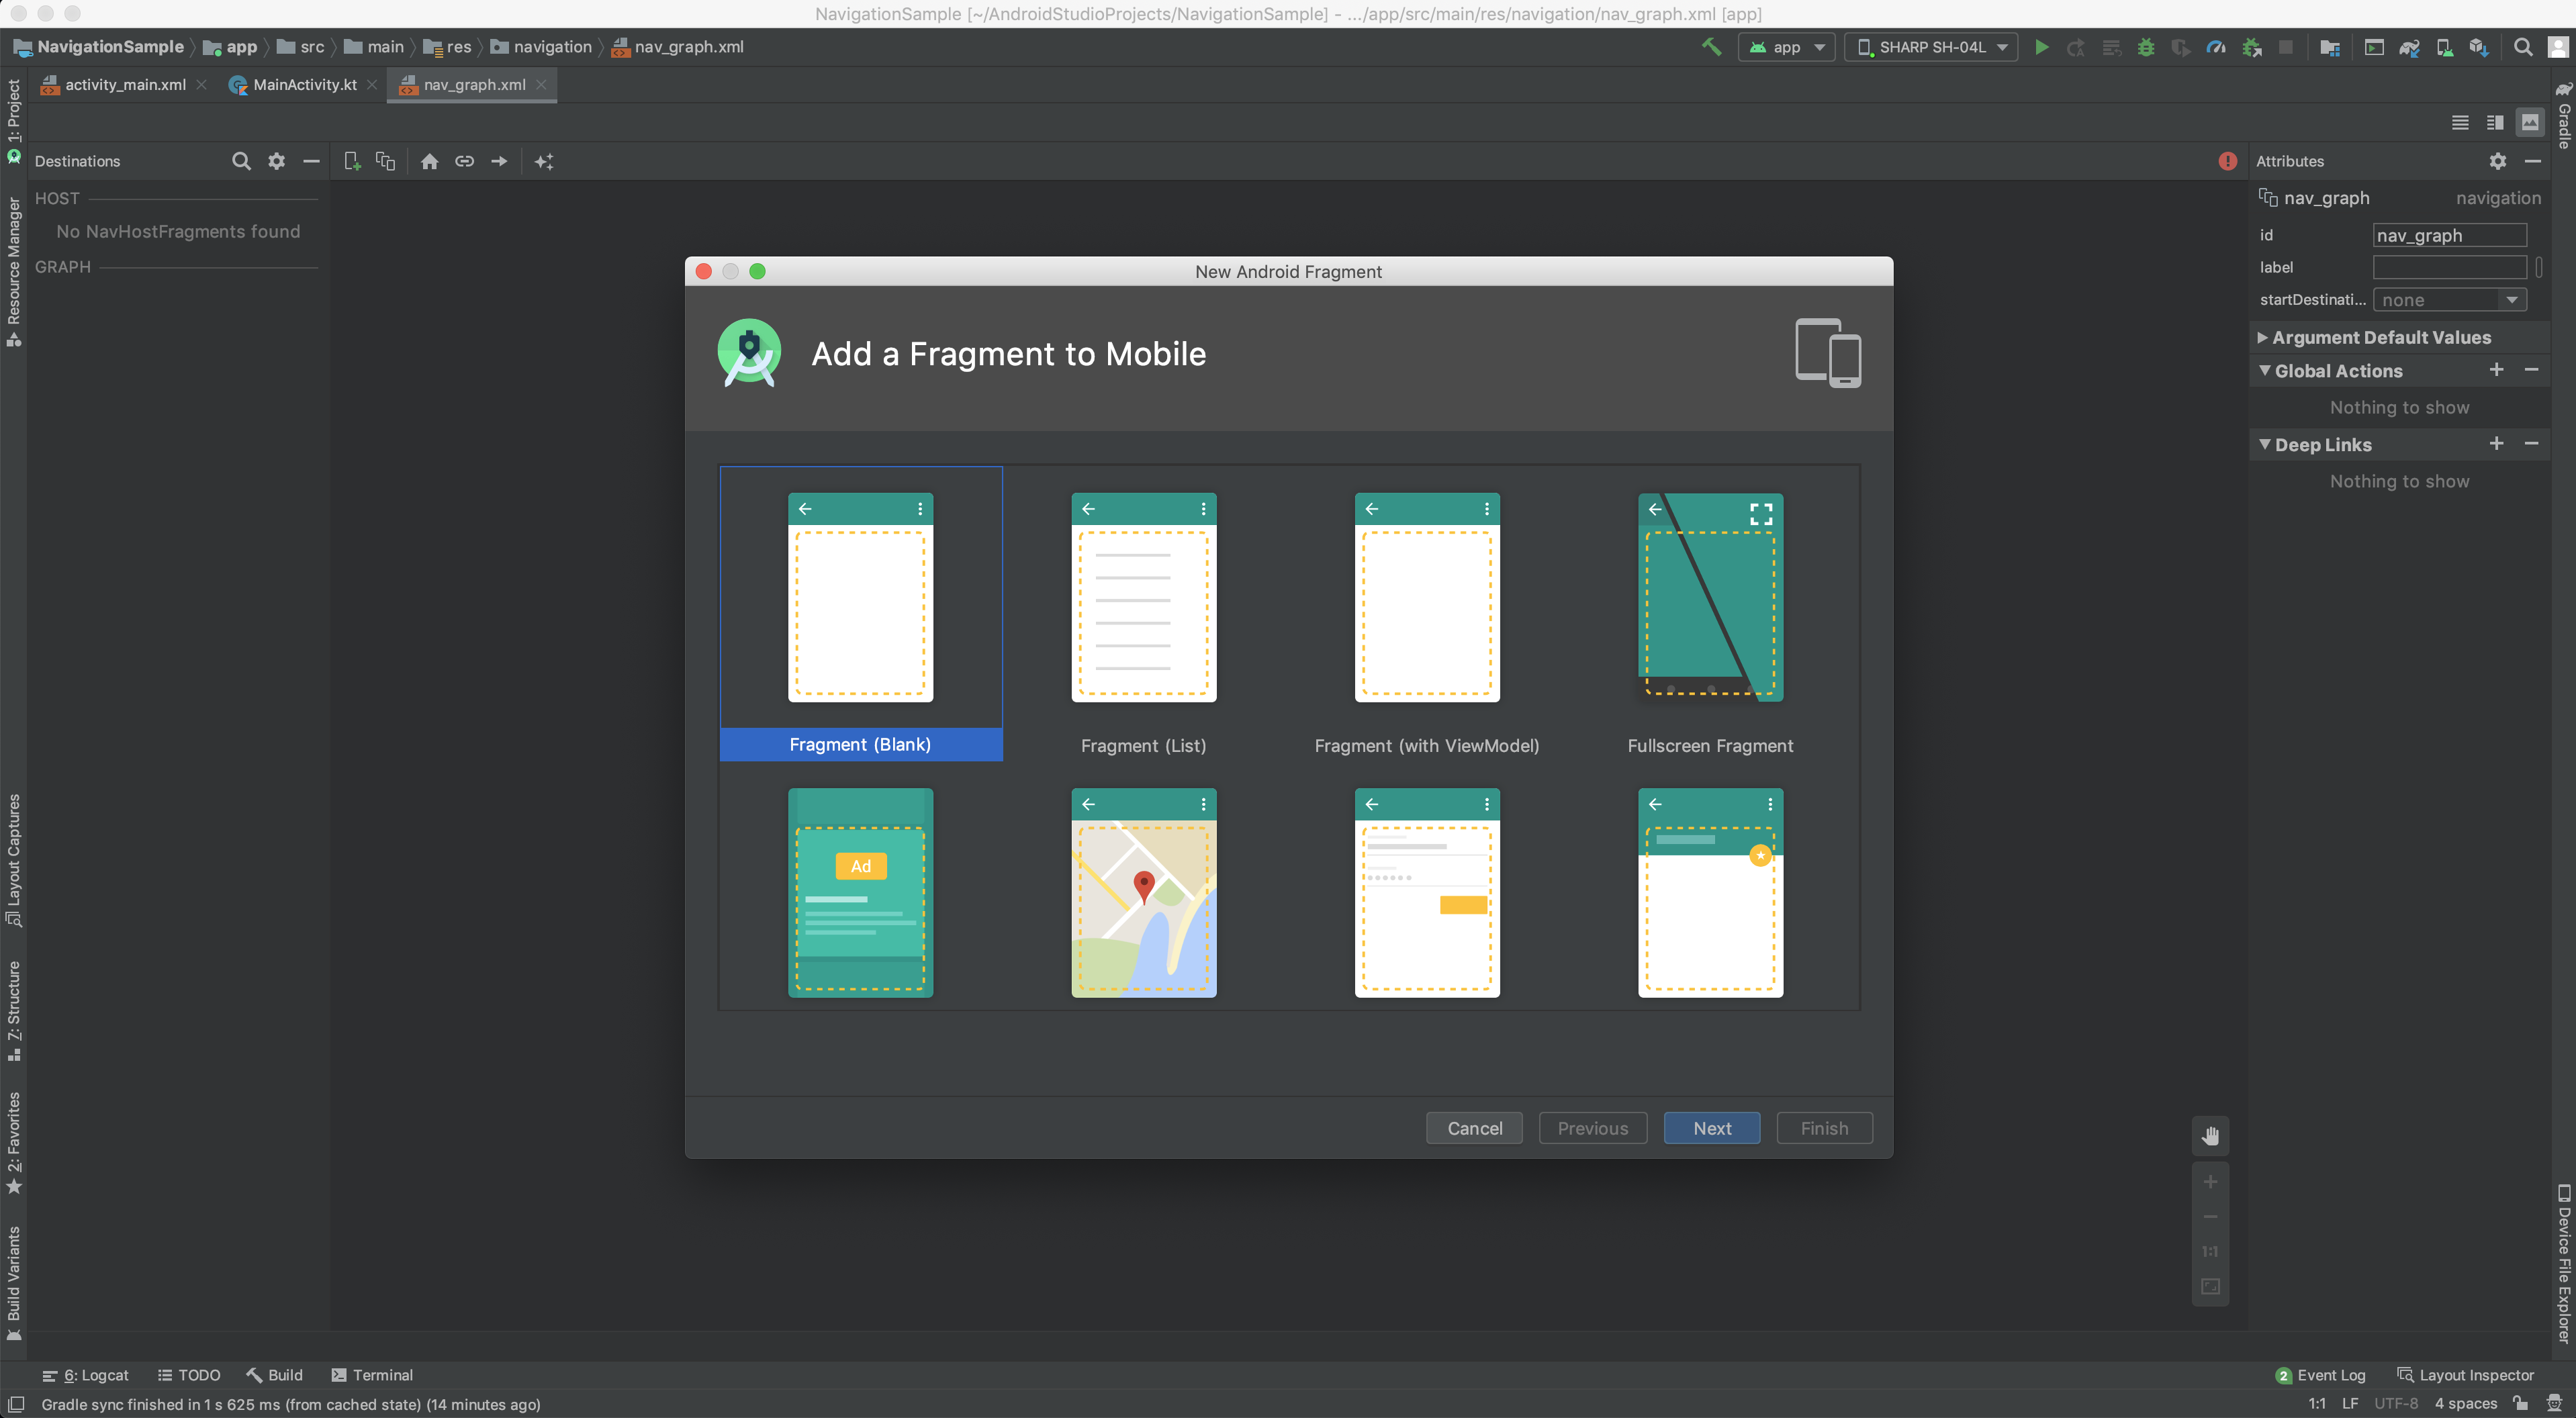
フラグメントの名前、言語を決めてFinishをクリックしてください。

Navigation Editorに戻ると作成したデスティネーションが追加されていると思います。

nav_graph.xmlのコードはこのようになっています。
<?xml version="1.0" encoding="utf-8"?>
<navigation xmlns:android="http://schemas.android.com/apk/res/android"
    xmlns:app="http://schemas.android.com/apk/res-auto"
    xmlns:tools="http://schemas.android.com/tools"
    android:id="@+id/nav_graph"
    app:startDestination="@id/firstFragment">

    <fragment
        android:id="@+id/firstFragment"
        android:name="com.example.navigationsample.FirstFragment"
        android:label="fragment_first"
        tools:layout="@layout/fragment_first" />
</navigation>
既存のフラグメントからデスティネーションを作成する
Navigation EditorからNew Destinationアイコンをクリックするとプルダウンメニューが表示されます。
プルダウンメニューの追加したいデスティネーションを選択します。今回は、前もって作成しておいたSecondFragmentを選択しました。

Navigation Editorに選択したデスティネーションが追加されていると思います。

nav_graph.xmlのコードはこのようになっています。
<?xml version="1.0" encoding="utf-8"?>
<navigation xmlns:android="http://schemas.android.com/apk/res/android"
    xmlns:app="http://schemas.android.com/apk/res-auto"
    xmlns:tools="http://schemas.android.com/tools"
    android:id="@+id/nav_graph"
    app:startDestination="@id/firstFragment">

    <fragment
        android:id="@+id/firstFragment"
        android:name="com.example.navigationsample.FirstFragment"
        android:label="fragment_first"
        tools:layout="@layout/fragment_first" />
    <fragment
        android:id="@+id/secondFragment"
        android:name="com.example.navigationsample.SecondFragment"
        android:label="fragment_second"
        tools:layout="@layout/fragment_second" />
</navigation>
アクションの追加
次に、アクション(どの画面からどの画面に移動するか)を追加していきます。
Navigation Editorで移動元となるデスティネーションの右側にカーソルを合わせます。
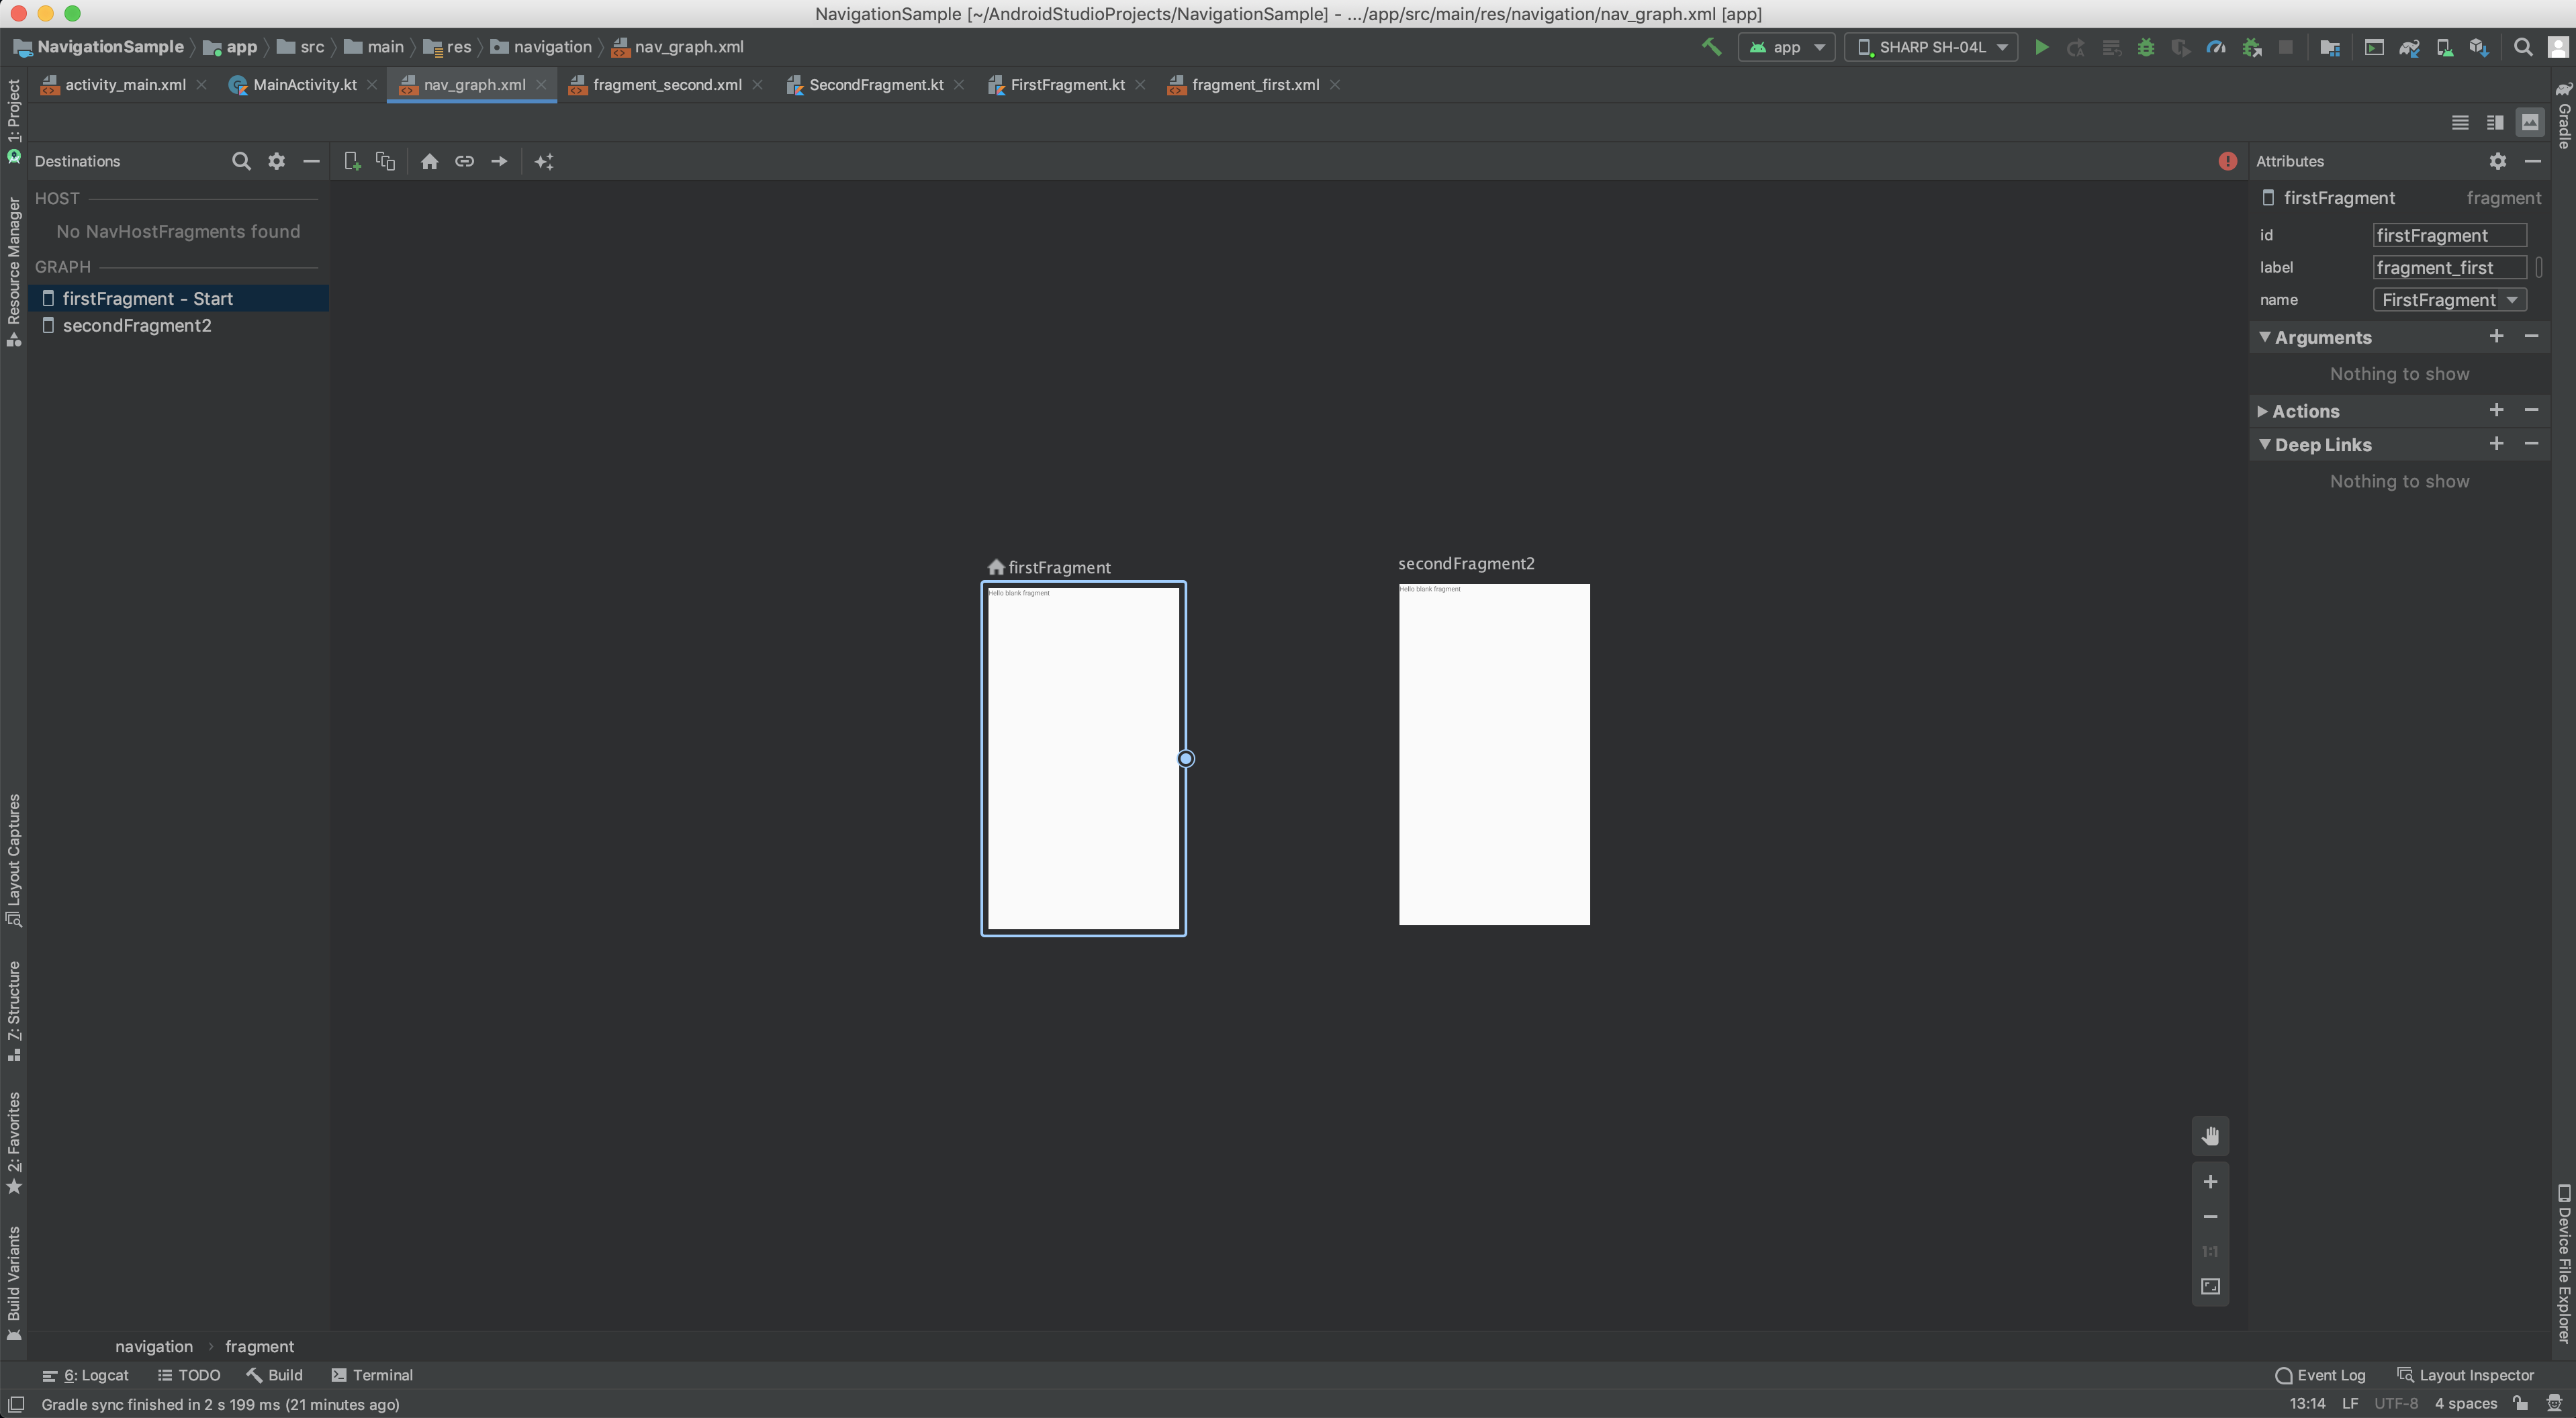
クリックしたまま、遷移したいデスティネーションにカーソルをドラッグします。するとアクションが追加されて2つのデスティネーションを結ぶ線が表示されます。
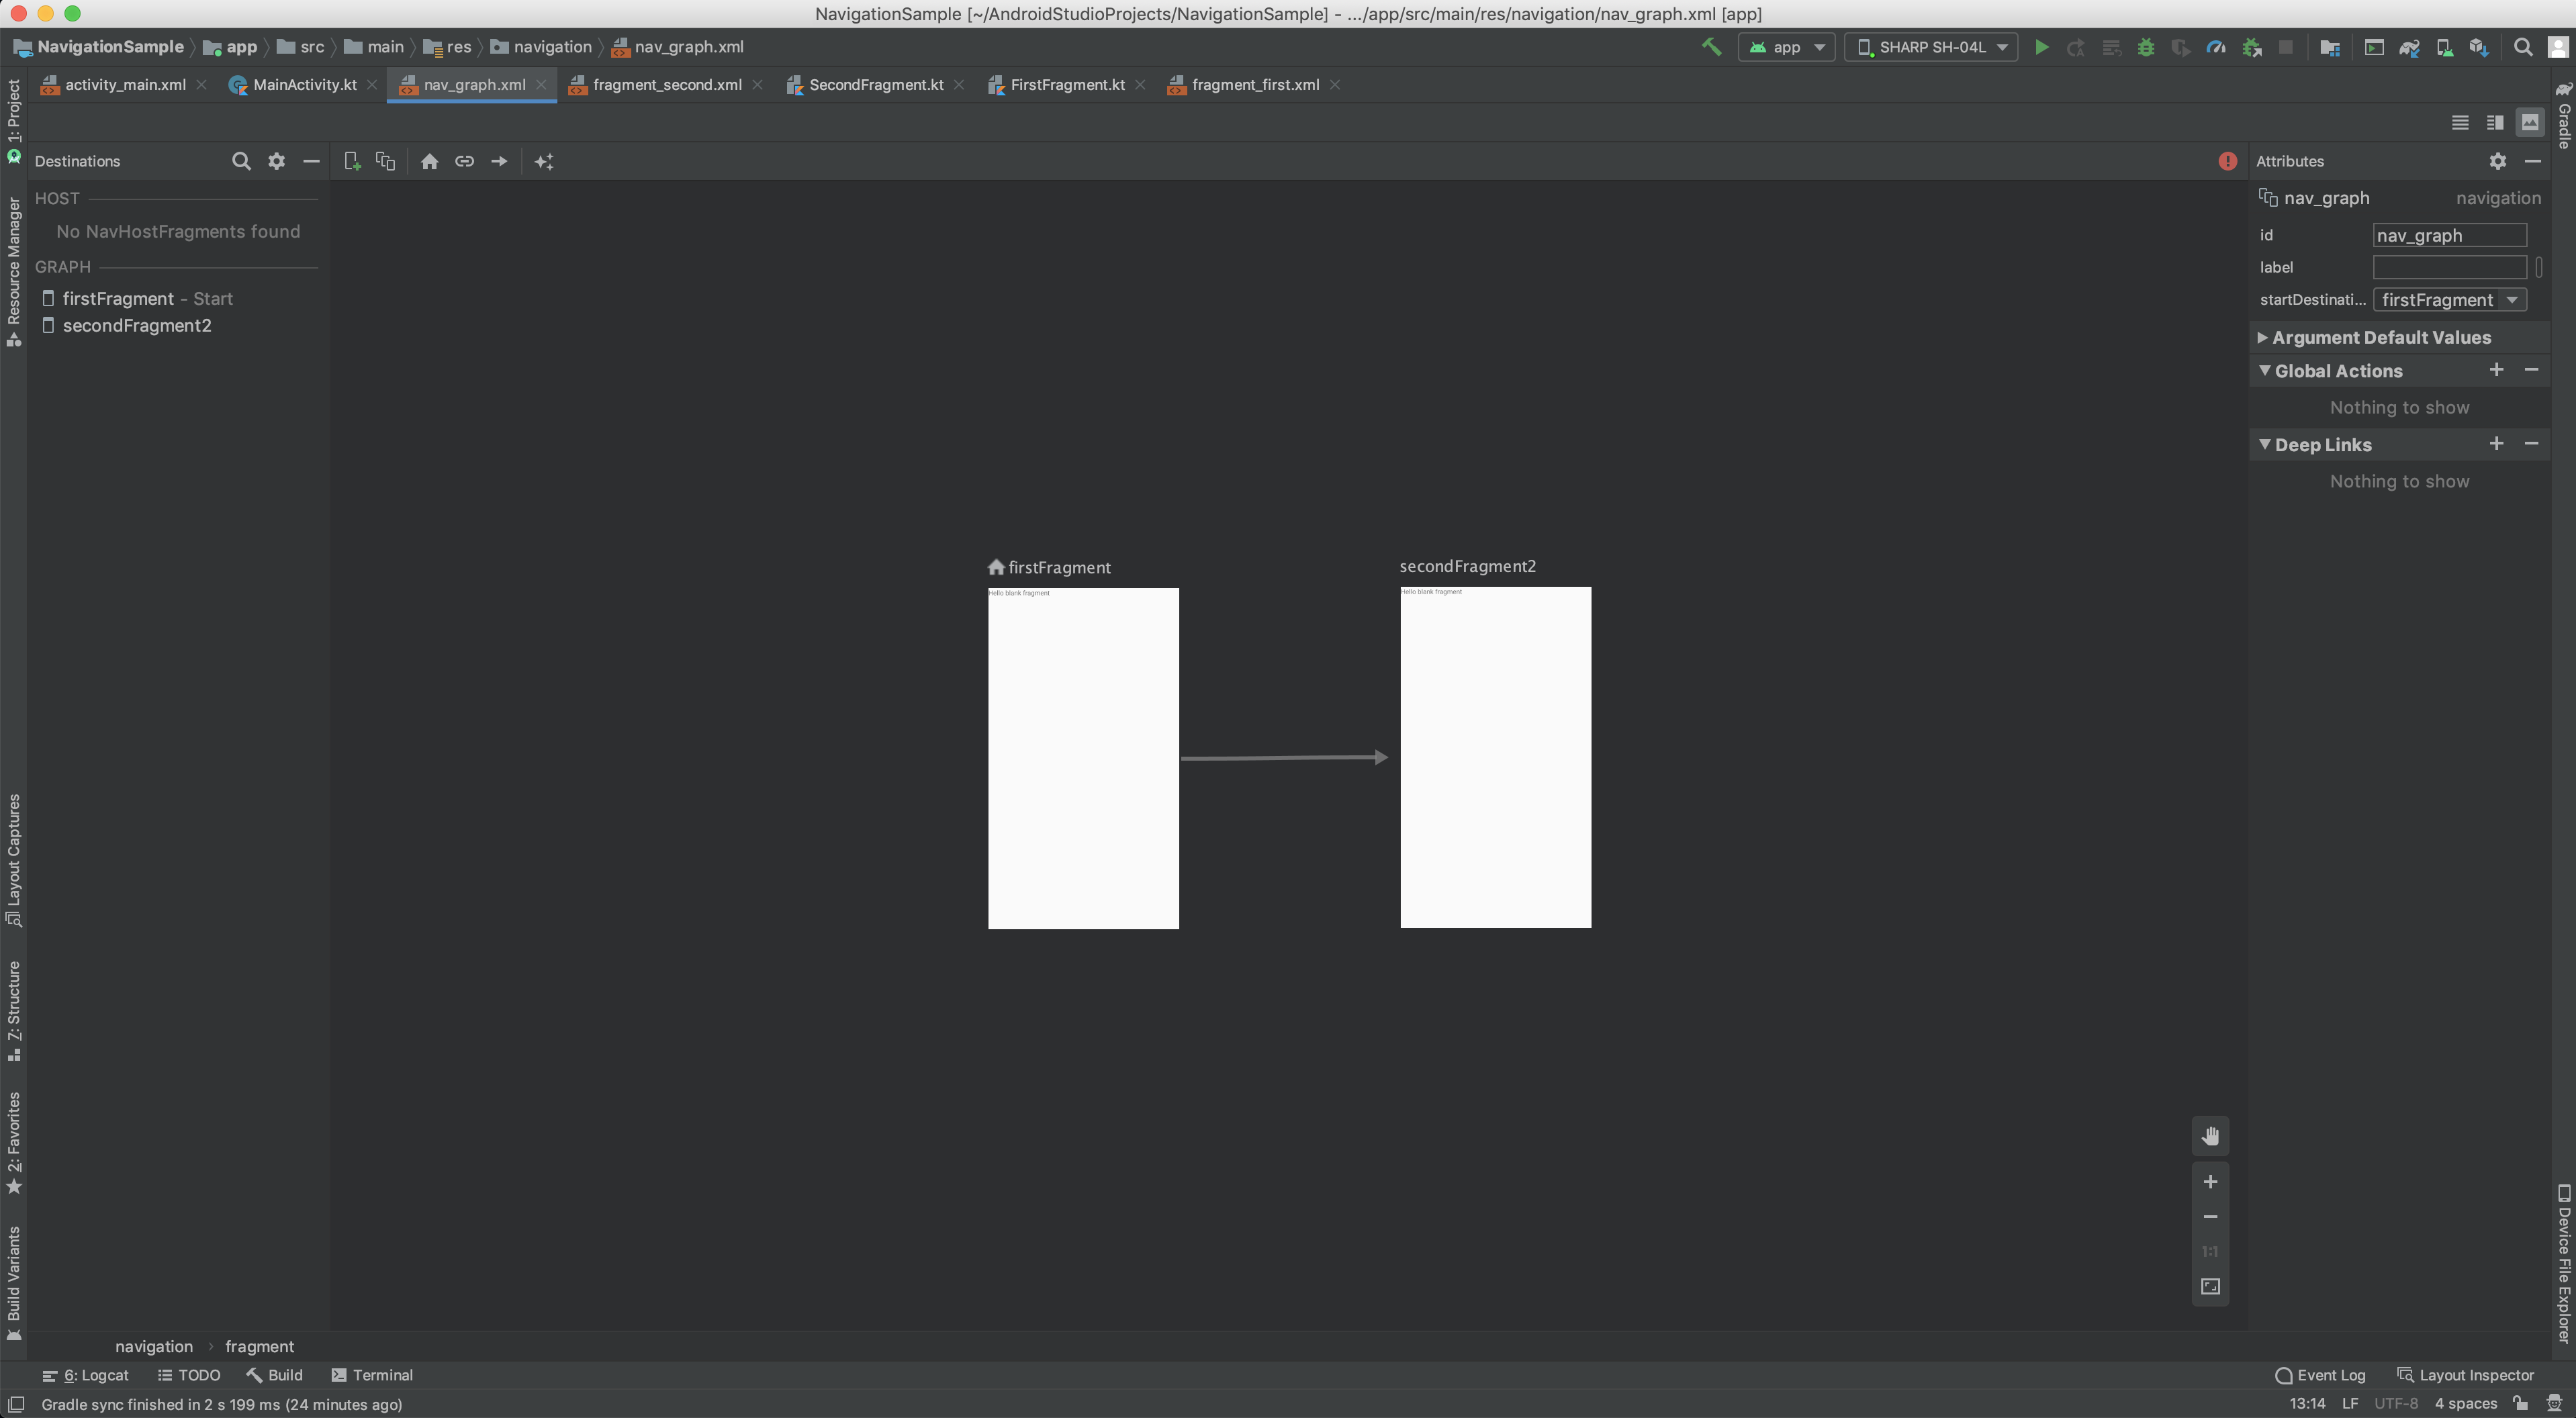
nav_graph.xmlをコードはこのようになっています。
FirstFragmentのデスティネーションに<action>タグが追加されていて、アクションIDと遷移先のデスティネーションのIDがあります。
<?xml version="1.0" encoding="utf-8"?>
<navigation xmlns:android="http://schemas.android.com/apk/res/android"
    xmlns:app="http://schemas.android.com/apk/res-auto"
    xmlns:tools="http://schemas.android.com/tools"
    android:id="@+id/nav_graph"
    app:startDestination="@id/firstFragment">

    <fragment
        android:id="@+id/firstFragment"
        android:name="com.example.navigationsample.FirstFragment"
        android:label="fragment_first"
        tools:layout="@layout/fragment_first" >
        <action
            android:id="@+id/action_firstFragment_to_secondFragment"
            app:destination="@id/secondFragment" />
    </fragment>
    <fragment
        android:id="@+id/secondFragment"
        android:name="com.example.navigationsample.SecondFragment"
        android:label="fragment_second"
        tools:layout="@layout/fragment_second" />
</navigation>
NavHostをアクティビティに追加する
Navigation Componentは一つのアクティビティに対して、必要に応じて複数のフラグメントを切り替えて表示します。その切替を行ってくれるNavHostFragmentをアクティビティに追加していきます。app:navgraphでNavHostFragmentに先程作成したナビゲーショングラフを関連付けています。
<?xml version="1.0" encoding="utf-8"?>
<androidx.constraintlayout.widget.ConstraintLayout xmlns:android="http://schemas.android.com/apk/res/android"
    xmlns:app="http://schemas.android.com/apk/res-auto"
    xmlns:tools="http://schemas.android.com/tools"
    android:layout_width="match_parent"
    android:layout_height="match_parent"
    tools:context=".MainActivity">

    <fragment
        android:id="@+id/nav_host_fragment"
        android:name="androidx.navigation.fragment.NavHostFragment"
        android:layout_width="0dp"
        android:layout_height="0dp"
        app:layout_constraintLeft_toLeftOf="parent"
        app:layout_constraintRight_toRightOf="parent"
        app:layout_constraintTop_toTopOf="parent"
        app:layout_constraintBottom_toBottomOf="parent"

        app:navGraph="@navigation/nav_graph" />

</androidx.constraintlayout.widget.ConstraintLayout>
画面間での遷移方法
ナビゲーショングラフも作成できたところで、画面間での遷移方法を説明していきます。
今回は、FirstFragmentでボタンを押したら、SecondFragmentに遷移するようにしていきます。
まず、ボタンを追加するべくFirstFragmentのレイアウトを以下のように編集しました。
<?xml version="1.0" encoding="utf-8"?>
<androidx.constraintlayout.widget.ConstraintLayout xmlns:android="http://schemas.android.com/apk/res/android"
    xmlns:app="http://schemas.android.com/apk/res-auto"
    xmlns:tools="http://schemas.android.com/tools"
    android:layout_width="match_parent"
    android:layout_height="match_parent"
    tools:context=".FirstFragment">

    <Button
        android:id="@+id/button"
        android:layout_width="wrap_content"
        android:layout_height="wrap_content"
        android:text="@string/hello_blank_fragment"
        app:layout_constraintBottom_toBottomOf="parent"
        app:layout_constraintEnd_toEndOf="parent"
        app:layout_constraintStart_toStartOf="parent"
        app:layout_constraintTop_toTopOf="parent" />

</androidx.constraintlayout.widget.ConstraintLayout>
FirstFragmentの画面は、以下のようになっていると思います。

SecondFragmentに遷移するときはNavigation.findNavController(view: View).navigate(遷移先のデスティネーションID)を使います。
override fun onCreateView(
    inflater: LayoutInflater, container: ViewGroup?,
    savedInstanceState: Bundle?
): View? {
    // Inflate the layout for this fragment
    val view =  inflater.inflate(R.layout.fragment_first, container, false)

    view.findViewById<Button>(R.id.button).setOnClickListener {
        // SecondFragmentに遷移するよ
        Navigation.findNavController(it).navigate(R.id.action_firstFragment_to_secondFragment2)
    }

    return view
}
データの受け渡し方法
次に値の受け渡しの方法を説明していきます。
データの受け渡しは、Safe Argsと呼ばれるGradleプラグインを使うことを強く推奨されています。Safe Argsを使用すると型の安全性が保証されるためです。
まずは、Safe Argsを使用するためにプロジェクトに追加していきます。
dependencies {
        // 追加するもの
        def nav_version = "2.1.0"
        classpath "androidx.navigation:navigation-safe-args-gradle-plugin:$nav_version"
}
apply plugin: "androidx.navigation.safeargs.kotlin"
ナビゲーショングラフに渡す値を設定していきます。
Navigation Editorから遷移先のデスティネーションを指定して、Argumentsタブの+アイコンをクリックします。
Add Argumentダイアログがでてくるので渡す値の名前と型を入力してください。
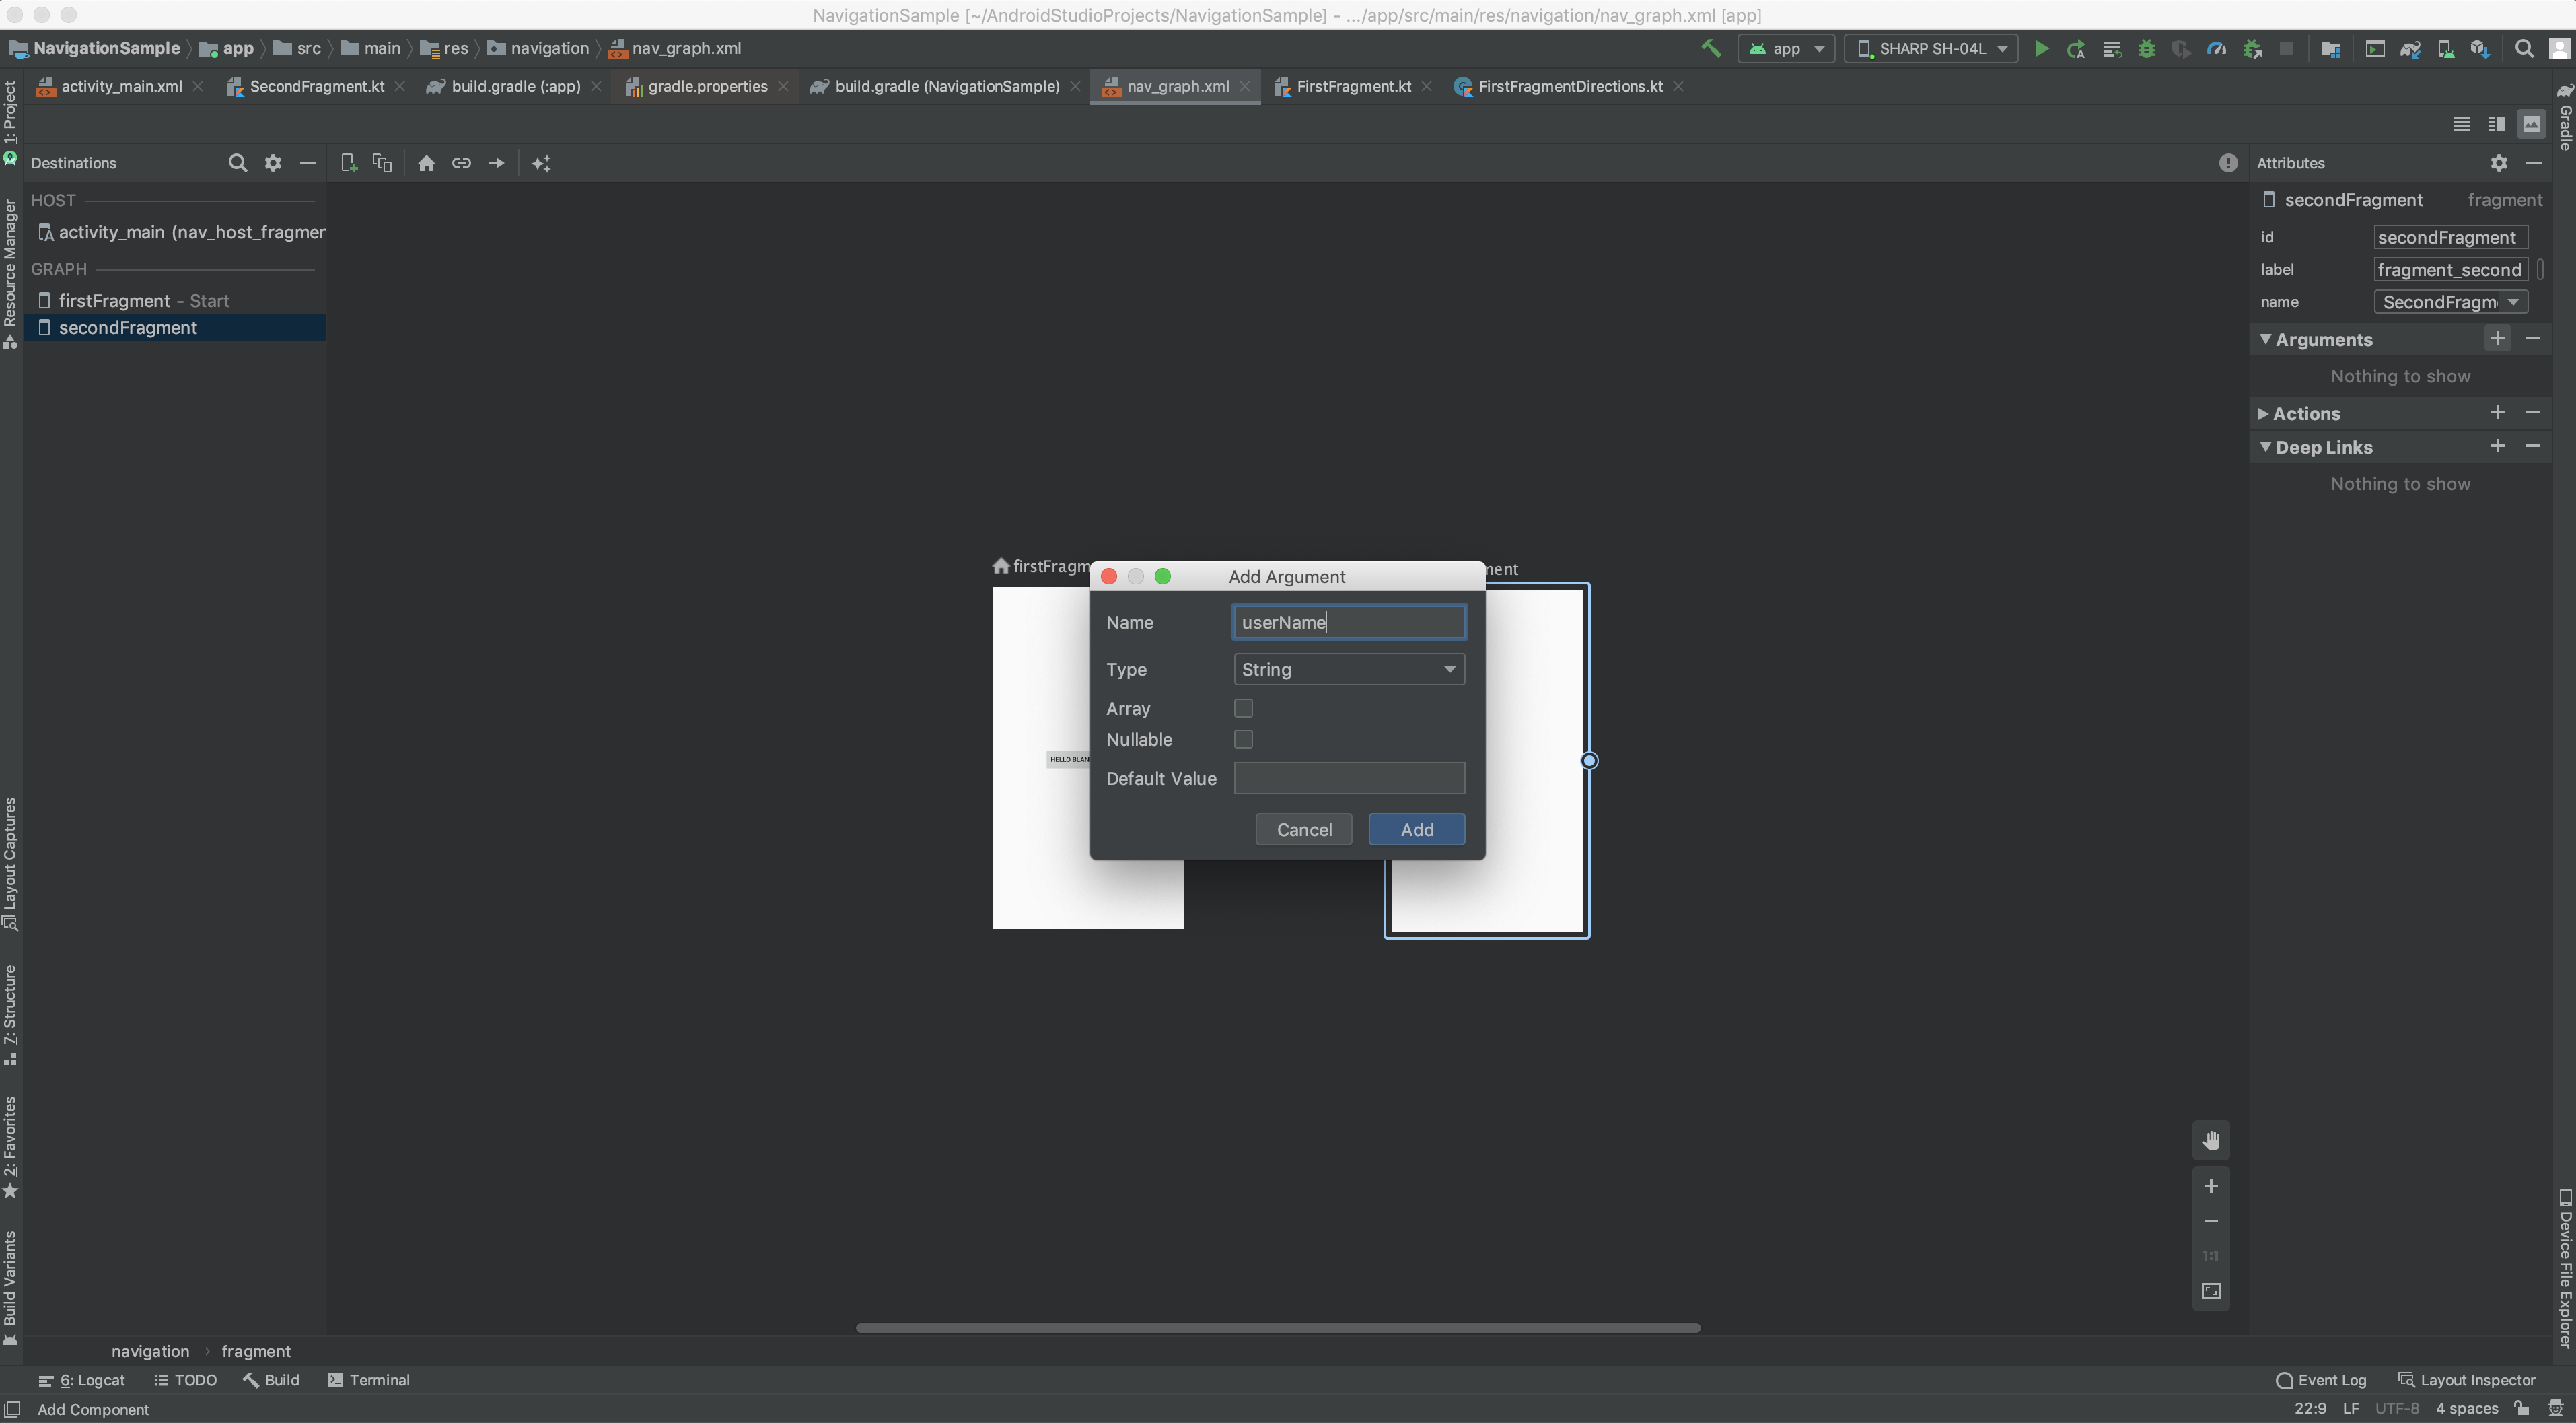
追加するとnav_graph.xmlが以下のようになっていると思います。
<?xml version="1.0" encoding="utf-8"?>
<navigation xmlns:android="http://schemas.android.com/apk/res/android"
    xmlns:app="http://schemas.android.com/apk/res-auto"
    xmlns:tools="http://schemas.android.com/tools"
    android:id="@+id/nav_graph"
    app:startDestination="@id/firstFragment">

    <fragment
        android:id="@+id/firstFragment"
        android:name="com.example.navigationsample.FirstFragment"
        android:label="fragment_first"
        tools:layout="@layout/fragment_first">
        <action
            android:id="@+id/action_firstFragment_to_secondFragment"
            app:destination="@id/secondFragment" />
    </fragment>
    <fragment
        android:id="@+id/secondFragment"
        android:name="com.example.navigationsample.SecondFragment"
        android:label="fragment_second"
        tools:layout="@layout/fragment_second">

        <argument
            android:name="userName"
            app:argType="string" />
    </fragment>
</navigation>
Safe Argsを使用しているとFirstFragmentDirectionsというクラスとSecondFragmentArgsというクラスが作成されます。
遷移元のフラグメントから値を渡す時は、以下のようにしてあげます。
override fun onCreateView(
    inflater: LayoutInflater, container: ViewGroup?,
    savedInstanceState: Bundle?
): View? {
    // Inflate the layout for this fragment
    val view =  inflater.inflate(R.layout.fragment_first, container, false)

    view.findViewById<Button>(R.id.button).setOnClickListener {
        val action = FirstFragmentDirections.actionFirstFragmentToSecondFragment("fu_mirai")

        Navigation.findNavController(it).navigate(action)
    }

    return view
}
遷移先のフラグメントで値を受け取る時は、以下のようにしてあげます。
val args: SecondFragmentArgs by navArgs()

override fun onCreateView(
    inflater: LayoutInflater, container: ViewGroup?,
    savedInstanceState: Bundle?
): View? {
    // Inflate the layout for this fragment
    val userName = args.userName

    return inflater.inflate(R.layout.fragment_second, container, false)
}
終わりに
今回は、Navigation Componentについて説明していきました。
画面間の遷移が簡単に実装できたり、値の受け渡しがシンプルになるのがとてもよかったです。また、Android Studio上でどの画面からどの画面に遷移しているのかがわかるのも良きでした。
ディープリンクなども簡単に設定できたりするらしいので試していきたいなと思います。