対象者
この記事はこんな人におすすめです!
- RecyclerView使ってみたいけどRecyclerViewの使い方がわからない
- データを複数件表示したい
RecyclerViewとは
RecyclerViewの概要については
Create a List with RecyclerView
に書いてあるのですが、重要なものは3つです。
| 名前 | 説明 |
|---|---|
| Adapter | RecyclerViewに表示するデータの保持、ViewHolderの生成、データをViewに設定 |
| ViewHolder | 各行のViewに対する参照を保持する |
| LayoutManager | RecyclerViewにViewをどのように配置するか設定を行う |
どのようにこの3つが使われているのかサンプルアプリを作りながら解説していきます。
RecyclerViewを使ったサンプルアプリ
今回は、RecyclerViewを使ってメモを複数件表示するアプリを作っていきたいと思います。
表示するメモの要素は以下の4つです。
- ユーザのアイコン:ImageView
- ユーザ名:TextView
- 日付:TextView
- メモの内容:TextView

環境
- Android Studio 3.4
- Kotlin 1.3.31-release-Studio3.4-1
- AndroidX
実装方法
RecyclerViewを使うための準備
dependencies {
    //この一文を追加
    implementation 'androidx.recyclerview:recyclerview:1.0.0'
}
Layout
メモの内容を表示するlist_memo.xml を作成していきます。
<?xml version="1.0" encoding="utf-8"?>
<androidx.constraintlayout.widget.ConstraintLayout
    xmlns:android="http://schemas.android.com/apk/res/android"
    xmlns:app="http://schemas.android.com/apk/res-auto"
    xmlns:tools="http://schemas.android.com/tools"
    android:layout_width="match_parent"
    android:layout_height="wrap_content"
    android:paddingBottom="16dp">

    <ImageView
        android:id="@+id/userIcon"
        android:layout_width="60dp"
        android:layout_height="60dp"
        android:layout_marginStart="16dp"
        android:layout_marginTop="16dp"
        app:layout_constraintStart_toStartOf="parent"
        app:layout_constraintTop_toTopOf="parent"
        tools:srcCompat="@tools:sample/avatars" />

    <TextView
        android:id="@+id/userName"
        android:layout_width="wrap_content"
        android:layout_height="0dp"
        android:layout_marginStart="8dp"
        android:text="fu_neko"
        app:layout_constraintStart_toEndOf="@+id/userIcon"
        app:layout_constraintTop_toTopOf="@+id/userIcon" />

    <TextView
        android:id="@+id/date"
        android:layout_width="wrap_content"
        android:layout_height="0dp"
        android:layout_marginStart="8dp"
        android:layout_marginTop="3dp"
        android:text="2019/06/10"
        android:textSize="12sp"
        app:layout_constraintStart_toEndOf="@+id/userName"
        app:layout_constraintTop_toTopOf="@+id/userName" />

    <TextView
        android:id="@+id/content"
        android:layout_width="300dp"
        android:layout_height="0dp"
        android:layout_below="@+id/userName"
        android:layout_marginStart="8dp"
        android:layout_marginTop="4dp"
        android:text="今日のご飯は、カレーライス、とんかつ、寿司、チャーハン、カレーライス!"
        android:textStyle="bold"
        app:layout_constraintStart_toEndOf="@+id/userIcon"
        app:layout_constraintTop_toBottomOf="@+id/userName" />
</androidx.constraintlayout.widget.ConstraintLayout>
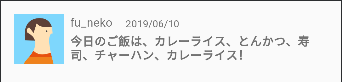
下記のようなDesign画面が表示されます。
Data Class
メモの内容を保持するデータクラスを作成します。
Memoクラスは、第一引数にメモの内容、第二引数にメモをした日付を持つデータクラスです。
package com.example.recyclerviewapp.model

data class Memo(val content: String, val date: String)
Adapter, ViewHolder
ViewHolderの生成やデータとViewの設定を行うMemoViewAdapterクラスを作成します。
package com.example.recyclerviewapp.adapter

import android.content.Context
import android.view.LayoutInflater
import android.view.View
import android.view.ViewGroup
import android.widget.ImageView
import android.widget.TextView
import androidx.recyclerview.widget.RecyclerView
import com.example.recyclerviewapp.R
import com.example.recyclerviewapp.model.Memo

class MemoViewAdapter(private val context: Context, private val memoList: List<Memo>) :
    RecyclerView.Adapter<MemoViewAdapter.MemoViewHolder>() {

    class MemoViewHolder(view: View) : RecyclerView.ViewHolder(view) {
        val userIconImageView: ImageView = view.findViewById(R.id.userIcon)
        val userNameTextView: TextView = view.findViewById(R.id.userName)
        val dateTextView: TextView = view.findViewById(R.id.date)
        val contentTextView: TextView = view.findViewById(R.id.content)
    }

    override fun onCreateViewHolder(parent: ViewGroup, viewType: Int): MemoViewHolder =
        MemoViewHolder(LayoutInflater.from(context).inflate(R.layout.list_memo, parent, false))

    override fun getItemCount(): Int = memoList.size

    override fun onBindViewHolder(holder: MemoViewHolder, position: Int) {
        holder.userIconImageView.setImageResource(R.mipmap.ic_launcher)
        holder.userNameTextView.text = "fu_neko"
        holder.dateTextView.text = memoList[position].date
        holder.contentTextView.text = memoList[position].content
    }
}
#onCreateViewHolder
onCreateViewHolderでは、list_memo.xmlを読み込み、Viewを生成しています。
その後、生成したViewをViewHolderに渡している。
#MemoViewHolder
OnCreateViewHolderで生成されたViewに対して、findViewByIdでViewの紐付けを行っている。
#onBindViewHolder
onBindViewHolderでは、ViewHolderの持つViewにデータを設定している。
| データ | 設定 |
|---|---|
| userIconImageView | ドロイド君のアイコン |
| userNameTextView | fu_neko |
| dateTextView | Memoクラスのdate変数 |
| contentTextView | Memoクラスのcontent変数 |
#getItemCount
getItemCountでは、表示するメモの総数を取得しています。
Activity
RecyclerViewのWidgetを設置
RecyclerViewのWidgetをactivity_main.xmlに追加していきます。
<?xml version="1.0" encoding="utf-8"?>
<androidx.constraintlayout.widget.ConstraintLayout
    xmlns:android="http://schemas.android.com/apk/res/android"
    xmlns:app="http://schemas.android.com/apk/res-auto"
    xmlns:tools="http://schemas.android.com/tools"
    android:layout_width="match_parent"
    android:layout_height="match_parent"
    tools:context=".MainActivity">

    <androidx.recyclerview.widget.RecyclerView
        android:id="@+id/memoRecyclerView"
        android:layout_width="0dp"
        android:layout_height="0dp"
        app:layout_constraintBottom_toBottomOf="parent"
        app:layout_constraintEnd_toEndOf="parent"
        app:layout_constraintStart_toStartOf="parent"
        app:layout_constraintTop_toTopOf="parent">
    </androidx.recyclerview.widget.RecyclerView>
</androidx.constraintlayout.widget.ConstraintLayout>
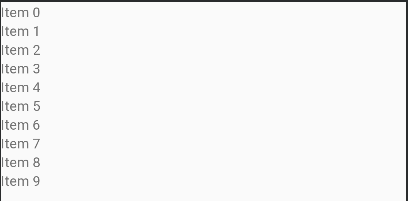
下記のようなDesign画面が表示されます。
RecyclerViewにAdapterとLayoutManagerを設定
MainActivity.ktでは、まずAdapterに渡すデータの生成を行っています。
次にRecyclerViewを取得し、AdapterとLayoutManagerの設定を行います。
今回は、縦にViewを並べたいのでLinearLayoutManagerを使っています。
package com.example.recyclerviewapp

import androidx.appcompat.app.AppCompatActivity
import android.os.Bundle
import androidx.recyclerview.widget.LinearLayoutManager
import androidx.recyclerview.widget.RecyclerView
import com.example.recyclerviewapp.adapter.MemoViewAdapter
import com.example.recyclerviewapp.model.Memo
import java.text.SimpleDateFormat
import java.util.Date

class MainActivity : AppCompatActivity() {

    override fun onCreate(savedInstanceState: Bundle?) {
        super.onCreate(savedInstanceState)
        setContentView(R.layout.activity_main)

        //テストデータの生成
        val date = SimpleDateFormat("yyyy/MM/dd").format(Date())
        val memoList = mutableListOf<Memo>()
        repeat((0..100).count()) { memoList.add(Memo("僕の名前は麻婆", date)) }

        //RecyclerViewにAdapterとLayoutManagerを設定
        findViewById<RecyclerView>(R.id.memoRecyclerView).also { recyclerView: RecyclerView ->
            recyclerView.adapter = MemoViewAdapter(this, memoList)
            recyclerView.layoutManager = LinearLayoutManager(this)
        }
    }
}
まとめ
今回は、アプリ開発をするにあたってRecyclerViewを使う機会があり、その際に学んだことをサンプルアプリを作りながら説明していきました。もしここ間違っているよ等あればコメントください。