はじめに
前回まででIBM Cloud Code Engine上にPlay Frameworkで作ったアプリケーションをデプロイしてみましたが、そのままだとコード開発の後にデプロイを行うまでかなりの手動ステップを必要とします。
-
sbt distでパッケージを作成 - zipファイルを展開
- dockerイメージを作成
- container registryへpush
これを解決する手段としてはまずCI/CDパイプラインを導入することが考えられますが、IBM Cloud Code Engineではアプリケーションをデプロイするのに作成済みのイメージを使用する他に、直接ソースコードからイメージをビルドしてデプロイする方法も提供しています。今回はそちらの機能を使って上記の手動ステップを行わずにアプリケーションをデプロイする方法を探ってみます。
GitHubにリポジトリを作成
まずはGitHub上に空のリポジトリを作成します。Repositoriesのタブから"New"をクリックして以下の画面で名前をつけます。

"Initialize this repository with:"の項目はチェックしなくて良いです。"Create repository"をクリックしたらリポジトリが生成されます。
アプリケーションを作成
前回作った開発用のJava+sbt環境でアプリケーションを作成していきます。
# sbt new playframework/play-scala-seed.g8 --name=play-test
[info] welcome to sbt 1.5.8 (Oracle Corporation Java 11.0.13)
[info] set current project to new (in build file:/tmp/sbt_743b6074/new/)

Template applied in /root/./play-test
アプリケーションの雛形ができたら、このディレクトリ自体をgit repositoryとして初期化します。
$ git init
hint: Using 'master' as the name for the initial branch. This default branch name
hint: is subject to change. To configure the initial branch name to use in all
hint: of your new repositories, which will suppress this warning, call:
hint:
hint: 	git config --global init.defaultBranch <name>
hint:
hint: Names commonly chosen instead of 'master' are 'main', 'trunk' and
hint: 'development'. The just-created branch can be renamed via this command:
hint:
hint: 	git branch -m <name>
ビルドの生成物等は既に.gitignoreに追加されているので、そのまま追加してコミットします。
$ git add .

...(snip)...

$ git commit -m "Initial commit"

[master (root-commit) 711a304] Initial commit
 19 files changed, 313 insertions(+)

...(snip)...
これで準備完了です。これを先ほど作成したリポジトリにpushします。
$ git remote add origin ssh://git@github.com/fterui/play-test
$ git push origin master
Enumerating objects: 39, done.
Counting objects: 100% (39/39), done.
Delta compression using up to 8 threads
Compressing objects: 100% (28/28), done.
Writing objects: 100% (39/39), 6.75 KiB | 2.25 MiB/s, done.
Total 39 (delta 1), reused 0 (delta 0), pack-reused 0
remote: Resolving deltas: 100% (1/1), done.
To ssh://github.com/fterui/play-test
 * [new branch]      master -> master
GitHubのUIからもちゃんとpushされていることが確認できます。
デプロイのための変更
前回施したのと同様の変更を入れていきます。app/views/index.scala.htmlはこんな感じにしておきます。
@()

@main("Welcome to Play") {
  <h1>Welcome to Play!</h1>
  Hello World!  Built from source code!
}
次にDockerfileを作成します。前回はJava+sbtの開発環境でsbt distコマンドでプロダクション用のアプリケーションをビルドしましたが、今回はそれも含めてビルド内で行う必要があります。ですがビルドするにはsbtが必要でランタイムには不要ということで、ここはdocker multi stage buildを使うのが良さそうです。Dockerfileは以下のようになります。
FROM hseeberger/scala-sbt:11.0.13_1.5.8_2.13.7 as builder
COPY . /root/

WORKDIR /root
RUN sbt compile
RUN sbt dist
RUN mkdir build

WORKDIR /root/build
RUN unzip ../target/universal/play-test-1.0-SNAPSHOT.zip

FROM openjdk:11-jre-slim
COPY --from=builder /root/build/play-test-1.0-SNAPSHOT /root

RUN addgroup nonroot --gid 1100 && \
  adduser nonroot --ingroup nonroot --uid 1100 --disabled-password && \
  chown -R nonroot:nonroot /root

USER nonroot
WORKDIR /root

CMD ["/root/bin/play-test"]
前回のDockerfileと違う点はCMDのところで-Dplay.http.secret.keyの設定を除いているところですね。今回はこのDockerfileをパブリックなリポジトリにpushするので、そのファイル中にsecret keyを書くのは避けた方が良いでしょう。その設定は環境変数を経由してアプリケーションに渡すことになるので、conf/application.confは以下のように書きます。(今回はlocalhostのポート指定も外しています。)
# https://www.playframework.com/documentation/latest/Configuration

play.http.secret.key="changeme"
play.http.secret.key=${?APPLICATION_SECRET}

play.filters.hosts {
    allowed = [${?APPLICATION_HOST_NAME}, "localhost"]
}
ビルドしてみます。
$ docker build . -t play-test
ビルドは成功しますが、実行しようとすると当たり前ですがエラーになります。
$ docker run play-test
WARNING: An illegal reflective access operation has occurred
WARNING: Illegal reflective access by com.google.inject.internal.cglib.core.$ReflectUtils$1 (file:/root/lib/com.google.inject.guice-4.2.3.jar) to method java.lang.ClassLoader.defineClass(java.lang.String,byte[],int,int,java.security.ProtectionDomain)
WARNING: Please consider reporting this to the maintainers of com.google.inject.internal.cglib.core.$ReflectUtils$1
WARNING: Use --illegal-access=warn to enable warnings of further illegal reflective access operations
WARNING: All illegal access operations will be denied in a future release
Oops, cannot start the server.
Configuration error: Configuration error[
The application secret has not been set, and we are in prod mode. Your application is not secure.
To set the application secret, please read http://playframework.com/documentation/latest/ApplicationSecret
          ]
        at play.api.Configuration$.$anonfun$configError$1(Configuration.scala:157)
        at scala.Option.map(Option.scala:242)
起動するには環境変数でsecret keyを渡す必要があります。
$ docker run -e APPLICATION_SECRET="HORVsaoVwdmKFsw8Pxl2vvWhCwmOCEuMCUjf/IFawzs=" -p 9001:9000 play-test
WARNING: An illegal reflective access operation has occurred
WARNING: Illegal reflective access by com.google.inject.internal.cglib.core.$ReflectUtils$1 (file:/root/lib/com.google.inject.guice-4.2.3.jar) to method java.lang.ClassLoader.defineClass(java.lang.String,byte[],int,int,java.security.ProtectionDomain)
WARNING: Please consider reporting this to the maintainers of com.google.inject.internal.cglib.core.$ReflectUtils$1
WARNING: Use --illegal-access=warn to enable warnings of further illegal reflective access operations
WARNING: All illegal access operations will be denied in a future release
2021-12-24 06:10:13 INFO  play.api.Play  Application started (Prod) (no global state)
2021-12-24 06:10:13 INFO  play.core.server.AkkaHttpServer  Listening for HTTP on /0.0.0.0:9000
起動確認できました。

作成したファイルをgit addしてgit pushしておきます。
リポジトリからのデプロイ
では早速GitHubリポジトリから直接ビルドしてデプロイするアプリケーションを作成してみます。IBM CloudのコンソールからCode Engineのプロジェクトを開いて、アプリケーションのリストのページを開きます。「作成」を押すと以下のような画面に遷移するので、ここで今度は「ソース・コード」を選んでリポジトリのURLを入力します。

「ビルド詳細の指定」をクリックして詳細な設定を行います。まず「ソース」タブでプライベートリポジトリの指定やブランチ名の指定等が可能ですが、今回はパブリックなリポジトリでmasterブランチを用いるので何も指定せずに「次へ」をクリックします。「戦略」タブではどのようにビルドするかの戦略を定義できますが、ここもデフォルトのDockerfileを用いる方法のまま「次へ」をクリックします。最後に「出力」タブでビルドして作ったイメージをどこに保存するかの指定になりますが、ここは前回使ったレジストリを選択します(1つしか候補がなければ自動的に選択されているはずです)。イメージ名は任意の名前が指定できます。
ビルド詳細を構成したら、前回同様listenポートの9000を指定するのをお忘れなく。また、環境変数でAPPLICATION_SECRETとAPPLICATION_HOST_NAMEを指定しないと動作しないのでこちらも忘れずに指定します。
「作成」を押すとトースターのメッセージで「ビルドが作成された」という感じのメッセージが出ると思います。まずはビルドによってイメージが作成され、そのイメージを使ってアプリケーションをデプロイすることになりますね。下記の画面の「ビュー・ビルド」をクリックすると別画面でビルドの進行状況を確認することもできます。

ビルドはまあまあかかりましたね。私の構成だと5分ちょっとでした。ビルドの「戦略」タブでもっとリソースを割り当てたら恐らく速くなるのではないかと思います。(未確認です。)
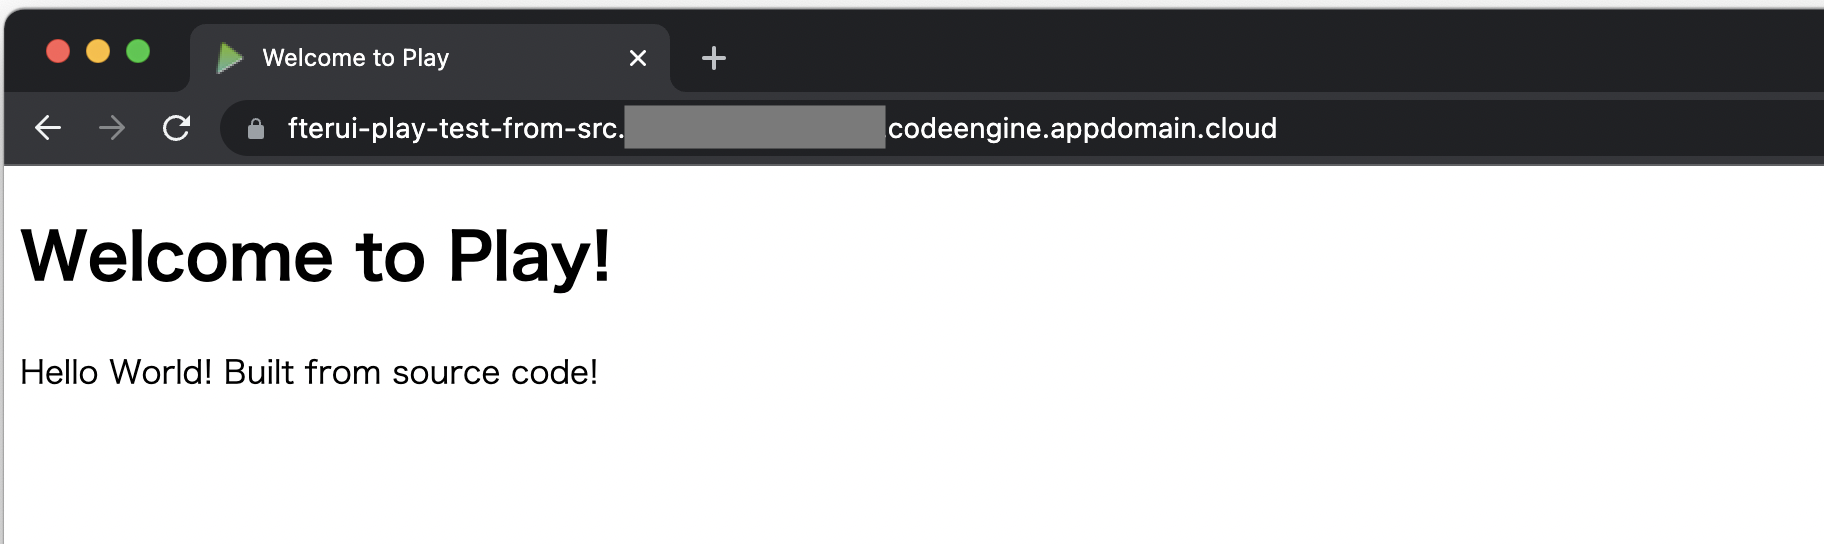
デプロイが完了した後そのURLにアクセスすると無事アプリケーションにアクセスできました。
まとめ
IBM Cloud Code Engineを使って、直接GitHubのリポジトリからビルドとデプロイを行う手順が確認できました。新たなバージョンをデプロイするときは新しいリビジョンを作成するだけで他に手動のステップは不要なので、デプロイの手順が大幅に簡略化できます。