はじめに
Webアプリケーション開発で厄介なものの1つにファイルアップロードがあります。
なぜ厄介かというと、アップロード可能なファイルサイズの上限を数GBまで上げてしまうと、Webサーバーの負担が大きくなるからです。ファイルアップロードにリソース(ネットワーク帯域、CPU時間、メモリ、等)を割かれてしまい、肝心の画面表示系の処理が重くなってしまいます。
この課題を解決するにはWebサーバーを経由せずにファイルをアップロードする方法があります。
その方法の一つとして、Web ブラウザーから直接 Azure Blob Storage にファイルをアップロードする方法があります。ここでは SvelteKit で実装する方法を紹介します。
概念
Azure Blob Storage からファイルアップロード用の一時トークン(SAS:Shared Access Signatures)を生成してもらい、そのトークンと一緒にファイルをアップロードすることでセキュアなファイルアップロードを実現できます。
事前準備
アプリケーションの基盤
を参考に GitHub Codespaces 上で SvelteKit のスケルトンを作成してください。
Azure Blob Storage 用のライブラリを導入
npm i @azure/storage-blob
Azure Storage 接続文字列の取得
Azure Portal の Storage account の Access Key から 取得できます。

取得した文字列を .env ファイルに記載します。
AZURE_STORAGE_CONNECTION_STRING=[接続文字列]
Azure Blob Storage にコンテナを追加する
fileupload という名前のコンテナを追加します。
Azure Blob Storage の CORS 設定
以下の様に設定して Save ボタンをクリックして保存します。

実装
+page.server.ts
import type { Actions } from './$types';
import { BlobSASPermissions, BlobServiceClient } from '@azure/storage-blob';
import crypto from 'crypto';
import { env } from '$env/dynamic/private';

export const actions = {
	/**
	 * SAS URL を取得するアクション
	 */
	getSasUrl: async ({ request }) => {
		try {
			const fileName = (await request.formData()).get('fileName') as string;
			const sasUrl = await getSasUrl("dummyuser_id", "fileupload", fileName);
			return createData({ sasUrl: sasUrl });
		} catch (error: any) {
			console.error(error);
			return createData({ sasMessage: 'error:' + error.message });
		}
	}
} satisfies Actions;

type Args = {
	message?: string;
	sasUrl?: string;
	sasMessage?: string;
};

const createData = (args: Args) => {
	return {
		message: args.message,
		sasUrl: args.sasUrl,
		sasMessage: args.sasMessage
	};
};

async function getSasUrl(userId: string, containerName: string, fileName: string) {
	const containerClient = getContainerClient(containerName);

	// 特定のパスを指定
	const blockBlobClient = containerClient.getBlockBlobClient(
		userId + '/' + crypto.randomUUID() + '_' + fileName
	);

	return blockBlobClient.generateSasUrl({

		// 書き込みを許可
		permissions: BlobSASPermissions.from({
			write: true
		}),

		// 有効期間は1時間
		expiresOn: new Date(new Date().setHours(new Date().getHours() + 1))
	});
}

function getContainerClient(containerName: string) {
	const blobServiceClient = getBlobServiceClient();
	const containerClient = blobServiceClient.getContainerClient(containerName);
	return containerClient;
}

function getBlobServiceClient() {
	const AZURE_STORAGE_CONNECTION_STRING = env.AZURE_STORAGE_CONNECTION_STRING;
	if (!AZURE_STORAGE_CONNECTION_STRING) {
		throw Error('Azure Storage Connection string not found');
	}
	const blobServiceClient = BlobServiceClient.fromConnectionString(AZURE_STORAGE_CONNECTION_STRING);
	return blobServiceClient;
}
+page.svelte
<script lang="ts">
	import type { ActionData } from './$types';
	import { enhance } from '$app/forms';
	import { BlockBlobClient } from '@azure/storage-blob';
	let fileInput: HTMLInputElement;
	let fileName: HTMLInputElement;
	let success = false;

	const uploadFile = async (sasUrl) => {
		if (!fileInput) {
			return;
		}
		const files = fileInput.files;
		if (!files || files.length === 0) {
			return;
		}
		const blockBlobClient = new BlockBlobClient(sasUrl);
		const promises = [];
		promises.push(blockBlobClient.uploadData(files[0]));
		await Promise.all(promises);
	};
</script>

<h1>Upload to Blob Storage by SAS</h1>
<input
	type="file"
	name="file"
	bind:this={fileInput}
	on:change={() => {
		const files = fileInput.files;
		if (!files || files.length === 0) return;
		fileName.value = files[0].name;
	}}
/>
<form
	method="POST"
	action="?/getSasUrl"
	use:enhance={() => {
		return async ({ result, update }) => {
			success = false;
			const sasUrl = result.data.sasUrl;
			// SAS URL を取得できたらファイルをアップロードする
			uploadFile(sasUrl).then(() => {
				success = true;
			});
		};
	}}
>
	<input type="hidden" name="fileName" bind:this={fileName} />
	<button type="submit" disabled={!fileName?.value}>upload to blob storage</button>
</form>
{#if success}
	<div>success!</div>
{/if}
動作確認
npm run dev
表示されたURLにアクセスしてください。
たまにポートフォワードがうまくいかず 502 エラーが発生します。
この場合、コマンド末尾に -- --host 127.0.0.1 を追加してみてください。
ファイルを選択して upload to blob storage ボタンをクリックすると、ファイルアップロードが実行され、以下の様に success が表示されます。

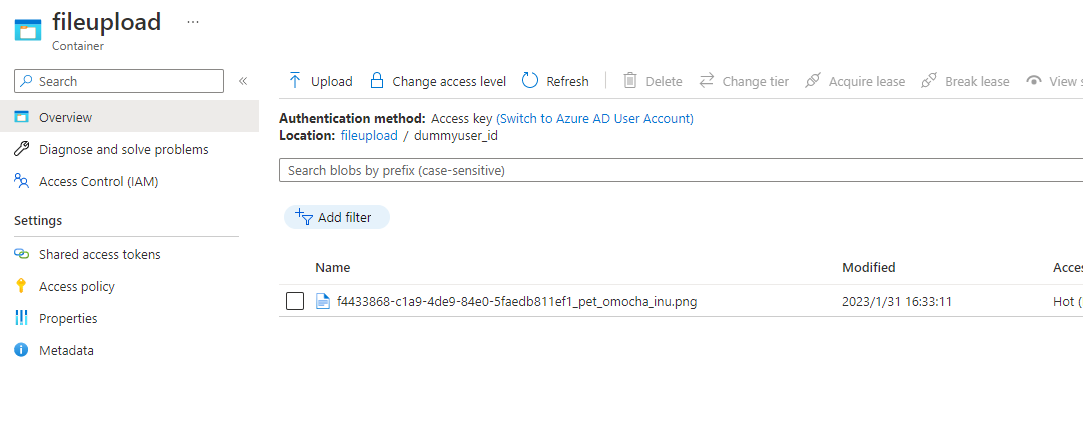
Azure Blob Storage にファイルがアップロードされているか確認します。

アップロードされてますね!
まとめ
BlockBlobClient は uploadData(..) 以外のメソッドもあるので、いろんなケースに対応できると思います。ファイルアップロードの進捗表示もできそうです。
これでファイルアップロードに悩まされることはなくなりそうです!![]()

