以前、画像処理の記事を2本投稿しました。
船井総研デジタルはAzureを積極的に使っていますので、今回はAzure AI Visionを触ってみました。
Azure AI Visionとは?
Azureが提供するサービスの1つです。
AIを用いた画像処理に特化しており、物体検出やOCRなどの機能が備わっています。
機能
| 名前 | 詳細 |
|---|---|
| 光学文字認識(OCR) | 光学式文字認識 (OCR) サービスは、画像からテキストを抽出します。 新しい Read API を使用して、印刷されたテキストと手書きのテキストを写真やドキュメントから抽出することができます。 ディープラーニングベースのモデルを使用して、さまざまなサーフェスや背景のテキストを操作します。 たとえば、ビジネス ドキュメント、請求書、レシート、ポスター、名刺、レター、ホワイトボードが対象となります |
| 画像分析 | 画像分析サービスは、物、顔、成人向けコンテンツ、自動生成されたテキストの説明など、さまざまな視覚的特徴を画像から抽出します。 |
| Face | Face サービスは、画像に含まれている人の顔を検出、認識、分析する AI アルゴリズムを提供します。 |
| 空間分析 | 空間分析サービスは、ビデオ フィードでの人々の存在と移動を分析し、他のシステムが応答できるイベントを生成します。 |
詳細は公式ドキュメントを確認してください。
実際に試してみる
では、実際に遊んでみます。
Azure AI Visionの作成
- Azureにアクセスします。
- 「Computer Vision」で検索します。

- 「作成」をクリックします。

- 項目を入力します。
サブスクリプション:任意のサブスクリプション
リソースグループ:任意のリソースグループ
リージョン:画面上は西日本にしていますが、アメリカのリージョンの方が使用できる機能が多いようです。そのため、いろいろ試したい方はアメリカのリージョンを選択した方が良いです。今回は日本のリージョンにします。
名前:任意の名前を入力してください。
価格レベル:フリープランを選択します。有料でも良い方はスタンダードプランを選択してください。
入力が終わると、「確認と作成」をクリックして作成してください。

エンドポイントとキーの設定
ここからは、Microsoftの公式サイトを参考にします。
エンドポイントとキーを環境変数に設定します。
Azure AI Visionを使う
実際に、Azure AI Visionを使ってみます。
今回はPythonを使用しますので、Pythonが使える環境を用意してください。
用意が出来たらAzureのモジュールをインストールします。
pip install azure-ai-vision
インストールが完了したら今回使用する画像をインストールします。
これで準備完了です。実際にコードを書いていきます。
物体検出
ソースコードは下記の通りとなります。
import os
import azure.ai.vision as sdk

# 環境変数からキーとエンドポイントを取得
service_options = sdk.VisionServiceOptions(os.environ["VISION_ENDPOINT"],
                                           os.environ["VISION_KEY"])

# ファイル名を設定
filename = "./presentation.png"

# Azure AI Visionを使用するソースを設定
vision_source = sdk.VisionSource(filename=filename)

# ImageAnalyzer の関数を制御する構成オプション
analysis_options = sdk.ImageAnalysisOptions()

# イメージから抽出する 1 つ以上のビジュアル機能を取得または設定
analysis_options.features = (
    sdk.ImageAnalysisFeature.CROP_SUGGESTIONS |
    sdk.ImageAnalysisFeature.OBJECTS |
    sdk.ImageAnalysisFeature.PEOPLE |
    sdk.ImageAnalysisFeature.TAGS |
    sdk.ImageAnalysisFeature.TEXT
)

# 画像分析で結果に使用する言語を取得または設定
analysis_options.language = "ja"

# 画像分析キャプション結果の性別に中立性を取得または設定
analysis_options.gender_neutral_caption = True

# 画像分析
image_analyzer = sdk.ImageAnalyzer(
    service_options, vision_source, analysis_options)

# 分析結果を取得
result = image_analyzer.analyze()

# 分析が成功した場合、結果を表示
if result.reason == sdk.ImageAnalysisResultReason.ANALYZED:

    print(" Image height: {}".format(result.image_height))  # 画像高さ
    print(" Image width: {}".format(result.image_width))  # 画像幅

    # Azure AI Visionのバージョン
    print(" Model version: {}".format(result.model_version))

    # オブジェクトに関する情報を出力(名前、座標、信頼度)
    if result.objects is not None:
        print(" Objects:")
        for object in result.objects:
            print("   '{}', {}, Confidence: {:.4f}".format(
                object.name, object.bounding_box, object.confidence))

# 分析が失敗した場合、エラーを表示
else:

    error_details = sdk.ImageAnalysisErrorDetails.from_result(result)
    print(" Analysis failed.")
    print("   Error reason: {}".format(error_details.reason))
    print("   Error code: {}".format(error_details.error_code))
    print("   Error message: {}".format(error_details.message))
流れとしては作成したAzure AI VisionのAPIを叩き、結果を出力するというものです。
これを実行すると以下の通りに出力されました。
Image height: 692
Image width: 1038
Model version: 2023-02-01-preview
Objects:
   'person', Rectangle(x=655, y=83, w=263, h=605), Confidence: 0.9050
   'television', Rectangle(x=75, y=76, w=678, h=414), Confidence: 0.8080
上から順番に画像の高さ、幅、Azure AI Visionのバージョン、物体検出の結果です。
物体検出の結果は以下の通りになります。
物体名、座標ボックス、信頼度
テキストで見てもわからないので、可視化してみましょう。
OpenCVを使って取得した座標を枠で囲みます。下記の記事を参考にOpneCVをインストールしてください。
ソースコードは下記の通りとなります。
import os
import azure.ai.vision as sdk
#####ここから追加####################
import cv2
#####ここまで追加####################

# 環境変数からキーとエンドポイントを取得
service_options = sdk.VisionServiceOptions(os.environ["VISION_ENDPOINT"],
                                           os.environ["VISION_KEY"])

# ファイル名を設定
filename = "./presentation.png"

#####ここから追加####################
img = cv2.imread(filename=filename)
#####ここまで追加####################

# Azure AI Visionを使用するソースを設定
vision_source = sdk.VisionSource(filename=filename)

# ImageAnalyzer の関数を制御する構成オプション
analysis_options = sdk.ImageAnalysisOptions()

# イメージから抽出する 1 つ以上のビジュアル機能を取得または設定
analysis_options.features = (
    sdk.ImageAnalysisFeature.CROP_SUGGESTIONS |
    sdk.ImageAnalysisFeature.OBJECTS |
    sdk.ImageAnalysisFeature.PEOPLE |
    sdk.ImageAnalysisFeature.TAGS |
    sdk.ImageAnalysisFeature.TEXT
)

# 画像分析で結果に使用する言語を取得または設定
analysis_options.language = "ja"

# 画像分析キャプション結果の性別に中立性を取得または設定
analysis_options.gender_neutral_caption = True

# 画像分析
image_analyzer = sdk.ImageAnalyzer(
    service_options, vision_source, analysis_options)

# 分析結果を取得
result = image_analyzer.analyze()

# 分析が成功した場合、結果を表示
if result.reason == sdk.ImageAnalysisResultReason.ANALYZED:

    print(" Image height: {}".format(result.image_height))  # 画像高さ
    print(" Image width: {}".format(result.image_width))  # 画像幅

    # Azure AI Visionのバージョン
    print(" Model version: {}".format(result.model_version))

    # オブジェクトに関する情報を出力(名前、座標、信頼度)
    if result.objects is not None:
        print(" Objects:")
        for object in result.objects:
            print("   '{}', {}, Confidence: {:.4f}".format(
                object.name, object.bounding_box, object.confidence))

			#####ここから追加####################
            x = object.bounding_box.x
            y = object.bounding_box.y
            w = object.bounding_box.w
            h = object.bounding_box.h

            cv2.rectangle(img, (x, y), (x+w, y+h), (0, 0, 255), thickness=2)
            #####ここまで追加####################

# 分析が失敗した場合、エラーを表示
else:

    error_details = sdk.ImageAnalysisErrorDetails.from_result(result)
    print(" Analysis failed.")
    print("   Error reason: {}".format(error_details.reason))
    print("   Error code: {}".format(error_details.error_code))
    print("   Error message: {}".format(error_details.message))

#####ここから追加####################
cv2.imwrite("output.png", img)
#####ここまで追加####################
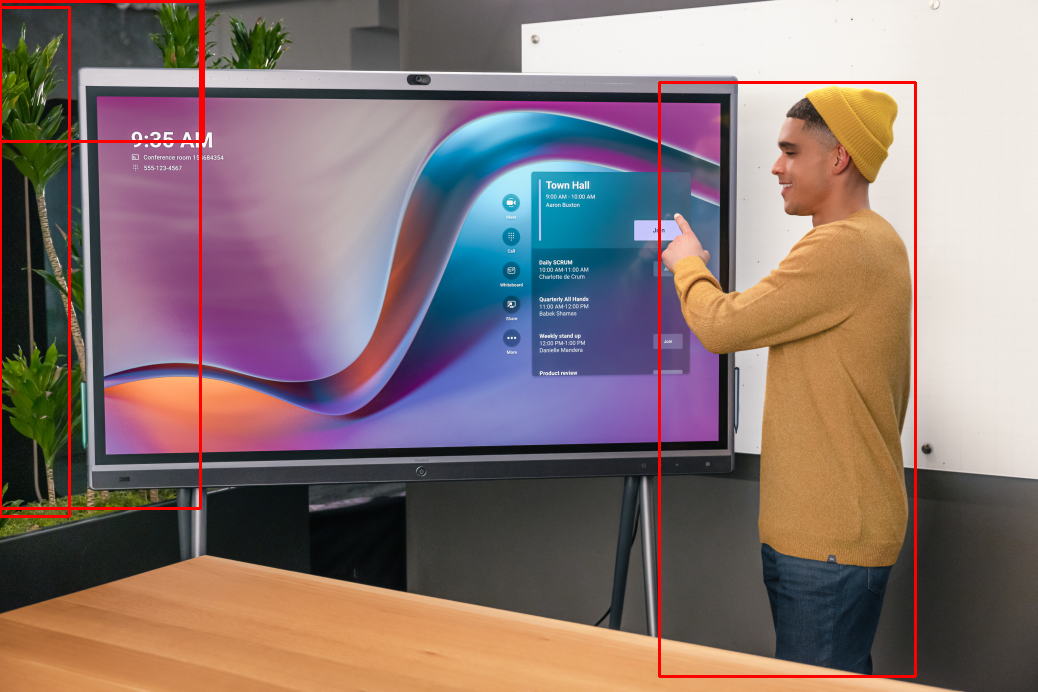
OpenCVで画像を読み込み、取得したオブジェクトの座標を枠で囲み、出力するというコードを追加しました。
これを実行するとoutput.pngという名前で下記の画像が出力されます。
テキストの出力結果を可視化すると確かに合っていることが分かりますね。
物体検出が正しくできていることが確認できました。
人間の検出
次は人間だけを検出してみます。コードは下記のとおりです。
import os
import azure.ai.vision as sdk
import cv2

# 環境変数からキーとエンドポイントを取得
service_options = sdk.VisionServiceOptions(os.environ["VISION_ENDPOINT"],
                                           os.environ["VISION_KEY"])

# ファイル名を設定
filename = "./presentation.png"

##### ここから追加####################
img = cv2.imread(filename=filename)
##### ここまで追加####################

# Azure AI Visionを使用するソースを設定
vision_source = sdk.VisionSource(filename=filename)

# ImageAnalyzer の関数を制御する構成オプション
analysis_options = sdk.ImageAnalysisOptions()

# イメージから抽出する 1 つ以上のビジュアル機能を取得または設定
analysis_options.features = (
    sdk.ImageAnalysisFeature.CROP_SUGGESTIONS |
    sdk.ImageAnalysisFeature.OBJECTS |
    sdk.ImageAnalysisFeature.PEOPLE |
    sdk.ImageAnalysisFeature.TAGS |
    sdk.ImageAnalysisFeature.TEXT
)

# 画像分析で結果に使用する言語を取得または設定
analysis_options.language = "ja"

# 画像分析キャプション結果の性別に中立性を取得または設定
analysis_options.gender_neutral_caption = True

# 画像分析
image_analyzer = sdk.ImageAnalyzer(
    service_options, vision_source, analysis_options)

# 分析結果を取得
result = image_analyzer.analyze()

# 分析が成功した場合、結果を表示
if result.reason == sdk.ImageAnalysisResultReason.ANALYZED:

    # オブジェクトに関する情報を出力(名前、座標、信頼度)
    if result.people is not None:
        print(" People:")
        for person in result.people:
            print("   {}, Confidence {:.4f}".format(
                person.bounding_box, person.confidence))

            x = person.bounding_box.x
            y = person.bounding_box.y
            w = person.bounding_box.w
            h = person.bounding_box.h

            cv2.rectangle(img, (x, y), (x+w, y+h), (0, 0, 255), thickness=2)

# 分析が失敗した場合、エラーを表示
else:

    error_details = sdk.ImageAnalysisErrorDetails.from_result(result)
    print(" Analysis failed.")
    print("   Error reason: {}".format(error_details.reason))
    print("   Error code: {}".format(error_details.error_code))
    print("   Error message: {}".format(error_details.message))

cv2.imwrite("output.png", img)
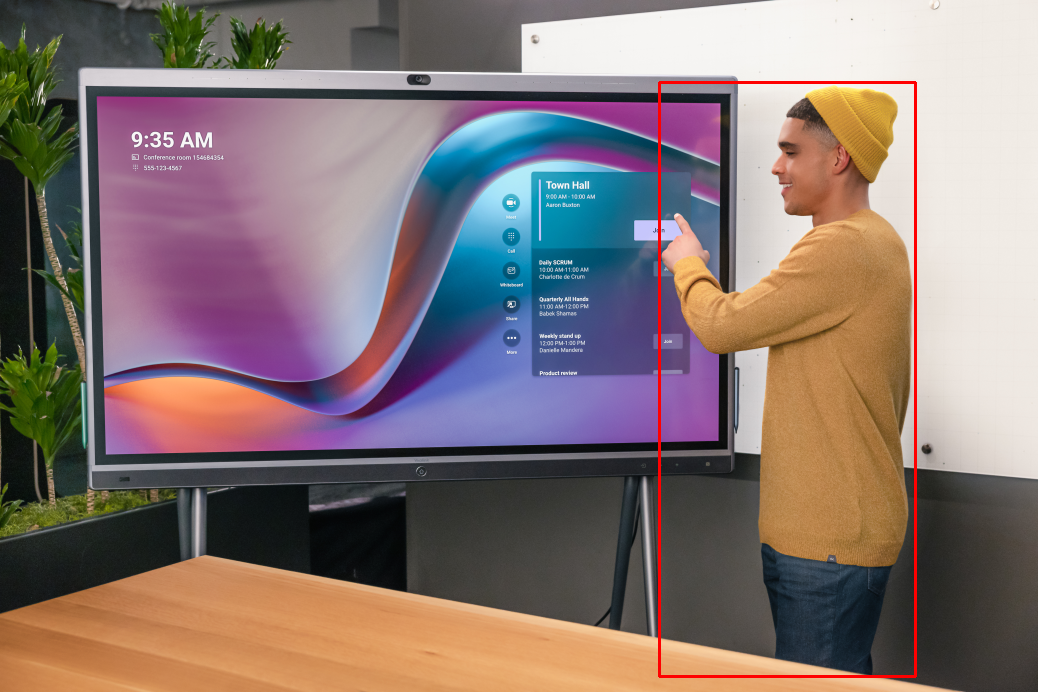
出力結果は下記の通りとなりました。

人がいないところも検出されていますね。ここで、テキストの結果も確認してみます。
 People:
   Rectangle(x=659, y=82, w=256, h=594), Confidence 0.9593
   Rectangle(x=0, y=1, w=200, h=507), Confidence 0.0040
   Rectangle(x=0, y=7, w=69, h=509), Confidence 0.0025
   Rectangle(x=0, y=0, w=203, h=141), Confidence 0.0011
1人しかいませんが、検出結果は4人となっています。
ここで、判断に使うものとしてConfidenceがあります。Confidenceは信頼度という意味であり、簡単に言えばこの結果にどのくらい自身があるかの指標になります。高ければ高いほど結果に自信があり、低いほど自信がないということになります。
今回の結果を見ると1つ目は96%の信頼度がありますが、その他はほぼ0%となっています。
ここで、信頼度が低いものを切り捨てて、画像に書き出してみます。
cv2.rectangle(img, (x, y), (x+w, y+h), (0, 0, 255), thickness=2)
の箇所を
if person.confidence>0.9:
                cv2.rectangle(img, (x, y), (x+w, y+h), (0, 0, 255), thickness=2)
に変更して、実行してみてください。

今度は正しく出力することが出来ました。
信頼度を上手く活用することでより正確に画像解析を行うことができるようになります。
タグ
タグは画像に表示される何千もの認識可能なオブジェクト、生物、景色、アクションのコンテンツ タグを返すことができます。
コードは以下の通りです。
import os
import azure.ai.vision as sdk

# 環境変数からキーとエンドポイントを取得
service_options = sdk.VisionServiceOptions(os.environ["VISION_ENDPOINT"],
                                           os.environ["VISION_KEY"])

# ファイル名を設定
filename = "./presentation.png"

# Azure AI Visionを使用するソースを設定
vision_source = sdk.VisionSource(filename=filename)

# ImageAnalyzer の関数を制御する構成オプション
analysis_options = sdk.ImageAnalysisOptions()

# イメージから抽出する 1 つ以上のビジュアル機能を取得または設定
analysis_options.features = (
    sdk.ImageAnalysisFeature.CROP_SUGGESTIONS |
    sdk.ImageAnalysisFeature.OBJECTS |
    sdk.ImageAnalysisFeature.PEOPLE |
    sdk.ImageAnalysisFeature.TAGS |
    sdk.ImageAnalysisFeature.TEXT
)

# 画像分析で結果に使用する言語を取得または設定
analysis_options.language = "ja"

# 画像分析キャプション結果の性別に中立性を取得または設定
analysis_options.gender_neutral_caption = True

# 画像分析
image_analyzer = sdk.ImageAnalyzer(
    service_options, vision_source, analysis_options)

# 分析結果を取得
result = image_analyzer.analyze()

# 分析が成功した場合、結果を表示
if result.reason == sdk.ImageAnalysisResultReason.ANALYZED:
    if result.tags is not None:
        print(" Tags:")
        for tag in result.tags:
            print("   '{}', Confidence {:.4f}".format(tag.name, tag.confidence))

# 分析が失敗した場合、エラーを表示
else:

    error_details = sdk.ImageAnalysisErrorDetails.from_result(result)
    print(" Analysis failed.")
    print("   Error reason: {}".format(error_details.reason))
    print("   Error code: {}".format(error_details.error_code))
    print("   Error message: {}".format(error_details.message))
これを実行すると下記のような結果が表示されます。
Tags:
   'テキスト', Confidence 0.9966
   '衣類', Confidence 0.9801
   '人', Confidence 0.9596
   'ディスプレイ デバイス', Confidence 0.9490
   '屋内', Confidence 0.9475
   '壁', Confidence 0.9396
   'メディア', Confidence 0.9306
   'テレビ セット', Confidence 0.9281
   'バックライト付き液晶ディスプレイ', Confidence 0.9255
   'フラット パネル ディスプレイ', Confidence 0.9209
   '家具', Confidence 0.9133
   '液晶テレビ', Confidence 0.8951
   '男', Confidence 0.8884
   'テレビ', Confidence 0.8766
   'ビデオ', Confidence 0.8747
   'マルチメディア', Confidence 0.8719
   '出力装置', Confidence 0.8586
   'コンピューター モニター', Confidence 0.8442
   'テーブル', Confidence 0.8430
   '画面', Confidence 0.7113
   '立ったまま', Confidence 0.7051
   'デザイン', Confidence 0.4042
タグに出力されたものは、おおむね正しいですね。
テキスト抽出
次に、画像に記載されている文字を出力します。
コードは下記のとおりです。
import os
import azure.ai.vision as sdk

# 環境変数からキーとエンドポイントを取得
service_options = sdk.VisionServiceOptions(os.environ["VISION_ENDPOINT"],
                                           os.environ["VISION_KEY"])

# ファイル名を設定
filename = "./presentation.png"

# Azure AI Visionを使用するソースを設定
vision_source = sdk.VisionSource(filename=filename)

# ImageAnalyzer の関数を制御する構成オプション
analysis_options = sdk.ImageAnalysisOptions()

# イメージから抽出する 1 つ以上のビジュアル機能を取得または設定
analysis_options.features = (
    sdk.ImageAnalysisFeature.CROP_SUGGESTIONS |
    sdk.ImageAnalysisFeature.OBJECTS |
    sdk.ImageAnalysisFeature.PEOPLE |
    sdk.ImageAnalysisFeature.TAGS |
    sdk.ImageAnalysisFeature.TEXT
)

# 画像分析で結果に使用する言語を取得または設定
analysis_options.language = "ja"

# 画像分析キャプション結果の性別に中立性を取得または設定
analysis_options.gender_neutral_caption = True

# 画像分析
image_analyzer = sdk.ImageAnalyzer(
    service_options, vision_source, analysis_options)

# 分析結果を取得
result = image_analyzer.analyze()

# 分析が成功した場合、結果を表示
if result.text is not None:
	print(" Text:")
	for line in result.text.lines:
		points_string = "{" + ", ".join([str(int(point))
										for point in line.bounding_polygon]) + "}"
		print("   Line: '{}', Bounding polygon {}".format(
			line.content, points_string))
		for word in line.words:
			points_string = "{" + ", ".join([str(int(point))
											for point in word.bounding_polygon]) + "}"
			print("     Word: '{}', Bounding polygon {}, Confidence {:.4f}"
					.format(word.content, points_string, word.confidence))

# 分析が失敗した場合、エラーを表示
else:

    error_details = sdk.ImageAnalysisErrorDetails.from_result(result)
    print(" Analysis failed.")
    print("   Error reason: {}".format(error_details.reason))
    print("   Error code: {}".format(error_details.error_code))
    print("   Error message: {}".format(error_details.message))
出力結果は以下の通りとなります。
 Text:
   Line: '9:35 AM', Bounding polygon {130, 129, 215, 130, 215, 149, 130, 148}
     Word: '9:35', Bounding polygon {131, 130, 171, 130, 171, 149, 130, 149}, Confidence 0.9930
     Word: 'AM', Bounding polygon {179, 130, 204, 130, 203, 149, 178, 149}, Confidence 0.9980
   Line: 'E Conference room 154584354', Bounding polygon {130, 153, 224, 154, 224, 161, 130, 161}
     Word: 'E', Bounding polygon {131, 154, 135, 154, 135, 161, 131, 161}, Confidence 0.1040
     Word: 'Conference', Bounding polygon {142, 154, 174, 154, 173, 161, 141, 161}, Confidence 0.9020
     Word: 'room', Bounding polygon {175, 154, 189, 155, 188, 161, 175, 161}, Confidence 0.7960
     Word: '154584354', Bounding polygon {192, 155, 224, 154, 223, 162, 191, 161}, Confidence 0.8640
   Line: '#: 555-173-4547', Bounding polygon {130, 163, 182, 164, 181, 171, 130, 170}
     Word: '#:', Bounding polygon {131, 163, 139, 164, 139, 171, 131, 171}, Confidence 0.0360
     Word: '555-173-4547', Bounding polygon {142, 164, 182, 165, 181, 171, 142, 171}, Confidence 0.5970
   Line: 'Town Hall', Bounding polygon {546, 180, 590, 180, 590, 190, 546, 190}
     Word: 'Town', Bounding polygon {547, 181, 568, 181, 568, 190, 546, 191}, Confidence 0.9810
     Word: 'Hall', Bounding polygon {570, 181, 590, 181, 590, 191, 570, 190}, Confidence 0.9910
   Line: '9:00 AM - 10:00 AM', Bounding polygon {546, 191, 596, 192, 596, 200, 546, 199}
     Word: '9:00', Bounding polygon {546, 192, 555, 192, 555, 200, 546, 200}, Confidence 0.0900
     Word: 'AM', Bounding polygon {557, 192, 565, 192, 565, 200, 557, 200}, Confidence 0.9910
     Word: '-', Bounding polygon {567, 192, 569, 192, 569, 200, 567, 200}, Confidence 0.6910
     Word: '10:00', Bounding polygon {570, 192, 585, 193, 584, 200, 570, 200}, Confidence 0.8850
     Word: 'AM', Bounding polygon {586, 193, 593, 194, 593, 200, 586, 200}, Confidence 0.9910
   Line: 'Aaron Buaion', Bounding polygon {543, 201, 581, 201, 581, 208, 543, 208}
     Word: 'Aaron', Bounding polygon {545, 202, 560, 202, 559, 208, 544, 208}, Confidence 0.6020
     Word: 'Buaion', Bounding polygon {561, 202, 580, 202, 579, 208, 560, 208}, Confidence 0.2910
   Line: 'Daily SCRUM', Bounding polygon {537, 259, 575, 260, 575, 266, 537, 265}
     Word: 'Daily', Bounding polygon {538, 259, 551, 260, 550, 266, 538, 265}, Confidence 0.1750
     Word: 'SCRUM', Bounding polygon {552, 260, 570, 260, 570, 266, 551, 266}, Confidence 0.1140
   Line: '10:00 AM 11:00 AM', Bounding polygon {536, 266, 590, 266, 590, 272, 536, 272}
     Word: '10:00', Bounding polygon {539, 267, 553, 267, 552, 273, 538, 272}, Confidence 0.8570
     Word: 'AM', Bounding polygon {554, 267, 561, 267, 560, 273, 553, 273}, Confidence 0.9980
     Word: '11:00', Bounding polygon {564, 267, 578, 267, 577, 273, 563, 273}, Confidence 0.4790
     Word: 'AM', Bounding polygon {579, 267, 586, 267, 585, 273, 578, 273}, Confidence 0.9940
   Line: 'Churlette de Crum', Bounding polygon {538, 273, 584, 273, 585, 279, 538, 279}
     Word: 'Churlette', Bounding polygon {539, 274, 562, 274, 561, 279, 538, 279}, Confidence 0.4640
     Word: 'de', Bounding polygon {563, 274, 569, 274, 568, 279, 562, 279}, Confidence 0.8100
     Word: 'Crum', Bounding polygon {570, 274, 582, 273, 581, 279, 569, 279}, Confidence 0.8850
   Line: 'Quarterly NI Hands', Bounding polygon {538, 295, 588, 295, 588, 301, 538, 302}
     Word: 'Quarterly', Bounding polygon {540, 296, 562, 296, 562, 302, 539, 302}, Confidence 0.5230
     Word: 'NI', Bounding polygon {563, 296, 570, 296, 570, 302, 563, 302}, Confidence 0.3030
     Word: 'Hands', Bounding polygon {572, 296, 588, 296, 588, 302, 571, 302}, Confidence 0.6130
   Line: '11.00 AM-12:00 PM', Bounding polygon {536, 304, 588, 303, 588, 309, 536, 310}
     Word: '11.00', Bounding polygon {538, 304, 552, 304, 552, 310, 538, 310}, Confidence 0.6180
     Word: 'AM-12:00', Bounding polygon {554, 304, 578, 304, 577, 310, 553, 310}, Confidence 0.2700
     Word: 'PM', Bounding polygon {579, 304, 586, 304, 586, 309, 578, 310}, Confidence 0.6620
   Line: 'Bebek Shaman', Bounding polygon {538, 310, 577, 310, 577, 316, 538, 316}
     Word: 'Bebek', Bounding polygon {539, 310, 554, 310, 554, 317, 539, 316}, Confidence 0.6110
     Word: 'Shaman', Bounding polygon {555, 310, 576, 311, 576, 317, 555, 317}, Confidence 0.6050
   Line: 'Weekly stand up', Bounding polygon {537, 332, 582, 333, 582, 339, 537, 338}
     Word: 'Weekly', Bounding polygon {538, 332, 557, 333, 556, 339, 538, 338}, Confidence 0.6060
     Word: 'stand', Bounding polygon {558, 333, 572, 334, 571, 340, 557, 339}, Confidence 0.4890
     Word: 'up', Bounding polygon {574, 334, 580, 334, 580, 340, 573, 340}, Confidence 0.8150
   Line: '12:00 PM-1:00 PM', Bounding polygon {537, 340, 583, 340, 583, 347, 536, 346}
     Word: '12:00', Bounding polygon {539, 341, 553, 341, 552, 347, 538, 347}, Confidence 0.8260
     Word: 'PM-1:00', Bounding polygon {554, 341, 575, 341, 574, 347, 553, 347}, Confidence 0.2090
     Word: 'PM', Bounding polygon {576, 341, 583, 341, 582, 347, 575, 347}, Confidence 0.0390
   Line: 'Delle Marckre', Bounding polygon {538, 347, 582, 347, 582, 352, 538, 353}
     Word: 'Delle', Bounding polygon {540, 348, 559, 347, 558, 353, 539, 353}, Confidence 0.5800
     Word: 'Marckre', Bounding polygon {560, 347, 582, 348, 582, 353, 559, 353}, Confidence 0.2750
   Line: 'Product review', Bounding polygon {538, 370, 577, 370, 577, 376, 538, 375}
     Word: 'Product', Bounding polygon {539, 370, 559, 371, 558, 376, 539, 376}, Confidence 0.6150
     Word: 'review', Bounding polygon {560, 371, 576, 371, 575, 376, 559, 376}, Confidence 0.0400
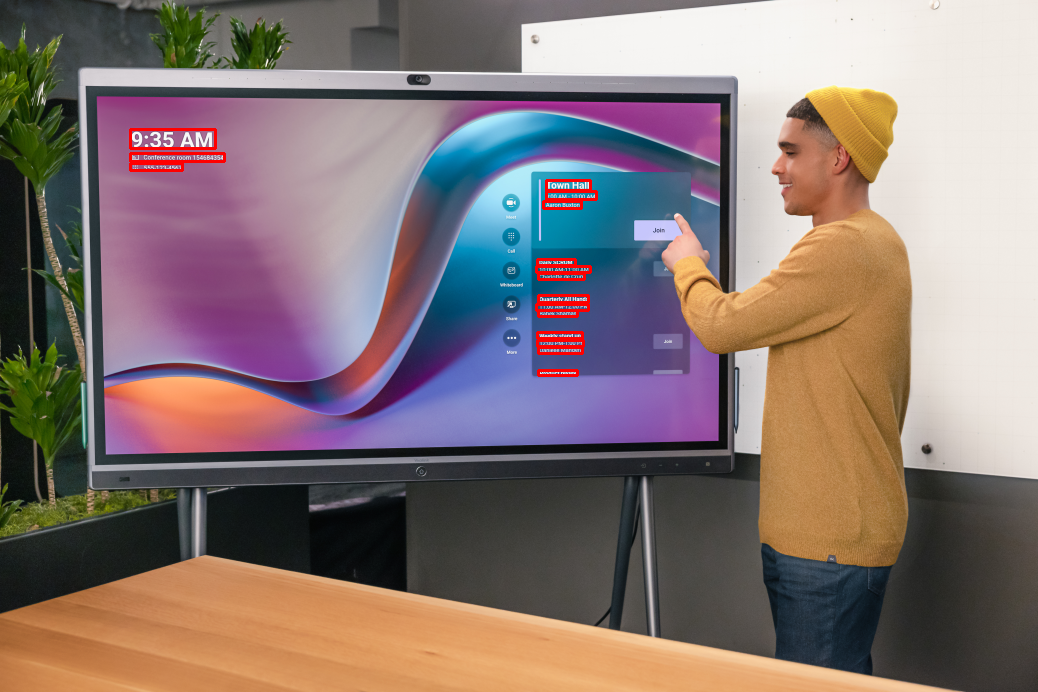
では、これも画像に表示してみます。
import os
import azure.ai.vision as sdk
#### ここから追加####
import cv2
#### ここまで追加####

# 環境変数からキーとエンドポイントを取得
service_options = sdk.VisionServiceOptions(os.environ["VISION_ENDPOINT"],
                                           os.environ["VISION_KEY"])

# ファイル名を設定
filename = "./presentation.png"

#### ここから追加####
img = cv2.imread(filename=filename)
#### ここまで追加####

# Azure AI Visionを使用するソースを設定
vision_source = sdk.VisionSource(filename=filename)

# ImageAnalyzer の関数を制御する構成オプション
analysis_options = sdk.ImageAnalysisOptions()

# イメージから抽出する 1 つ以上のビジュアル機能を取得または設定
analysis_options.features = (
    sdk.ImageAnalysisFeature.CROP_SUGGESTIONS |
    sdk.ImageAnalysisFeature.OBJECTS |
    sdk.ImageAnalysisFeature.PEOPLE |
    sdk.ImageAnalysisFeature.TAGS |
    sdk.ImageAnalysisFeature.TEXT
)

# 画像分析で結果に使用する言語を取得または設定
analysis_options.language = "ja"

# 画像分析キャプション結果の性別に中立性を取得または設定
analysis_options.gender_neutral_caption = True

# 画像分析
image_analyzer = sdk.ImageAnalyzer(
    service_options, vision_source, analysis_options)

# 分析結果を取得
result = image_analyzer.analyze()

# 分析が成功した場合、結果を表示
if result.text is not None:
    print(" Text:")
    for line in result.text.lines:
        points_string = "{" + ", ".join([str(int(point))
                                         for point in line.bounding_polygon]) + "}"
        print("   Line: '{}', Bounding polygon {}".format(
            line.content, points_string))
        for word in line.words:
            points_string = "{" + ", ".join([str(int(point))
                                             for point in word.bounding_polygon]) + "}"
            print("     Word: '{}', Bounding polygon {}, Confidence {:.4f}"
                  .format(word.content, points_string, word.confidence))
        #### ここから追加####
        x = (int)(line.bounding_polygon[0])
        y = (int)(line.bounding_polygon[1])
        w = (int)(line.bounding_polygon[2]-line.bounding_polygon[0])
        h = (int)(line.bounding_polygon[7]-line.bounding_polygon[1])
        cv2.rectangle(img, (x, y), (x+w, y+h), (0, 0, 255), thickness=2)
        #### ここまで追加####

# 分析が失敗した場合、エラーを表示
else:

    error_details = sdk.ImageAnalysisErrorDetails.from_result(result)
    print(" Analysis failed.")
    print("   Error reason: {}".format(error_details.reason))
    print("   Error code: {}".format(error_details.error_code))
    print("   Error message: {}".format(error_details.message))

#### ここから追加####
cv2.imwrite("output.png", img)
#### ここまで追加####
元々の画像の文字が小さくて一部、検出できていませんが、おおよそ検出できているようです。
Crop Suggestion
Crop Suggestionは、画像コンテンツの大部分を保持する箇所をトリミングします。
ソースは下記のとおりです。
import os
import azure.ai.vision as sdk
import cv2

# 環境変数からキーとエンドポイントを取得
service_options = sdk.VisionServiceOptions(os.environ["VISION_ENDPOINT"],
                                           os.environ["VISION_KEY"])

# ファイル名を設定
filename = "./presentation.png"

img = cv2.imread(filename=filename)

# Azure AI Visionを使用するソースを設定
vision_source = sdk.VisionSource(filename=filename)

# ImageAnalyzer の関数を制御する構成オプション
analysis_options = sdk.ImageAnalysisOptions()

# イメージから抽出する 1 つ以上のビジュアル機能を取得または設定
analysis_options.features = (
    sdk.ImageAnalysisFeature.CROP_SUGGESTIONS |
    sdk.ImageAnalysisFeature.OBJECTS |
    sdk.ImageAnalysisFeature.PEOPLE |
    sdk.ImageAnalysisFeature.TAGS |
    sdk.ImageAnalysisFeature.TEXT
)

# 画像分析で結果に使用する言語を取得または設定
analysis_options.language = "ja"

# 画像分析キャプション結果の性別に中立性を取得または設定
analysis_options.gender_neutral_caption = True

# 画像分析
image_analyzer = sdk.ImageAnalyzer(
    service_options, vision_source, analysis_options)

# 分析結果を取得
result = image_analyzer.analyze()

# 分析が成功した場合、結果を表示
if result.crop_suggestions is not None:
    print(" Crop Suggestions:")
    for crop_suggestion in result.crop_suggestions:
        print("   Aspect ratio {}: Crop suggestion {}"
              .format(crop_suggestion.aspect_ratio, crop_suggestion.bounding_box))
    x = (int)(crop_suggestion.bounding_box.x)
    y = (int)(crop_suggestion.bounding_box.y)
    w = (int)(crop_suggestion.bounding_box.w)
    h = (int)(crop_suggestion.bounding_box.h)
    cv2.rectangle(img, (x, y), (x+w, y+h), (0, 0, 255), thickness=2)

# 分析が失敗した場合、エラーを表示
else:

    error_details = sdk.ImageAnalysisErrorDetails.from_result(result)
    print(" Analysis failed.")
    print("   Error reason: {}".format(error_details.reason))
    print("   Error code: {}".format(error_details.error_code))
    print("   Error message: {}".format(error_details.message))

cv2.imwrite("output.png", img)
結果は以下の通りです。
Crop Suggestions:
   Aspect ratio 1.09: Crop suggestion Rectangle(x=303, y=29, w=692, h=634)
人が何か説明しようとしているというこの画像を表す部分を囲めてるので、良いのではないでしょうか。
まとめ
今回は、Azure AI Visionを使って、様々な機能を試してみました。
日本のリージョンで作成したため、機能が一部使用できませんでしたので、フルで機能を使いたい方はアメリカのリージョンを使用することをお勧めします。


