実施環境
CentOS 8-Stream
Splunk Free 8.2.2
Python 3.7.10
splunk-sdk-python 1.7.3
0. 概要
前回は入出力に関する部分について機能を追加しました。
今回は以下のプログラムに対し、それ以外の様々な機能を追加してみます。
test.py
#!/usr/bin/env python

import sys

sys.path.insert(0, "/opt/splunk/etc/apps/search/lib")
from splunklib.searchcommands import \
    dispatch, GeneratingCommand, Configuration

@Configuration()
class test_class(GeneratingCommand):
    def generate(self):
        return [{"test_field": "Hello World !"}]

dispatch(test_class)
1. セッション情報の取得
サーチを実行している App やユーザなどのセッション情報を取得したい場合は、「 metadata 」の「 searchinfo 」から取得できます。
test.py
#!/usr/bin/env python

import sys

sys.path.insert(0, "/opt/splunk/etc/apps/search/lib")
from splunklib.searchcommands import \
    dispatch, GeneratingCommand, Configuration

@Configuration()
class test_class(GeneratingCommand):
    def generate(self):
        test_result = {}
        test_result["app"] = self.metadata.searchinfo.app
        test_result["user"] = self.metadata.searchinfo.username
        test_result["sid"] = self.metadata.searchinfo.sid
        return [test_result]

dispatch(test_class)
splunk
| TestCommand
| table app, user, sid
2. ルックアップ情報の取得
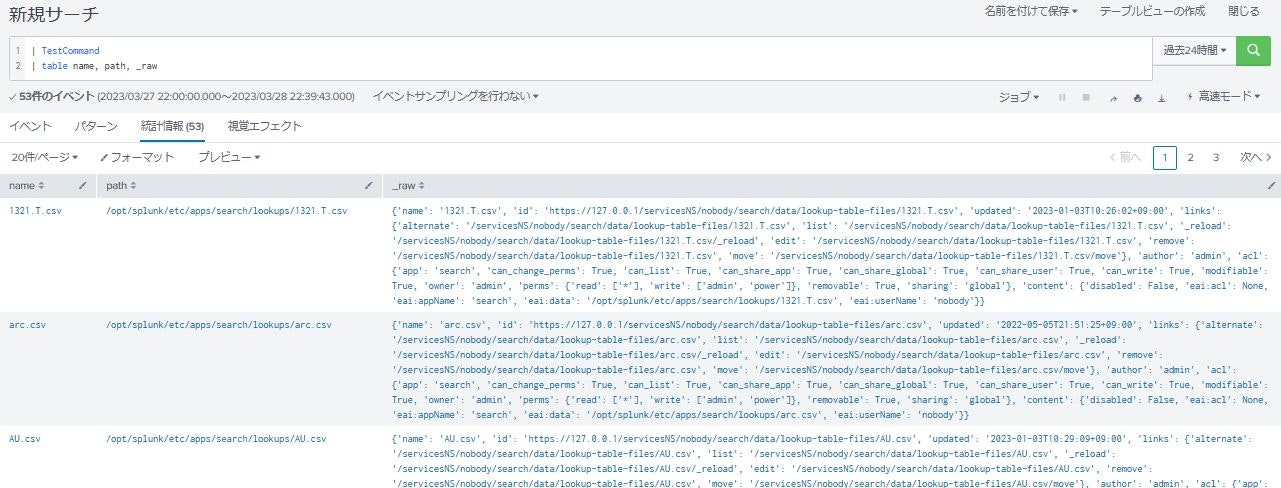
ルックアップ情報を取得したい場合は、「 service.get 」で RestAPI を呼び出して使用します。
test.py
#!/usr/bin/env python

import sys, json

sys.path.insert(0, "/opt/splunk/etc/apps/search/lib")
from splunklib.searchcommands import \
    dispatch, GeneratingCommand, Configuration

@Configuration()
class test_class(GeneratingCommand):
    def generate(self):
        objapi = self.service.get( \
            "/servicesNS/-/" + \
            self.metadata.searchinfo.app + \
            "/data/lookup-table-files", \
            **{"output_mode":"json","count":0})
        objjson = json.loads(objapi.body.read())
        for objentry in objjson["entry"]:
            test_result = {}
            test_result["name"] = objentry["name"]
            test_result["path"] = objentry["content"]["eai:data"]
            test_result["_raw"] = str(objentry)
            yield test_result

dispatch(test_class)
splunk
| TestCommand
| table name, path, _raw
3. エラーメッセージの出力
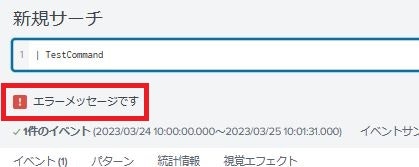
エラーメッセージを画面に出力したい場合は、「 _record_writer 」の「 write_message 」を使用します。
test.py
#!/usr/bin/env python

import sys

sys.path.insert(0, "/opt/splunk/etc/apps/search/lib")
from splunklib.searchcommands import \
    dispatch, GeneratingCommand, Configuration

@Configuration()
class test_class(GeneratingCommand):
    def generate(self):
        self._record_writer.write_message("ERROR", "エラーメッセージです")
        return [{"test_field": "Hello World !"}]

dispatch(test_class)
splunk
| TestCommand
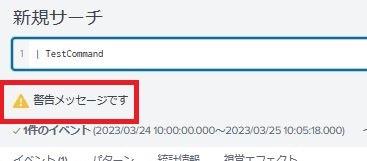
「 ERROR 」を「 WARN 」に変えると、警告メッセージになります。
test.py
#!/usr/bin/env python

import sys

sys.path.insert(0, "/opt/splunk/etc/apps/search/lib")
from splunklib.searchcommands import \
    dispatch, GeneratingCommand, Configuration

@Configuration()
class test_class(GeneratingCommand):
    def generate(self):
        self._record_writer.write_message("WARN", "警告メッセージです")
        return [{"test_field": "Hello World !"}]

dispatch(test_class)
splunk
| TestCommand


