スタンプが「バンッ!」となる雰囲気を特別なライブラリなしで。獲得済みのスタンプ数をユーザーデフォルト等で管理することで、いわゆるログインボーナス的な用途で利用できると思います。
完成見本

1.プロジェクトの作成
「Single View Application」をテンプレートにプロジェクトを新規作成します。
2.スタンプ台とスタンプの位置をAutolayoutで定義
重なりが下から、view(StampBaseView(黄色)) → ImageView(スタンプ台) → ImageView(スタンプ x10) となるように配置します。ポイントはStampBaseView(黄色)を基準に、スタンプ台とスタンプの制約付けをしていくことです。でないとスタンプ押下時にスタンプが一緒に揺れずに浮いた感じになってしまいます。StampBaseViewは分かりやすいように背景を黄色にしてますが最終的に透明にします。

3.ViewController実装
**doStamp()がスタンプを押下するメソッドです。処理直前にサイズを大きく&透明にし、指定秒をかけてサイズと不透明度を元に戻すことでスピード感を演出しています。スタンプのアニメーションのコールバックにvibrate()**を指定しています。vibrateは台紙を揺らすメソッドです。左右に小さなローテートを与えて揺れる感じを出してます。
// swift 3.0

import UIKit

class ViewController: UIViewController {

    var currentStampNo:Int = 0

    @IBOutlet weak var stampBaseView: UIView!

    @IBOutlet var stamps: [UIImageView]!

    // スタンプリセット
    @IBAction func stampReset(_ sender:UIButton) {

        let _ = stamps.map { $0.isHidden = true }
        currentStampNo = 0
    }

    // スタンプ押す
    @IBAction func stampAdd(_ sender:UIButton) {

        if currentStampNo < stamps.count {
            doStamp(stamp: stamps[currentStampNo] )
            currentStampNo += 1
        } else {
            let alert = UIAlertView()
            alert.title = "Stamp Demo"
            alert.message = "もういぱいです!"
            alert.addButton(withTitle: "OK")
            alert.show()

        }
    }

    override func viewDidLoad() {
        super.viewDidLoad()
        // Do any additional setup after loading the view, typically from a nib.

        // スタンプ初期化
        let _ = stamps.map { $0.isHidden = true }


    }

    override func didReceiveMemoryWarning() {
        super.didReceiveMemoryWarning()
        // Dispose of any resources that can be recreated.
    }


    // スタンプ台を揺らす。amount = 揺れ幅
    func vibrate(amount: Float ,view: UIView) {
        if amount > 0 {
            var animation: CABasicAnimation
            animation = CABasicAnimation(keyPath: "transform.rotation")
            animation.duration = 0.1
            animation.fromValue = amount * Float(M_PI) / 180.0
            animation.toValue = 0 - (animation.fromValue as! Float)
            animation.repeatCount = 1.0
            animation.autoreverses = true
            view.layer .add(animation, forKey: "VibrateAnimationKey")
        }
        else {
            view.layer.removeAnimation(forKey: "VibrateAnimationKey")
        }
    }

    // スタンプ押下
    func doStamp(stamp:UIImageView) {

        // 透明にする
        stamp.alpha = 0.0
        // 表示
        stamp.isHidden = false
        // サイズと位置情報
        let b = stamp.bounds

        UIView.animate(withDuration: 0.05,
                       delay:0.0,
                       usingSpringWithDamping:0.2,
                       initialSpringVelocity:10,
                       options:[],animations:{
                            // サイズを大きくする
                            stamp.bounds = CGRect(x:b.origin.x,
                                                  y:b.origin.y,
                                                  width:b.size.width + 130,
                                                  height:b.size.height + 130)
                        },
                        completion: nil)


         UIView.animate(withDuration: 0.05,
                        delay: 0.8,
                        usingSpringWithDamping: 1.0,
                        initialSpringVelocity: 90,
                        options: [], animations: {
                            // サイズを元に戻す
                            stamp.bounds = CGRect(x:b.origin.x,
                                                  y:b.origin.y,
                                                  width:b.size.width,
                                                  height:b.size.height)
                            // 透過度を元に戻す
                            stamp.alpha = 1.0
                        },
                        completion:{ finished in
                            // 台紙を揺らす
                            self.vibrate(amount: 3.0 ,view: self.stampBaseView)
                        })
    }

}
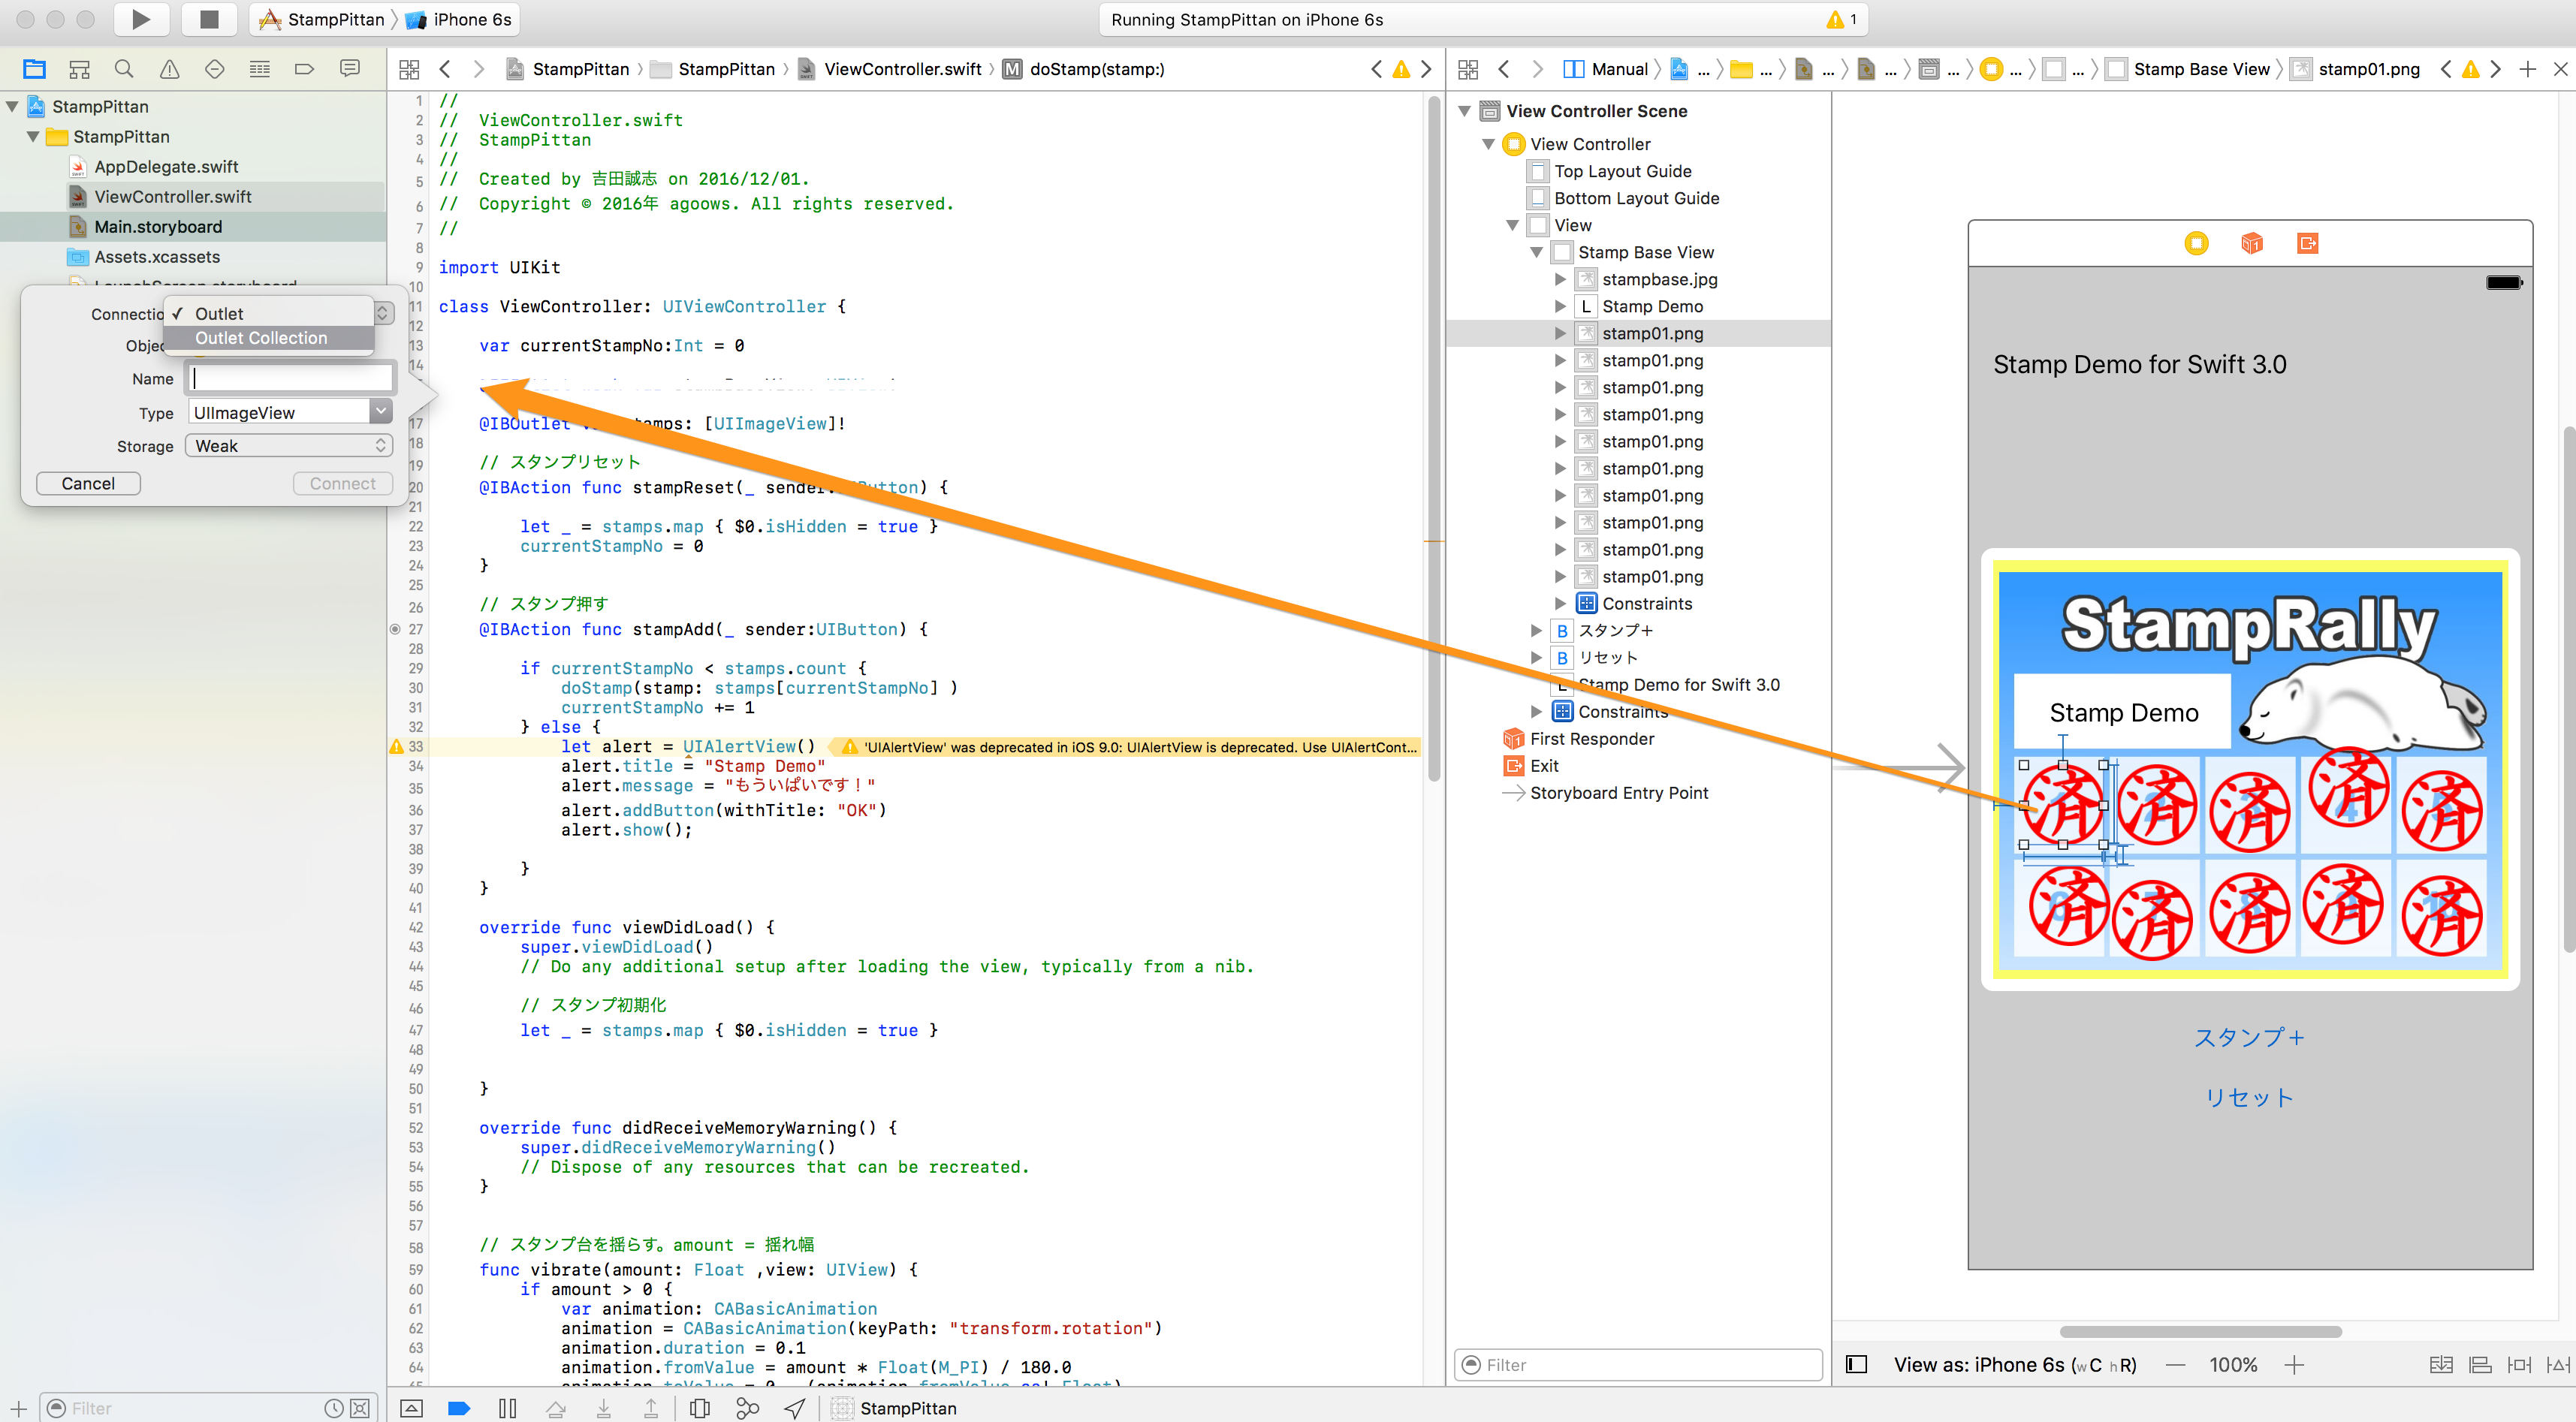
4.アクション・アウトレット接続
コードと部品を接続します。(アウトレットコレクションの接続方法は下部の補足参照)
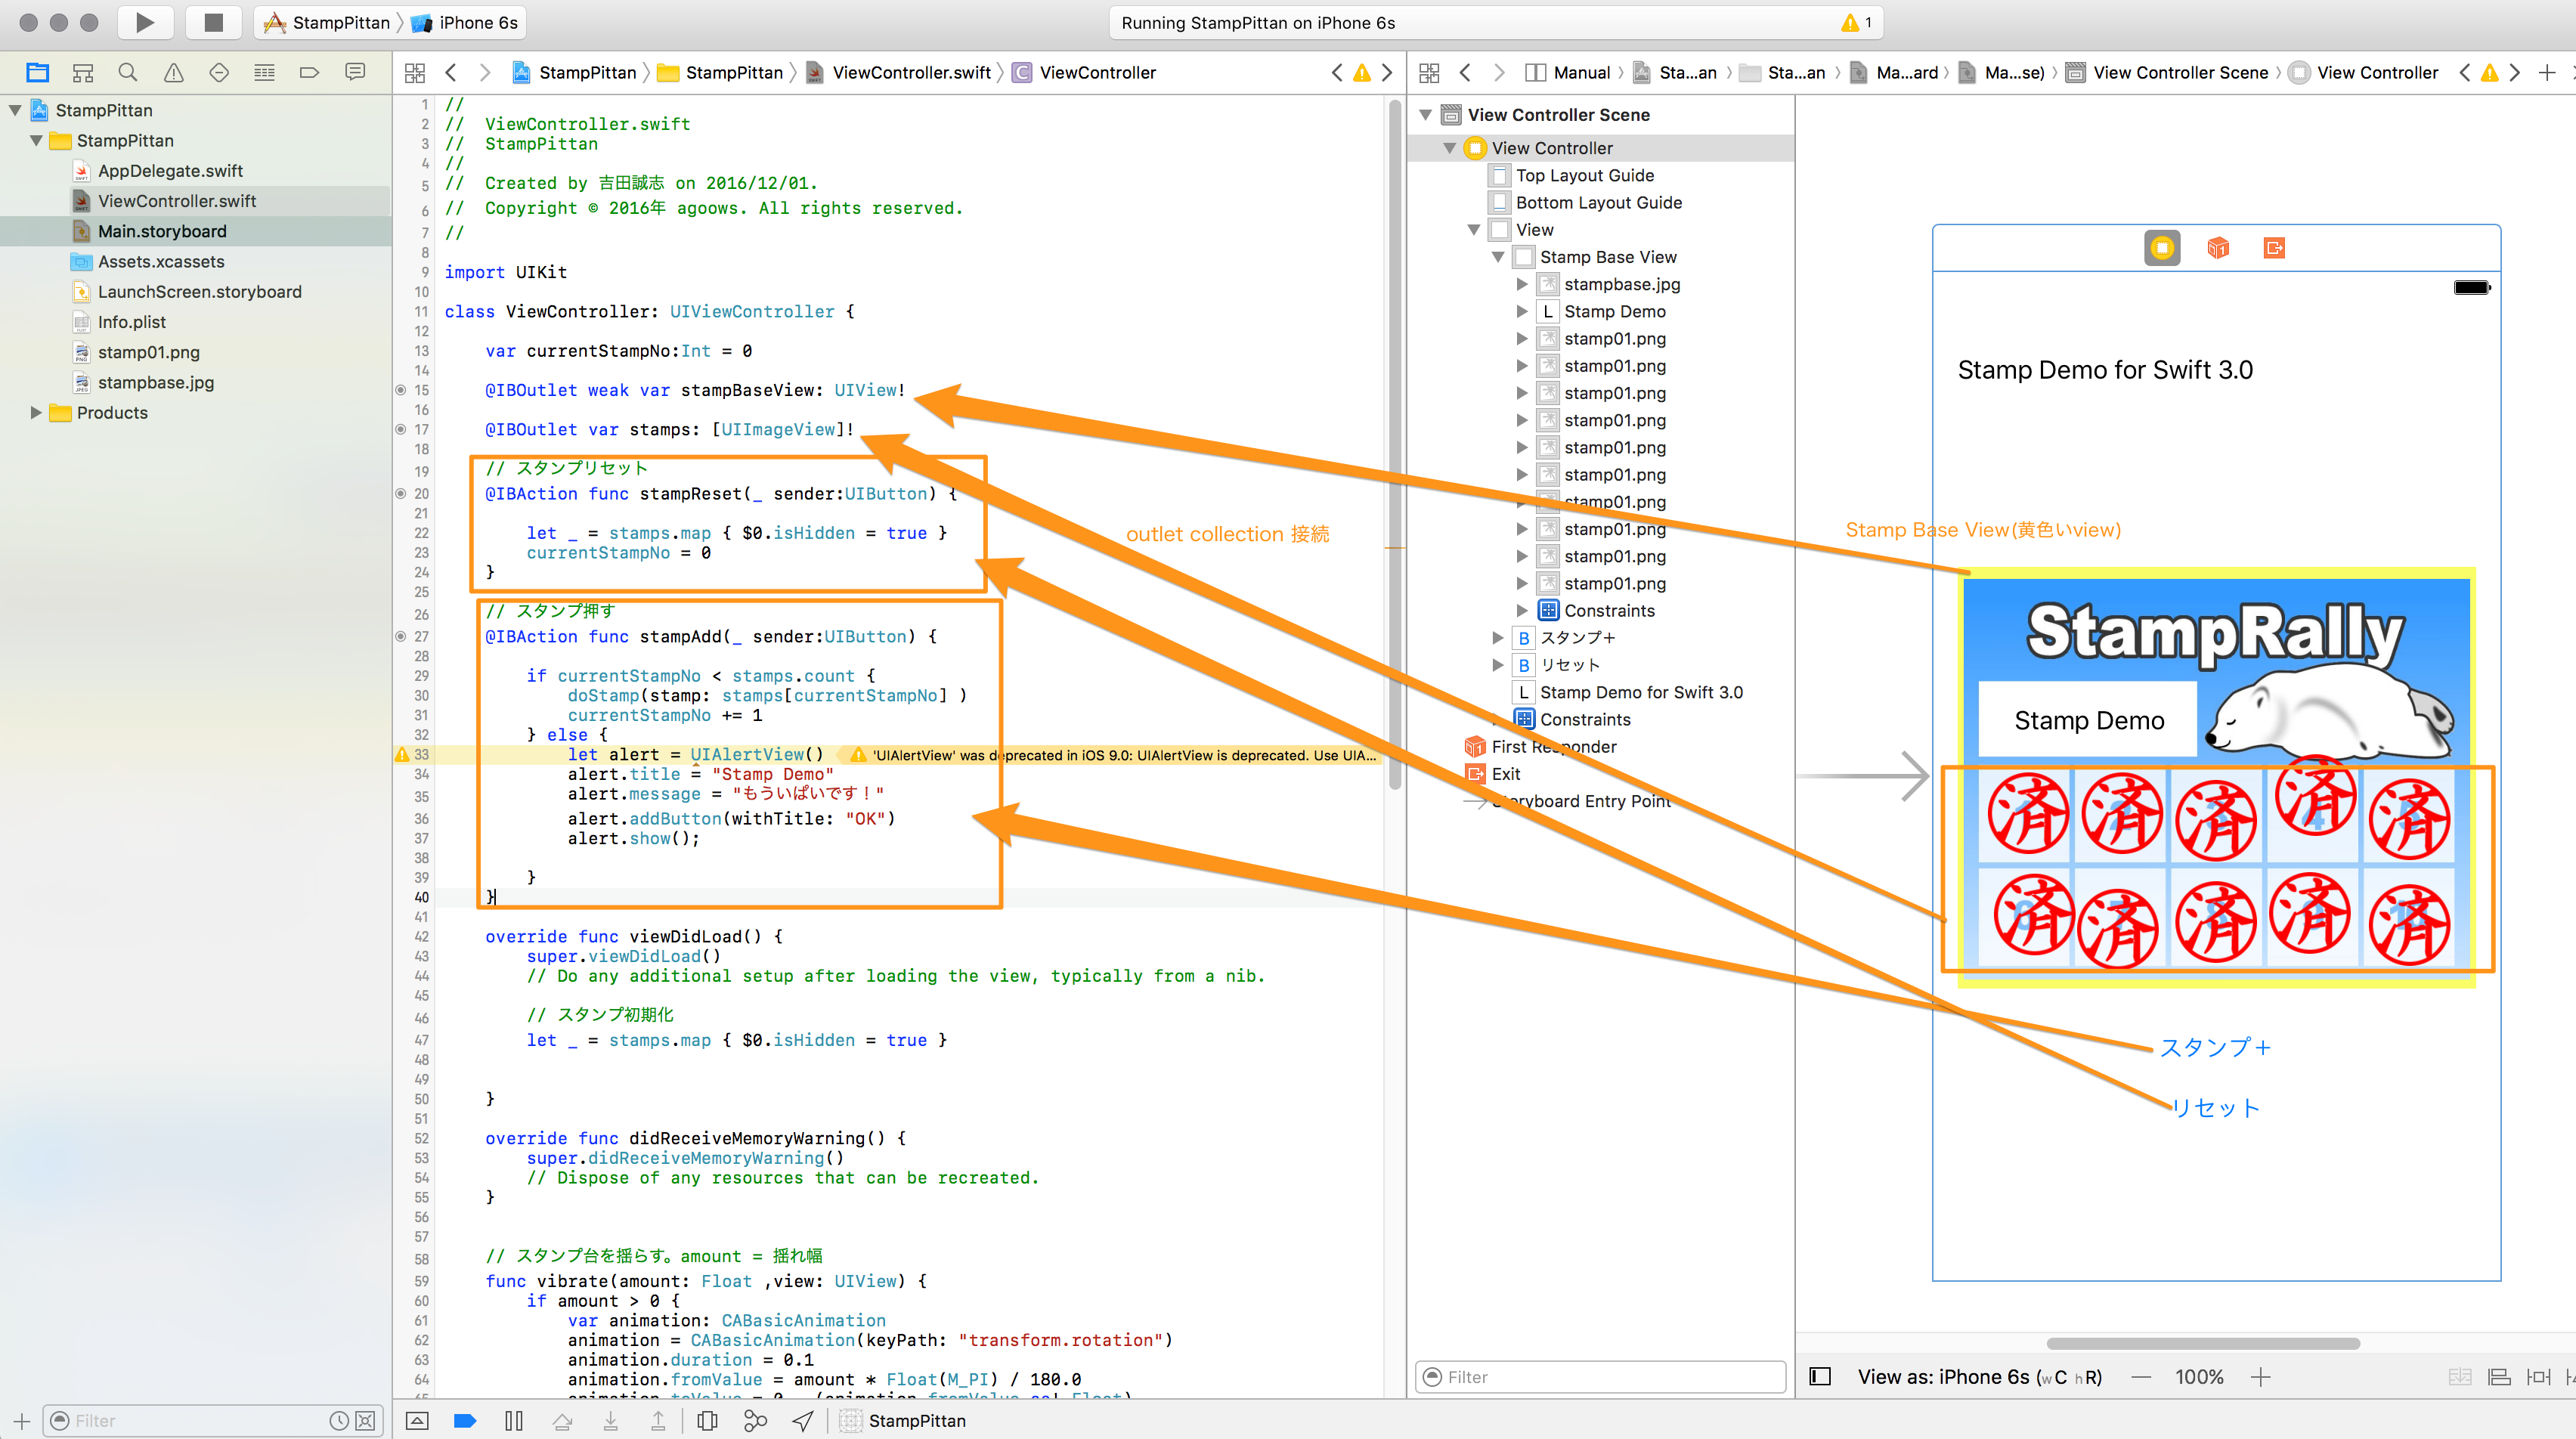
5.完成!
[スタンプ+]ボタンでスタンプが一つ増えます。10個を超えるとダイアログが表示されます。[リセット]ボタンで初期化です。
補足(Outlet Collection)
ソース上の作成したいところへ1つ目の部品をcontrolを押しながらドラッグ。「connection」で「Outlet Collection」を選択します。変数が作成されたら他の部品を順に接続していきます。接続順でインデックスが作成されるようです。
![]() 画像素材として以下のサイトさまから利用させてもらいました
画像素材として以下のサイトさまから利用させてもらいました
スタンプ台紙素材
イラストボックス
http://www.illust-box.jp/
スタンプ素材
無料素材倶楽部
http://sozai.7gates.net/
プロジェクト一式をGitHubに置いときます