OAuthSwift本家のデモは素晴らしいのですが、複数OS、対応している全てのソーシャルのデモを兼ねている都合上、外部ファイル定義や#ifdefブロック、extensionのコードが多めで、自分のプロジェクトに必要なとこだけ取り入れようとした時、パッと見どこをどう摘めばよいのか分かりづらかった。OAuthSwift自体のシンプルなサンプルも意外と少ないなと思ったので掲載します。
前提
- Twitterサービスは登録済み
- **OAuthSwift(https://github.com/OAuthSwift/OAuthSwift)**はインスートル済み
- Twitter OAuth 1.1です
1. プロジェクトの新規作成
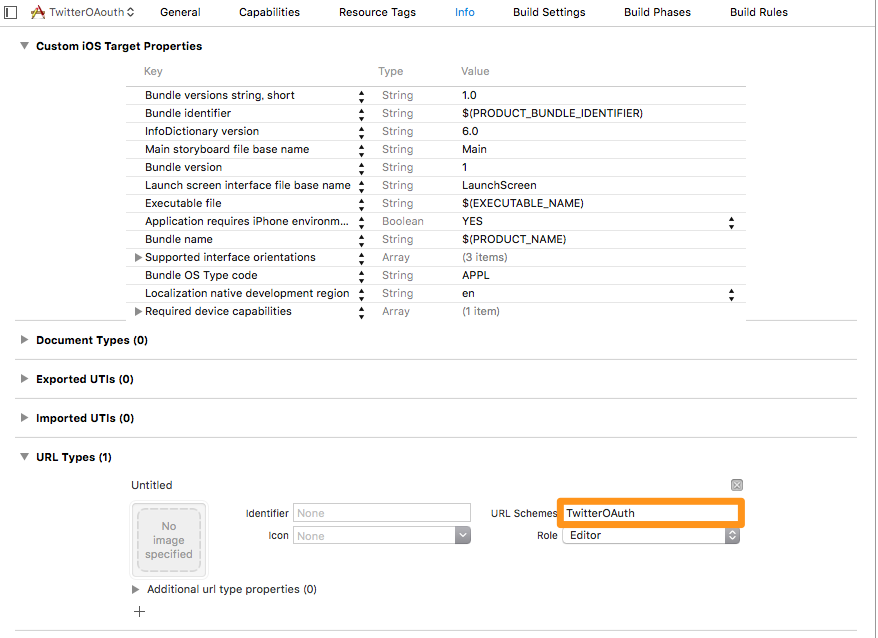
「Single View Application」がテンプレです。URL Schemesの設定をしておきます。
2. AppDelegate.swift
AppDelegate.swift
//
//  AppDelegate.swift
//  TwitterOAouth
//
//

import UIKit
import OAuthSwift

@UIApplicationMain
class AppDelegate: UIResponder, UIApplicationDelegate {

    var window: UIWindow?


    func application(_ application: UIApplication, didFinishLaunchingWithOptions launchOptions: [UIApplicationLaunchOptionsKey: Any]?) -> Bool {
        // Override point for customization after application launch.
        return true
    }

    func applicationWillResignActive(_ application: UIApplication) {
        // Sent when the application is about to move from active to inactive state. This can occur for certain types of temporary interruptions (such as an incoming phone call or SMS message) or when the user quits the application and it begins the transition to the background state.
        // Use this method to pause ongoing tasks, disable timers, and invalidate graphics rendering callbacks. Games should use this method to pause the game.
    }

    func applicationDidEnterBackground(_ application: UIApplication) {
        // Use this method to release shared resources, save user data, invalidate timers, and store enough application state information to restore your application to its current state in case it is terminated later.
        // If your application supports background execution, this method is called instead of applicationWillTerminate: when the user quits.
    }

    func applicationWillEnterForeground(_ application: UIApplication) {
        // Called as part of the transition from the background to the active state; here you can undo many of the changes made on entering the background.
    }

    func applicationDidBecomeActive(_ application: UIApplication) {
        // Restart any tasks that were paused (or not yet started) while the application was inactive. If the application was previously in the background, optionally refresh the user interface.
    }

    func applicationWillTerminate(_ application: UIApplication) {
        // Called when the application is about to terminate. Save data if appropriate. See also applicationDidEnterBackground:.
    }

    // **** 追加 *****
    func application(_ application: UIApplication, open url: URL, sourceApplication: String?, annotation: Any) -> Bool {
        applicationHandle(url: url)
        return true
    }

}

// MARK: handle callback url
extension AppDelegate {

    func applicationHandle(url: URL) {
        if (url.host == "oauth-callback") {
            OAuthSwift.handle(url: url)
        } else {
            // Google provider is the only one wuth your.bundle.id url schema.
            OAuthSwift.handle(url: url)
        }
    }
}
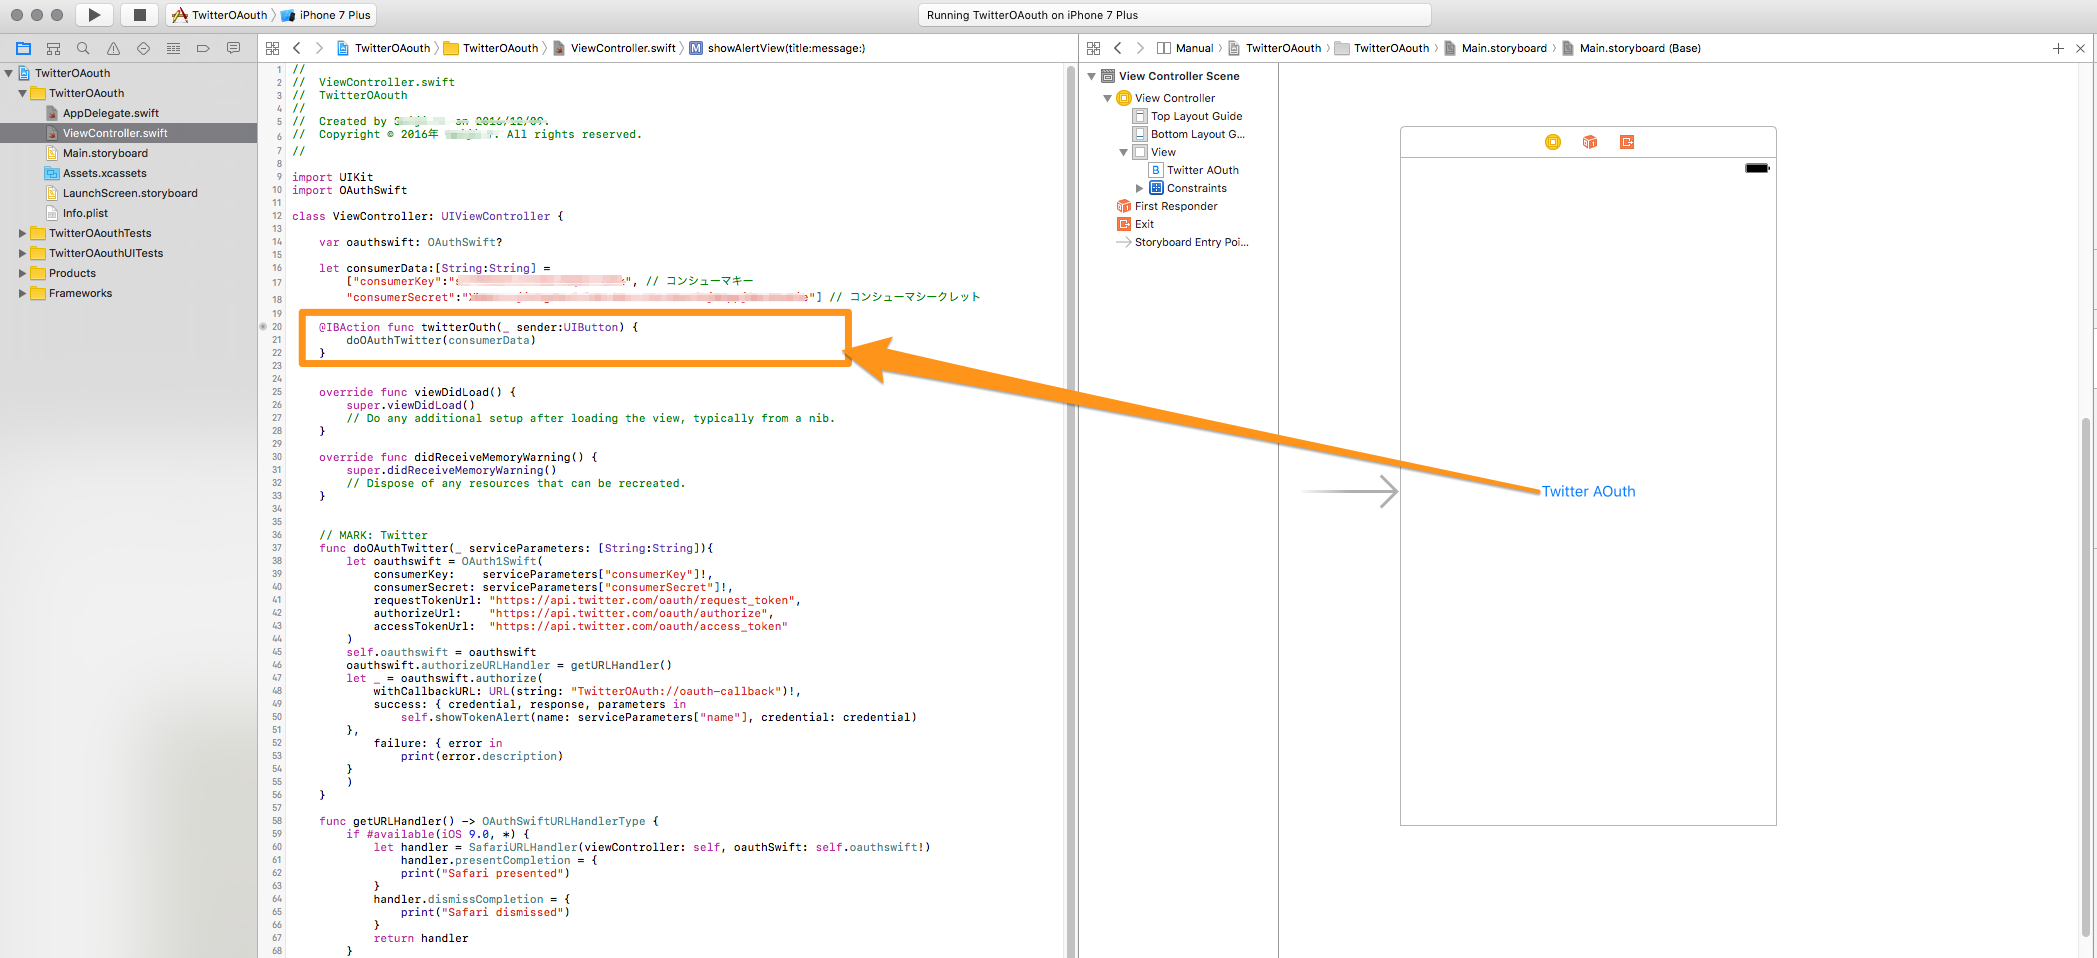
3. ViewController.swift
コンシューマキーとコンシューマシークレットには自身のサービスのものに置き換えます。oauthswift.authorizeのwithCallbackURLに設定するのはコンシューマ登録時のコールバックURLではありませんので注意です。
//
// ViewController.swift
// TwitterOAouth
//
//
import UIKit
import OAuthSwift
class ViewController: UIViewController {
var oauthswift: OAuthSwift?
let consumerData:[String:String] =
["consumerKey":"xxxxxxxxxxxxxxxxxxxxxxxxxxxx", // コンシューマキー
"consumerSecret":"xxxxxxxxxxxxxxxxxxxxxxxxxxxxxxxxxxxxxxxxxxxx"] // コンシューマシークレット
@IBAction func twitterAuth(_ sender:UIButton) {
doOAuthTwitter(consumerData)
}
override func viewDidLoad() {
super.viewDidLoad()
// Do any additional setup after loading the view, typically from a nib.
// オートレイアウト使わない場合のコード
/*
let button = UIButton()
button.setTitle("Twitter OAuth", for: .normal)
button.setTitleColor(UIColor.blue, for: .normal)
button.titleLabel?.font = UIFont.systemFont(ofSize: 15)
button.bounds = CGRect(x:0,y:0,width:120,height:30)
button.center = self.view.center
button.addTarget(self, action: #selector(ViewController.twitterAuth(_:)), for: .touchUpInside)
self.view.addSubview(button)
*/
}
override func didReceiveMemoryWarning() {
super.didReceiveMemoryWarning()
// Dispose of any resources that can be recreated.
}
// MARK: Twitter
func doOAuthTwitter(_ serviceParameters: [String:String]){
let oauthswift = OAuth1Swift(
consumerKey: serviceParameters["consumerKey"]!,
consumerSecret: serviceParameters["consumerSecret"]!,
requestTokenUrl: "https://api.twitter.com/oauth/request_token",
authorizeUrl: "https://api.twitter.com/oauth/authorize",
accessTokenUrl: "https://api.twitter.com/oauth/access_token"
)
self.oauthswift = oauthswift
oauthswift.authorizeURLHandler = getURLHandler()
let _ = oauthswift.authorize(
withCallbackURL: URL(string: "TwitterOAuth://oauth-callback")!,
success: { credential, response, parameters in
self.showTokenAlert(name: serviceParameters["name"], credential: credential)
},
failure: { error in
print(error.description)
}
)
}
func getURLHandler() -> OAuthSwiftURLHandlerType {
if #available(iOS 9.0, *) {
let handler = SafariURLHandler(viewController: self, oauthSwift: self.oauthswift!)
handler.presentCompletion = {
print("Safari presented")
}
handler.dismissCompletion = {
print("Safari dismissed")
}
return handler
}
return OAuthSwiftOpenURLExternally.sharedInstance
}
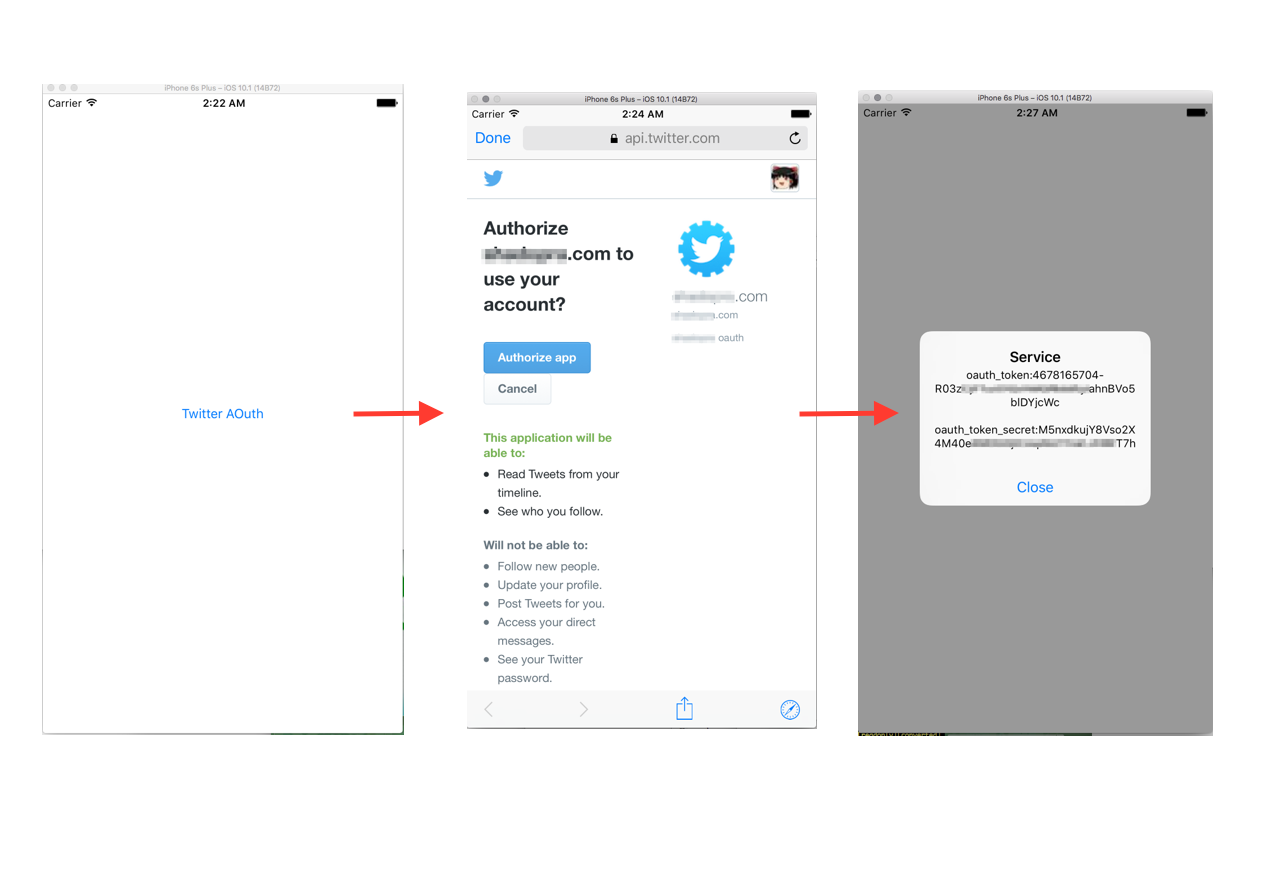
func showTokenAlert(name: String?, credential: OAuthSwiftCredential) {
var message = "oauth_token:\(credential.oauthToken)"
if !credential.oauthTokenSecret.isEmpty {
message += "\n\noauth_token_secret:\(credential.oauthTokenSecret)"
}
self.showAlertView(title: name ?? "Service", message: message)
}
func showAlertView(title: String, message: String) {
let alert = UIAlertController(title: title, message: message, preferredStyle: UIAlertControllerStyle.alert)
alert.addAction(UIAlertAction(title: "Close", style: UIAlertActionStyle.default, handler: nil))
self.present(alert, animated: true, completion: nil)
}
}
4. ストーリーボードで画面を作成
真ん中にボタンがあるだけです。twitterOuthファンクションに紐付けます。ソース中の「オートレイアウト使わない場合のコード」を使用する場合、このステップは省略できます。
5. 実行してみる