はじめに
AWSのスティッキーセッションは、ロードバランサーを介した通信で特定のクライアントが同じターゲット(例:EC2インスタンス)に接続され続けるようにする機能です。
この設定は、セッションの一貫性が求められるアプリケーション(例:ショッピングカートやログインセッション)で特に有用です。
本記事では、Terraformを使用してAWSのApplication Load Balancer(ALB)にスティッキーセッションを有効にする方法をご紹介します。
前提整理
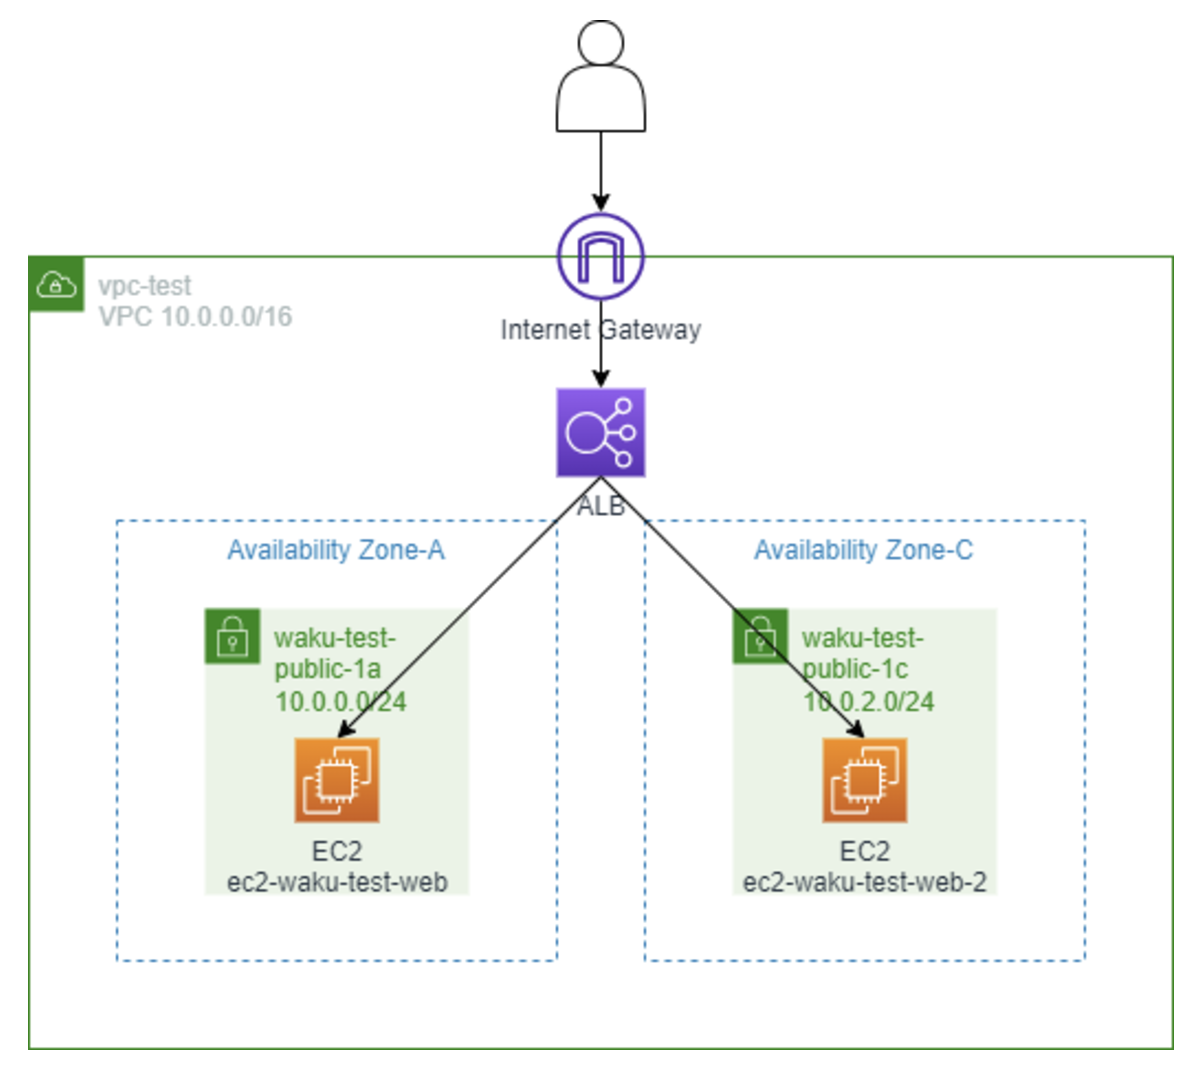
前回の記事では、EC2インスタンスの起動からApplication Load Balancer(ALB)の設定までを、検証目的でシンプルに構成しました。

引用画像:https://canmakewakuwaku.com/elb_alb/
ステッキーセッションとは?
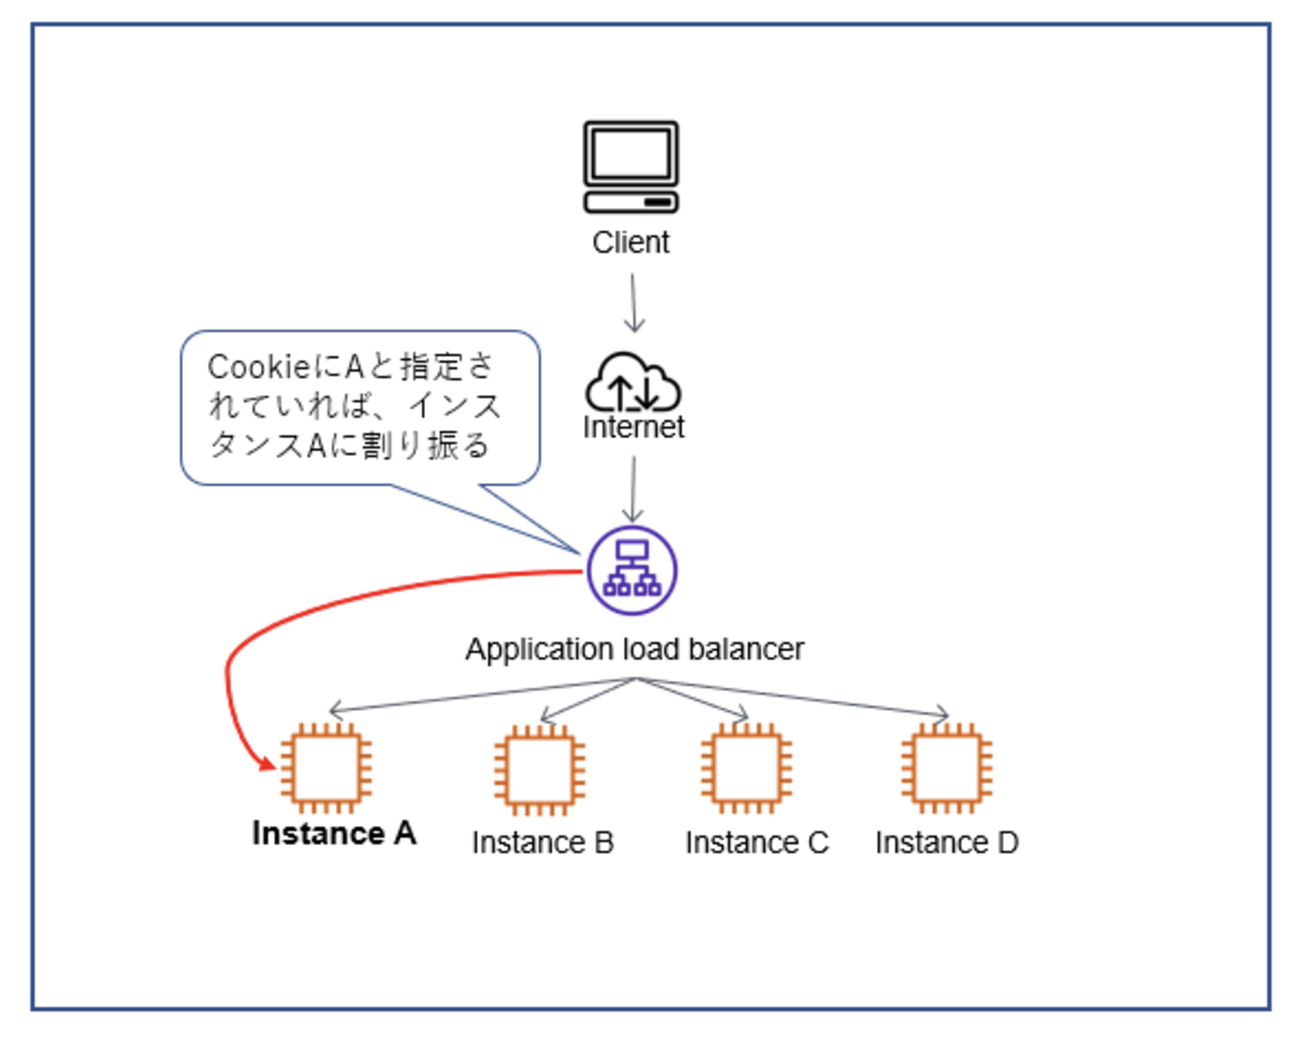
スティッキーセッション(セッションスティッキネスとも呼ばれます)は、ロードバランサーが特定のクライアント(IPやブラウザなど)のリクエストを、同じターゲット(サーバーやインスタンス)に送信し続ける仕組みです。

引用画像:https://www.sunnycloud.jp/column/20210217-01/
これにより、ショッピングカートやログイン状態など、ユーザーセッション情報を保持したまま処理を継続できます。
前回の記事でコード化した部分に、今回はステッキーセッションの設定コードを追加して技術検証を行います。
ステッキーセッションのコード追加
スティッキーセッションは、ターゲットグループの設定で有効にできます。既存の aws_lb_target_group リソースに stickiness ブロックを追加することで設定します。
# ターゲットグループ作成 (EC2インスタンスをターゲットに)
resource "aws_lb_target_group" "main_target_group" {
  name     = "terraform-main-target-group"
  port     = 80
  protocol = "HTTP"
  vpc_id   = aws_vpc.main_vpc.id

  health_check {
    interval = 30
    path     = "/"
    protocol = "HTTP"
    timeout  = 5
    healthy_threshold   = 3
    unhealthy_threshold = 3
  }

  # スティッキーセッション設定
  stickiness {
    type            = "lb_cookie"  # ロードバランサークッキーを使用
    enabled         = true         # 有効化
    cookie_duration = 86400        # クッキーの有効期間 (秒)
  }

  tags = {
    Name = "terraform-main-target-group"
  }
}
このブロックにより、ロードバランサーが生成するクッキーを使用して、クライアントが同じターゲットに接続され続けます。
実際に完成したコード
以下は、Terraformで作成したコードです。コードは少し長めですが、内容としてはシンプルで、理解しやすい構成になっています。
provider "aws" {
  region = "ap-northeast-1"  # 東京リージョンを指定
}

# VPC作成
resource "aws_vpc" "main_vpc" {
  cidr_block           = "10.0.0.0/16"
  enable_dns_support   = true
  enable_dns_hostnames = true

  tags = {
    Name = "terraform-main-vpc"
  }
}

# パブリックサブネット1作成
resource "aws_subnet" "public_subnet_1" {
  vpc_id                  = aws_vpc.main_vpc.id
  cidr_block              = "10.0.1.0/24"
  map_public_ip_on_launch = true

  tags = {
    Name = "terraform-public-subnet-1"
  }
}

# パブリックサブネット2作成
resource "aws_subnet" "public_subnet_2" {
  vpc_id                  = aws_vpc.main_vpc.id
  cidr_block              = "10.0.2.0/24"
  map_public_ip_on_launch = true

  tags = {
    Name = "terraform-public-subnet-2"
  }
}

# インターネットゲートウェイ作成
resource "aws_internet_gateway" "main_igw" {
  vpc_id = aws_vpc.main_vpc.id

  tags = {
    Name = "terraform-main-igw"
  }
}

# ルートテーブル作成 (パブリックルート)
resource "aws_route_table" "public_route_table" {
  vpc_id = aws_vpc.main_vpc.id

  route {
    cidr_block = "0.0.0.0/0"
    gateway_id = aws_internet_gateway.main_igw.id
  }

  tags = {
    Name = "terraform-public-route-table"
  }
}

# サブネット1とルートテーブルを関連付ける
resource "aws_route_table_association" "public_association_1" {
  subnet_id      = aws_subnet.public_subnet_1.id
  route_table_id = aws_route_table.public_route_table.id
}

# サブネット2とルートテーブルを関連付ける
resource "aws_route_table_association" "public_association_2" {
  subnet_id      = aws_subnet.public_subnet_2.id
  route_table_id = aws_route_table.public_route_table.id
}

# セキュリティグループ作成
resource "aws_security_group" "public_sg" {
  vpc_id = aws_vpc.main_vpc.id

  ingress {
    from_port   = 80
    to_port     = 80
    protocol    = "tcp"
    cidr_blocks = ["0.0.0.0/0"]
  }

  ingress {
    from_port   = 22
    to_port     = 22
    protocol    = "tcp"
    cidr_blocks = ["0.0.0.0/0"]
  }

  egress {
    from_port   = 0
    to_port     = 0
    protocol    = "-1"
    cidr_blocks = ["0.0.0.0/0"]
  }

  tags = {
    Name = "terraform-public-sg"
  }
}

# EC2インスタンス1作成
resource "aws_instance" "apache_ec2_1" {
  ami                         = "ami-0b6fe957a0eb4c1b9"
  instance_type               = "t2.micro"
  subnet_id                   = aws_subnet.public_subnet_1.id
  security_groups             = [aws_security_group.public_sg.id]
  associate_public_ip_address = true

  user_data = <<-EOF
    #!/bin/bash
    yum update -y
    yum install -y httpd
    systemctl start httpd
    systemctl enable httpd
    echo "<html><body><h1>自分に負けるな〜(Aサイト)</h1></body></html>" > /var/www/html/index.html
  EOF

  depends_on = [aws_security_group.public_sg]

  tags = {
    Name = "terraform-apache-ec2-1"
  }
}

# EC2インスタンス2作成
resource "aws_instance" "apache_ec2_2" {
  ami                         = "ami-0b6fe957a0eb4c1b9"
  instance_type               = "t2.micro"
  subnet_id                   = aws_subnet.public_subnet_2.id
  security_groups             = [aws_security_group.public_sg.id]
  associate_public_ip_address = true

  user_data = <<-EOF
    #!/bin/bash
    yum update -y
    yum install -y httpd
    systemctl start httpd
    systemctl enable httpd
    echo "<html><body><h1>自分に負けるな〜(Bサイト)</h1></body></html>" > /var/www/html/index.html
  EOF

  depends_on = [aws_security_group.public_sg]

  tags = {
    Name = "terraform-apache-ec2-2"
  }
}

# アプリケーションロードバランサー(ALB)作成
resource "aws_lb" "main_alb" {
  name               = "terraform-main-alb"
  internal           = false
  load_balancer_type = "application"
  security_groups    = [aws_security_group.public_sg.id]
  subnets            = [aws_subnet.public_subnet_1.id, aws_subnet.public_subnet_2.id]

  enable_deletion_protection = false

  tags = {
    Name = "terraform-main-alb"
  }
}

# ターゲットグループ作成
resource "aws_lb_target_group" "main_target_group" {
  name     = "terraform-main-target-group"
  port     = 80
  protocol = "HTTP"
  vpc_id   = aws_vpc.main_vpc.id

  health_check {
    interval = 30
    path     = "/"
    protocol = "HTTP"
    timeout  = 5
    healthy_threshold   = 3
    unhealthy_threshold = 3
  }

  # スティッキーセッション設定
  stickiness {
    type            = "lb_cookie"  # ロードバランサークッキーを使用
    enabled         = true         # 有効化
    cookie_duration = 86400        # クッキーの有効期間 (秒)
  }

  tags = {
    Name = "terraform-main-target-group"
  }
}

# ALBのリスナー作成
resource "aws_lb_listener" "http_listener" {
  load_balancer_arn = aws_lb.main_alb.arn
  port              = "80"
  protocol          = "HTTP"

  default_action {
    type             = "forward"
    target_group_arn = aws_lb_target_group.main_target_group.arn
  }
}

# EC2インスタンス1をターゲットグループに追加
resource "aws_lb_target_group_attachment" "ec2_attachment_1" {
  target_group_arn = aws_lb_target_group.main_target_group.arn
  target_id        = aws_instance.apache_ec2_1.id
  port             = 80
}

# EC2インスタンス2をターゲットグループに追加
resource "aws_lb_target_group_attachment" "ec2_attachment_2" {
  target_group_arn = aws_lb_target_group.main_target_group.arn
  target_id        = aws_instance.apache_ec2_2.id
  port             = 80
}
実際にやってみた
ここでは、CloudShellでの Terraform のセットアップが完了していることを前提に進めます。
まだセットアップが完了していない方は、過去の記事を参考にしてセットアップを実施してください。
まず、以下のコマンドを入力して、main.tfというファイルを作成します。
vi main.tf
viでは、ファイル編集後にESCキーを押し、:wqで保存して終了します。
# 上記の完成した全体のコードをコピーして貼り付けてください。
次に、以下のコマンドで Terraform を初期化します。
terraform init
実際に、以下のように「Terraform has been successfully initialized!」と表示され、成功が確認できました。
Partner and community providers are signed by their developers.
If you'd like to know more about provider signing, you can read about it here:
https://www.terraform.io/docs/plugins/signing.html

Terraform has created a lock file .terraform.lock.hcl to record the provider
selections it made above. Include this file in your version control repository
so that Terraform can guarantee to make the same selections by default when
you run "terraform init" in the future.

Terraform has been successfully initialized!

You may now begin working with Terraform. Try running "terraform plan" to see
any changes that are required for your infrastructure. All Terraform commands
should now work.

If you ever set or change modules or backend configuration for Terraform,
rerun this command to reinitialize your working directory. If you forget, other
commands will detect it and remind you to do so if necessary.
次に、以下のコマンドを入力して、確認メッセージが表示されたら「yes」と入力します。
terraform apply
その後、以下のように「Apply complete! Resources: xx added, 0 changed, 0 destroyed.」と表示され、作成が成功したことが確認できました。
デプロイ後の動作確認
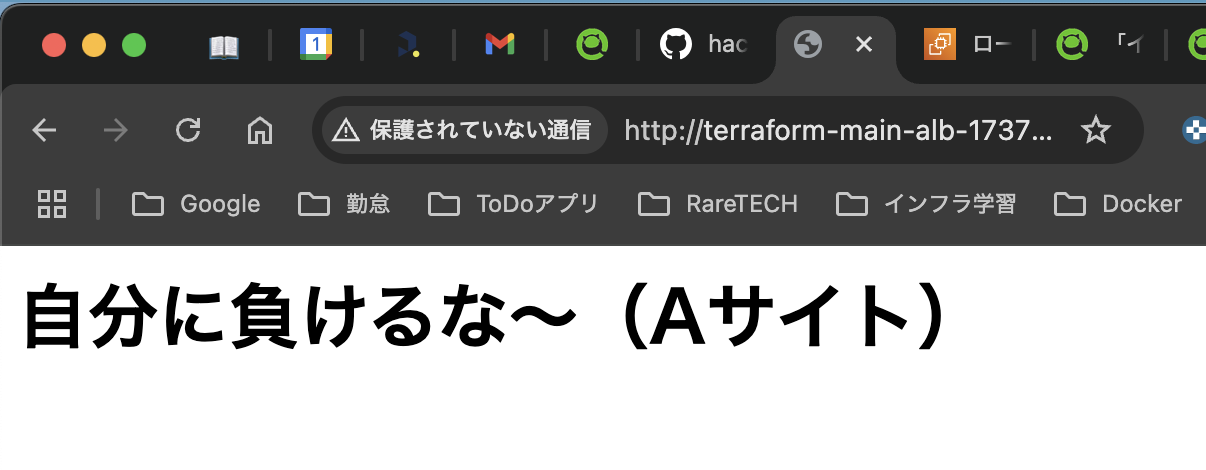
ALBの詳細画面からDNS名を取得し、ブラウザでアクセスして、リクエストが固定されているか確認します。
私の環境では、http://terraform-main-alb-1729934941.ap-northeast-1.elb.amazonaws.com/がロードバランサーのDNS名ですので、ブラウザで確認してみます。
何度かアクセスしても「自分に負けるな〜(Aサイト)」と表示され、ALB側でリクエストが同じターゲット(サーバーやインスタンス)に送信されていることが確認できました。
これで、スティッキーセッションのコード化の検証は大成功です!
まとめ
ステッキーセッションの設定は、ユーザー体験を向上させる重要な要素です。
Terraformを使用することで、この設定をコードベースで管理し、再現性の高いインフラ構築を実現できます。
今回の記事で紹介した方法を活用し、スティッキーセッションが有効なロードバランシングを構築していただき、この記事が誰かの技術の支えになれば幸いです!
おまけ:手動での設定
ちなみに、手動での設定も非常に簡単です。ターゲットグループの「属性」タブから維持設定をオンにし、維持設定のタイプを選択するだけです。
関連記事
Terraformについての記事はいくつか投稿しているので興味のあるものがあれば、読んでみてください!


