はじめに
前回の記事では、AWSのインフラをTerraformでコード化することにチャレンジしました。
特に、EC2インスタンス周りの設定で構文エラーに悩まされ、エラー調査に予想以上の時間を費やしました。
この記事では、パブリックサブネットにApacheが導入されたEC2インスタンスを構築し、ブラウザからアクセスしてテストページが表示されることをゴールとします。
自動化する構成について
今回は、AWSのインフラを構築するために、以下の構成を自動化しました。
-
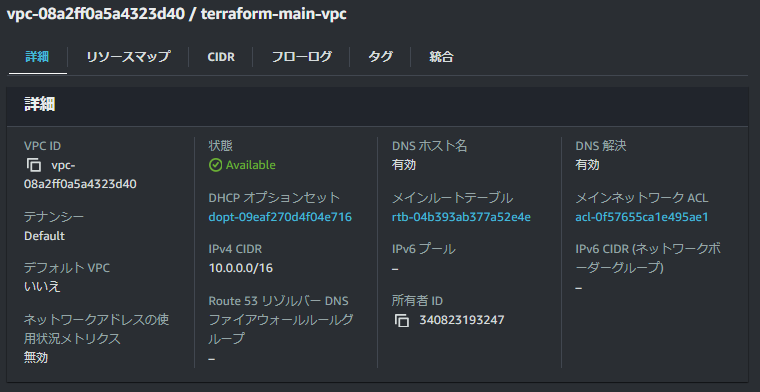
VPC(仮想プライベートクラウド):
10.0.0.0/16のCIDRを持つネットワークを構成します。 -
サブネット:
パブリックサブネット(10.0.1.0/24)を作成し、EC2インスタンスを配置します。 -
インターネットゲートウェイ(IGW):
インターネットとVPCを接続します。 -
ルートテーブル:
サブネットからインターネットへのルートを設定します。 -
セキュリティグループ:
HTTP(80番ポート)およびSSH(22番ポート)アクセスを許可します。 -
EC2インスタンス:
Amazon Linux 2を使用し、Apache HTTPサーバーをインストールします。
実際に作成したVPCのリソースマップは以下の通りで、パブリックサブネットにApacheが導入されたEC2インスタンスが構築されます。
この構成を手動で作成するのは時間がかかり、管理も煩雑になります。
Terraformを使うことでコードとして管理でき、再現性のあるインフラを実現できます。
追加したコード
今回は特にEC2インスタンスの作成に焦点を当てて解説します。
前回の記事では他のコードについても紹介していますので、そちらも参考にしてみてください。
また、この記事ではCloudShellにTerraformを導入して、実際に手を動かしながらハンズオンで進めています。
EC2インスタンス作成のコード
ここでの注意点として、東京リージョンのAmazon Linux 2 AMIを指定していますが、実際に使用するAMIのIDに変更してください。
resource "aws_instance" "apache_ec2" {
  ami                         = "ami-0b6fe957a0eb4c1b9" # Amazon Linux 2 AMI (Tokyo region)
  instance_type               = "t2.micro"
  subnet_id                   = aws_subnet.public_subnet.id
  security_groups             = [aws_security_group.public_sg.id] # 修正: IDを参照
  associate_public_ip_address = true # パブリックIPv4アドレスを有効化

  user_data = <<-EOF
    #!/bin/bash
    yum update -y
    yum install -y httpd
    systemctl start httpd
    systemctl enable httpd
    echo "<html><body><h1>Welcome to Apache Server powered by Terraform!</h1></body></html>" > /var/www/html/index.html
  EOF

  depends_on = [aws_security_group.public_sg] # 修正: セキュリティグループに依存

  tags = {
    Name = "terraform-apache-ec2"
  }
}
また、associate_public_ip_addressをtrueに設定することで、EC2インスタンスにパブリックIPアドレスが付与されます。
完成した全体のコード
こちらが、前回の内容を踏まえて完成したTerraformコード全体です。
provider "aws" {
  region = "ap-northeast-1" # Tokyo region
}

# VPC作成
resource "aws_vpc" "main_vpc" {
  cidr_block           = "10.0.0.0/16"
  enable_dns_support   = true
  enable_dns_hostnames = true

  tags = {
    Name = "terraform-main-vpc"
  }
}

# サブネット作成 (パブリックサブネット)
resource "aws_subnet" "public_subnet" {
  vpc_id                  = aws_vpc.main_vpc.id
  cidr_block              = "10.0.1.0/24"
  map_public_ip_on_launch = true

  tags = {
    Name = "terraform-public-subnet"
  }
}

# インターネットゲートウェイ作成
resource "aws_internet_gateway" "main_igw" {
  vpc_id = aws_vpc.main_vpc.id

  tags = {
    Name = "terraform-main-igw"
  }
}

# ルートテーブル作成
resource "aws_route_table" "public_route_table" {
  vpc_id = aws_vpc.main_vpc.id

  route {
    cidr_block = "0.0.0.0/0"
    gateway_id = aws_internet_gateway.main_igw.id
  }

  tags = {
    Name = "terraform-public-route-table"
  }
}

# サブネットとルートテーブルの関連付け
resource "aws_route_table_association" "public_association" {
  subnet_id      = aws_subnet.public_subnet.id
  route_table_id = aws_route_table.public_route_table.id
}

# セキュリティグループ作成
resource "aws_security_group" "public_sg" {
  vpc_id = aws_vpc.main_vpc.id

  ingress {
    from_port   = 80
    to_port     = 80
    protocol    = "tcp"
    cidr_blocks = ["0.0.0.0/0"] # HTTPアクセスを許可
  }

  ingress {
    from_port   = 22
    to_port     = 22
    protocol    = "tcp"
    cidr_blocks = ["0.0.0.0/0"] # SSHアクセスを許可
  }

  egress {
    from_port   = 0
    to_port     = 0
    protocol    = "-1"
    cidr_blocks = ["0.0.0.0/0"] # すべてのアウトバウンドを許可
  }

  tags = {
    Name = "terraform-public-sg"
  }
}

# EC2インスタンス作成
resource "aws_instance" "apache_ec2" {
  ami                         = "ami-0b6fe957a0eb4c1b9" # Amazon Linux 2 AMI (Tokyo region)
  instance_type               = "t2.micro"
  subnet_id                   = aws_subnet.public_subnet.id
  security_groups             = [aws_security_group.public_sg.id] # 修正: IDを参照
  associate_public_ip_address = true # パブリックIPv4アドレスを有効化

  user_data = <<-EOF
    #!/bin/bash
    yum update -y
    yum install -y httpd
    systemctl start httpd
    systemctl enable httpd
    echo "<html><body><h1>Welcome to Apache Server powered by Terraform!</h1></body></html>" > /var/www/html/index.html
  EOF

  depends_on = [aws_security_group.public_sg] # 修正: セキュリティグループに依存

  tags = {
    Name = "terraform-apache-ec2"
  }
}
VPC、サブネット、インターネットゲートウェイ、ルートテーブル、セキュリティグループ、EC2インスタンスを全てまとめて設定しています。
実際にやってみた
ここでは、CloudShellでのTerraformのセットアップが完了していることを前提に進めます。
まだセットアップが完了していない方は、過去の記事を参考にしてセットアップを実施してください。
まず、以下のコマンドを入力して、main.tfというファイルを作成します。
vi main.tf
viでは、ファイル編集後にESCキーを押し、:wqで保存して終了します。
# 上記の完成した全体のコードをコピーして貼り付けてください。
次に、以下のコマンドで Terraform を初期化します。
terraform init
実際に、以下のように「Terraform has been successfully initialized!」と表示され、成功が確認できました。
Partner and community providers are signed by their developers.

・・・(省略)

Terraform has been successfully initialized!
You may now begin working with Terraform. Try running "terraform plan" to see

・・・(省略)

rerun this command to reinitialize your working directory. If you forget, other
commands will detect it and remind you to do so if necessary.
次に、以下のコマンドを入力して、確認メッセージが表示されたら「yes」と入力します。
terraform apply
その後、以下のように「Apply complete! Resources: 7 added, 0 changed, 0 destroyed.」と表示され、作成が成功したことが確認できました。
検証結果の確認
これで作業は完了しましたので、実際にマネジメントコンソール上で確認します。VPCが想定通り作成されていることが確認できました。
また、コード内で作成したEC2インスタンスも確認できました。パブリックIPアドレスをブラウザに入力し、アクセスを確認してみます。
今回はあくまで検証のため、https通信ではなくhttp通信でアクセスしています。
http://35.73.225.105/
実際に、terraform-apache-ec2のindex.htmlファイルの内容が表示されていることを確認できました。
この確認をもって、検証は大成功です!
まとめ
今回は、Terraformを使ってAWSのEC2インスタンスを自動化する構成を作成しました。
構文エラーに悩まされながらも、無事にインフラをコード化することができました。
特に、セキュリティグループや依存関係の設定には注意が必要でしたが、Terraformのドキュメントを参照しながら、スムーズに進められました。
今後は、より複雑な構成に挑戦し、さらに自動化を進めていきたいと思います!
参考文献


