はじめに
前回の記事では、Go言語をDockerコンテナ上で動作させ、別のコンテナ内で稼働するMySQLに接続する技術検証を行いました。
👉 前回の記事はこちら
今回は、自宅のVirtualBox上に構築したMySQLに接続できるかを検証していきます。
この記事では、Docker環境を活用し、Go言語を使ってMySQLと連携する方法を詳しく解説します。
この内容がどなたかの技術学習の支えになれば幸いです。
書こうと思ったきっかけ
当初の目標は、Goアプリケーションを動かすためのDockerfileを作成することでした。
しかし、システムが動作したり、接続が成功した瞬間の楽しさに引き込まれ、いつの間にか夢中になっていました…。
以前、PythonのFlaskを使った小規模なアプリ開発で、自宅のVirtualBox上に構築したMySQLと接続した経験があります。
👉 参考記事はこちら
今回もその時と同じアプローチを採用し、Dockerの知識を活用しながら、Go言語については「まず動かしてみること」を目標にローカル開発を進めました。
結果として、想定通りの挙動を実現できただけでなく、これがAWSのRDSなどのコスト削減につながる可能性を感じたため、今回改めて記事としてまとめることにしました。
事前準備
1. ローカルのMySQLサーバーを起動
ローカル環境にMySQLがインストールされていることを前提とします。
もしまだインストールされていない場合は、以下の記事でインストール方法を紹介していますので、ぜひ参考にしてください。
MySQLを起動するには、以下のコマンドを実行します。
sudo service mysql start  # UbuntuやDebian系
sudo systemctl start mysqld  # CentOSやRHEL系
2. データベースが存在しない場合
go_app_db データベースが存在しない場合は、以下のSQLコマンドを実行して作成してください。
CREATE DATABASE go_app_db;
USE go_app_db;
3. テーブルの作成
データベースを選択した状態で、以下のコマンドを実行して greetings テーブルを作成します。
CREATE TABLE greetings (
    id INT AUTO_INCREMENT PRIMARY KEY,
    message TEXT NOT NULL
);
4. テーブル作成の確認
テーブルが正しく作成されたことを確認するには、以下のコマンドを実行します。
SHOW TABLES;
greetings がリストに表示されていれば、テーブル作成は成功です。
ディレクトリ構成
プロジェクトのディレクトリ構造は以下の通りです。
/go-app/
├── Dockerfile         # Goアプリケーション用のDocker設定ファイル
├── go.mod             # Goモジュールの依存関係を記述
├── main.go            # Goアプリケーションのメインファイル
└── /templates/        # HTMLテンプレートを格納するディレクトリ
    └── index.html
それぞれ必要なファイルについて
Dockerfile
このDockerfileは、Goアプリケーションをビルドし、コンテナ内で実行可能な状態にする設定を記述しています。
※補足:ポート8080でアプリケーションが動作します。
# Goの公式イメージをベースに使用
FROM golang:1.20

# 作業ディレクトリを設定
WORKDIR /app

# Goモジュールの依存関係をコピー
COPY go.mod ./
COPY go.sum ./
RUN go mod download

# アプリケーションのソースコードをコピー
COPY . .

# アプリケーションをビルド
RUN go build -o app .

# コンテナのポート8080を公開
EXPOSE 8080

# アプリケーションを起動
CMD ["./app"]
go.mod
go.mod ファイルは、Goアプリケーションのモジュール名を設定し、Goのバージョンや必要な依存関係を管理します。
module go-app

go 1.20

require github.com/go-sql-driver/mysql v1.8.1

require filippo.io/edwards25519 v1.1.0 // indirect
ここでは、MySQLドライバが直接の依存関係として定義され、間接的な依存関係も含まれています。
go mod init go-app
go get -u github.com/go-sql-driver/mysql
上記のコマンドを実行して、モジュールを初期化し、MySQLドライバを追加します。
main.go
このGoアプリケーションでは、HTTPサーバーをポート 8080 で起動し、以下の2つのルートで処理を分けています:
-
/ルート:データベースからメッセージを取得して表示します。 -
/addルート:ユーザーが送信したメッセージをデータベースに保存します。
package main

import (
	"database/sql"
	"fmt"
	"html/template"
	"log"
	"net/http"

	_ "github.com/go-sql-driver/mysql"
)

var tmpl = template.Must(template.ParseFiles("templates/index.html"))

func getDBConnection() (*sql.DB, error) {
	// ローカルMySQLの接続情報
	dsn := "root:Honda!12345@tcp(192.168.1.10:3306)/go_app_db"
	return sql.Open("mysql", dsn)
}

func homeHandler(w http.ResponseWriter, r *http.Request) {
	db, err := getDBConnection()
	if err != nil {
		http.Error(w, "Failed to connect to the database", http.StatusInternalServerError)
		return
	}
	defer db.Close()

	rows, err := db.Query("SELECT message FROM greetings")
	if err != nil {
		http.Error(w, "Failed to fetch messages", http.StatusInternalServerError)
		return
	}
	defer rows.Close()

	var messages []string
	for rows.Next() {
		var message string
		if err := rows.Scan(&message); err == nil {
			messages = append(messages, message)
		}
	}

	tmpl.Execute(w, map[string]interface{}{
		"Messages": messages,
	})
}

func addMessageHandler(w http.ResponseWriter, r *http.Request) {
	if r.Method != http.MethodPost {
		http.Error(w, "Invalid request method", http.StatusMethodNotAllowed)
		return
	}

	message := r.FormValue("message")
	db, err := getDBConnection()
	if err != nil {
		http.Error(w, "Failed to connect to the database", http.StatusInternalServerError)
		return
	}
	defer db.Close()

	_, err = db.Exec("INSERT INTO greetings (message) VALUES (?)", message)
	if err != nil {
		http.Error(w, "Failed to insert message", http.StatusInternalServerError)
		return
	}

	http.Redirect(w, r, "/", http.StatusSeeOther)
}

func main() {
	http.HandleFunc("/", homeHandler)
	http.HandleFunc("/add", addMessageHandler)

	fmt.Println("Server is running on port 8080...")
	log.Fatal(http.ListenAndServe(":8080", nil))
}
※これにより、データの表示と追加が簡単に行える仕組みを構築しています。
5. templates/index.html
HTMLテンプレートを保存するために、templates ディレクトリを作成し、以下の内容を記述します。
<!DOCTYPE html>
<html lang="en">
<head>
    <meta charset="UTF-8">
    <meta name="viewport" content="width=device-width, initial-scale=1.0">
    <title>Goアプリケーション</title>
</head>
<body>
    <h1>メッセージリスト</h1>
    <form action="/add" method="post">
        <input type="text" name="message" placeholder="Enter your message" required>
        <button type="submit">Add Message</button>
    </form>
    <h2>Messages:</h2>
    <ul>
        {{range .Messages}}
        <li>{{.}}</li>
        {{end}}
    </ul>
</body>
</html>
※このテンプレートは、アプリケーションでメッセージを表示および追加するための画面を提供します。
アプリケーションを起動してみた
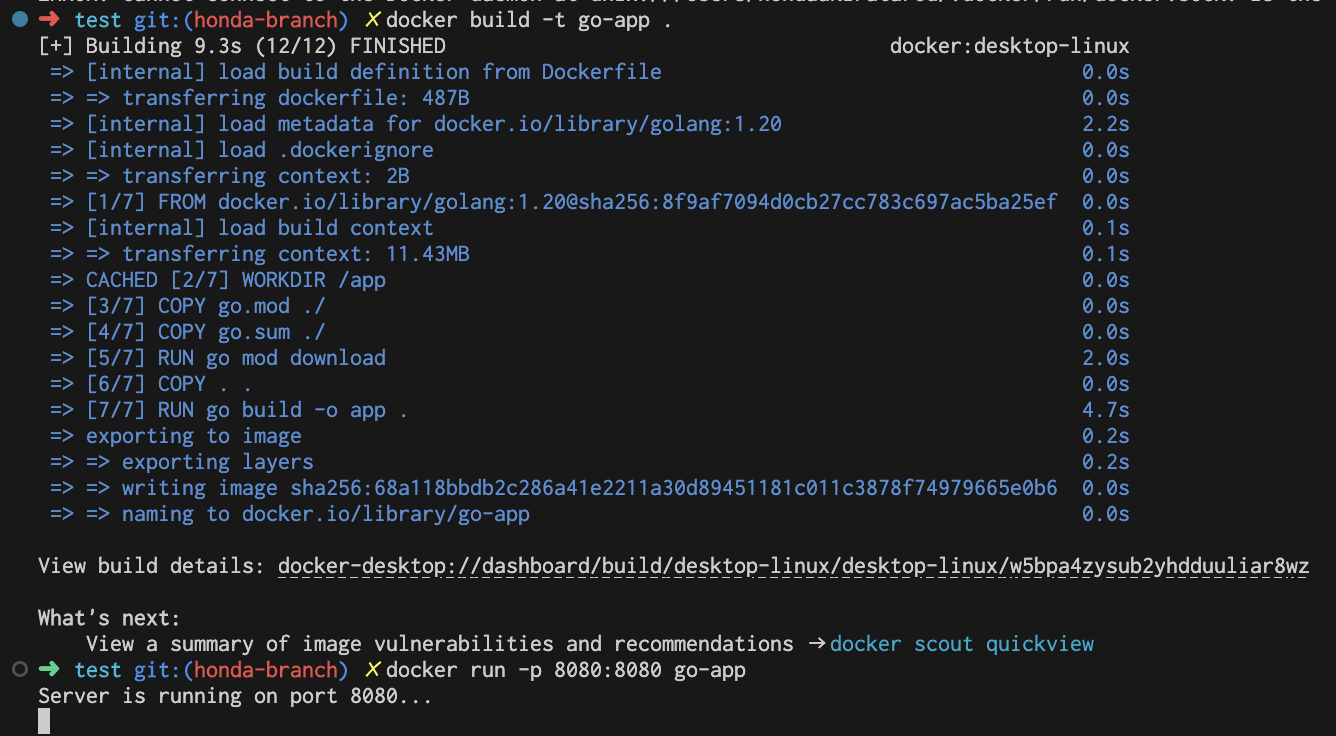
まず、Dockerイメージをビルドし、Dockerコンテナを起動します。
docker build -t go-app .
docker run -p 8080:8080 go-app
実際にブラウザでアクセスしてみた
ブラウザで http://localhost:8080 にアクセスし、「メッセージリスト」が表示されることを確認します。
表示例
また、ターミナル上では以下のように、Server is running on port 8080... と出力され、正常に起動していることが確認できます。
ターミナル表示例
まとめ
ここまで読んでいただきありがとうございました!
今回は、Go言語の学習の一環として、自宅のVirtualBox上で稼働するMySQLに接続し、簡単なレスポンスを返す技術検証を行いました。
エラーの修正や調査には少し時間がかかりましたが、最終的に自己解決し、ブラウザ上でアプリケーションを動かすことができ、とても嬉しかったです!
次回の記事では、Go言語を使って簡単なログイン機能を実装してみたいと思っています!

