目的
みんな大好きTinder UIをライブラリKolodaを使って実装します。
KolodaはTableViewと似ていてとっても使いやすいライブラリです。
サンプルはこちら→https://github.com/freadteam/TinderUISample
今日やること
- 画像を表示するTinder UI(スワイプでLike, Nopeを選択)を実装する。
- 背景色をランダムに変える。
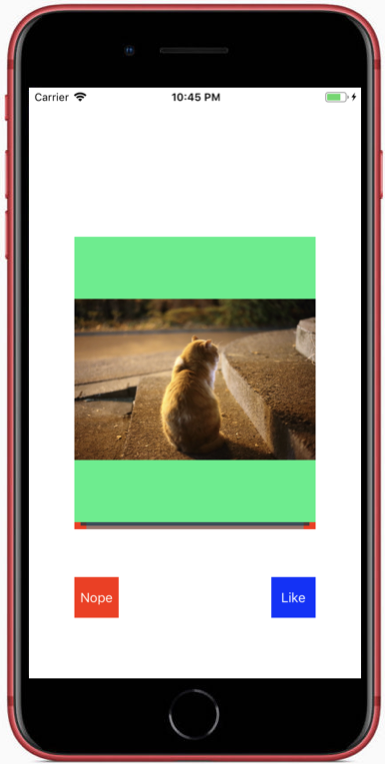
完成イメージ
左右にスワイプできるボタンも実装します。
実装
-
Kolodaの導入
① KolodaをXcodeにインストール
pod "Koloda" 表示をする画像を入れる
10枚ぐらい適当に入れといてください。
② StoryBoardの編集
-
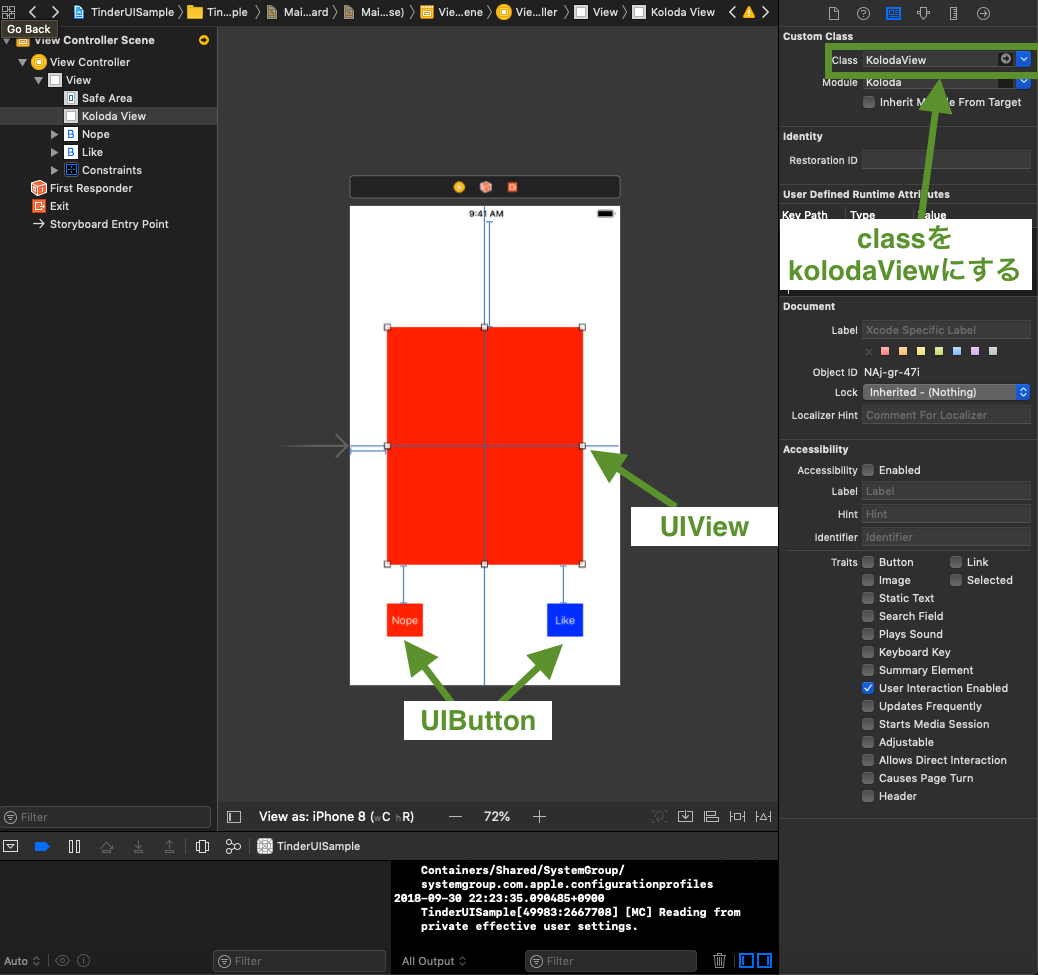
必要なパーツ
- Tinder UIの土台となるUIView
- Like, Nope用のUIButton
パーツを配置
図のようにパーツを配置。その際に、UIViewのclassをKolodaViewにする。
わかりやすいように図では各パーツに着色してある。
③ コードの実装
import UIKit
import Koloda

class ViewController: UIViewController, KolodaViewDataSource, KolodaViewDelegate {

    @IBOutlet weak var kolodaView: KolodaView!
    var imageNameArray = ["1.jpg", "2.jpg", "3.jpg", "4.jpg", "5.jpg", "6.jpg", "7.jpg", "8.jpg", "9.jpg", "10.jpg", ]

    override func viewDidLoad() {
        super.viewDidLoad()
        kolodaView.dataSource = self
        kolodaView.delegate = self
        // Do any additional setup after loading the view, typically from a nib.
    }

    override func didReceiveMemoryWarning() {
        super.didReceiveMemoryWarning()
        // Dispose of any resources that can be recreated.
    }

    //枚数
    func kolodaNumberOfCards(_ koloda: KolodaView) -> Int {
        return imageNameArray.count
    }

    //ドラッグのスピード
    func kolodaSpeedThatCardShouldDrag(_ koloda: KolodaView) -> DragSpeed {
        return .fast
    }

    //表示内容
    func koloda(_ koloda: KolodaView, viewForCardAt index: Int) -> UIView {
        //        let view = UIView(frame: koloda.bounds)
        //        view.backgroundColor = randomColor()
        //        return view
        let imageView = UIImageView(frame: koloda.bounds)
        imageView.contentMode = .scaleAspectFit
        imageView.image = UIImage(named: imageNameArray[index])
        koloda.addSubview(imageView)
        imageView.backgroundColor = randomColor()
        return imageView
    }

    //カードの色を指定、今回はランダム
    func randomColor() -> UIColor {
        return UIColor(red: randomFloat(), green: randomFloat(), blue: randomFloat(), alpha: 1)
    }

    //ランダムに色を生成
    func randomFloat() -> CGFloat {
        return CGFloat(arc4random()) / CGFloat(UInt32.max)
    }


    //delegate------------------

    // カードを全て消費したときの処理を定義する
    func kolodaDidRunOutOfCards(_ koloda: KolodaView) {
        print("Finish cards.")
        //シャッフル
        imageNameArray = imageNameArray.shuffled()
        //リスタート
        koloda.resetCurrentCardIndex()
    }

    //カードをタップした時に呼ばれる
    func koloda(_ koloda: KolodaView, didSelectCardAt index: Int) {
        //urlに飛べる
        //UIApplication.shared.openURL(URL(string: "https://yalantis.com/")!)
    }

    //dragやめたら呼ばれる
    func kolodaDidResetCard(_ koloda: KolodaView) {
        print("reset")
    }

    //darag中に呼ばれる
    func koloda(_ koloda: KolodaView, shouldDragCardAt index: Int) -> Bool {
        print(index, "drag")
        return true
    }

    //dtagの方向など
    func koloda(_ koloda: KolodaView, didSwipeCardAt index: Int, in direction: SwipeResultDirection) {
        print(index, direction)
    }

    //nopeへ
    @IBAction func cardGoToNope() {
        kolodaView.swipe(.left)
    }

    //likeへ
    @IBAction func cardGoToLike() {
        kolodaView.swipe(.right)
    }

}
④ コードの解説
TableViewと同じでDatasourceとDelegateがある。
- Datasource
     //枚数
    func kolodaNumberOfCards(_ koloda: KolodaView) -> Int {
        return imageNameArray.count
    }

    //ドラッグのスピード
    func kolodaSpeedThatCardShouldDrag(_ koloda: KolodaView) -> DragSpeed {
        return .fast
    }

    //表示内容
    func koloda(_ koloda: KolodaView, viewForCardAt index: Int) -> UIView {
        //        let view = UIView(frame: koloda.bounds)
        //        view.backgroundColor = randomColor()
        //        return view
        let imageView = UIImageView(frame: koloda.bounds)
        imageView.contentMode = .scaleAspectFit
        imageView.image = UIImage(named: imageNameArray[index])
        koloda.addSubview(imageView)
        imageView.backgroundColor = randomColor()
        return imageView
    }
- Delegate
    // カードを全て消費したときの処理を定義する
    func kolodaDidRunOutOfCards(_ koloda: KolodaView) {
        print("Finish cards.")
        //シャッフル
        imageNameArray = imageNameArray.shuffled()
        //リスタート
        koloda.resetCurrentCardIndex()
    }

    //カードをタップした時に呼ばれる
    func koloda(_ koloda: KolodaView, didSelectCardAt index: Int) {
        //urlに飛べる
        //UIApplication.shared.openURL(URL(string: "https://yalantis.com/")!)
    }

    //dragやめたら呼ばれる
    func kolodaDidResetCard(_ koloda: KolodaView) {
        print("reset")
    }

    //darag中に呼ばれる
    func koloda(_ koloda: KolodaView, shouldDragCardAt index: Int) -> Bool {
        print(index, "drag")
        return true
    }

    //dtagの方向など
    func koloda(_ koloda: KolodaView, didSwipeCardAt index: Int, in direction: SwipeResultDirection) {
        print(index, direction)
    }
- その他
swipe方向は下記のように指定できる。
public enum SwipeResultDirection: String {
    case left
    case right
    case up
    case down
    case topLeft
    case topRight
    case bottomLeft
    case bottomRight
}
DragSpeed speedは下記のように指定できる。
public enum DragSpeed: TimeInterval {
    case slow = 2.0
    case moderate = 1.5
    case `default` = 0.8
    case fast = 0.4
}
コードでSwipeのしても可能
//左にSwipe
kolodaView.swipe(.left)
課題
Nope, Likeした画像をそれぞれ表示するTableViewを実装してみよう
答え→https://github.com/freadteam/TinderUISample/tree/develop