背景
ユーザ先設置のWindowsサーバでリモートデスクトップが禁止されたときのために。そういう時もあるかもしれないので。
・接続される側→ホスト
・接続する側→クライアント
とします。
※ 2020/12/08追記
クライアント側で設定が必要な旨を追記しました。
信頼済みホストへの登録が必要です。
WinRM
いまのところこれが気に入っています。というかこれしか知りません。sshはサーバ側でインストールが必要なので、デフォルトで使えるのが便利かなーって。
クライアントがWindows10 1903、ホストがWindows Server 2019の環境で試しました。
通信経路のNW機器(ルータ等)で、ホスト宛てTCPの5985宛て通信がブロックされていないことを前提で話を進めます。
手順
1.ホストで設定
Enable-PSRemoting
コマンドレット1発で設定されるのは便利ですが、結構な設定変更が行われます。中身を確認して、運用ポリシーに違反するものがないか確認したほうが良いです。
ただ、 Windows Server 2019で確認したときはファイアウォールのみオフにした状態のほかはホスト側なんもせずに接続できたので、デフォルトで接続できるように設定されてるんじゃないかなと思いますが…
The Enable-PSRemoting cmdlet performs the following operations:
Runs the Set-WSManQuickConfig cmdlet, which performs the following tasks:
Starts the WinRM service.
Sets the startup type on the WinRM service to Automatic.
Creates a listener to accept requests on any IP address.
Enables a firewall exception for WS-Management communications.
Creates the simple and long name session endpoint configurations if needed.
Enables all session configurations.
Changes the security descriptor of all session configurations to allow remote access.
Restarts the WinRM service to make the preceding changes effective.
2.クライアントで設定
Start-Service -Name WinRM
-Nameはなくてもいける。
信頼済みホストを登録する
Set-Item WSMan:\localhost\Client\TrustedHosts -Value <接続先ホストのIPアドレス>
信頼済みホストを確認するときは下記、
Get-Item WSMan:\localhost\Client\TrustedHosts
信頼済みホストを削除するときは下記です。
Clear-Item WSMan:\localhost\Client\Trustedhosts
3.接続する
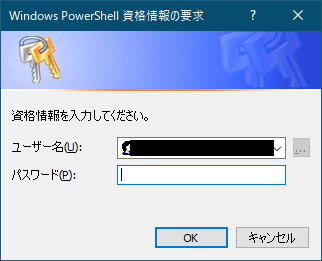
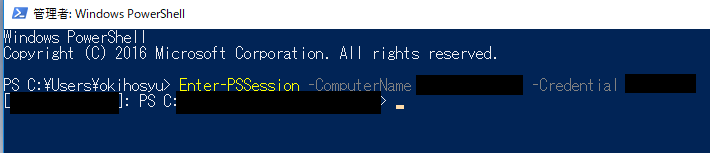
Enter-PSSession -Computername <接続先ホストのIPアドレス or ホスト名> -Credential <接続先ホストで有効なアカウント名>
パスワードの入力ダイアログが表示されたら、パスワードを入力します。
接続できたらプロンプト の表示が変わります。
接続さえできてしまえば、あとはいろいろできますね。