概要
ボーダーみたいな見た目のシェーダーを作ってみました。
ソースコード
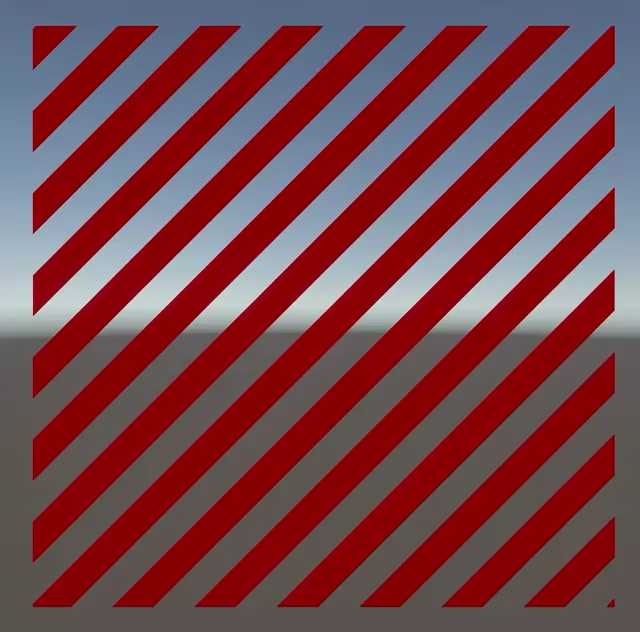
全体図です。
Shader "MyShader/Border"
{
    Properties
    {
        _Color ("Color", Color) = (1, 0, 0, 0.5)
        _Div ("Stripe Division Amount (when parallel to the axis)", Range(1, 1000)) = 10
        _SlopeX ("Stripe Slope X (auto normalized to be Y is positive)", Float) = 1.0
        _SlopeY ("Stripe Slope Y (auto normalized to be Y is positive)", Float) = 1.0
        _MoveSpeed ("Stripe Slope Move Speed (clockwise is negative)", Range(-5, 5)) = 1.0
    }

    SubShader
    {
        Tags{ "RenderType" = "Transparent" "Queue" = "Transparent" }

        Pass
        {
            Cull Back
            ZTest LEqual
            ZWrite Off
            Blend SrcAlpha OneMinusSrcAlpha

            CGPROGRAM

            #pragma vertex vert
            #pragma fragment frag

            #include "UnityCG.cginc"

            half4 _Color;
            half _Div;
            half _SlopeX;
            half _SlopeY;
            half _MoveSpeed;

            struct appdata
            {
                float4 pos : POSITION;
                float2 uv : TEXCOORD0;
            };

            struct v2f
            {
                float4 pos : SV_POSITION;
                float2 uv : TEXCOORD0;
            };

            v2f vert(appdata v)
            {
                v2f o;
                o.pos = UnityObjectToClipPos(v.pos);
                o.uv = v.uv;
                return o;
            }

            half4 frag(v2f i) : SV_Target
            {

                // 使いやすいように初期計算
                half2 slope = normalize(half2(_SlopeX, _SlopeY));
                // - 傾きのy座標は正であってほしいので、もしそうでないなら象限を原点対象に反転する
                slope *= lerp(step(0, slope.y), 1, -1);
                // - 傾きのなす角
                half theta = atan2(slope.y, slope.x);

                // UV座標を -theta 回転し、縦方向にストライプがつくようにすれば良い
                half cosTheta = cos(theta), sinTheta = sin(theta);
                half2 uvRotated = half2(
                    cosTheta * i.uv.x + sinTheta * i.uv.y,
                    -sinTheta * i.uv.x + cosTheta * i.uv.y
                );

                // _Div 分割し、ストライプの箇所ならそのままのアルファ、
                // そうでないならアルファを0にして透明にする
                // - アルファの係数 (0 or 1)
                half aCoef = step(0.5, frac(uvRotated.y * _Div - _MoveSpeed * _Time.y));
                return half4(_Color.rgb, _Color.a * aCoef);
            }

            ENDCG
        }
    }
}
フラグメントシェーダーの所が重要です。
half4 frag(v2f i) : SV_Target
{

    // 使いやすいように初期計算
    half2 slope = normalize(half2(_SlopeX, _SlopeY));
    // - 傾きのy座標は正であってほしいので、もしそうでないなら象限を原点対象に反転する
    slope *= lerp(step(0, slope.y), 1, -1);
    // - 傾きのなす角
    half theta = atan2(slope.y, slope.x);

    // UV座標を -theta 回転し、縦方向にストライプがつくようにすれば良い
    half cosTheta = cos(theta), sinTheta = sin(theta);
    half2 uvRotated = half2(
        cosTheta * i.uv.x + sinTheta * i.uv.y,
        -sinTheta * i.uv.x + cosTheta * i.uv.y
    );

    // _Div 分割し、ストライプの箇所ならそのままのアルファ、
    // そうでないならアルファを0にして透明にする
    // - アルファの係数 (0 or 1)
    half aCoef = step(0.5, frac(uvRotated.y * _Div - _MoveSpeed * _Time.y));
    return half4(_Color.rgb, _Color.a * aCoef);
}
解説
ストライプを斜めに描画しています。
ストライプの傾きからなす角θが求められ、UV座標をその分回転させています。
時間に応じてUV座標にオフセットを与えています。
まとめ
テクスチャなしでも、数値計算のみで色々と図形が作れる。
透明にする所は discard とかの方がいい?