xmlのレイアウトを使って ダイアログを表示させる方法
結果はコールバック onActivityResult() で検出させてます
画面レイアウト
activity_main.xml
<?xml version="1.0" encoding="utf-8"?>
<android.support.constraint.ConstraintLayout xmlns:android="http://schemas.android.com/apk/res/android"
    xmlns:app="http://schemas.android.com/apk/res-auto"
    xmlns:tools="http://schemas.android.com/tools"
    android:layout_width="match_parent"
    android:layout_height="match_parent"
    tools:context=".MainActivity">
    <ImageView
        android:id="@+id/selectIcon"
        android:layout_width="@android:dimen/notification_large_icon_width"
        android:layout_height="@android:dimen/notification_large_icon_height"
        android:layout_marginTop="32dp"
        android:layout_weight="1"
        app:layout_constraintEnd_toEndOf="parent"
        app:layout_constraintStart_toStartOf="parent"
        app:layout_constraintTop_toTopOf="parent"
        app:srcCompat="@mipmap/ic_launcher" />
    <Button
        android:id="@+id/button"
        android:layout_width="wrap_content"
        android:layout_height="wrap_content"
        android:layout_marginBottom="260dp"
        android:layout_marginEnd="148dp"
        android:layout_marginLeft="148dp"
        android:layout_marginRight="148dp"
        android:layout_marginStart="148dp"
        android:layout_marginTop="139dp"
        android:text="Button"
        app:layout_constraintBottom_toBottomOf="parent"
        app:layout_constraintEnd_toEndOf="parent"
        app:layout_constraintStart_toStartOf="parent"
        app:layout_constraintTop_toBottomOf="@+id/selectIcon" />
</android.support.constraint.ConstraintLayout>
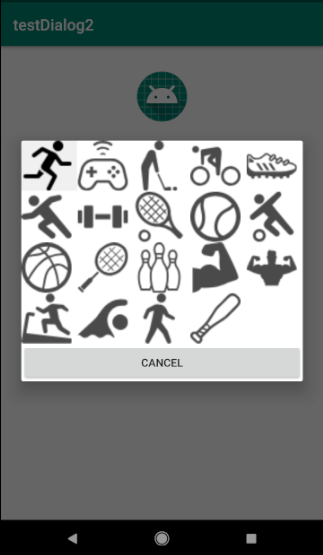
ボタンを押してダイアログを表示させ
選択したアイコンを ImageView selectIconに表示させる
view_dialog.xml
ダイアログ用のxml
<?xml version="1.0" encoding="utf-8"?>
<LinearLayout
    xmlns:android="http://schemas.android.com/apk/res/android"
    android:layout_width="match_parent"
    android:layout_height="match_parent"
    android:gravity="center"
    android:orientation="vertical">
    <GridView
        android:id="@+id/iconGridView2"
        android:layout_width="match_parent"
        android:layout_height="wrap_content"
        android:layout_weight="9"
        android:horizontalSpacing="1dp"
        android:numColumns="5"
        android:stretchMode="columnWidth"
        android:verticalSpacing="1dp"/>
    <Button
        android:id="@+id/button_cancel"
        android:layout_width="match_parent"
        android:layout_height="wrap_content"
        android:layout_weight="1"
        android:text="@android:string/cancel" />
</LinearLayout>
アイコンを表示させる場所と
キャンセル・ボタン
cell.xml
実際のイメージを貼り付ける場所
<?xml version="1.0" encoding="utf-8"?>
<RelativeLayout xmlns:android="http://schemas.android.com/apk/res/android"
    xmlns:app="http://schemas.android.com/apk/res-auto"
    android:layout_width="match_parent"
    android:layout_height="match_parent">
    <LinearLayout
        android:layout_width="wrap_content"
        android:layout_height="wrap_content"
        android:orientation="vertical">
        <ImageView
            android:id="@+id/iconImage"
            android:layout_width="64dp"
            android:layout_height="64dp"
            android:layout_weight="1"
            app:srcCompat="@mipmap/ic_launcher" />
    </LinearLayout>
</RelativeLayout>
タイトルなどを追加する場合はここに
コード
MainActivity.kt
class MainActivity : AppCompatActivity() {
    private val requestCodeDialog : Int = 1001

    override fun onCreate(savedInstanceState: Bundle?) {
        super.onCreate(savedInstanceState)
        setContentView(R.layout.activity_main)

        button.setOnClickListener { _ ->
            // 生成
            val dialog : ClsInputDialog = ClsInputDialog(this)
            // 表示
            dialog.openDialog( requestCodeDialog, supportFragmentManager)
        }
    }
    // コールバック
    override fun onActivityResult(requestCode:Int, resultCode:Int, data: Intent?) {
        if(requestCode == requestCodeDialog && resultCode == Activity.RESULT_OK) {
            val selNul : Int = data?.getIntExtra("parent",0) ?: 0
            Log.d("OK", selNul.toString())
            selectIcon.setImageResource(
                    ClsImageList().mImageList[selNul]
            )
        }
        else if(requestCode == requestCodeDialog && resultCode == Activity.RESULT_CANCELED) {
            Log.d("CANCELED", requestCode.toString())
        }
    }
}
ボタンを押したらダイアログを表示
今回はダイアログからコールバックさせていますので、その処理
ok=選択されたイメージを表示
キャンセル=なにもしない(Log)
ClsInputDialog.kt
ダイアログのクラス
class ClsInputDialog( mc:Context) {
    private val mDialog : MyDialog = MyDialog()
    init {
        mDialog.mContext = mc
    }
    // ダイアログ表示
    fun openDialog(requestCode:Int, manager: FragmentManager) {
        mDialog.setTargetFragment(null,requestCode)
        mDialog.show( manager,"dialog")
    }
    // イメージ選択のダイアログ
    class MyDialog : DialogFragment() {
        var mContext : Context? =null
        //
        override fun onCreateDialog(savedInstanceState: Bundle?): Dialog {
            val alertView : View = activity!!.layoutInflater.inflate(R.layout.view_dialog, null)
            // イメージクリック
            val mIconGridView =alertView.findViewById(R.id.iconGridView2) as GridView
            mIconGridView.adapter = ImageListAdapter(mContext!!)
            mIconGridView.setOnItemClickListener { _, _, position, _ ->
                val result = Intent()
                // 選択された結果(position)を入れて
                result.putExtra("parent",position )
                val pi = activity!!.createPendingResult(targetRequestCode, result, PendingIntent.FLAG_ONE_SHOT)
                try {
                    // RESULT_OKでコールバック
                    pi.send(Activity.RESULT_OK)
                } catch (ex: PendingIntent.CanceledException) {
                    ex.printStackTrace()
                }
                dialog.dismiss()
            }
            // キャンセルボタン
            val mCancelButton = alertView.findViewById(R.id.button_cancel) as Button
            mCancelButton.setOnClickListener {
                val pi = activity!!.createPendingResult(targetRequestCode, Intent(), PendingIntent.FLAG_ONE_SHOT)
                try {
                    // RESULT_CANCELEDでコールバック
                    pi.send(Activity.RESULT_CANCELED)
                } catch (ex: PendingIntent.CanceledException) {
                    ex.printStackTrace()
                }
            }
            // 実際は AlertDialog を使用
            val dialogBuilder = AlertDialog.Builder(activity!!)
            // 設定した画面を設定
            dialogBuilder.setView(alertView)
            return dialogBuilder.create()
        }
        override fun onPause() {
            super.onPause()
            dismiss()
        }
    }
}
val alertView : View = activity!!.layoutInflater.inflate(R.layout.view_dialog, null)
でxmlレイアウトを呼び出して、処理を設定
dialogBuilder.setView(alertView) で AlertDialog に渡しています
コールバックはActivityに対して
val pi = activity!!.createPendingResult(targetRequestCode, Intent(), PendingIntent.FLAG_ONE_SHOT)
pi.send(Activity.RESULT_CANCELED)
で行ってます
値を返す場合は
val result = Intent()
result.putExtra("キー",値 )
受けは MainActivity onActivityResultで
requestCodeとresultCodeを確認して
val selNul : Int = data.getIntExtra("キー",なかった時の値)
で受け取ってます
ImageListAdapter.kt
イメージを表示させるためのアダプター
class ImageListAdapter(private val mContext: Context) : BaseAdapter() {
    private val mLayoutInflater: LayoutInflater = LayoutInflater.from(mContext)
    private val mImageList =     ClsImageList()
    //
    private class ViewHolder {
        var iconImage : ImageView? = null
    }
    //
    override fun getCount(): Int {
        return mImageList.size
    }
    //
    override fun getView(position: Int, cView: View?, parent: ViewGroup): View {
        var convertView : View? = cView

        val holder: ViewHolder
        if (convertView == null) {
            holder = ViewHolder()
            convertView = mLayoutInflater.inflate(R.layout.cell, null)
            holder.iconImage =  convertView.findViewById(R.id.iconImage)
            convertView.tag = holder
        } else {
            holder = convertView.tag as ViewHolder
        }
        // イメージの設定
        holder.iconImage!!.setImageResource(mImageList.getDrawableID(position))
        return convertView!!
    }
    //
    override fun getItemId(position: Int): Long {
        return 0
    }
    //
    override fun getItem(position: Int): Any? {
        return null
    }
}
参考までにサンプルデータ
class ClsImageList {
    val mImageList :Array<Int> = arrayOf<Int>(
            R.drawable.ic_1001 ,
            R.drawable.ic_1002 ,
            R.drawable.ic_1003 ,
            R.drawable.ic_1004 ,
            R.drawable.ic_1005 ,
            R.drawable.ic_1006 ,
            R.drawable.ic_1007 ,
            R.drawable.ic_1008 ,
            R.drawable.ic_1009 ,
            R.drawable.ic_1010 ,
            R.drawable.ic_1011 ,
            R.drawable.ic_1012 ,
            R.drawable.ic_1013 ,
            R.drawable.ic_1014 ,
            R.drawable.ic_1015 ,
            R.drawable.ic_1016 ,
            R.drawable.ic_1017 ,
            R.drawable.ic_1018 ,
            R.drawable.ic_1019
    )
    val size : Int
        get() {
            return mImageList.size
        }
    fun getDrawableID( position: Int) : Int {
        return if (mImageList.size > position ) {
            mImageList[position]
        } else {
            0
        }
    }
}
drawableに名前を付けてアイコンおいてあります
・起動するとアイコンのダイヤログが表示されて
・クリックして選択すると、前の画面に戻り、選択したアイコンを表示
コードは gitに置いてます