はじめに
マルチスレッドからデータを扱う時、どのようなlockをしていますか?
lockする時間が少しでも長いだけで
プログラム全体の速度の低下を招くため、lockは非常に難しいですね。
http://qiita.com/episteme/items/9e6e17512ecadb2ccb40
面白い記事を拝見し、効率の良いLockでデータを扱うと
どれぐらいパフォーマンスに違いがあるのかなと気になり
それを検証してみました。
若干コードが多めです(。。
この記事での普通のLockとは、以下のコードの事を指しています。
純粋にlockが取れるまでblockするコードですね。
std::lock_guard<decltype(mtx)> l(mtx);
結果だけ先に知りたい方は↓に行ってしまって下さい!
測定の概要
測定には以下のルールで行います。
- 1.concurrent_queueを用意し、測定前にthread-safeなのか検証。
- 2.concurrent_queueに対して、複数スレッドからデータのpush/popを繰り返し、その回数をスコアとして扱う。
- 3.測定時間は5秒として、3回行う。
concurrent_queueの実装
今回は普通のlockと、効率の良いlockを比較するので
lockに関して抽象クラスを用意します。
struct ILock {
    virtual bool lock() = 0;
    virtual void unlock() = 0;
};
スコープを抜けたら勝手にunlockされて欲しいですね。
なので以下のhelperも追加しておきます。
struct releaser {
	using release_func = std::function <void()>;
	releaser(release_func f) : f_(std::move(f)) {}
	~releaser() {
		if (f_) {
			f_();
		}
	}

	operator bool() const {
		return (f_) ? true : false;
	}
	release_func f_;
};
次にconcurrent_queueの実装です。
template <typename T, typename L>
class concurrent_queue {
	static_assert(std::is_base_of <flowTumn::ILock, L>::value, "L must be a descendant of ILock.");

public:
	enum struct Result {
		Success,
		Failed,
		Empty,
		Timeout,
	};

	// lockをRAIIに。
	struct locker {
		releaser lock() {
			if (l_.lock()) {
				return{ [this]{ l_.unlock(); } };
			}
			else {
				return{ nullptr };
			}
		}
		L l_;
	} lock_controller;

	concurrent_queue() = default;

	//queueにデータを詰め込み。
	Result push(const T& v) {
		for (;;) {
			if (auto l = lock_controller.lock()) {
				queue_.push(v);
				return Result::Success;
			}
			std::this_thread::sleep_for(std::chrono::milliseconds(1));
		}
		return Result::Failed;
	}

	//fから取り出したデータをqueueに詰め込み。
	Result push(std::function <T()> f) {
		for (;;) {
			if (auto l = lock_controller.lock()) {
				queue_.push(f());
				return Result::Success;
			}
			std::this_thread::sleep_for(std::chrono::milliseconds(1));
		}
		return Result::Failed;
	}

	//queueからデータを取得。
	std::pair <Result, T> pop() {
		for (;;) {
			if (auto l = lock_controller.lock()) {
				if (0 < queue_.size()) {
					auto r = queue_.front();
					queue_.pop();
					return{ Result::Success, r };
				} else {
					return{ Result::Empty, {} };
				}
			}
			std::this_thread::sleep_for(std::chrono::milliseconds(1));
		}
		return{ Result::Failed, {} };
	}

private:
	std::queue <T> queue_;
};
以上で今回に使用するconcurrent_queueの完成です。
concurrent_queueは型パラメーターでILockを渡してもらい
それに対してlockを行い、成功が返されたら
データをpush/popするといった作りになっています。
このconcurrent_queueを用いてパフォーマンスを測定してみます。
Lockの方式
さて今回のメインですね。
ILock#lockの中で純粋にmutexをlockしてしまっても構いませんし
別のやり方でlockをしても良いです。
とにかくlock出来た事だけを返せば良いので
以下の3パターンのILockを実装します。
//普通のlock。mutexをlockできるまでblockします。
struct lockNormal : public ILock {
	bool lock() override {
		mutex_.lock();
		return true;
	}
	void unlock() override {
		mutex_.unlock();
	}
	std::mutex mutex_;
};

//blockせずにlockを獲得。
struct lockTry : public ILock {
	bool lock() override {
		return mtx_.try_lock();
	}
	void unlock() override{
		mtx_.unlock();
	}
	std::mutex mtx_;
};

//atomic<bool>を用いてtrueに変更できたら成功。
struct lockWeak : public ILock {
	bool lock() override {
		bool expected = false;
		bool desired = true;
		return flg_.compare_exchange_weak(expected, desired);
	}
	void unlock() override {
		flg_ = false;
	}
	std::atomic <bool> flg_{ false };
};
以上を持って、concurrent_queueは以下の用にして使う事が出来る様になりました。
auto q = concurrent_queue <int64_t, lockNormal>{};
後は3パターンのlockを使って測定するだけです。
測定の実装
測定前に、測定の実装になります。
コードばかりで申し訳ありません(..
queueがきちんとthread-safeなのかを検証した後にスコアを測ります。
template <typename T, typename Lock, typename F>
uint64_t queue_tester(
F gen,
uint32_t createGenCount,
std::function <void(T)> notify,
uint32_t createNotifyCount,
std::chrono::milliseconds timeout) {
using queue_type = concurrent_queue <int64_t, Lock>;
auto queue = queue_type{};
auto counter = std::atomic <uint64_t> {0};
std::atomic <bool> g{ false };
std::vector <std::thread> thr;
auto push = [&gen, &queue, &counter, &g]() {
while (!g) {}
while (g) {
queue.push(gen());
++counter;
}
};
auto pop = [¬ify, &g, &counter, &queue]() {
while (!g) {}
while (g) {
auto r = queue.pop();
if (r.first == queue_type::Result::Success) {
notify(r.second);
}
++counter;
}
};
std::generate_n(std::back_inserter(thr), createGenCount, [push] { return std::thread{ push }; });
std::generate_n(std::back_inserter(thr), createNotifyCount, [pop] { return std::thread{ pop }; });
g = !g;
std::this_thread::sleep_for(timeout);
g = !g;
for (auto& elem : thr) {
elem.join();
}
return counter.load();
}
//queueがthread safeなのかを検証します。
template <typename L>
bool checkQueue() {
auto v1 = std::atomic <int64_t> {0};
auto v2 = std::atomic <int64_t> {0};
auto result = std::atomic <bool> {true};
//cpuのコア数分詰める処理を追加し、popしたデータを検証するのは一つが担う。
queue_tester <int64_t, L>(
[&v1] {
# if 1
//検証するデータを生成するfunctionを返す。(この処理はlockされた後に呼ばれる。)
return std::function <int64_t()> {
[&v1] {
++v1;
return v1.load();
}
};
# else
// 詰めるスレッドが複数なら、詰められる値はバラバラになってしまう。
++v1;
return v1.load();
# endif
},
std::thread::hardware_concurrency(),
[&v2, &result](int64_t n) {
//queueから取得したデータの通知を受け検証する。
++v2;
if (v2.load() != n) {
result = false;
assert(false && "queue is bug.");
}
},
1,
std::chrono::seconds(5)
);
return result.load();
}
//スコアを計測。
template <typename Lock>
uint64_t score() {
const auto core = std::max <uint32_t> (std::thread::hardware_concurrency() >> 1, 1);
return queue_tester <uint64_t, Lock>(
[] {
//好きな値で詰める。重要なのは呼ばれた回数。
return 1234;
},
core,
[](uint64_t) {
//popしたデータを受けても何もしない。重要なのは呼ばれた回数。
},
core,
std::chrono::seconds(5)
);
}
//平均を算出
template <typename F, typename FN>
auto avg(F f, uint32_t count, FN notify) -> decltype(f()) {
auto r = decltype(f()){};
for (auto i = UINT32_C(0); i < count; ++i) {
auto rr = f();
notify(rr);
r += rr;
}
return r / count;
}
ふう……完成です。
最後の一振りは
検証と結果の出力をマクロにしておきます。
//キューを検証した後にスコアを計測。
# define SCORE(lock, count) \
	std::cout << "TargetLock => " << ""#lock""  << std::endl; \
	if (checkQueue<lock>()) { \
		std::cout << "\t" << "checkQueue: Success." << std::endl; \
		std::cout << "\t" << "Score(Avg): " << avg(score<lock>, count, [](decltype(score<lock>()) score) { std::cout << "\t\t" << "Score: " << score << std::endl; }) << std::endl; \
	} else {  \
		std::cout << "\t" << "checkQueue: Failed." << std::endl; \
	} \
	std::cout << std::endl;
測定 & 結果
さてさて、実際にスコアを計測してみましょう。
int main() {
	const auto TEST_COUNT = 3;

	//スコアを計測。lockの実装が不十分だと検証で弾かれる。
	SCORE(lockNormal, TEST_COUNT);
	SCORE(lockTry, TEST_COUNT);
	SCORE(lockWeak, TEST_COUNT);
	return 0;
}
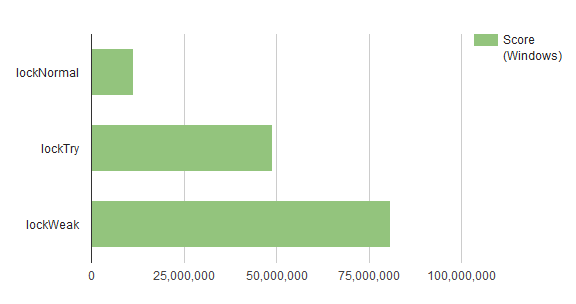
私の開発マシンでは以下のようになりました
(CPU: i7-2600k、Win7、VC2013 Release Build)
1: Test timeout computed to be: 9.99988e+006
1: TargetLock => lockNormal
1: 	checkQueue: Success.
1: 		Score: 11758106
1: 		Score: 9432942
1: 		Score: 13260581
1: 	Score(Avg): 11483876
1:
1: TargetLock => lockTry
1: 	checkQueue: Success.
1: 		Score: 48652518
1: 		Score: 49120617
1: 		Score: 48946418
1: 	Score(Avg): 48906517
1:
1: TargetLock => lockWeak
1: 	checkQueue: Success.
1: 		Score: 80397898
1: 		Score: 80919271
1: 		Score: 81028361
1: 	Score(Avg): 80781843
1:
1/1 Test #1: test .............................   Passed   64.01 sec
おお、凄い結果になりました。。
折角なのでグラフにもしてみます。
atomic <bool>恐るべし…
調べるとCPU命令で比較と値の交換を行っているんですね。(CAS)
http://qiita.com/kmikmy/items/0a7324cc50fd40470407
http://cpprefjp.github.io/reference/atomic/atomic/compare_exchange_weak.html
ソースコード
今回の記事に作成したソース一式です。
https://github.com/flowtumn/lock_performance
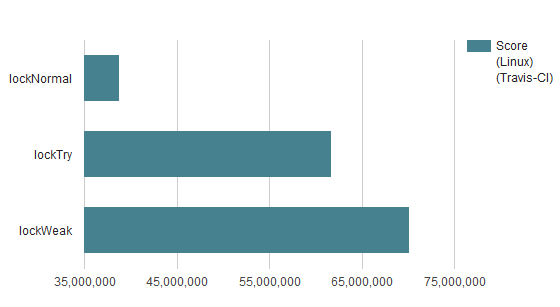
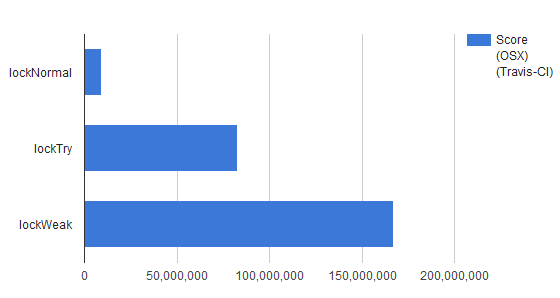
travis-ciでの測定結果(linux/osx)
2015/12/18 travis-ciで計測してみました。