Firebase MLKit と ARCore Sceneform 融合サンプル
Firebase MLKitの画像認識でラベルを取得し、ラベルをARCore Sceneformを使いAR上に表示するサンプルを作成しました。
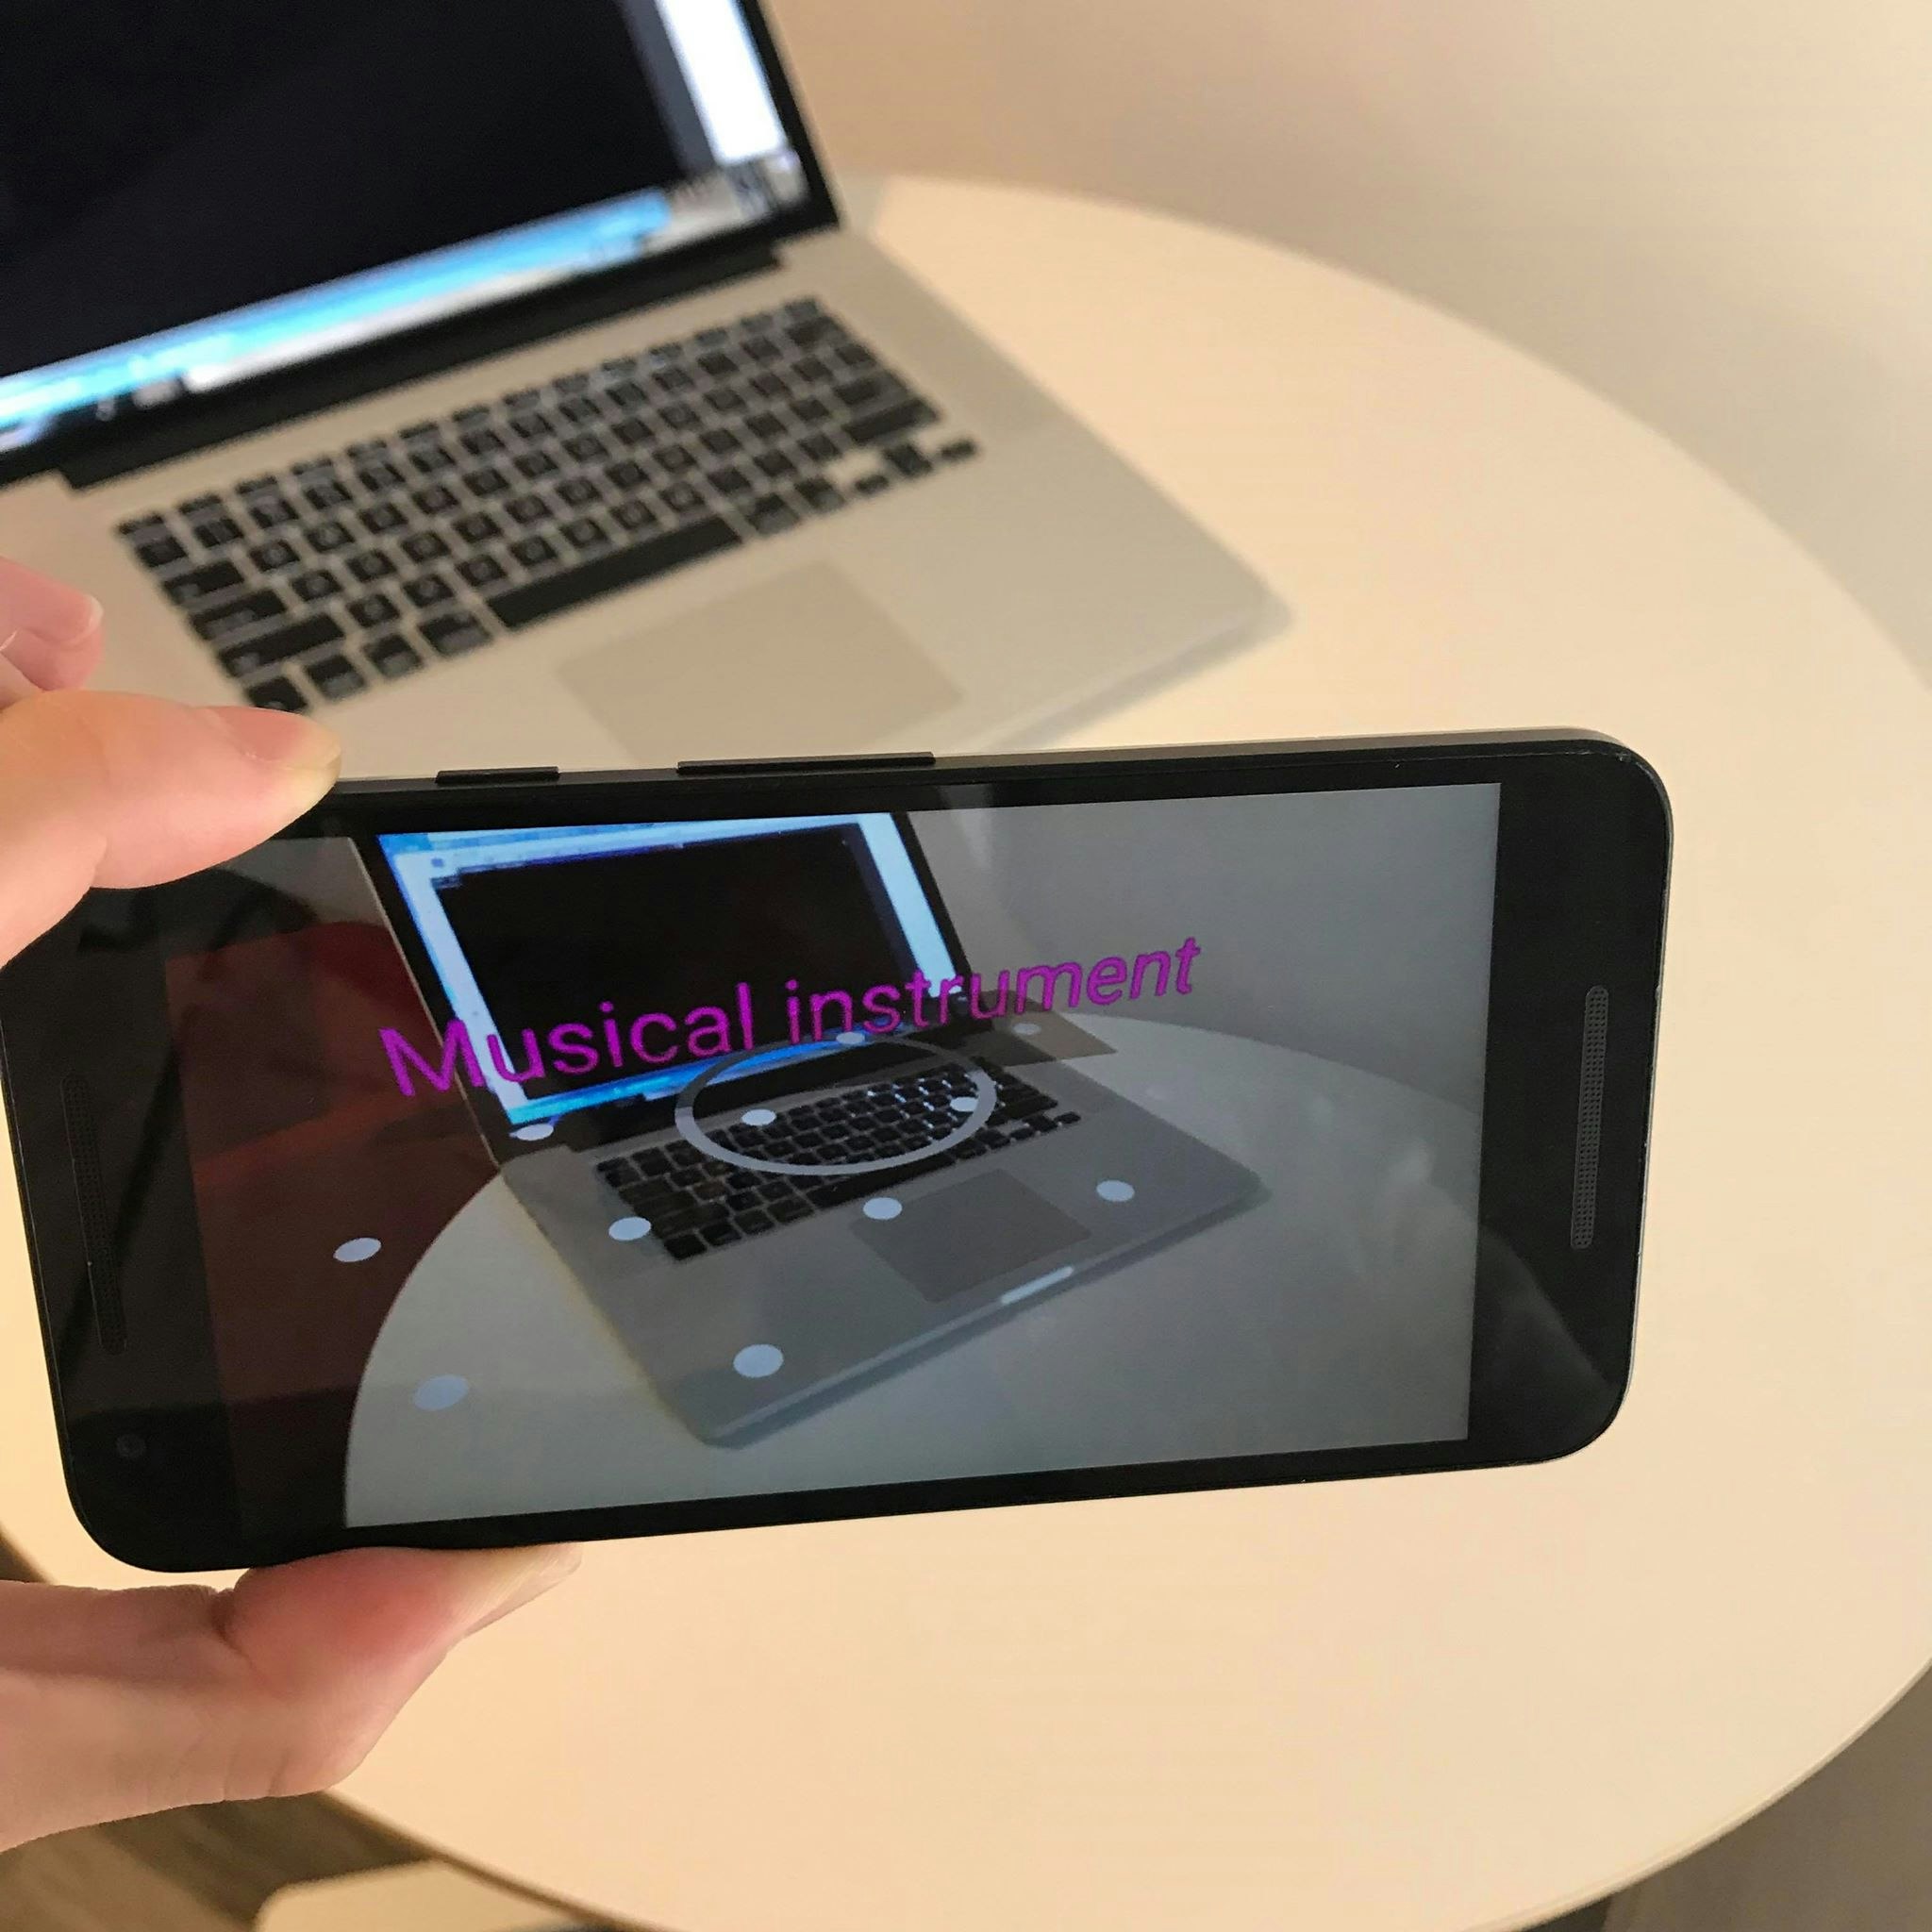
こんな感じ
サンプルはこちら
Firebase ML Kit とは?
ML Kitとはモバイルアプリ向けに機械学習の機能を導入することができるSDKです。文字認識、画像ラベリング、バーコードスキャン、顔検出、ランドマーク認識の機能などを実装することができます。詳しくはこちら。
ARCore Sceneformとは?
Sceneformは、3DグラフィックスやOpenGLを学ぶことなく、Android開発者がARCoreを扱えるようにしたものです。詳しくはこちら
このサンプルの元ネタ
元ネタは先日参加した第7回石巻ハッカソンで作ったアプリです。今回紹介するサンプルは、元ネタのアプリの簡易版となります。
発表スライド → http://bit.ly/2wVqJVZ

対応デバイスの確認
このページでお持ちの端末がARCoreに対応しているか確認する。
ライブラリのインストール
プロジェクト直下のbuild.gradleを編集
buildscript {
    ext.kotlin_version = '1.2.50'
    repositories {
        google()
        jcenter()
    }
    dependencies {
        ...
        classpath 'com.google.gms:google-services:4.0.1'
        classpath 'com.google.ar.sceneform:plugin:1.4.0'
        ...
    }
}

allprojects {
    repositories {
        google()
        jcenter()
    }
}

task clean(type: Delete) {
    delete rootProject.buildDir
}
app/直下のbuild.gradleを編集
apply plugin: 'com.android.application'

apply plugin: 'kotlin-android'

apply plugin: 'kotlin-android-extensions'

android {
    compileSdkVersion 28
    defaultConfig {
        ...
        ndk {
            /*
             * Sceneform is available for the following ABIs: arm64-v8a, armv7a,
             * x86_64 and x86. This sample app enables arm64-v8a to run on
             * devices and x86 to run on the emulator. Your application should
             * list the ABIs most appropriate to minimize APK size (arm64-v8a recommended).
             */
            abiFilters 'arm64-v8a', 'x86'
        }
    }

    compileOptions {
        sourceCompatibility JavaVersion.VERSION_1_8
        targetCompatibility JavaVersion.VERSION_1_8
    }
   ...
}

dependencies {
    ...

    implementation "com.google.ar.sceneform:core:1.4.0"
    implementation "com.google.ar.sceneform.ux:sceneform-ux:1.4.0"
    implementation 'com.google.firebase:firebase-ml-vision:17.0.0'
    implementation 'com.google.firebase:firebase-ml-vision-image-label-model:15.0.0'
}

apply plugin: 'com.google.gms.google-services'
apply plugin: 'com.google.ar.sceneform.plugin'
AndroidManifest.xmlを編集
<manifest>
...
    <uses-permission android:name="android.permission.ACCESS_COARSE_LOCATION" />
    <uses-permission android:name="android.permission.ACCESS_FINE_LOCATION" />
    <uses-permission android:name="android.permission.CAMERA" />
    <uses-permission android:name="android.permission.INTERNET" />
    <uses-permission android:name="android.permission.WRITE_EXTERNAL_STORAGE" />
    <uses-feature android:name="android.hardware.camera.ar" android:required="true"/>

    <application
        ...
        android:usesCleartextTraffic="false"
        tools:ignore="GoogleAppIndexingWarning">
        <activity
            ...
            android:configChanges="orientation|screenSize"
            android:theme="@style/Theme.AppCompat.NoActionBar"
            android:screenOrientation="locked"
            android:exported="true">
            ...
        </activity>
        <meta-data android:name="com.google.ar.core" android:value="required" />
        <meta-data
            android:name="com.google.firebase.ml.vision.DEPENDENCIES"
            android:value="ocr,face,barcode,label" />
    </application>
</manifest>
Firebase Web ConsoleでAndroidアプリを登録
ダウンロードした google-services.jsonを app/ 直下にいれます

これで準備完了です。
ArFragmentを表示
なんと!xmlを定義しただけで、AR用のカメラ起動し、さらに端末を動かすことを促すUIが出てきました!そして平面を認識すると丸い点が表示されます!ArFragmentしゅごい。(いつもならカメラを出すだけで一苦労なのにw)
<FrameLayout xmlns:android="http://schemas.android.com/apk/res/android"
    xmlns:tools="http://schemas.android.com/tools"
    android:layout_width="match_parent"
    android:layout_height="match_parent"
    tools:context=".MainActivity">
    <fragment android:name="com.google.ar.sceneform.ux.ArFragment"
        android:id="@+id/ux_fragment"
        android:layout_width="match_parent"
        android:layout_height="match_parent" />
</FrameLayout>
物体を検出しラベルがAR表示されるサンプル
今回はサンプルなのでActivity1つで実装するハードコーディング^^;
class MainActivity : AppCompatActivity() {
    private val TAG = MainActivity::class.java.simpleName
    private val MIN_OPENGL_VERSION = 3.0
    private var arFragment: ArFragment? = null
    private var viewRenderable: ViewRenderable? = null
    private var textView: TextView? = null

    override fun onCreate(savedInstanceState: Bundle?) {
        super.onCreate(savedInstanceState)
        if (!checkIsSupportedDeviceOrFinish(this)) {
            return
        }

        setContentView(R.layout.activity_main)
        textView = LayoutInflater.from(this).inflate(R.layout.text_view, null) as TextView
        arFragment = supportFragmentManager.findFragmentById(R.id.ux_fragment) as ArFragment?
        ViewRenderable.builder()
                .setView(this, textView)
                .build()
                .thenAccept({ renderable -> viewRenderable = renderable })

        arFragment?.setOnTapArPlaneListener { hitResult: HitResult, plane: Plane, motionEvent: MotionEvent ->
            // Create the Anchor.
            val anchor = hitResult.createAnchor()
            val anchorNode = AnchorNode(anchor)
            anchorNode.setParent(arFragment?.getArSceneView()?.scene)
            takePhoto(anchorNode)
        }
    }

    //README: Detect labels with MLKit after take photo
    private fun takePhoto(anchorNode: AnchorNode) {
        val view = arFragment?.getArSceneView()

        // Create a bitmap the size of the scene view.
        val bitmap = Bitmap.createBitmap(view!!.width, view.height,
                Bitmap.Config.ARGB_8888)

        // Create a handler thread to offload the processing of the image.
        val handlerThread = HandlerThread("PixelCopier")
        handlerThread.start()
        // Make the request to copy.
        PixelCopy.request(view, bitmap, { copyResult ->
            if (copyResult == PixelCopy.SUCCESS) {
                val image = FirebaseVisionImage.fromBitmap(bitmap)
                FirebaseVision.getInstance()
                        .visionLabelDetector
                        .detectInImage(image)
                        .addOnSuccessListener { labels ->
                            labels.forEach {
                                val transformableNode = TransformableNode(arFragment?.getTransformationSystem())
                                transformableNode.setParent(anchorNode)
                                transformableNode.renderable = viewRenderable
                                transformableNode.select()
                                textView?.text = labels[0].label
                            }
                        }
                        .addOnFailureListener { e ->
                            e.printStackTrace()
                        }
            } else {
                Toast.makeText(this,"Failed to copyPixels: $copyResult", Toast.LENGTH_LONG).show()
            }
            handlerThread.quitSafely()
        }, Handler(handlerThread.looper))
    }

    private fun checkIsSupportedDeviceOrFinish(activity: Activity): Boolean {
        if (Build.VERSION.SDK_INT < Build.VERSION_CODES.N) {
            Log.e(TAG, "Sceneform requires Android N or later")
            Toast.makeText(activity, "Sceneform requires Android N or later", Toast.LENGTH_LONG).show()
            activity.finish()
            return false
        }
        val openGlVersionString = (activity.getSystemService(Context.ACTIVITY_SERVICE) as ActivityManager)
                .deviceConfigurationInfo
                .glEsVersion
        if (java.lang.Double.parseDouble(openGlVersionString) < MIN_OPENGL_VERSION) {
            Log.e(TAG, "Sceneform requires OpenGL ES 3.0 later")
            Toast.makeText(activity, "Sceneform requires OpenGL ES 3.0 or later", Toast.LENGTH_LONG)
                    .show()
            activity.finish()
            return false
        }
        return true
    }
}
ラベルを表示する xml も定義
<TextView xmlns:android="http://schemas.android.com/apk/res/android"
    android:id="@+id/messageText"
    android:layout_width="wrap_content"
    android:layout_height="wrap_content"
    android:layout_weight="1"
    android:gravity="center"
    android:orientation="vertical"
    android:text="Hello"
    android:padding="6dp"
    android:textColor="#f500d1"
    android:textAlignment="center" />
ARCoreの感想
数年前にARのサンプルを作ったときより手軽に実装できました。すごいぞ ARCore! すごいぞ Sceneform! 気軽にARの技術に触れることができるので、対応端末をお持ちの方はぜひお試しください。
ML Kitの感想
こちらも気軽にオフライン推論が実装できるのがいいですね。もちろんオンライン推論の方が精度は高いですが、今回のサンプルのようにカメラで撮影したあと精度が低くてもすぐに推論の結果が欲しいときには適していると思います。
このサンプルを元に色々作れそう。アイディアお持ちの方はコメント頂けると嬉しいです:)