はじめに
Bootstrap3 Datepicker v4は、カレンダーを表示して、日付/時間を選択、取得できるライブラリです。
ここでは、Bootstrap3 Datepicker v4のカレンダーを使って超簡易的な予約システム(予約情報入力⇒送信⇒予約情報の表示)を作って解説します。
カレンダー表示に絞った解説はここに書いてます。
構成
フォルダの構成は下記を想定しています。
コードはここに置いています。
project
├ index.html(予約フォーム表示、POST送信)
├ reserve.php(予約内容表示用)
├ src
│ ├ css
│ │ ├ bootstrap.min.css
│ │ └ bootstrap-datetimepicker.min.css
│ └ js
│ │ ├ jquery-3.5.1.min.js
│ │ ├ moment-width-locales.min.js
│ │ ├ bootstrap.min.js
│ │ └ bootstrap-datetimepicker.min.js
│ └ fonts
│ ├ glyphicons-halflings-regular.eot
│ ├ glyphicons-halflings-regular.svg
│ ├ glyphicons-halflings-regular.ttf
│ ├ glyphicons-halflings-regular.woff
│ └ glyphicons-halflings-regular.woff2
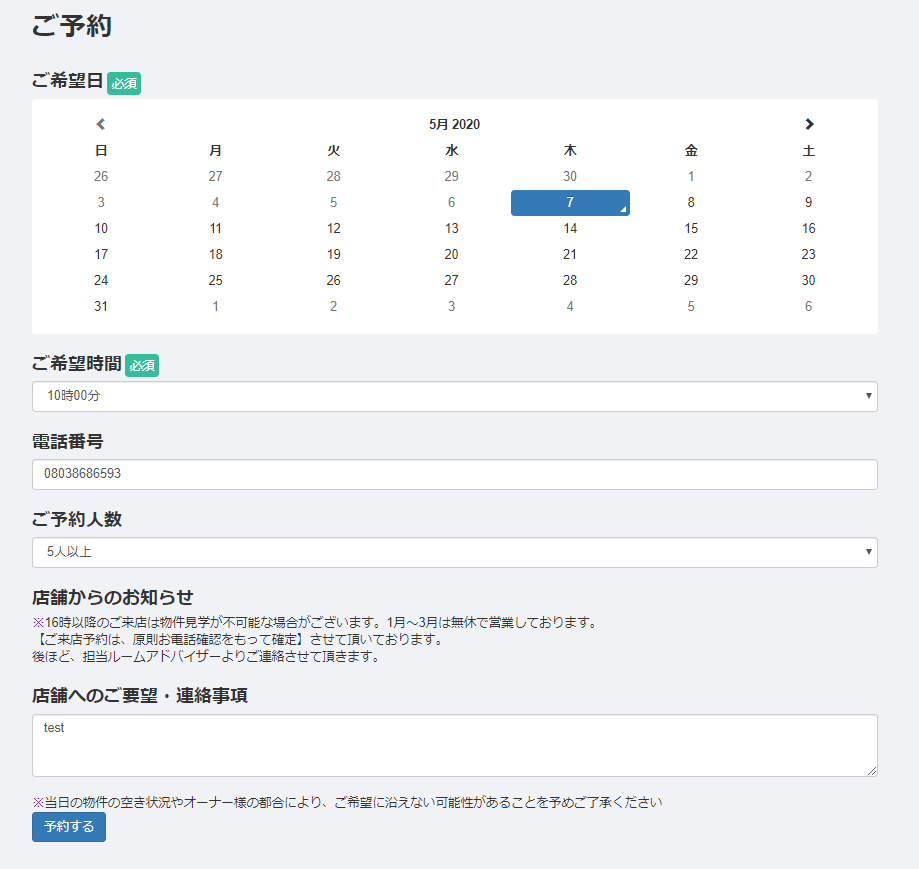
完成画面
予約フォーム
予約内容画面

index.html(予約フォーム)作成
<!DOCTYPE html>
<html lang="ja">
<head>
    <meta charset="UTF-8">
    <meta name="viewport" content="width=device-width, initial-scale=1.0">
    <meta http-equiv="X-UA-Compatible" content="ie=edge">
    <!-- js -->
    <script src="src/js/jquery-3.5.1.min.js"></script>
    <script src="src/js/moment-with-locales.min.js"></script>
    <script src="src/js/bootstrap.min.js"></script>
    <script src="src/js/bootstrap-datetimepicker.min.js"></script>
    <!-- css -->
    <link rel="stylesheet" href="src/css/bootstrap.min.css">
    <link rel="stylesheet" href="src/css/bootstrap-datetimepicker.min.css">
    <link rel="stylesheet" href="style.css">
    <title>予約システム</title>
</head>
<body>
    <div class="container">
        <!-- ページの要素はここから -->
        <h4 class="p-reserve-ttl">ご予約</h4>
        <div class="">
            <!-- ご希望日 -->
            <div class="form-group">
                <label class="c-form-ttl">ご希望日</label><span class="c-label-required">必須</span>
                <div class="row">
                    <div class="col-md-12">
                        <div id="calendar"></div>
                    </div>
                </div>
            </div>
            <form method="post" action="./reserve.php">
                <input type="hidden" value="test" name="reserve_request_date" id="reserve_start_date">

                <!-- ご希望時間 -->
                <div class="form-group">
                    <label class="c-form-ttl">ご希望時間</label><span class="c-label-required">必須</span>
                    <select class="form-control" name="reserve_request_time" id="reserve_request_start_time"
                        aria-invalide="false">
                        <option value="10時00分" label="10時00分" selected></option>
                        <option value="11時00分" label="11時00分"></option>
                        <option value="12時00分" label="12時00分"></option>
                        <option value="13時00分" label="13時00分"></option>
                        <option value="14時00分" label="14時00分"></option>
                        <option value="15時00分" label="15時00分"></option>
                        <option value="16時00分" label="16時00分"></option>
                        <option value="17時00分" label="17時00分"></option>
                        <option value="18時00分" label="18時00分"></option>
                    </select>
                </div>
                <!-- 電話番号 -->
                <div class="form-group">
                    <label class="c-form-ttl">電話番号</label>
                    <input class="form-control" type="text" placeholder="例)090-0900-0900"
                            name="reserve_request_tels" id="reserve_request_client_tels_tel">
                </div>
                <!-- ご予約人数 -->
                <div class="form-group">
                    <label class="c-form-ttl">ご予約人数</label>
                    <select class="form-control" name="reserve_request_num"
                        id="reserve_request_number_of_persons" aria-invalid="false">
                        <option value="1人" label="1人" selected></option>
                        <option value="2人" label="2人"></option>
                        <option value="3人" label="3人"></option>
                        <option value="4人" label="4人"></option>
                        <option value="5人以上" label="5人以上"></option>
                    </select>
                </div>
                <!-- 店舗からのお知らせ -->
                <div class="form-group">
                    <label class="c-form-ttl">店舗からのお知らせ</label>
                    <p>※16時以降のご来店は物件見学が不可能な場合がございます。1月~3月は無休で営業しております。
                        <br>【ご来店予約は、原則お電話確認をもって確定】させて頂いております。
                        <br>後ほど、担当ルームアドバイザーよりご連絡させて頂きます。</p>
                </div>
                <!-- 店舗へのご要望・連絡事項 -->
                <div class="form-group">
                    <label class="c-form-ttl">店舗へのご要望・連絡事項</label>
                    <textarea name="reserve_request_comment" id="reserve_request_comment" cols="" rows="3"
                        class="form-control" placeholder="例)ご要望等あればご記入ください"></textarea>
                </div>
                <div>
                    ※当日の物件の空き状況やオーナー様の都合により、ご希望に沿えない可能性があることを予めご了承ください
                </div>

                <!-- 予約する -->
                <button type="submit" class="btn btn-primary">予約する</button>

            </form>
        </div>

    </div>

<script>
$(function(){

    $('#calendar').datetimepicker({
        inline: true,
        minDate: moment().format("YYYY/MM/DD"),
        locale: 'ja'
    });
    $("#calendar").on("dp.change", function (event) {
        $("#reserve_start_date").val(event.date.format("YYYY/MM/DD"));
    });

})

</script>
</body>
</html>
普通にPOST送信しているだけですが、カレンダーから日付を取得するところを少し工夫しているので解説します。
<input type="hidden" value="test" name="reserve_request_date" id="reserve_start_date">
まず、カレンダーの日付を取得するためにinput要素をtype="hidden"でform内に配置します。ただ、単に配置しているだけだと意味がないので、、下記の関数をscript内に記載しています。
$("#calendar").on("dp.change", function (event) { $("#reserve_start_date").val(event.date.format("YYYY/MM/DD")); });
この"dp.change"イベントはカレンダーの日付をクリックしたときに発火します。関数内では、クリックした日付をinputタグのvalueの値に代入しています。こうすることでPOST送信したときに、PHP側で$_POST["reserve_request_date"]で日付にアクセスできます。
reserve.php(予約内容表示)作成
<?php

//予約日
$reserve_date = isset($_POST['reserve_request_date']) ? $_POST['reserve_request_date'] : '-';
//予約時間
$reserve_time = isset($_POST['reserve_request_time']) ? $_POST['reserve_request_time'] : '';
//電話番号
$reserve_tels = isset($_POST['reserve_request_tels']) ? $_POST['reserve_request_tels'] : '-';
//予約人数
$reserve_num = isset($_POST['reserve_request_num']) ? $_POST['reserve_request_num'] : '-';
//連絡事項
$reserve_comment = isset($_POST['reserve_request_comment']) ? $_POST['reserve_request_comment'] : '-';

?>

<!DOCTYPE html>
<html lang="ja">
<head>
    <meta charset="UTF-8">
    <meta name="viewport" content="width=device-width, initial-scale=1.0">
    <meta http-equiv="X-UA-Compatible" content="ie=edge">
    <!-- css -->
    <link rel="stylesheet" href="src/css/bootstrap.min.css">
    <link rel="stylesheet" href="style.css">

    <title>予約システム</title>
</head>
<body>
    <div class="p-reserve-info container mt-3">
        <p>ご予約ありがとうございました。</p>
        <table class="table table-striped">
            <tbody>
                <tr>
                    <th>予約日時</th>
                    <td><?php echo $reserve_date." ".$reserve_time ?></td>
                </tr>
                <tr>
                    <th>ご予約人数</th>
                    <td><?php echo $reserve_num ?></td>
                </tr>
                <tr>
                    <th>電話番号</th>
                    <td><?php echo $reserve_tels ?></td>
                </tr>
                <tr>
                    <th>ご要望・連絡事項</th>
                    <td><?php echo $reserve_comment ?></td>
                </tr>
            </tbody>
        </table>
    </div>

</body>
</html>
PHP側はpost送信された予約情報を取得し、表示しているだけなので解説は特にないです。
おわりに
カレンダーから日付を取得して、PHP側に送信する方法について解説しました。ここに記載した内容は超絶簡単な予約システムですが、どの予約システムもベースはここに書いていることが基になっているので、知っていて損はないかなと思います。