はじめに
全3回に分けFlutterでLinuxのGUIアプリを作成する手順をまとめています。
開発環境はVScodeを使用し、タイマーアプリを作成します。
第一回 環境構築編
第二回 画面作成編(今回はここ)
第三回 完成編
今回は前回の続きから画面の作成までの記事です。
完成画面
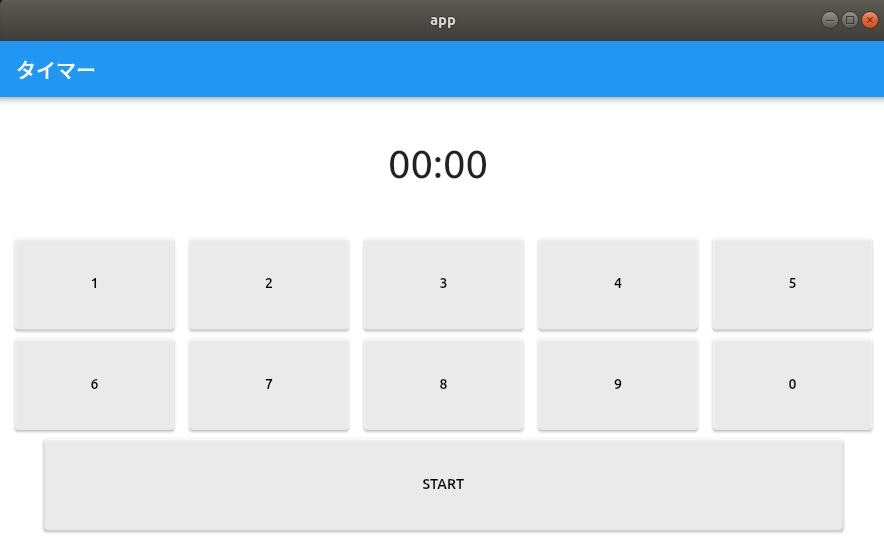
では、早速始めていきます。
ソースコードはここ
画面作成
基本的に前回作成したプロジェクトのクラス名はそのまま流用していきます。
変更していくファイルは、app/lib/main.dartです。
Flutterでは、各クラスのWidget build(BuildContext context)メソッド内でWidgetをインスタンス化し、
それを名前付き引数で親Widgetのコンストラクタに渡していく階層構造にして画面を作成していきます。
アプリケーションバーの名前変更
MyAppクラス内を次のように書き換えます。
class MyApp extends StatelessWidget {
  // This widget is the root of your application.
  @override
  Widget build(BuildContext context) {
    return MaterialApp(
      home: MyHomePage(title: 'タイマー'),
    );
  }
}
ボタンの共有化
数字ボタンはデザインも押したときの処理もほぼ同じなので共有化しておきます。
各Widgetごとに値が変わるものを引き数として受け取りようにしています。
class CustomButton extends StatelessWidget {
  //コンストラクタ
  const CustomButton({
    this.text,
    this.width,
    this.height,
    this.onPressed,
    Key key,
  }) : super(key: key);

  final VoidCallback onPressed; //ボタンのコールバック
  final double width;
  final double height;
  final String text;

  @override
  Widget build(BuildContext context) {
    return SizedBox(
        width: width,
        height: height,
        child: ElevatedButton(
          onPressed: onPressed,
          style: ElevatedButton.styleFrom(
            primary: Colors.white70,
            onPrimary: Colors.white,
          ),
          child: Text(
            text,
            style: TextStyle(color: Colors.black),
          ),
        ));
  }
}
テキストやボタンを配置
_MyHomePageStateクラス内に記述していきます。
まず、テキストの内容やボタンが押された時のイベントをフィールドに定義します。
数字ボタンは押されたときにどれが押されたかわかるように引数付きでイベントを作成します。
  String _time = "00:00";
  String _start = "START";

  void _numberPressed(String number) {}
  void _startPressed() {}
Widget build(BuildContext context)メソッドの処理を記述していきます。
つぎに、Widgetのサイズ取得部分です。
時間を表示する部分とボタン全部を表示する部分を3:7で分けています。
その後、各数字ボタンのサイズを計算しています。
    final size = MediaQuery.of(context).size; //ウインドウサイズ取得
    final padding = MediaQuery.of(context).padding;
    var maxHeight = size.height - padding.top - kToolbarHeight; //ウインドウサイズからツールバーを除いた高さを計算

    //Widgetのサイズ作成
    final timeAreaHeight = maxHeight * (30 / 100);
    final buttomAreaHeight = maxHeight * (70 / 100);
    final buttomHeight = buttomAreaHeight * (30 / 100);
    final buttomWidth = size.width * (18 / 100);
最後に、デザイン部分です。
Containerで2つの領域を作って、時間を表示する部分とボタンを表示する部分を作ります。
下で、詳しく解説します。
    return Scaffold(
      appBar: AppBar(
        title: Text(widget.title),
      ),
      body: Center(
          child: Column(
        children: <Widget>[
          Container(
            decoration: BoxDecoration(color: Colors.white),
            width: size.width,
            height: timeAreaHeight,
            padding: EdgeInsets.only(right: 10.0),
            child: Row(
              mainAxisSize: MainAxisSize.max, // 親Containerの最大まで広げる
              mainAxisAlignment: MainAxisAlignment.center, // 中央に設置
              children: <Widget>[
                Text(
                  "$_time",
                  style: TextStyle(fontSize: 40),
                ),
              ],
            ),
          ),
          Container(
              decoration: BoxDecoration(color: Colors.white),
              width: size.width,
              height: buttomAreaHeight,
              child: Column(
                  mainAxisSize: MainAxisSize.max,
                  mainAxisAlignment: MainAxisAlignment.spaceEvenly,
                  children: <Widget>[
                    Row(
                        mainAxisSize: MainAxisSize.max,
                        mainAxisAlignment: MainAxisAlignment.spaceEvenly,
                        children: <Widget>[
                          CustomButton(
                              text: "1",
                              width: buttomWidth,
                              height: buttomHeight,
                              onPressed: () => _numberPressed("1")),
                          CustomButton(
                              text: "2",
                              width: buttomWidth,
                              height: buttomHeight,
                              onPressed: () => _numberPressed("2")),
                          CustomButton(
                              text: "3",
                              width: buttomWidth,
                              height: buttomHeight,
                              onPressed: () => _numberPressed("3")),
                          CustomButton(
                              text: "4",
                              width: buttomWidth,
                              height: buttomHeight,
                              onPressed: () => _numberPressed("4")),
                          CustomButton(
                              text: "5",
                              width: buttomWidth,
                              height: buttomHeight,
                              onPressed: () => _numberPressed("5")),
                        ]),
                    Row(
                        mainAxisSize: MainAxisSize.max,
                        mainAxisAlignment: MainAxisAlignment.spaceEvenly,
                        children: <Widget>[
                          CustomButton(
                              text: "6",
                              width: buttomWidth,
                              height: buttomHeight,
                              onPressed: () => _numberPressed("6")),
                          CustomButton(
                              text: "7",
                              width: buttomWidth,
                              height: buttomHeight,
                              onPressed: () => _numberPressed("7")),
                          CustomButton(
                              text: "8",
                              width: buttomWidth,
                              height: buttomHeight,
                              onPressed: () => _numberPressed("8")),
                          CustomButton(
                              text: "9",
                              width: buttomWidth,
                              height: buttomHeight,
                              onPressed: () => _numberPressed("9")),
                          CustomButton(
                              text: "0",
                              width: buttomWidth,
                              height: buttomHeight,
                              onPressed: () => _numberPressed("0"))
                        ]),
                    Row(
                        mainAxisSize: MainAxisSize.max,
                        mainAxisAlignment: MainAxisAlignment.spaceEvenly,
                        children: <Widget>[
                          CustomButton(
                              text: "$_start",
                              width: size.width * (90 / 100),
                              height: buttomHeight,
                              onPressed: _startPressed)
                        ])
                  ]))
        ],
      )),
    );
時間を表示する部分です。
最大サイズにして、真ん中にテキストが表示されるようにしています。
Container(
  decoration: BoxDecoration(color: Colors.white),
  width: size.width,
  height: timeAreaHeight,
  padding: EdgeInsets.only(right: 10.0),
  child: Row(
    mainAxisSize: MainAxisSize.max, // 親Containerの最大まで広げる
    mainAxisAlignment: MainAxisAlignment.center, // 中央に設置
    children: <Widget>[
      Text(
        "$_time",
        style: TextStyle(fontSize: 40),
      ),
    ],
  ),
),
ボタンを表示する部分です。
RowWidgetを3つ使い3段になるようにしています。
数字のボタンはテキスト以外すべて同じで、ボタンを押したときのイベントに引数を渡すために() => _numberPressed("1")と記述しています。
引数がない場合は、_startPressedのような書き方で問題ありません。
child: Column(
  mainAxisSize: MainAxisSize.max,
  mainAxisAlignment: MainAxisAlignment.spaceEvenly,
  children: <Widget>[
    Row(
        mainAxisSize: MainAxisSize.max,
        mainAxisAlignment: MainAxisAlignment.spaceEvenly,
        children: <Widget>[
          CustomButton(
              text: "1",
              width: buttomWidth,
              height: buttomHeight,
              onPressed: () => _numberPressed("1")),
              ~省略~
        ]),
    Row(~省略~),
    Row(
        mainAxisSize: MainAxisSize.max,
        mainAxisAlignment: MainAxisAlignment.spaceEvenly,
        children: <Widget>[
          CustomButton(
              text: "$_start",
              width: size.width * (90 / 100),
              height: buttomHeight,
              onPressed: _startPressed)
        ])
  ])
終わりに
理解はできたが、画面が複雑になると括弧が多くなるので、終わりの括弧を見失いそうになった。
その場合は、Widgetをクラス化していくのがよいののだと思う。
次回が最後になりますので、よければぜひ読んでください。
最後まで読んで下さりありがとうございました。
次回またお会いしましょう。
間違い等がありましたらご指摘・コメントをお願いします。