はじめのはじめに
この記事は
「IDOM Engineer Advent Calendar 2017」
の23日目の記事です.
はじめに
今回の記事の対象はこんな感じです.
- Vue使ったことない
- Vueは使ったことあるけど,Vuexはない
簡単なカウンターを作りながら説明していきます.
作ったカウンターのリポジトリはこちら(https://github.com/ferretdayo/vuex-counter)
VueとVuexのバージョンは以下の通りです.
- Vue: 2.5.2
- Vuex: 3.0.1
何か間違っている所などあればご意見よろしくお願いします.
まずVueプロジェクトの作成
- vue-cliのインストール
これを利用すると簡単にvueのプロジェクト作成出来るようになります.
npm install -g vue-cli
プロジェクトの作成をします.
vue-cliの詳細はこちらから
vue init webpack counter
フォルダ構成
初期のsrcのフォルダ構成はこんな感じです
src/
├── App.vue
├── assets
│   └── logo.png
├── components
│   └── HelloWorld.vue
├── main.js
└── router
    └── index.js
必要なパッケージのインストール
プロジェクトのディレクトリに入り,以下のコマンドを実行します.
vuexは最初から入ってないので追加で入れます.
yarn install
yarn add -D vuex
ひとまず動かす
yarn start
カウンター機能を作成
やることとしてはこの2つです.ひとまずVuexは使わずにVueのみでやります.
- Counterコンポーネントを作成し,カウンター機能の追加
- HelloWorldコンポーネントでCounterコンポーネントを利用
Counterコンポーネントを作成し,カウンター機能の追加
以下のように,src/components/Counter.vueを作成しましょう.
ここでの説明
- data()の中の変数は
{{count}}のようにすることで表示できる - clickイベントは
v-on:clickで設定できる - 関数は
methodsに書いていく -
<style scoped></style>のscopedはCSSの影響範囲をこのコンポーネント内にできる.コンポーネントスコープ CSS(Scoped CSS)
<template>
  <div id="counter">
    <div>{{count}}</div>
    <button v-on:click="decrement">-1</button>
    <button v-on:click="increment">+1</button>
  </div>
</template>

<script>
export default {
  name: 'Counter',
  data () {
    return {
      count: 0
    }
  },
  methods: {
    increment () {
      this.count++
    },
    decrement () {
      this.count--
    }
  }
}
</script>

<style scoped>

</style>
HelloWorldコンポーネントでCounterコンポーネントを利用
次は,既にあるsrc/components/HelloWorld.vueを編集します.
ここでの説明
- 必要なComponentをimportする
-
components: {}にimportしたCounterコンポーネントを追加することで,<counter></counter>のように利用できる
<template>
  <div class="hello">
    <counter></counter>
  </div>
</template>

<script>
import Counter from './Counter'

export default {
  name: 'HelloWorld',
  components: {
    Counter
  }
}
</script>

<style scoped>

</style>
もし,<counter></counter>を<my-counter></my-counter>にしたい場合は,components:{}を以下のようにすればいける
export default {
  name: 'HelloWorld',
  components: {
    my-counter: Counter
  }
}
動いてるか見てみる
ちゃんと+1と-1が動いた!
Vuexとは
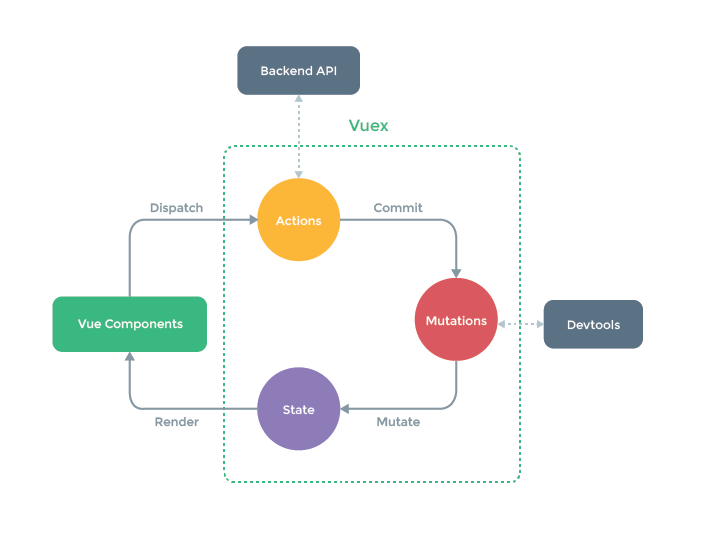
概要は公式の図から.要は図のようなデータの流れを持つ,状態管理のパターンです.
- ComponentはdispatchすることでActionsを実行する
- (ex:incrementする,decrementするというAction)
- ActionsはCommitすることでMutationsを利用する
- (ex:incrementやdecrementでcountの増減の実行)
- MutationsはStateを変更する
- (ex:countの増減)
どういうときにVuexが必要?
コンポーネント間のデータの受け渡しが大変になってきた時に必要というか欲しくなる...
あとデータの流れがわからなくなった時にVuexを利用すると,データの流れが1方向なので,わかりやすくなる.
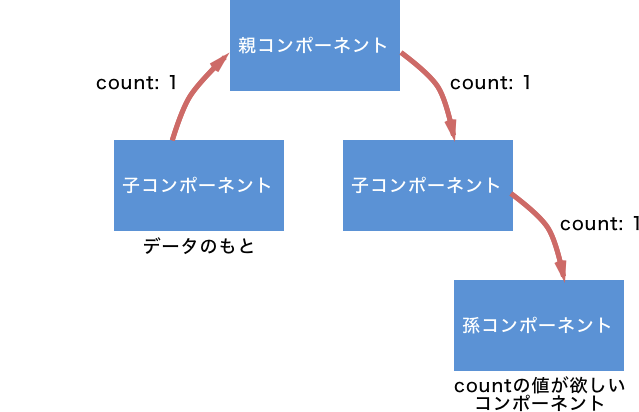
例えば,Vuexを利用しない時のコンポーネント間のデータ受け渡しは以下の感じ.

つまり,データバケツリレーする必要がある.
カウンター機能にVuexを利用
やることとしては,以下の3つあります.
- storeファイルを作成し,state, actions, mutations, gettersを定義
- rootコンポーネントのmain.jsにstoreファイルに書かれたstoreを登録
- CounterコンポーネントからVuexを利用
最終的なsrcのフォルダ構成は以下の通り.
src
 ├── App.vue
 ├── assets
 │   └── logo.png
 ├── components
 │   ├── Counter.vue
 │   └── HelloWorld.vue
 ├── main.js
 ├── router
 │   └── index.js
 └── store.js
storeファイルを作成
まずactionsやmutations,getters,stateを持つsrc/store.jsを作成します.
ここでの説明
- stateには状態を持ちたい情報を定義する
- actionsでアクションを定義,commitすることでmutationsが実行される
- gettersはコンポーネントがデータを取得する際に利用される
- mutationsはstateの状態を変更する際に利用される
- gettersとmutationsのメソッドの引数には定義したstateが代入される
- actionsのメソッドの引数のcontextにはdispatch,commit,getters,stateを持つオブジェクトが代入される
- 引数に
{ commit }とすると,commitだけ利用できる. - 詳しくはES2015の分割代入
- 引数に
import Vuex from 'vuex'
import Vue from 'vue'

Vue.use(Vuex)

/**
 * 状態を保持したい変数の管理
 */
const state = {
  count: 0
}
/**
 * actionsはmutationsを利用して,アクションの処理を実装
 */
const actions = {
  increment (context) {
    context.commit('increment')
  },
  decrement ({ commit }) {
    commit('decrement')
  }
}
/**
 * gettersはstateの値を取得するのに利用
 */
const getters = {
  getCount (state) {
    return state.count
  }
}
/**
 * mutationsは値の移り変わりの処理を実装
 */
const mutations = {
  increment (state) {
    state.count += 1
  },
  decrement (state) {
    state.count -= 1
  }
}

export default new Vuex.Store({
  state,
  actions,
  getters,
  mutations
})
rootコンポーネントにstoreを登録
どこでもstoreにアクセスできるようにrootコンポーネントであるmain.jsに登録します.
import Vue from 'vue'
import App from './App'
import router from './router'
import store from './store'

Vue.config.productionTip = false

/* eslint-disable no-new */
new Vue({
  el: '#app',
  router,
  store,
  template: '<App/>',
  components: { App }
})
CounterコンポーネントからVuexの利用
Main.jsで追記したstoreを利用するにはthis.$storeから利用します.
個人的には,dispatchとgettersだけを利用して,stateとcommitはstore.jsだけでアクセスするようにしたほうがごちゃごちゃせずにいい気がします.
また,this.$storeは,以下の4つにアクセスできます.
- state
- stateにアクセスする際に利用
- dispatch
- actionsで定義したメソッド名を引数に渡すことで,actionを実行できる
- getters
- ここからgettersで定義したメソッドを利用できる
- commit
- mutationsに定義したメソッド名を引数に渡すことで,mutationを実行できる
データの取得にはcomputedで,storeのgettersで定義したcountの値を返すgetCountメソッドを利用する.
computedの理由は,変更検知したときに実行されるためです.
computedの説明は以下のように公式にもあります.
算出プロパティはキャッシュされ、そしてリアクティブ依存が変更されたときにだけ再算出します。
<template>
  <div id="counter">
    <div>{{count}}</div>
    <button v-on:click="decrement">-1</button>
    <button v-on:click="increment">+1</button>
  </div>
</template>

<script>
export default {
  name: 'Counter',
  computed: {
    count () {
      return this.$store.getters.getCount
    }
  },
  methods: {
    increment () {
      this.$store.dispatch('increment')
    },
    decrement () {
      this.$store.dispatch('decrement')
    }
  }
}
</script>

<style scoped>

</style>
Vuexを利用したCounterを動かしてみる
スクショ見せるまでもないですが,さっきと同じ動作ができていると思います.

Vuexのコードを少し発展させる
actionsを利用するために,methodsにincrement()とdecrement()メソッドを書きました.
しかし,actionsが増えるたびにメソッド追加するのはめんどうです.
ということで,mapActionsをインポートし,利用することで以下のように書き換えることもできます.
VuexはmapActions以外にも,mapState,mapGetters,mapMutationsがあります.
<template>
  <div id="counter">
    <div>{{count}}</div>
    <button v-on:click="decrement">-1</button>
    <button v-on:click="increment">+1</button>
  </div>
</template>

<script>
import { mapActions } from 'vuex'

export default {
  name: 'Counter',
  computed: {
    count () {
      return this.$store.getters.getCount
    }
  },
  methods: {
    ...mapActions([
      'increment',
      'decrement'
    ])
  }
}
</script>

<style scoped>

</style>
もし,mappingの名前を変えたい場合は,以下のようにすることでできます.
こうすることで,addメソッドを呼べば,actionsにあるincrementメソッドを呼び出すようになります.
...mapActions({
  add: 'increment',
  sub: 'decrement'
})
おわりに
今回はカウンター機能をVueを触りつつ,Vuexを利用して開発しました.
これで大体VueとVuexの概要がわかった気になりました.
store.jsにあるactionsやmutations,stateの量が多くなった場合は大変になりそうなので,その時はどうするのかが今後考えなきゃいけなさそうですね.
まぁ公式に書いてるので,それをやるだけですがw


